
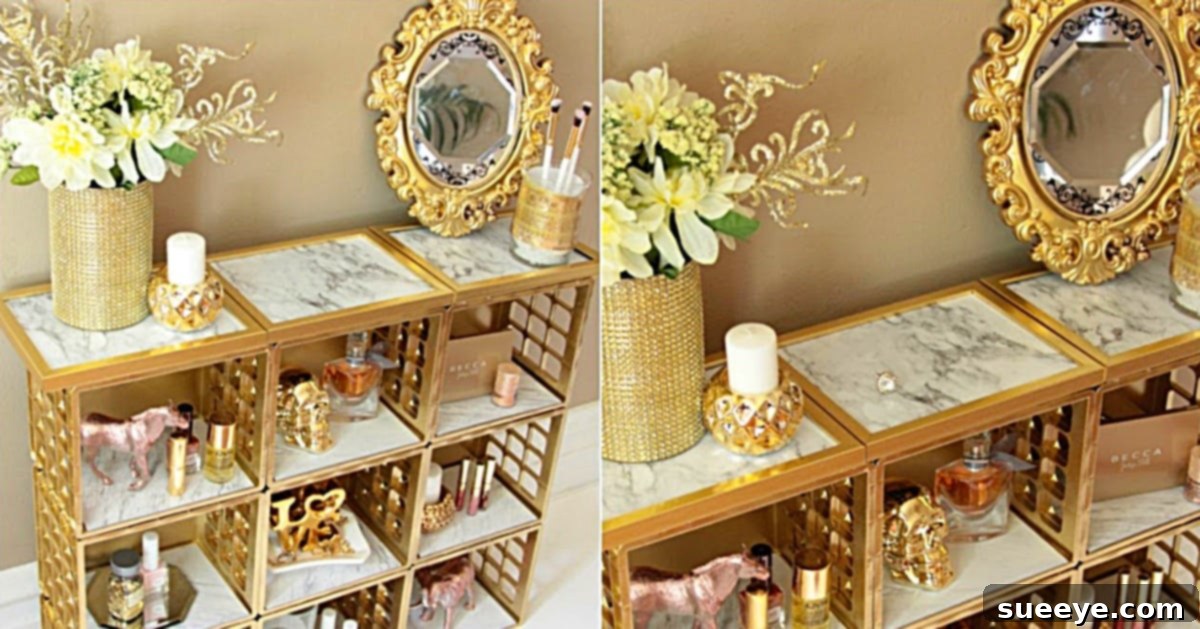
Are you searching for a stylish yet incredibly affordable solution to organize and display your cherished keepsakes, small plants, or office supplies? Imagine creating a beautiful, custom shelving unit that looks like it came from a high-end boutique, but costs only a fraction of the price. We recently stumbled upon an ingenious DIY project that does exactly that: a stunning Marble and Gold Organizer crafted almost entirely from Dollar Tree materials. This brilliant idea, inspired by a fantastic YouTube tutorial from creative minds like @BargainBethany, promises to transform simple, budget-friendly items into a sophisticated piece of home decor. Forget expensive furniture stores; with a little creativity, a few dollars, and a trip to your local Dollar Tree, you can achieve a professional-looking curio cabinet that perfectly suits your style and needs. This comprehensive guide will walk you through the process of making your very own elegant shelving unit, demonstrating just how effortless and rewarding budget-conscious crafting can be.
DIY Dollar Tree Marble and Gold Organizer: Chic Shelving on a Budget
In today’s world, creating a beautiful and organized home doesn’t have to mean spending a fortune. The rise of clever DIY projects, especially those utilizing incredibly affordable materials from discount stores like Dollar Tree, has empowered countless individuals to personalize their spaces with unique and stylish decor. This particular project, the DIY Marble and Gold Organizer, stands out as a prime example of how ingenuity can elevate everyday items into something truly extraordinary. Whether you’re looking for extra storage, a decorative display shelf for your favorite knick-knacks, a chic way to organize your craft supplies, or simply want to add a touch of glam to any room, this Dollar Tree craft offers a perfect blend of functionality, aesthetics, and unbeatable cost-effectiveness. Let’s delve into how you can bring this elegant design into your home with minimal effort and maximum impact, proving that high style doesn’t always come with a high price tag.
Why Choose Dollar Tree for Your DIY Home Decor Projects?
Dollar Tree has cemented its reputation as a veritable treasure trove for crafters, DIY enthusiasts, and anyone looking to decorate on a dime, and for excellent reasons. The sheer affordability of their products means you can experiment with creative ideas without the fear of breaking the bank. For a project like our marble and gold organizer, this is particularly advantageous. You can gather all your primary structural materials – in this case, the mini crates – for just a few dollars, leaving more room in your budget for quality finishing touches like metallic spray paint and elegant contact paper. This accessibility not only makes crafting more democratic but also actively encourages creativity, as you’re free to imagine how simple, unassuming items can be repurposed and transformed. It’s a fantastic way to indulge your artistic side, explore new ideas, and achieve impressive results that defy their humble origins. Shopping for these materials at Dollar Tree often turns a routine errand into an exciting treasure hunt, setting the stage for your next home decor masterpiece.
Materials Needed for Your Elegant Dollar Tree Shelving Unit
One of the most appealing aspects of this DIY Marble and Gold Organizer is the simplicity and affordability of its material list. You’ll be amazed at what you can create with a handful of items, most of which can be found at your local Dollar Tree. While a couple of specialized items might require a quick stop at a home improvement or general merchandise store, the bulk of your shopping can typically be done in one convenient location, making this a truly “one-stop shop” project.
- 9 Mini Crates: These serve as the foundational building blocks of your shelving unit. Dollar Tree typically stocks these in various colors, but their exact shade won’t matter since they will be entirely painted. Look for sturdy plastic ones that are uniform in size to ensure a cohesive and stable structure.
- Zip Ties: These are absolutely essential for securely joining the mini crates together. Opt for small to medium-sized zip ties that are strong enough to hold the structure firmly and prevent any wobbling. It’s wise to get a pack with plenty of ties, as you’ll use several connections to ensure maximum stability.
- Rust-Oleum Metallic Gold Spray Paint: This is where the “gold” in your organizer truly comes to life. A high-quality metallic spray paint will give your unit a luxurious, even, and durable finish. Rust-Oleum is a highly recommended choice for its excellent coverage, rich color, and long-lasting adherence. Always ensure you have proper ventilation if spraying indoors, or work outdoors on a calm, wind-free day.
- Marble Tile (Optional, or for a premium finish): While the primary tutorial suggests faux marble contact paper, for those seeking a more authentic, durable, and luxurious top surface or internal shelves, real marble tiles can be incorporated. Small marble tiles or even tile samples are often available at stores like Home Depot. If choosing real tiles, consider their weight and how they will be securely adhered to your crate structure.
- Duck Brand Marble Contact Paper ($5.00 at Menard’s or similar stores): This is the ingenious secret to achieving that coveted marble look affordably and with ease. Contact paper is simple to apply and comes in various realistic patterns. The “Duck Brand Marble Contact Paper” is a widely available and reliable option for a convincing faux marble effect. You’ll need enough to cover the top surface of your assembled unit and potentially some interior shelf surfaces, depending on your design.
- 5 x 7 Gold Picture Frames (Optional, for decorative accents or backing): These can be creatively repurposed as elegant backings for certain sections of your shelves, or even as decorative side panels, adding an extra touch of sophistication and visual interest. You can often find affordable gold picture frames at Dollar Tree or other discount stores.
Step-by-Step Directions: Crafting Your Marble and Gold Organizer
The true beauty of this DIY project lies in its straightforward nature. You don’t need extensive crafting experience, complex woodworking skills, or specialized tools to achieve a stunning and professional-looking result. Follow these easy, step-by-step instructions to construct your chic new shelving unit efficiently:
Step 1: Assembling the Crate Structure
Begin by arranging your 9 mini crates into your desired configuration. A common and highly stable design involves stacking three crates wide and three crates high, creating a sturdy 3×3 grid. However, don’t limit your creativity; you can experiment with various layouts – perhaps two stacks of four with a single crate on top, a more staggered arrangement, or a tall, narrow tower – to perfectly suit your specific needs and aesthetic preferences. Once you have your crates precisely positioned and aligned, use the zip ties to firmly secure them together. Pass the zip ties through the openings in the crates, pulling them as tight as possible to ensure a stable and rigid structure. Focus on connecting adjacent crates at multiple points (top, middle, and bottom where feasible) to maximize overall stability. After tightening each zip tie, carefully trim any excess material with scissors for a clean, professional finish that won’t detract from the final look.
Step 2: Transforming with Gold Spray Paint
With your crate structure securely assembled, it’s time to add that touch of opulence with a luxurious gold finish. Lay down a protective drop cloth or old newspapers in a well-ventilated area, preferably outdoors or in a garage with the door open, to protect your workspace from overspray. Shake your Rust-Oleum Metallic Gold Paint can thoroughly for at least one minute after the mixing ball begins to rattle. Hold the can approximately 8-12 inches (20-30 cm) from the surface of your unit and apply light, even coats with a sweeping motion. It is always better to apply several thin coats than one thick coat, as this prevents unsightly drips, sags, and ensures a smoother, more professional finish. Rotate the entire unit as needed to ensure all visible sides, interior edges, and intricate corners of the crates are evenly and completely covered. Allow each coat to dry according to the manufacturer’s instructions before applying the next. The metallic gold will instantly elevate the appearance of the humble plastic crates, making them look far more expensive and sophisticated than they actually are.
Step 3: Adding the Faux Marble Elegance
Once your gold paint is completely and thoroughly dry (this step is crucial to prevent the contact paper from lifting, bubbling, or adhering poorly), it’s time to introduce the elegant marble effect. Carefully measure the top surface of your assembled shelving unit, as well as any interior shelves or backing you wish to cover with the marble pattern. Cut pieces of the Duck Brand Marble Contact Paper to fit these precise dimensions, adding a small overlap (about half an inch or 1-2 cm) on all sides to allow for precise trimming and a perfect edge. Peel back a small section of the backing paper from one corner of your contact paper piece. Align it meticulously with the edge of your shelving unit or shelf, then slowly and deliberately press down, smoothing out any trapped air bubbles with a credit card, a specialized squeegee tool, or even your hand as you progressively peel away the rest of the backing. Work slowly and methodically to achieve a perfectly smooth, seamless marble surface. Trim any excess contact paper with a sharp craft knife or scissors for a clean, professional edge. This step is incredibly satisfying, as the marble contact paper instantly and dramatically transforms the look of your piece, adding a layer of high-end style.
Tips for a Flawless Finish and Enhanced Durability
Achieving a professional-looking result with your DIY Marble and Gold Organizer is easier than you think, especially with these insider tips:
- Thorough Preparation is Key: Before you even pick up your paint can, ensure your mini crates are immaculately clean and completely dry. A quick wipe-down with a damp cloth followed by thorough drying can remove any dust, grime, or residue, allowing the paint to adhere much better and last longer.
- Optimal Ventilation for Spray Painting: Always, without exception, spray paint in a very well-ventilated area. Outdoors on a calm day is ideal. If working indoors, ensure windows are open and consider using a fan. Wearing a respiratory mask is highly recommended to protect yourself from inhaling paint fumes.
- Patience with Drying Times: Rushing the drying process between paint coats or, critically, before applying the contact paper, can lead to an inferior finish, peeling, or bubbling. Always adhere strictly to the drying times specified on your paint can’s label.
- Mastering Contact Paper Application: When applying contact paper, begin from one edge and slowly work your way across. Use a flat tool (like a squeegee, credit card, or even a ruler wrapped in cloth) to press out any air bubbles as you go. If you encounter a stubborn bubble, gently lift the paper slightly and reapply, smoothing it down carefully.
- Consider a Protective Top Coat: For enhanced durability and long-term protection, especially if your organizer will hold heavier items, endure frequent handling, or be placed in a high-traffic area, you could apply a clear protective sealant or top coat over the gold paint once it’s fully cured.
- Adding a Finished Backing: For an even more polished and enclosed look, consider cutting pieces of foam board or sturdy poster board to precisely fit the back openings of some or all crates. You can cover these backing pieces with leftover marble contact paper or a complementary patterned paper before securing them in place with hot glue or double-sided tape.
Customize Your Creation: Personalizing Your Dollar Tree Organizer
While the classic marble and gold theme offers timeless elegance, this DIY project is incredibly versatile and serves as an excellent canvas for your personal style. Don’t hesitate to put your own unique spin on it:
- Color Palette Swap: Instead of traditional gold, try a chic metallic silver, a romantic rose gold, a sophisticated matte black, a bold copper, or even a vibrant jewel tone like emerald green or sapphire blue. Pair your chosen paint color with different contact paper patterns – think rustic wood grain, modern geometric designs, a subtle fabric texture, or even a solid pop of contrasting color.
- Texture Play: Experiment with various types of contact paper to introduce different tactile and visual textures. Beyond marble, consider options like faux wood, sleek concrete, shimmery glitter, or even embossed patterns for a bolder statement.
- Functional Enhancements: Boost the utility of your organizer by adding small adhesive hooks to the sides for hanging keys, jewelry, or small tools. Attach tiny caster wheels to the bottom for a mobile storage unit that can be easily moved between rooms. Insert small storage bins, woven baskets, or fabric drawers into some of the crate compartments for concealed storage and added organization.
- Decorative Accents: Utilize the optional 5×7 gold picture frames in creative ways. Remove the glass and backing, spray paint the frames gold if necessary, and then secure them to the front of certain crate openings as decorative fascias or elegant “doors.” You can even line the inside of these frames with a contrasting fabric, a small mirror tile, or a piece of complementary patterned paper for added flair and visual depth.
- Different Configurations: The modular nature of the mini crates allows for endless possibilities beyond the 3×3 grid. Create a tall, narrow tower that fits perfectly in a corner space, or a long, low unit ideal for placement under a window or along a wall as a console. You could even build smaller, individual units for a desk or bathroom counter.
The Perfect Addition to Any Room and Purpose
This versatile marble and gold organizer, with its customizable design and elegant aesthetic, can find a functional and beautiful purpose in nearly every room of your home, seamlessly complementing a wide range of interior design styles, from modern minimalist to glam chic:
- Living Room: Display small decorative items, cherished photo frames, beautiful vases, or house your favorite small plants.
- Bedroom: Organize jewelry, small collections of books, store remote controls, or serve as a chic and compact bedside table alternative.
- Home Office: Keep desk supplies tidy, hold notebooks, categorize important documents, or showcase small personal touches that inspire productivity.
- Bathroom: Store toiletries, neatly rolled towels, beauty products, or create a spa-like display for candles and soaps.
- Craft Room: Efficiently categorize craft supplies, yarns, tools, or art materials, keeping your creative space organized and inspiring.
- Entryway: A perfect spot for keys, mail, sunglasses, or other small essentials as you come and go.
Conclusion: Your Affordable Step Towards Elegant Organization
Creating this DIY Marble and Gold Organizer from Dollar Tree materials is much more than just a simple craft project; it’s a testament to how creativity, resourcefulness, and a clever approach to budgeting can lead to truly beautiful and highly functional home decor. This project offers an unbeatable combination of affordability, ease of execution, and stunning, high-end-looking results. It’s incredibly rewarding to transform simple, inexpensive items into a bespoke piece that not only serves a practical purpose but also adds a significant touch of sophisticated style and personal charm to your living space. So, gather your materials, unleash your inner DIY enthusiast, and prepare to impress yourself, your family, and your guests with your very own custom-built, high-end-looking shelving unit. This is your chance to elevate your home decor without the hefty price tag. Happy crafting!