
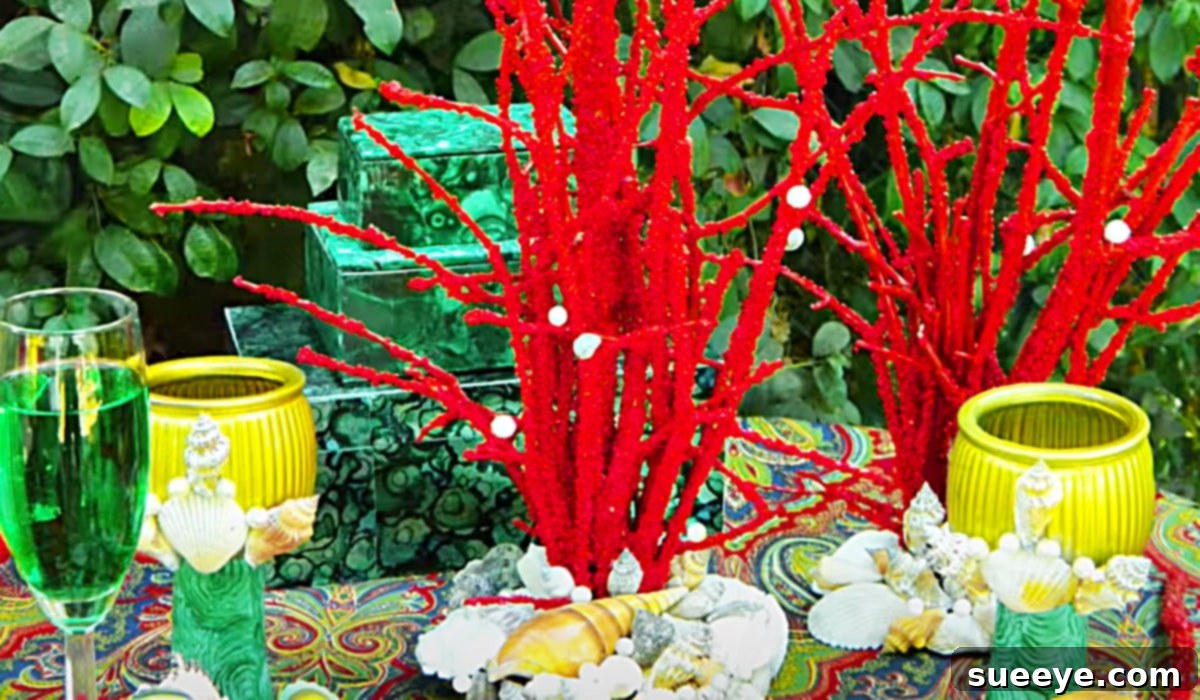
How To Craft A Captivating Faux Coral Centerpiece: Your Ultimate DIY Guide
Transform your living space with a breathtaking, ocean-inspired centerpiece that exudes luxury and a bohemian charm. This detailed guide will walk you through creating your very own faux coral masterpiece, a project that promises to be a stunning focal point for any dining table, patio party, or console. Inspired by the ingenious video tutorial by the renowned Mark Montano on YouTube, this DIY endeavor combines natural elements like simple twigs with vibrant aquarium rocks to mimic the intricate beauty of real coral. The result? An opulent, eclectic, and undeniably chic piece of decor that will have your guests marveling at your crafty prowess. Forget expensive store-bought decorations; this handmade beauty offers an authentic, personalized touch that is both sustainable and incredibly satisfying to create.
Why Choose a Faux Coral Centerpiece for Your Home?
The allure of coral decor is undeniable, bringing a sense of coastal elegance and natural wonder into any interior. However, using real coral raises significant environmental concerns due to over-harvesting and damage to delicate marine ecosystems. Opting for a faux coral centerpiece allows you to embrace this aesthetic responsibly. Beyond its eco-friendly aspect, a DIY faux coral offers several advantages:
- Sustainability: You’re using readily available and often recycled materials, reducing your ecological footprint.
- Cost-Effectiveness: Crafting your own centerpiece is significantly cheaper than purchasing genuine coral or even high-end replicas.
- Customization: You have complete control over the size, shape, color, and texture, allowing you to perfectly match your existing decor or create a unique statement piece.
- Durability: Unlike fragile natural coral, your faux creation will be robust and last for years with proper care, making it a timeless addition to your home.
- Artistic Expression: It’s a fantastic opportunity to unleash your creativity, experiment with different techniques, and enjoy the therapeutic process of hands-on crafting.
This particular design, utilizing humble twigs and vibrant aquarium rocks, creates an incredibly realistic and textured finish that beautifully captures the organic elegance of deep-sea formations. It’s an ideal project for those who appreciate bespoke decor and a touch of the extraordinary.
Essential Materials for Your Faux Coral Creation
To embark on this exciting DIY journey, gather the following materials. Many of these can be found around your home, in nature, or at your local craft store, making this project accessible and budget-friendly:
- Assorted Seashells (various sizes and shapes)
- E6000 Adhesive (or a strong craft glue suitable for multi-surfaces)
- Elmer’s White Glue (PVA glue, for adhering rocks)
- Dried Twig Stick Branches (various thicknesses and lengths, resembling coral branches)
- Aquarium Rocks (preferably in red, coral, or a mix of vibrant colors)
- Acrylic Craft Paint (in gold, red, coral, white, or colors matching your desired aesthetic)
- Hot Glue Gun
- Hot Glue Sticks
- Paintbrushes (various sizes for detail and broader strokes)
- 2 Jar Lids (mayonnaise jar size or larger, made of plastic or metal, to serve as a base)
A Closer Look at Your Materials:
Seashells: These will add an authentic marine touch, nestling at the base of your coral structure. Collect them yourself from beach trips, or purchase them from craft stores. Variety in size and shape will enhance the natural look.
E6000 Adhesive: This industrial-strength glue is perfect for securely attaching the twig branches to the plastic lids, ensuring a durable and long-lasting bond. Its strong hold is crucial for the structural integrity of your centerpiece.
Elmer’s White Glue: A versatile and easy-to-use adhesive, white glue is ideal for coating your branches before sprinkling the aquarium rocks. It dries clear and provides a good base for the textured surface.
Twig Stick Branches: The “bones” of your coral. Look for naturally fallen branches in your yard or local park. Opt for pieces with interesting, multi-directional forms that mimic the branching patterns of real coral. Ensure they are dry and clean before use.
Aquarium Rocks: These are the secret ingredient for the realistic coral texture. Red and coral hues are perfect for a classic coral look, but feel free to experiment with other colors to match your theme. Small, irregular shapes work best for a natural appearance.
Acrylic Craft Paint: Gold can add an opulent shimmer, while red and coral provide the vibrant natural tones. White or cream can be used as a base coat or for highlighting. Choose colors that complement your home decor or the desired oceanic theme.
Jar Lids: These sturdy, circular bases provide stability for your twig structure. Plastic lids are easy to work with and scratch, but metal lids can also be used, just ensure a good adhesive bond.
Essential Tools for a Seamless Crafting Experience
Beyond the materials, having the right tools makes the crafting process smoother and more enjoyable:
- Hot Glue Gun
- Paintbrushes (various sizes)
Understanding Your Tools:
Hot Glue Gun: While E6000 provides permanent strength, a hot glue gun offers instant adhesion, which is incredibly useful for temporarily securing branches in place while the slower-drying E6000 sets. It’s also excellent for quickly attaching smaller elements like additional rocks or shells.
Paintbrushes: A selection of brush sizes will be beneficial. Larger brushes are good for applying the initial coat of white glue and base paint, while smaller, finer brushes are perfect for adding intricate details, highlights, or blending colors to achieve a natural, variegated look.
Step-by-Step Guide to Crafting Your Faux Coral Masterpiece
Now, let’s dive into the creative process. Follow these detailed steps to build your stunning faux coral centerpiece, transforming simple items into a captivating display.
Step 1: Prepare Your Base and Structure
Begin by preparing your jar lids, which will serve as the sturdy foundation for your coral. If using plastic lids, scratch grooves into the top surface with a sharp tool or sandpaper. This creates a rough texture that significantly improves glue adhesion, ensuring your branches form a stable structure. Next, take your selected twig branches and arrange them on the lid, experimenting with different configurations to find an appealing “coral” shape. Aim for a natural, organic look with branches extending upwards and outwards. Once satisfied with the arrangement, use a combination of E6000 glue for permanent bonding and hot glue for immediate hold to securely attach the base of each twig to the lid. Allow ample time for the E6000 to cure, typically 24-48 hours, for maximum strength. You may use a second lid on top if you want a more substantial base or to hide the initial glue points, adhering it after the twigs are set.
Step 2: Apply Texture with Aquarium Rocks
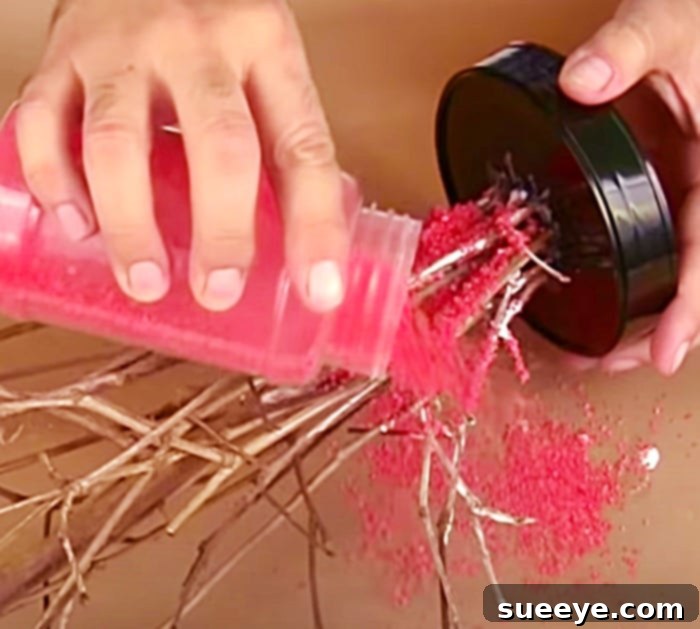
With your twig structure firmly in place, it’s time to add the iconic coral texture using aquarium rocks. Working in sections, generously coat the twig branches with Elmer’s white glue. You can use a paintbrush or even your fingers (wearing gloves) to ensure thorough coverage. Immediately after applying the glue to a section, liberally sprinkle your aquarium rocks over the wet surface. Gently press some rocks into the glue to ensure they adhere well, creating a dense, bumpy texture reminiscent of real coral. Don’t be afraid to apply multiple layers in certain areas to build up volume and vary the texture. Allow each section to dry sufficiently before moving to the next to prevent dislodging the rocks. This step is crucial for achieving that authentic, organic look.
Step 3: Add Vibrant Color and Depth
Once all the aquarium rocks are securely in place and completely dry, it’s time to bring your faux coral to life with color. Start by applying a base coat of your chosen acrylic paint (e.g., white or a pale coral) over the entire rock-covered structure. This helps unify the look and provides an even canvas. Once dry, begin layering your vibrant coral, red, or even gold acrylic paints. Use a dry-brush technique for a natural, weathered look, or dab the paint to get into all the crevices of the rocks. You can blend multiple shades to create depth and dimension, mimicking the natural variations found in real coral. Consider adding subtle highlights with a lighter shade or a touch of metallic gold for an opulent finish. Allow each layer of paint to dry before applying the next to prevent smudging.
Step 4: Embellish with Seashells
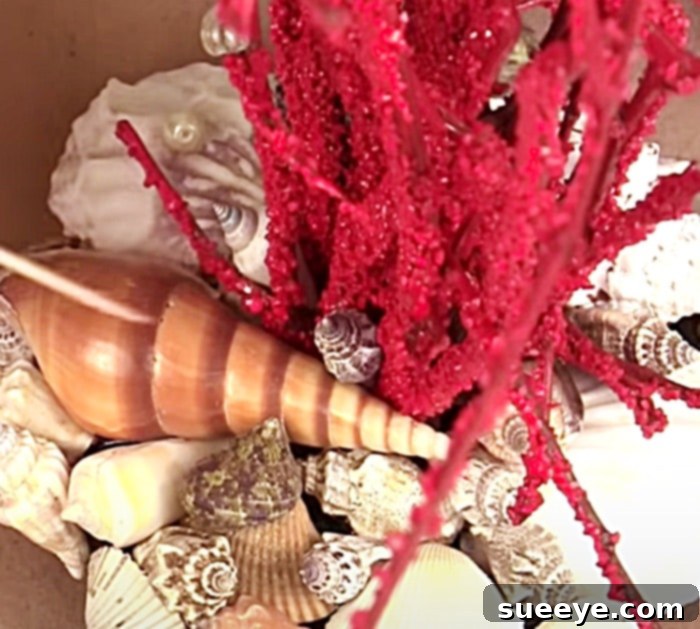
The final touch involves adding beautiful seashells to the base of your coral structure. Arrange your collected seashells around the base, nestled amongst the lower branches. Experiment with different placements until you achieve a visually appealing composition. Use E6000 or hot glue to securely attach the seashells to the base and the lower parts of the twigs. You can group smaller shells, or place larger, more prominent shells as focal points. This step enhances the marine theme and adds another layer of natural texture and interest to your centerpiece. Ensure all shells are firmly attached and stable.
Step 5: Final Inspection and Curing
Once all the elements are in place, take a moment to inspect your faux coral masterpiece from all angles. Touch up any areas that might need more paint, glue, or additional rocks/shells. Allow the entire centerpiece to dry and cure completely for at least 24-48 hours. This ensures that all glues have reached their maximum strength and paints are fully set, making your creation durable and ready for display. Your magnificent faux coral centerpiece is now complete and ready to adorn your table!
Tips for a Flawless Finish and Enhanced Durability
- Work in a Well-Ventilated Area: Especially when using strong adhesives like E6000.
- Patience is Key: Allow adequate drying time between each step. Rushing can lead to unstable structures or messy finishes.
- Layering Rocks: For a truly organic look, don’t just sprinkle rocks. Gently press some into the glue and build up layers, varying the density in different areas.
- Vary Your Twigs: Use a mix of thin and thick twigs with different branching patterns to create a more dynamic and realistic coral structure.
- Protect Your Workspace: Lay down newspaper or a protective sheet to catch glue drips and paint splatters.
- Seal for Longevity: Consider applying a clear matte or satin sealant spray once the entire piece is dry. This will protect the paint and rocks, making your centerpiece more durable and easier to clean.
Personalizing Your Faux Coral Centerpiece: Creative Variations
While the classic red/coral hues are beautiful, feel free to customize your centerpiece to perfectly match your personal style or seasonal decor:
- Color Schemes: Experiment with shades of blue and white for a cooler, ocean-depth look, or go for vibrant neons for a modern, artistic statement. Earthy tones with gold accents can create a rustic-luxe vibe.
- Additional Embellishments: Incorporate other beach-found treasures like sea glass, small pebbles, faux pearls, or even miniature plastic starfish and seahorses for added detail.
- Different Bases: Instead of jar lids, you could use a small wooden plaque, a terracotta saucer, or even a sturdy piece of driftwood as your base.
- Glitter Glam: A light dusting of iridescent glitter after painting (and before sealing) can add a magical, shimmery quality, especially captivating under candlelight.
- Mixed Media: Combine aquarium rocks with other textured materials like sand, tiny beads, or even crushed eggshells for different textural effects.
Styling Your New Faux Coral Centerpiece
Once complete, your faux coral centerpiece is a versatile decor item. Place it at the heart of your dining table, surrounded by simple candles or a few scattered smaller seashells for an elegant dinner party. It also looks stunning on a console table in your entryway, a coffee table in your living room, or as a unique accent on a bookshelf. Pair it with natural linens, glass elements, or other metallic accents to enhance its opulent, boho appeal. Let it be the star of your decor, effortlessly bringing a touch of the seaside indoors.
Care and Maintenance for Your Handmade Gem
Caring for your faux coral centerpiece is simple, ensuring it remains a beautiful fixture in your home for years to come. Dust it gently with a soft brush or a can of compressed air to remove any accumulated dust. Avoid using harsh chemical cleaners, as these might damage the paint or glue. If sealed, you can lightly wipe it with a damp cloth, but always test on an inconspicuous area first. Store it in a safe place where it won’t be knocked over, especially if it’s a particularly intricate design.
Conclusion: Embrace Your Inner Artist
Creating this faux coral centerpiece is more than just a craft project; it’s an opportunity to infuse your home with personalized beauty and embrace sustainable decor practices. With a few simple materials, a little patience, and a dash of creativity, you can transform ordinary twigs and rocks into an extraordinary piece of art that rivals any high-end store bought decor. The satisfaction of crafting something so stunning with your own hands is truly immense. So gather your supplies, follow these steps, and get ready to impress your friends and family with a truly unique, opulent, and eco-conscious centerpiece. Dive into this delightful DIY and let your imagination bring the serene beauty of the ocean right into your home!