
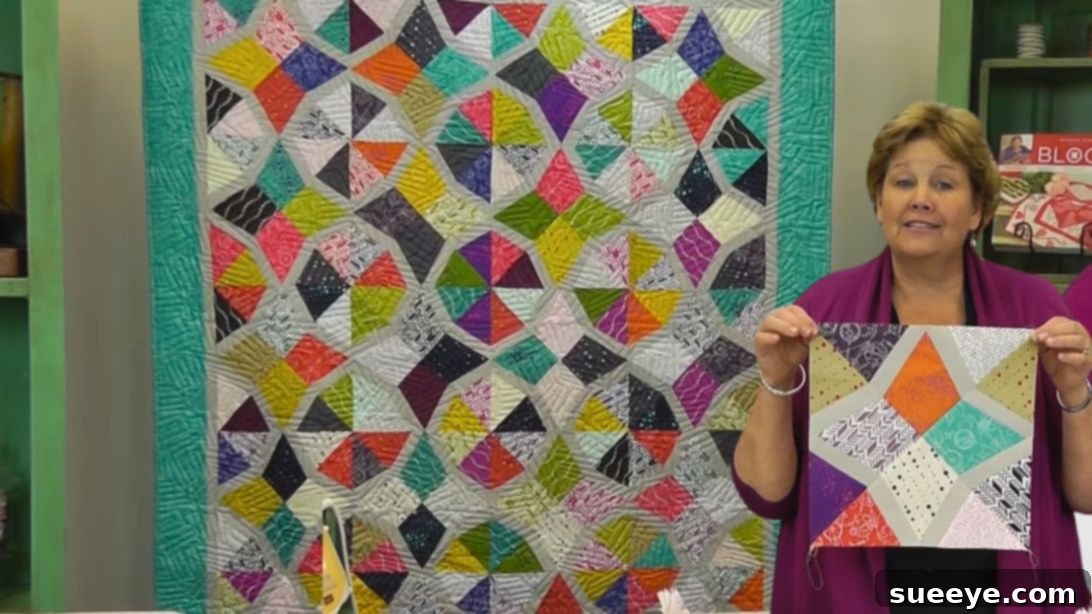
For those enchanted by the timeless charm of periwinkle patterns, the quilting world offers an irresistible array of designs. Missouri Star Quilt Company, renowned for its innovative and beginner-friendly tutorials, truly excels in this domain. Their collection boasts popular variations such as the classic Periwinkle Quilt, the adorable Mini Periwinkle Quilt, the expansive Stretched Periwinkle Quilt, and the intricate Periwinkle Plates Quilt. Each offers a unique spin on a beloved motif, promising both beauty and a rewarding crafting experience.
Today, we’re diving into a particularly captivating design: the Bordered Periwinkle Quilt. This pattern takes inspiration from its vintage predecessors but introduces a distinct border, elevating the classic aesthetic with a modern, polished finish. It’s a wonderful project that breathes new life into an enduring design, making it feel both familiar and refreshingly new. If you’ve enjoyed creating any of the earlier periwinkle variations, you’ll find this bordered iteration even more intuitive and satisfying.
RELATED: Create a Charming Mini Periwinkle Quilt with Jenny Doan
The Enduring Appeal of the Periwinkle Quilt Pattern
The periwinkle quilt pattern holds a special place in the hearts of quilters, celebrated for its unique ability to create a sense of movement and depth. When individual blocks are assembled, they often reveal captivating secondary patterns, frequently forming delightful circles or swirling motifs in the negative space. This visual interplay is what makes the design so dynamic and engaging. With Jenny Doan’s guidance, even complex-looking patterns become approachable, transforming potential challenges into enjoyable crafting moments. The bordered version adds an extra layer of design opportunity, allowing you to frame the central periwinkle elements beautifully and introduce complementary fabrics that enhance the overall composition.
This project is an excellent next step for those who have previously explored periwinkle patterns. The foundational techniques remain consistent, focusing on precise cutting with a periwinkle template and the clever use of wacky web paper for accurate assembly. You’ll begin by preparing your fabric shapes, adhering them to the specialized paper, then adding border strips and side triangles to construct your individual units. The magic truly unfolds as you arrange four of these finished triangles together to form a complete quilt block. The process is remarkably straightforward, especially when you maintain careful alignment of your triangles. As your blocks come together, you’ll witness the stunning circular design emerge in the center of your quilt, a testament to thoughtful planning and precise execution. Get ready to immerse yourself in the joyful process of sewing this lovely pattern, and watch the accompanying video for comprehensive, step-by-step instructions.
Essential Materials for Your Bordered Periwinkle Quilt
Gathering the right materials is the first step to a successful quilting project. For this beautiful Bordered Periwinkle Quilt, you’ll need the following:
- 1 pack of 40 – 10″ squares: Also known as “Layer Cakes,” these pre-cut fabric squares are fantastic for saving time on cutting and offer a wonderful variety of coordinating prints, ensuring a cohesive and visually rich quilt.
- Periwinkle Template: This specialized template is crucial for precisely cutting the unique periwinkle shape, ensuring consistency across all your quilt blocks.
- 80 wacky web papers: These specialized foundation papers are a game-changer for paper piecing, providing stability and accuracy for intricate designs. They guide your sewing, making it easier to achieve perfect points and precise angles.
- 1 1/2 yards of gray borders or 1 roll of 1 1/2″ strips: This fabric will form the inner border around your periwinkle shapes. Opting for a contrasting or complementary color will make your periwinkle units pop. Pre-cut strips can save significant time.
- 1 1/4 yard of outside border: This fabric will create the larger, final border around your entire quilt top, providing a beautiful frame for your finished design. Consider a fabric that ties all your other prints together or offers a striking contrast.
Having all your materials prepared before you begin will ensure a smooth and enjoyable quilting experience.
Step-by-Step Guide: Crafting Your Bordered Periwinkle Quilt with Jenny Doan
Step 1: Preparing Your Fabric Squares
To begin, select four individual 10″ squares from your pack. Stack them neatly one on top of the other, aligning all edges as precisely as possible. This method allows you to cut multiple layers of fabric simultaneously, ensuring efficiency and consistency. With your stack secure, carefully cut diagonally from one corner to the opposite corner. Repeat this process for the other diagonal, effectively dividing each 10-inch square into four large triangles. This initial cut is fundamental for creating the base shapes for your periwinkle units.
Step 2: Cutting the Periwinkle Shape
From the large triangles you’ve just cut, take one and center your periwinkle template upon it. Position the template carefully to maximize the yield of the periwinkle shape while ensuring all edges are within the fabric’s bounds. Using a rotary cutter, meticulously cut around the template to create your distinctive periwinkle piece. It’s important to set aside the remaining side pieces from these cuts, as these fabric scraps will be utilized in a later step to form the outer edges of your quilt block units.
Step 3: Beginning the Paper Piecing Process
Now, grab one of your wacky web papers and apply a glue stick evenly across its surface. This temporary adhesive will hold your fabric in place while you sew, ensuring stability and accuracy. Carefully position one of your cut periwinkle fabric pieces onto the center of the glued paper, taking care to align its corners precisely with the designated guidelines on the paper. The wacky web paper is designed to help you maintain perfect alignment. Next, from your gray border fabric, cut 28 pieces of 1 1/2″ strips. Take one of these strips and sew it along one side of the periwinkle fabric piece, following the seam line indicated on the wacky web paper. Once sewn, press the seam flat to one side, ensuring a crisp finish, and then trim any excess fabric using the paper’s edge as your guide. Repeat this process for the opposite side of the periwinkle, attaching another 1 1/2″ strip and pressing it flat. This step creates the inner border that beautifully frames your periwinkle design.
Step 4: Assembling the Bordered Triangle Units
Refer back to the side pieces you set aside in Step 2. Select two of these pieces and carefully position them on either side of the newly bordered periwinkle unit you just created. Ensure they fit snugly along the edges of the inner border strips. Sew these side pieces onto the border, remembering to use a consistent 1/4″ seam allowance. Precision here is key to ensuring your blocks will align perfectly later. Once sewn, use the wacky web paper as a guide to trim the entire unit to its final shape. After trimming, gently remove the paper from the back of the fabric unit. The paper has served its purpose in guiding your stitching and is no longer needed. You will need to create a total of four of these meticulously finished triangle units to form one complete quilt block.
Step 5: Constructing Your Quilt Blocks and Top
With your four finished bordered triangle units ready, arrange them carefully to form a cohesive block. Refer to the provided photo below for the correct arrangement; you’ll notice that when correctly positioned, the periwinkle centers will create a stunning circular pattern in the middle of your block. Once satisfied with the arrangement, sew these four units together, paying close attention to aligning your seams to ensure a neat finish. After sewing, press your seams open or to one side, whichever method you prefer for reducing bulk and achieving a flat block. To complete your quilt top, you will need to create a total of 20 such blocks. These blocks will be arranged into 5 rows, with each row containing 4 blocks. Carefully sew your blocks together to form each row, then join the rows to each other, pressing all seams as you go. This systematic approach ensures your quilt top is beautifully assembled, showcasing the intricate periwinkle design.
Expert Tips for a Stunning Bordered Periwinkle Quilt
Achieving a professional-looking quilt involves a few key practices that can significantly enhance your final product. Here are some expert tips to guide you:
- Precision is Paramount: In quilting, accuracy in cutting and sewing is fundamental. Always double-check your measurements before cutting, and strive for a consistent 1/4″ seam allowance throughout your project. Even a slight variation can throw off the alignment of your blocks.
- Mastering Paper Piecing: The wacky web paper is your friend! Take your time to understand how it works. It’s designed to ensure precise points and angles, especially beneficial for intricate patterns like the periwinkle. Don’t rush the glueing and sewing onto the paper.
- Pressing Matters: How you press your seams can greatly affect the flatness and overall appearance of your quilt. Experiment with pressing seams open or to one side, deciding which method reduces bulk most effectively for your specific fabric choices and block design. A hot, dry iron is usually best for cottons.
- Fabric Selection Wisdom: While the materials list suggests basic quantities, consider the interplay of colors and patterns. A well-chosen border fabric can dramatically enhance the central periwinkle design, making it pop or creating a harmonious blend. Don’t be afraid to experiment with contrast!
- Stay Organized: With multiple pieces and units, keeping your cut fabrics and assembled sections organized will prevent confusion and save time. Labeling piles or using project boxes can be incredibly helpful.
- Watch the Video: Jenny Doan’s video tutorial is an invaluable resource. Watching her demonstrate each step provides visual clarity that written instructions alone cannot always convey. Pause, rewind, and re-watch as needed!
Completing a quilt is a journey of creativity and patience, resulting in a beautiful heirloom that brings warmth and character to any home. The Bordered Periwinkle Quilt, with its classic appeal and elegant finish, is a truly rewarding project. Whether you’re making it for yourself or as a thoughtful gift, the care and effort you put into each stitch will shine through. Embrace the process, enjoy the meditative rhythm of sewing, and soon you’ll be admiring your very own masterpiece, crafted with the expert guidance of Jenny Doan and the timeless charm of the periwinkle design.
Your Beautiful Bordered Periwinkle Quilt Awaits!
With these detailed instructions and tips, you are now fully equipped to embark on your Bordered Periwinkle Quilt journey. Jenny Doan’s techniques simplify what might seem complex, making this an accessible yet deeply satisfying project. Unleash your creativity, choose your favorite fabrics, and enjoy every moment of bringing this stunning quilt to life. Happy quilting!