
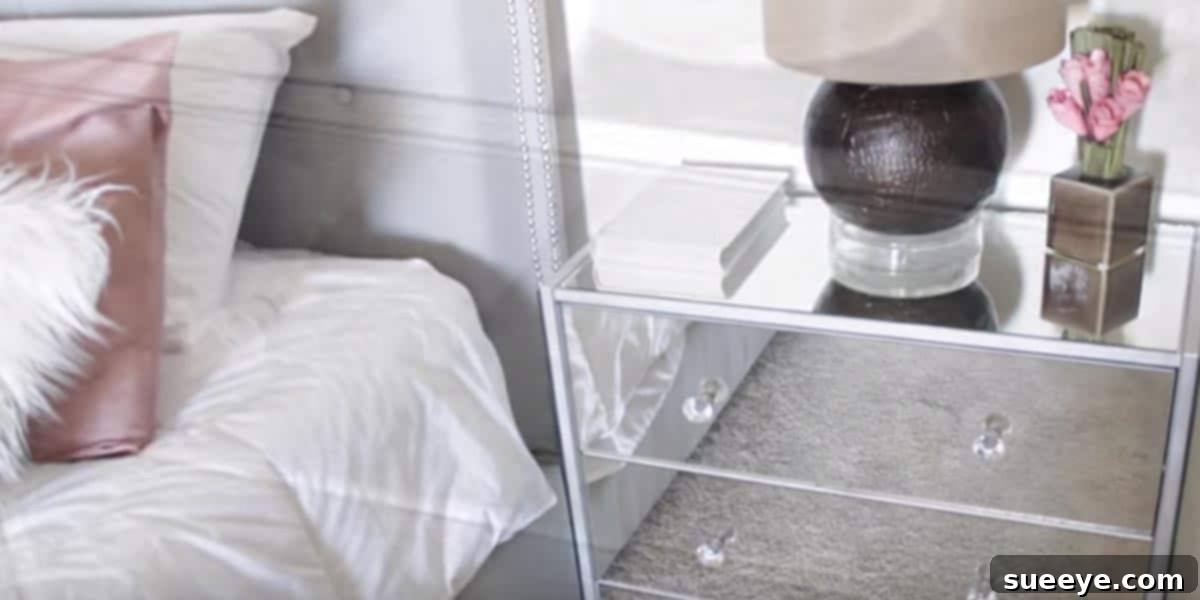
DIY Mirrored Nightstands: Achieve Luxury on a Budget
Are you captivated by the elegant sparkle and sophisticated charm of mirrored furniture, but find the price tags a little daunting? You’re not alone! High-end mirrored pieces can command premium prices, often putting them out of reach for many home decorators. But what if we told you that achieving that luxurious, reflective aesthetic in your own home is not only possible but also surprisingly easy and incredibly affordable? Get ready to unlock the secret to crafting your very own dazzling mirrored nightstands that will instantly elevate your bedroom’s style!
Imagine your bedroom transformed into a chic, glamorous sanctuary. That’s precisely the magic a set of DIY mirrored nightstands can conjure. They reflect light, making your space feel larger and brighter, while adding an undeniable touch of sophistication. We’re absolutely thrilled to share this incredible hack that allows you to create bespoke mirrored furniture without the hefty investment. I recently completed this project for my own bedroom, and the results are nothing short of fabulous! The newfound elegance and feminine chic they bring have inspired a complete refresh, even prompting the addition of plush, furry pillows to complete the opulent look. It’s truly amazing how two simple pieces can redefine an entire room!
Why DIY Mirrored Furniture is a Game-Changer for Home Decor
The allure of mirrored furniture lies in its ability to blend seamlessly with various decor styles, from modern minimalist to classic Hollywood glam. However, the cost often deters enthusiasts. This DIY approach completely bypasses that barrier, offering several compelling advantages that make it a truly smart choice for any home improvement enthusiast:
- Significant Cost Savings: Crafting your own mirrored nightstands can cost a fraction of what you’d pay for a retail equivalent, often saving you hundreds, if not thousands, of dollars. This makes luxury decor accessible to everyone.
- Customization to Your Taste: You choose the base furniture, the mirror style, the paint color, and the hardware. This means your finished piece will perfectly match your existing decor and personal aesthetic, something off-the-shelf options rarely offer.
- Sense of Accomplishment: There’s immense satisfaction in creating something beautiful and functional with your own hands. You’ll proudly tell guests, “I made that!” contributing to your home’s unique story.
- Eco-Friendly Option: Repurposing an old or inexpensive chest gives it a new lease on life, reducing waste and promoting sustainable decorating practices. It’s a fantastic way to upcycle and be environmentally conscious.
- Unique and Personalized: Unlike mass-produced items, your DIY mirrored nightstands will carry a unique touch, making your bedroom truly one-of-a-kind.
Gathering Your Materials: The Foundation of Your Mirrored Masterpiece
Before diving into the exciting transformation, a well-prepared workstation and a complete set of materials are essential. While the original tutorial referenced IKEA chests and Lowe’s for mirrors, this comprehensive guide offers broader advice, allowing you to adapt to what’s available in your area. This detailed list will ensure you have everything needed for a smooth and successful project.
Essential Materials for Your Mirrored Nightstand Project:
- Base Furniture: A sturdy chest of drawers or nightstand. This can be an inexpensive find from IKEA, a hidden gem from a thrift store, a garage sale score, or even an existing piece you already own and wish to update. Key considerations include looking for pieces with relatively flat surfaces on the front, top, and sides where mirrors will be applied, as these provide the best canvas for your mirrored panels.
- Metallic Spray Paint: Silver metallic spray paint is a classic and popular choice for achieving that chic, reflective edge. However, don’t limit yourself – gold, bronze, or even a deep charcoal can create different, equally stunning effects. Choose a paint specifically designed for furniture or multi-surface use to ensure optimal adhesion and durability. Depending on the size of your furniture and desired coverage, you’ll likely need 2-3 cans.
- Mirrors: This is where the true magic happens!
- Source: Home improvement stores like Lowe’s or Home Depot often offer custom mirror cutting services if you purchase the glass from them, which is incredibly convenient. Local glass shops are another excellent option, often providing high-quality cuts and potentially more custom options.
- Type: Standard plate glass mirrors are perfect for this project. You might consider different thicknesses, typically 1/8 inch (3mm) or 3/16 inch (5mm), with the latter offering more rigidity.
- Measurements: This step requires utmost precision. Measure *all* the surfaces you intend to cover (top, front of each drawer, and the sides of the nightstand) meticulously. Take these precise measurements with you for cutting. It’s always advisable to subtract a tiny fraction (e.g., 1/16th of an inch or 1-2mm) from each measurement to account for potential expansion or slight imperfections, ensuring the mirrors fit without forcing and allowing for adhesive.
- Mirror/Marble/Granite Adhesive: This specialized adhesive is absolutely crucial. Regular construction adhesives can contain chemicals that will damage the mirror’s silver backing, causing unsightly deterioration over time. Look for products specifically labeled for mirrors, marble, or granite. Popular brands include Loctite PL Premium or similar mirror-safe products (often around $4-$8 per tube).
- Drawer Knobs/Pulls: New hardware can drastically change the look of your piece, adding another layer of customization. Choose knobs that complement your desired aesthetic, whether sparkling crystal, sleek metallic, classic ceramic, or even ornate vintage styles.
- E6000 Adhesive: A strong, clear, industrial-strength adhesive that is perfect for attaching knobs directly to the mirror surface without the need for drilling. Its strong bond makes it ideal for this purpose.
Tools You’ll Need for a Smooth DIY Experience:
- Caulking Gun: For applying the mirror adhesive smoothly and efficiently, ensuring even distribution.
- Measuring Tape: An indispensable tool for all your accurate measurements.
- Pencil or Marker: For marking mirror placement, knob positions, and any areas for masking.
- Protective Drop Cloths or Tarps: To protect your work area, floors, and surrounding furniture from paint overspray and adhesive drips.
- Painter’s Tape: For masking off any areas you don’t want to paint or to temporarily hold mirrors in place while the adhesive sets.
- Gloves: Essential for protecting your hands from paint, adhesive, and potentially sharp mirror edges.
- Safety Glasses: Crucial eye protection, especially when working with mirrors and using spray paint.
- Cleaning Supplies: Rags, glass cleaner, and rubbing alcohol for thorough surface preparation.
- Sandpaper (fine-grit, optional): For light sanding to help paint adhesion, particularly on glossy or slick furniture surfaces.
The Step-by-Step Transformation: Bringing Your Mirrored Vision to Life
This DIY project is surprisingly straightforward, but patience and meticulous attention to detail at each stage will ensure a flawless, professional-looking finish. Follow these steps carefully to achieve the stunning results you envision.
Step 1: Prepare Your Base Furniture for Its Glamorous Makeover
Begin by giving your chosen chest or nightstand a thorough cleaning. Remove all existing hardware – old knobs, pulls, and any decorative elements that might interfere with mirror placement. If your furniture has a glossy, slick, or painted finish, a light sanding with fine-grit sandpaper (e.g., 220-grit) can significantly help the spray paint adhere better, creating a more durable finish. After sanding, wipe away any dust or debris with a damp cloth, followed by a dry cloth. Ensure the surface is completely dry before proceeding to the next step.
Step 2: Apply Metallic Spray Paint for a Seamless Foundation
This step is crucial for creating a polished, finished look, particularly for any visible edges or narrow gaps that might appear between the mirrors. It also helps to unify the piece if your base furniture has different colors or unfinished sections.
- Masking: Use high-quality painter’s tape to meticulously mask off any areas you *don’t* want to paint, such as the inside of drawers, the back of the nightstand, or any internal shelving. While the original tutorial suggested only spraying outer portions, a more comprehensive approach of painting all visible areas (top, sides, drawer fronts, and edges) that *won’t* be completely covered by mirrors will provide a truly seamless and high-end finish.
- Ventilation: Always work in a well-ventilated area. Outdoors is ideal, but a garage with open doors and proper airflow can also suffice. Lay down protective drop cloths or tarps extensively to protect your surroundings from overspray.
- Technique: Apply the spray paint in thin, even coats, holding the can about 8-12 inches away from the surface. Maintain a consistent sweeping motion. Remember, multiple thin coats are always superior to one thick coat, as this prevents drips, runs, and ensures a smoother, more durable finish. Allow each coat to dry according to the manufacturer’s instructions before applying the next. Aim for at least 2-3 coats for optimal coverage and depth of color.
- Drying: Allow the painted furniture to dry completely, ideally overnight or for at least 24 hours, before moving on to the next step to ensure the paint has fully cured.
Step 3: Precise Mirror Measurement and Professional Cutting
Accuracy here is paramount, as perfectly cut mirrors are key to a professional-looking result. Even if drawer fronts look identical, slight variations can occur, so measure each surface individually.
- Measure Twice, Cut Once (or Have it Cut): Double-check all your measurements for both length and width for every single surface. It’s a good practice to subtract a tiny fraction (e.g., 1/16th of an inch or 1-2 millimeters) from each measurement. This slight reduction accounts for potential material expansion, ensures the mirrors fit without forcing, and provides a minimal margin for error, preventing cracking.
- Professional Cutting: Take your precise measurements to a hardware store with a glass cutting service (like Lowe’s or Home Depot, as mentioned in the original inspiration) or a local glass shop. They possess the specialized tools and expertise to cut the mirrors to your exact specifications, ensuring clean, perfectly straight, and safe edges. This professional service is highly recommended for both safety and achieving a polished finish.
- Handling: Once you have your custom-cut mirrors, handle them with extreme care. Always wear gloves to protect your hands from potentially sharp edges and to keep unsightly fingerprints off the reflective surface.
Step 4: Applying the Mirrors – The Moment of Transformation
This is the moment your project truly comes to life, as the reflective panels begin to transform your furniture into a glamorous showpiece.
- Test Fit: Before applying any adhesive, take a moment to dry-fit each mirror piece to its intended surface. This confirms a perfect fit and allows you to visualize the placement.
- Adhesive Application: Load your chosen mirror-safe adhesive into a caulking gun. On the *back* of each mirror piece, apply a generous, continuous bead of adhesive in a zigzag or serpentine pattern. Ensure the adhesive is spread out enough to provide excellent coverage and strong adhesion, but avoid applying it too close to the edges, which could cause excessive squeeze-out.
- Placement: Carefully position the mirror onto the prepared surface. Start with one edge, aligning it precisely, and gently lay the mirror down, pressing firmly. Once in place, apply firm, even pressure across the entire surface of the mirror for several minutes. For vertical surfaces, you might find it helpful to use painter’s tape to hold the mirrors in place temporarily, securing them to the furniture until the adhesive begins to set and hold.
- Curing Time: This is a critical step for durability. Allow the adhesive to cure fully according to the manufacturer’s instructions. This can take anywhere from 24 to 72 hours, depending on the specific product, ambient temperature, and humidity. Resist the urge to move, bump, or place objects on the furniture during this crucial curing period to ensure a strong, lasting bond.
Step 5: Attaching Drawer Knobs – The Functional and Stylish Finish
The final touch for both functionality and aesthetic appeal. Your choice of knobs can significantly impact the overall look of your mirrored nightstands.
- No-Drill Method (E6000): For attaching knobs directly to the mirror surface without the need for drilling, E6000 glue is an excellent choice. Apply a small, pea-sized amount of E6000 glue to the back of your chosen knob. Carefully position the knob on the mirror surface of the drawer front and press firmly for a few seconds. You might need to hold it steady for a minute or two to ensure it initially adheres.
- Drying: Allow the E6000 glue to cure completely. While it may feel set within a few hours, it typically takes up to 24-72 hours to achieve maximum strength. Avoid using the drawers or pulling on the knobs during this curing period to ensure the strongest possible bond.
Styling Your New Mirrored Nightstands: Beyond the Build
Once your DIY mirrored nightstands are complete, they become stunning focal points that can inspire a whole new bedroom aesthetic. Mirrored furniture is incredibly versatile, adding unparalleled glamour and light to any space. Here’s how to make them truly shine and integrate them seamlessly into your decor:
- Complementary Textures: Pair the sleek, reflective surface with soft, inviting textures. Think plush faux fur (as in the original inspiration!), luxurious velvet throw pillows, cozy knitted blankets, or even a soft sheepskin rug nearby. These contrasts create compelling visual interest and add warmth, balancing the coolness of the glass.
- Strategic Lighting: Place elegant table lamps with metallic bases, crystal accents, or unique sculptural forms on your nightstands. The light emitted will beautifully bounce off the mirrored surfaces, creating a dazzling ambiance, making the room feel brighter, and enhancing the overall luxurious feel.
- Minimalist Decor: Don’t overcrowd your new statement pieces. A few carefully chosen items – a small, delicate plant, a neatly stacked collection of current reads, a decorative tray to corral small essentials, or a delicate jewelry holder – will enhance their elegance without creating visual clutter. Less is often more when showcasing mirrored furniture.
- Color Palettes: Mirrored furniture works beautifully with a wide range of color schemes. For a classic Hollywood glam look, pair them with crisp whites, soft creams, shimmering silvers, and sophisticated grays. For a bolder, more dramatic statement, they can anchor rooms adorned with deep jewel tones like emerald green, sapphire blue, or amethyst purple, adding depth and richness.
- Room Amplification: Remember that mirrors inherently create the illusion of more space and depth. If your bedroom is on the smaller side, these reflective nightstands will actively work to make it feel more open, airy, and expansive, maximizing visual square footage.
Tips for Success and Troubleshooting Common DIY Hurdles
Even seasoned DIYers can encounter minor hiccups. Here are some extra tips and common troubleshooting advice to ensure your project goes smoothly and yields the best results:
- Work Clean: Throughout the entire process, strive to keep your mirrors sparkling clean. Any smudges, dust particles, or debris trapped underneath the adhesive will be visible once the mirror is set, so a clean workspace and clean mirrors are paramount.
- Patience is Key: Do not rush the drying and curing times for either the paint or the adhesive. Rushing these steps can lead to a less durable bond, a less attractive finish, or even structural issues down the line. Good things come to those who wait!
- Dealing with Tiny Gaps: If, despite your best efforts, you have tiny, hairline gaps between mirror pieces, a thin bead of clear silicone caulk can be applied discreetly to fill them. This provides a clean, finished look and seals out dust.
- Regular Cleaning: Once your project is complete, maintain the brilliance of your mirrored nightstands with standard glass cleaner and a soft microfiber cloth. For the painted frame, a soft, damp cloth is usually sufficient for dusting. Avoid abrasive cleaners or harsh chemicals that could scratch the mirrors or damage the paint.
- Safety First, Always: Always wear robust gloves when handling mirrors to prevent cuts and to avoid leaving fingerprints. Ensure excellent ventilation when using spray paint and chemical adhesives to protect your respiratory health. Consider wearing a mask specifically designed for fumes.
The Cost-Effective Glamour: An Estimated Budget Breakdown
While prices can certainly vary based on your geographic location, where you source your materials, and the specific choices you make, here’s a rough estimate to demonstrate the incredible affordability of this DIY mirrored nightstand project compared to purchasing retail:
- Base Furniture: $20-$100 (if bought used from a thrift store or a budget-friendly new piece from IKEA/similar)
- Metallic Spray Paint: $10-$20 (for 2-3 cans, depending on brand and coverage needed)
- Mirrors: $30-$80 (depending on the total square footage and whether you opt for professional cutting services)
- Mirror-Safe Adhesive: $5-$10 (for 1-2 tubes, ensuring it’s specifically safe for mirror backing)
- Drawer Knobs: $10-$40 (depending on your chosen style, material, and quantity)
- E6000 Glue: $5-$10 (for a single tube, which will likely be more than enough)
- Miscellaneous Supplies (painter’s tape, drop cloth, gloves, etc.): $10-$20
Total Estimated Cost: Approximately $90 – $280. When you compare this to buying new mirrored nightstands, which can easily cost $300 to $1000+ *per piece* at retail, this DIY project offers truly incredible value. You’re not just saving money; you’re investing in a personalized, high-quality piece of furniture created with your own hands.
Conclusion: Your Dream Bedroom Awaits!
Who knew achieving such a high-end, glamorous look could be so accessible and rewarding? This DIY mirrored nightstand project unequivocally proves that with a little creativity, a touch of effort, and the right guidance, you can transform ordinary furniture into extraordinary statement pieces. It’s an empowering project that not only saves you a significant amount of money but also allows you to infuse your unique personal style and a sense of pride into your living space.
Say goodbye to wistfully drooling over expensive store-bought mirrored furniture that feels out of reach, and say hello to the incredible satisfaction of creating your own dazzling, custom-designed pieces. Get ready to enjoy a bedroom that feels fresh, feminine, utterly fabulous, and uniquely yours. Your personal gold mine of home decor inspiration starts right here, with this exciting and achievable transformation!