
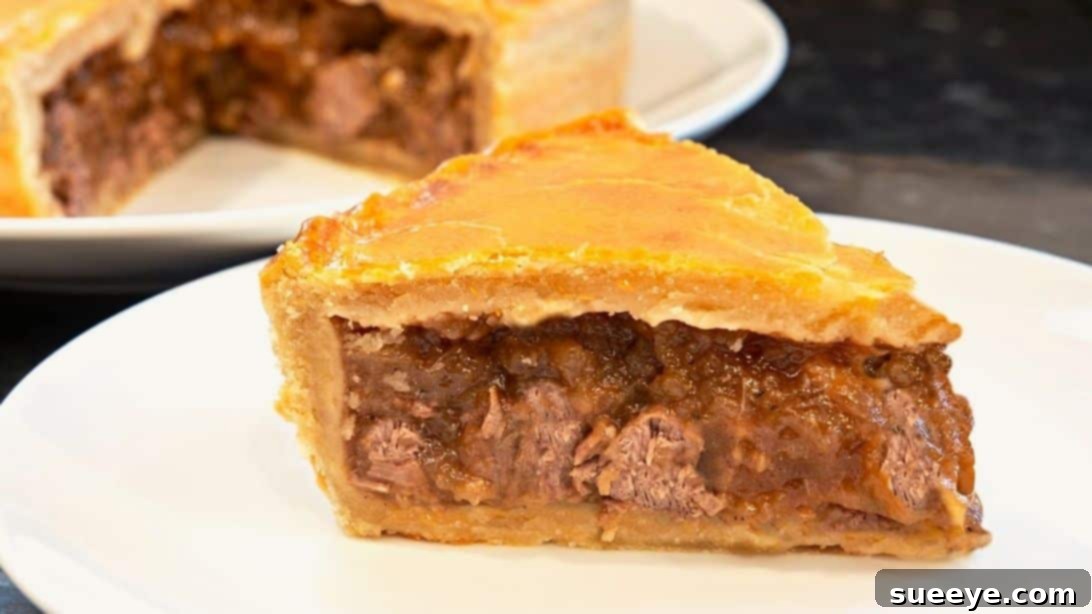
Few dishes evoke the warmth and comfort of home quite like a classic steak and onion pie. With its rich, savory filling encased in a golden, flaky crust, this traditional British staple is a culinary masterpiece that promises to satisfy even the most discerning appetites. Perfect for a cozy family dinner or a hearty meal with friends, this recipe guides you through creating a truly memorable pie from scratch. We’ve broken down every step, from crafting the perfect pastry to slow-cooking the tender beef and onions, ensuring a foolproof experience. Whether you’re a seasoned baker or a kitchen novice, you’ll find this recipe surprisingly straightforward and incredibly rewarding. Get ready to impress with a pie that’s not just food, but a heartwarming experience. For visual guidance, you can also follow along with the expert instructions provided by John Kirkwood on YouTube. Let’s embark on this delicious journey!
The Hearty Ingredients for a Perfect Steak and Onion Pie
Crafting an exceptional steak and onion pie begins with selecting high-quality ingredients. Our recipe calls for a simple yet robust list that delivers maximum flavor and a satisfying texture. Pay attention to the details, as each component plays a crucial role in the final masterpiece, ensuring every bite is a pure delight.
For the Flaky Hot Water Crust Pastry:
- 3¼ cups (approximately 400g) all-purpose or plain flour, providing the structural base for our delicious crust.
- ¾ cup (180ml) water, essential for bringing the pastry dough together.
- ½ cup (113g) unsalted butter, cut into cubes, adding rich flavor and tenderness to the pastry.
- ½ cup (113g) lard or vegetable shortening, for optimal flakiness and a wonderfully crisp texture that holds up to the hearty filling.
- 1 tsp fine sea salt, to enhance the flavor of the pastry itself.
- 1 large egg, whisked with a dash of milk, to create an egg wash that will give your pie a beautiful, golden-brown, and appealing finish.
For the Rich and Savory Beef and Onion Filling:
- 1 pound (approximately 450g) lean beef steak (such as rump, chuck, or stewing beef), *diced into uniform 1-inch cubes* for even cooking, maximum tenderness, and a satisfying bite in every forkful.
- 2 medium-sized yellow onions, *finely diced* to caramelize beautifully, meld seamlessly into the sauce, and provide a sweet, aromatic counterpoint to the rich beef.
- 1 pint (approximately 570ml) high-quality beef stock, preferably homemade or a good quality store-bought brand, vital for building a deep, robust flavor in the gravy.
- Salt, *to taste*, to perfectly season and enhance the natural flavors of the beef, onions, and the entire filling mixture.
- Freshly ground black pepper, *to taste*, for a subtle warmth and a gentle kick that complements the savory notes.
- 3 tbsp cornflour (cornstarch), an essential thickening agent for achieving a rich, luxurious gravy that coats the beef beautifully.
- 2 tbsp cold water, for mixing with cornflour to create a smooth, lump-free slurry, ensuring your gravy thickens evenly.
- 2 tbsp vegetable oil, perfect for browning the beef to create delicious crusts and sautéing the onions until perfectly tender.
Step-by-Step Directions: How to Master the Classic Steak and Onion Pie
Follow these detailed, easy-to-understand instructions to create a steak and onion pie that will become a cherished family favorite. Each step is designed to build layers of flavor and ensure perfect texture, guiding you from raw ingredients to a golden, bubbly masterpiece.
Part 1: Preparing the Perfect Hot Water Crust Pastry
The foundation of any truly great savory pie is its pastry. For a dish like steak and onion pie, a hot water crust is often the preferred choice due to its robust nature and ease of handling. This method yields a pastry that is both wonderfully tender and sturdy enough to hold a substantial, juicy filling without becoming soggy. Its forgiving nature makes it ideal for home bakers.
- Combine Dry Ingredients: Begin by taking a large mixing bowl. Into this bowl, whisk together the measured plain or all-purpose flour with the salt. It’s crucial to ensure the salt is evenly distributed throughout the flour, as this will season your pastry from within, contributing to its overall flavor. Set this bowl aside for a moment.
- Melt the Fats: Next, place a small to medium-sized saucepan on your stove. Add the measured water, the cubed butter, and the lard (or shortening) into the saucepan. Turn the heat to low. Gently stir the mixture as it heats, allowing the butter and lard to melt completely and thoroughly integrate with the water. Continue heating until the mixture reaches a gentle simmer, where the fats are fully liquefied and the liquid is visibly hot. This hot mixture is key to the unique texture of a hot water crust.
- Form the Dough: With caution, carefully pour the hot liquid mixture directly into the flour and salt mixture in your large mixing bowl. Immediately, using a wooden spoon or a sturdy spatula, begin to mix vigorously. Continue mixing until all the flour is incorporated and a cohesive dough starts to form, pulling away from the sides of the bowl. The dough will be quite soft and warm at this stage.
- Knead and Rest: Lightly flour a clean, dry work surface. Transfer the warm dough onto this prepared surface and knead it gently for just a few minutes, typically no more than five. The goal is to achieve a smooth, pliable dough. Avoid over-kneading, as this can develop too much gluten and result in a tough pastry. Once smooth, divide the dough into two distinct pieces: one piece should be slightly larger (this will be for the pie base), and the other smaller piece will form the top crust.
- Chill the Pastry: Individually wrap each piece of pastry tightly in plastic wrap or place them in separate food bags. This prevents the dough from drying out and forming a crust. Place them in the refrigerator for a minimum of 2 hours. Chilling is a crucial step; it allows the gluten in the dough to relax, making it much easier to roll out evenly, and it solidifies the fats, which is essential for creating that desirable flaky, crisp crust. You can even prepare this pastry a day in advance for added convenience.
Part 2: Crafting the Rich and Aromatic Beef Filling
While your pastry is chilling to perfection, you can begin preparing the heart of the pie: the savory beef and onion filling. This section focuses on developing deep, complex flavors through careful browning and slow simmering, ensuring perfectly tender meat that melts in your mouth.
- Brown the Beef: Place a large, heavy-bottomed pan or a Dutch oven on a stove over medium to medium-high heat. Add the vegetable oil and allow it to heat until it shimmers slightly. Add the diced beef to the hot pan in a single layer, making sure not to overcrowd the pan. If necessary, cook the beef in batches to avoid lowering the pan’s temperature, which would steam the meat instead of browning it. Brown the beef on all sides until it develops a rich, caramelized crust. This browning step, known as the Maillard reaction, is absolutely essential for developing deep, complex, and savory flavors in your filling.
- Sauté the Onions: Once the beef is beautifully browned and removed from the pan (set aside), add the finely diced onions to the same pan (you might add a tiny bit more oil if needed). Season the onions generously with salt and freshly ground black pepper. Continue to stir-fry or sauté the mixture, scraping up any browned bits from the bottom of the pan (deglazing), until the onions become soft, translucent, and begin to caramelize to a light golden color. This process extracts their natural sweetness, adding another wonderful layer of flavor to the filling.
- Simmer for Tenderness: Return the browned beef to the pan with the softened onion mixture. Pour in the beef stock. Bring the mixture to a rolling boil over high heat, then immediately reduce the heat to low. Cover the pan securely with a lid and let it simmer gently for at least an hour, or until the beef is incredibly tender when pierced with a fork. Simmering allows all the flavors to meld together beautifully and ensures the meat achieves that desired melt-in-your-mouth softness.
- Prepare the Thickener: While the beef is simmering and becoming tender, take this opportunity to prepare your cornflour slurry. In a small bowl, whisk together the 3 tablespoons of cornflour with 2 tablespoons of cold water until a smooth, lump-free paste forms. This slurry will be used later to thicken the rich gravy for your pie, giving it the perfect consistency.
Part 3: Assembling, Baking, and Finishing Your Masterpiece
The final stages are where all your hard work comes together to create a glorious, golden-crusted pie. Precision in assembly and careful baking are key to achieving a picture-perfect result with a perfectly cooked filling and a crisp, delicious crust.
- Thicken the Filling: Once the beef is wonderfully tender from simmering, carefully remove approximately half of the beef stock from the pan and set it aside; this reserved stock will be the flavorful base for your accompanying gravy. Stir the previously prepared cornflour and cold water mixture (slurry) into the remaining beef and onion filling in the pan. Continue to stir gently over low heat until the sauce visibly thickens to your desired consistency. It should be rich, glossy, and coating, not watery.
- Cool the Filling: Turn off the heat under the pan, cover it securely, and allow the filling to cool completely. This step is absolutely crucial for preventing a soggy bottom crust, as hot filling can generate steam within the pie, which softens the pastry. Cooling also allows the flavors to deepen and the filling to set, making it easier to handle.
- Prepare the Egg Wash: In a small bowl, whisk together one small egg with a dash of milk until they are well combined and smooth. This egg wash will be brushed over the top of your pie to give it that beautiful, irresistible golden-brown sheen during baking.
- Roll the Base Pastry: Retrieve the larger piece of chilled pastry from the refrigerator. On a lightly floured work surface, roll it out evenly to a thickness of approximately ¼ inch (6mm). Ensure the rolled pastry is large enough to line your greased baking tin (a 9-inch round or an equivalent rectangular tin works well) with some generous overhang.
- Line the Pie Tin: Carefully transfer the rolled pastry into your greased baking tin. Gently press the pastry into the base and up the sides of the tin, making sure it fits snugly into all corners and crevices without stretching. Trim any excessive overhang, leaving about an inch of pastry extending beyond the rim of the tin.
- Roll the Top Pastry: Retrieve the smaller piece of chilled pastry and roll it out on a lightly floured surface to a similar thickness as the base. This will form the top crust of your pie. Set it aside for now.
- Fill the Pie: Once the beef and onion filling has cooled completely to room temperature, spoon it evenly into the pastry-lined pie crust. Distribute the filling smoothly to create an even surface within the pie.
- Add the Top Crust: Carefully place the rolled top pastry over the filling. Trim the edges of the top crust to match the bottom crust, again leaving enough excess to crimp. Press the edges of the top and bottom crusts together firmly, then crimp them decoratively using your fingers or the tines of a fork to create a tight, attractive seal. This prevents the flavorful filling from leaking out during baking.
- Egg Wash and Vent: Brush the entire surface of the assembled pie generously with the prepared egg wash. This is what will give it that enticing golden-brown color and a beautiful slight sheen. Using a sharp knife, make a few small slits or a decorative pattern (like a cross or a star) on the top of the pie. These crucial vents allow steam to escape during baking, preventing the crust from becoming soggy or cracking, and ensuring the filling cooks evenly.
- Bake the Pie: Preheat your oven to 340°F (170°C). Carefully transfer the pie to the preheated oven and bake for approximately 50 minutes. The pie is done when the crust is deeply golden brown and the filling is visibly bubbly (you might see it gently bubbling through the vents). If you notice the crust browning too quickly, you can loosely tent it with aluminum foil to prevent over-browning.
- Rest the Pie: Once baked to perfection, remove the pie from the oven and let it cool on a wire rack for at least 15-20 minutes before attempting to slice it. This essential resting period allows the filling to set properly, preventing it from being too runny when served, and makes for cleaner slices. Use this brief cooling time to prepare your accompanying gravy.
Part 4: Making the Perfect Gravy Accompaniment
No truly authentic steak and onion pie is complete without a rich, flavorful gravy to drizzle generously over it. This uses the reserved stock from the filling, intensifying the overall flavor profile of your meal and bringing all the elements together harmoniously.
- Heat the Stock: Place a small saucepan on the stove over medium heat. Pour in the reserved beef stock that you set aside earlier. Add a small knob of butter (about 1-2 tablespoons) to enrich the gravy further, giving it a glossy finish and a touch more depth.
- Thicken the Gravy: Bring the stock to a gentle boil. If you have any leftover cornflour slurry from earlier, or prepare a fresh small batch (e.g., 1 teaspoon cornflour mixed with 1 tablespoon cold water for a thinner gravy), gradually whisk it into the boiling stock. Continue to stir constantly until the gravy thickens to your desired consistency. You want it to be rich and spoonable, not too thin or overly thick. Taste and season with additional salt and pepper if needed to achieve perfect balance.
Serving Suggestions and Pro Tips for Your Steak and Onion Pie
Your magnificent, homemade steak and onion pie is now ready to be enjoyed! Here are some delightful ideas to make your meal even more complete and satisfying, along with some invaluable tips for ensuring consistent success with this classic recipe.
Serving the Pie:
- Classic Pairing: The quintessential way to serve steak and onion pie is alongside generous scoops of creamy mashed potatoes and a helping of tender garden peas. This combination is a beloved British tradition for a reason.
- Drizzle with Gravy: Do not forget to liberally ladle that luscious, homemade gravy over each slice of pie and its accompanying sides. The gravy ties all the rich flavors together beautifully and adds an extra layer of moisture and richness.
- Additional Sides: For a more varied meal, consider serving your pie with other delightful sides. Steamed green beans, buttered carrots, a crisp side salad with a tangy vinaigrette dressing, or even some roasted root vegetables (like parsnips or sweet potatoes) can offer wonderful complementary textures and flavors.
Pro Tips for Success:
- Pastry Handling: The hot water crust pastry is generally quite forgiving. Work quickly with it while it’s warm, as it becomes easier to handle. If it cools too much and becomes too stiff to roll, you can gently reheat it for a few seconds in a microwave or a very low oven, but be extremely careful not to cook it.
- Meat Quality: While rump steak is recommended for its excellent balance of leanness and flavor, other cuts like chuck steak, silverside, or other stewing cuts will also yield outstanding results, especially with the benefit of slow simmering. Always ensure any tough gristle or excessive fat is trimmed before dicing.
- Enhancing Flavor Depth: For an even richer, more complex flavor profile in your beef filling, you can add a splash of robust red wine (about ¼ cup) or a teaspoon of Worcestershire sauce during the simmering stage. These additions can significantly deepen the umami notes.
- Make Ahead Options: Both the pie filling and the pastry can be prepared a day in advance and stored separately in the refrigerator. The filling should be kept in an airtight container, and the pastry tightly wrapped. You can also assemble the entire pie and refrigerate it for up to 24 hours before baking; just make sure to cover it loosely with plastic wrap to prevent it from drying out.
- Freezing Instructions: To freeze your steak and onion pie for future enjoyment, bake it completely according to the recipe, then allow it to cool entirely. Once cool, wrap it tightly in aluminum foil, and then again in plastic wrap or place it in a freezer-safe bag. It can be frozen for up to 3 months. To reheat, thaw the pie in the refrigerator overnight, then bake in a preheated oven at 325°F (160°C) until thoroughly heated through and the crust is wonderfully crisp again.
- Preventing a Soggy Bottom: The most critical step to avoid a soggy bottom crust is to ensure your pie filling is completely cool before spooning it into the pastry. Baking the pie on a preheated baking sheet (placed in the oven while it heats up) can also help create a crisper base by giving it an initial burst of heat.
- Creative Vents: Don’t just make simple slits for steam vents; get creative! Use small cookie cutters to make decorative shapes (like stars or leaves) on the top crust before placing it, or create a lattice top.
This classic steak and onion pie is more than just a meal; it’s a culinary journey that brings comfort, tradition, and immense satisfaction to the table. We hope you thoroughly enjoy making and sharing this delightful, hearty recipe with your loved ones, creating cherished food memories. Happy cooking!
*All images for this recipe are credited to John Kirkwood via YouTube. We enthusiastically encourage you to visit his channel for more fantastic cooking insights, step-by-step video tutorials, and to subscribe for his inspiring culinary content!
How To Make Classic Steak & Onion Pie – A Concise Summary
To summarize the process, crafting a classic steak and onion pie involves three meticulously executed main phases: first, preparing a sturdy yet tender hot water crust pastry; second, slow-cooking a rich and incredibly tender beef and onion filling; and finally, expertly assembling and baking the pie to a glorious golden perfection. The pastry is made by combining flour and salt with hot melted butter, lard, and water, then gently kneading and chilling it to achieve the perfect texture. The hearty filling features expertly browned beef and finely diced onions, which are then simmered in a robust beef stock until the meat is wonderfully tender, and subsequently thickened with a cornflour slurry to create a luscious gravy within. Once the filling is completely cooled, it is carefully encased in the prepared pastry, sealed securely, vented to allow steam to escape, generously brushed with an egg wash for a beautiful finish, and baked until its crust is beautifully golden. A complementary, savory gravy made from the reserved stock completes this comforting meal, which is traditionally served with creamy mashed potatoes and vibrant green peas. Patience and careful attention to detail at each stage will undoubtedly reward you with a deeply flavorful, incredibly satisfying, and truly authentic homemade steak and onion pie that’s perfect for any occasion and will surely become a household favorite.