
In a world where security and privacy are paramount, finding clever ways to safeguard your personal items can offer immense peace of mind. Whether you’re looking to protect valuable jewelry, secure spare keys, keep your favorite snacks away from prying eyes, or simply organize your space more efficiently, these ingenious DIY life hacks inspired by Blossom on YouTube provide incredibly discreet solutions. Forget bulky safes or obvious hiding spots; these tricks blend seamlessly into your everyday environment, offering surprisingly effective ways to stash your belongings right under everyone’s noses. Get ready to transform ordinary household items into secret compartments and functional organizers with these creative and easy-to-follow ideas that truly shouldn’t be missed.
Materials You’ll Need:
- A large, decorative candle
- A drill with a flat wood bit (or spade bit)
- A small canister or container (sized to fit inside the candle)
- A flat, rigid object (to cover the candle’s base hole)
- The original sticker from the candle (optional, for covering the flat object)
- An old picture frame (preferably one with a removable back)
- A heat gun (or strong hairdryer)
- An old hairbrush with a sturdy handle
- A piece of wood cut to fit inside a drawer (for a false bottom)
- Strong adhesive (e.g., hot glue gun and glue sticks)
- An empty mayonnaise bottle or similar opaque container
- White spray paint
- A jar lid
- A fidget spinner (for the bonus hack)
- A small serving tray (for the bonus hack)
Step-by-Step Instructions for Clever Hiding & Organization:
Step 1: Create a Secret Key Stash Within a Candle
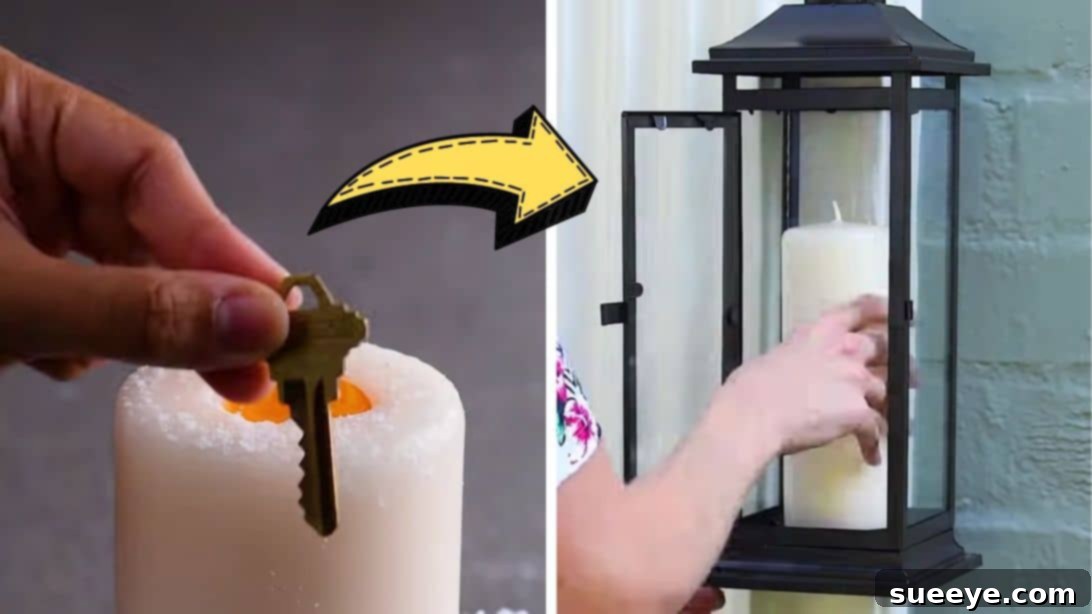
Imagine a spare key hidden in plain sight, an emergency solution that no one would ever suspect. This hack transforms a common decorative item into an ultimate discreet hiding spot. To begin, select a large, solid candle – the bigger and more opaque, the better for concealing your secret. Carefully, using a drill fitted with a flat wood bit, carve out a circular hole from the bottom center of the candle. Ensure the hole is deep enough to accommodate a small, sturdy canister or container. This container will be the actual housing for your spare key. Once the hole is perfectly sized, insert your chosen canister into this cavity, placing your key securely inside it. The next critical step is to make this hiding spot undetectable. Find a flat, rigid object, such as a piece of cardboard, plastic, or even a thin piece of wood, that can snugly cover the opening you drilled. For an added layer of camouflage, peel off the original sticker from the candle’s bottom and reapply it over your newly installed cover. This small detail ensures that the candle appears completely untouched. Finally, return the candle to its holder, and you’ll have a perfectly disguised emergency key ready for when you need it most, blending seamlessly with your home decor.
Step 2: Transform a Picture Frame into a Hidden Jewelry Safe
Jewelry and small keepsakes often need a secure yet accessible place. This clever hack turns an ordinary picture frame into an ingenious secret compartment, perfect for delicate items. Start by carefully disassembling an old picture frame. Remove the backing, the picture, and the glass. The key to this trick lies in repurposing the frame’s components. Attach the top border of the frame’s backing to the picture itself, creating a subtle handle. This will allow you to slide the picture upwards or sideways, revealing the hidden space behind it. Once this handle is secured, reassemble the frame, but instead of placing the picture directly against the glass, leave a small gap. You can use small spacers or create a new, slightly recessed backing. This gap is where your treasures will reside. You can even add small hooks or fabric pouches to the new backing to hang earrings, necklaces, or secure other small items. When the picture is slid back into place, your jewelry becomes completely invisible, protected within what appears to be a simple, decorative photo display. This method is ideal for keeping precious items safe from casual observers while keeping them easily accessible to you.
Step 3: Create a Secret Drawer Compartment with a Hairbrush Handle
Every home has drawers, making them excellent candidates for secret compartments. This hack leverages a common item – a hairbrush – to create an incredibly convincing hidden space within a drawer. Begin by taking an old hairbrush. Using a heat gun (or a powerful hairdryer), carefully apply heat to the handle until it becomes pliable. Gently bend the handle into a curved or L-shape; this will serve as your discreet pull tab. Next, measure and cut a piece of wood that perfectly fits inside your drawer, creating a false bottom. This piece of wood should be slightly raised from the actual drawer bottom, creating a cavity underneath. Secure this false bottom in place, ensuring it fits snugly but can still be removed. Now, apply strong adhesive, such as hot glue, to the bent hairbrush handle and firmly attach it to the top of your newly created false bottom. The hairbrush will act as a clever, camouflaged handle, allowing you to lift the false bottom and reveal the secret compartment below. This space is ideal for hiding snacks, important documents, small gadgets, or anything you wish to keep out of sight and securely tucked away in an unexpected spot. The beauty of this hack is its sheer simplicity and how naturally the “hairbrush” blends into a typical drawer’s contents.
Step 4: Disguise Treats and Candies in a Mayonnaise Jar
For those times when you want to keep your favorite treats and candies safe from family members or housemates, this trick is both hilarious and effective. The premise is simple: nobody wants to reach for an old mayonnaise jar looking for a snack! Start by thoroughly washing an empty mayonnaise jar. Remove all labels and ensure it’s spotless and completely dry. The next step is crucial for making it opaque: spray paint the inside of the jar with white paint. This interior coating will prevent anyone from seeing the contents from the outside, maintaining the illusion of a full mayonnaise jar. Allow the paint to dry completely, which typically takes about 30 minutes, or longer if necessary, to ensure there’s no lingering paint odor or tackiness. Once dry, fill the jar with your preferred treats, candies, or any other small items you wish to keep hidden. Place the lid back on tightly, and then return the disguised jar to its rightful place in the fridge or pantry. This method relies on psychological deterrence; the appearance of a half-used mayonnaise jar is usually enough to ward off curious hands, leaving your stash perfectly untouched for you to enjoy.
Bonus: DIY Rotating Food Tray for Easy Access and Organization
While not a hiding trick, this bonus hack offers an incredibly practical and space-saving solution for your kitchen or pantry, making items easily accessible and neatly organized. It’s perfect for adding convenience to dinner parties or just for everyday use. To construct this useful rotating tray, you’ll need two jar lids and a fidget spinner. Begin by placing one jar lid on a flat surface with its open side facing downwards. This will form the stable base. Take your fidget spinner and apply a generous amount of hot glue to its center, then firmly attach it to the bottom-facing jar lid. Ensure it’s centered for optimal balance and smooth rotation. Next, apply hot glue to the top of the fidget spinner and attach the second jar lid, this time with its open side facing upwards. This lid will serve as the connection point for your tray. Once the glue has set and the spinner is securely integrated between the two lids, place a serving tray on top of the uppermost lid. Distribute your food items, condiments, or spices onto the tray, and your DIY rotating food tray is complete! It’s now ready to be used, allowing everyone at the table to easily access items with a simple spin, reducing clutter and enhancing convenience.
These brilliant DIY hacks offer more than just a place to store your items; they provide a sense of security, privacy, and a dash of clever ingenuity to your everyday life. From safeguarding your keys in an unassuming candle to protecting your jewelry within a disguised picture frame, these methods prove that the best hiding spots are often right in front of us, cleverly camouflaged. The drawer compartment with its secret hairbrush handle and the mayonnaise jar guarding your treats demonstrate that creativity can turn ordinary household objects into extraordinary secret keepers. Even the bonus rotating tray, while not for hiding, exemplifies how simple modifications can drastically improve organization and accessibility. Each project encourages you to look at your surroundings with a fresh, inventive perspective, transforming your home into a more secure and functional space. With minimal effort and common materials, you can implement these tricks today and enjoy the peace of mind that comes with knowing your valuables are safe and your space is optimized. Dive into these DIY projects and discover the satisfaction of creating truly unique and practical solutions for your home.
*All images featured in this guide are credited to Blossom via YouTube. Be sure to visit their channel and subscribe for even more creative and inspiring DIY content!