
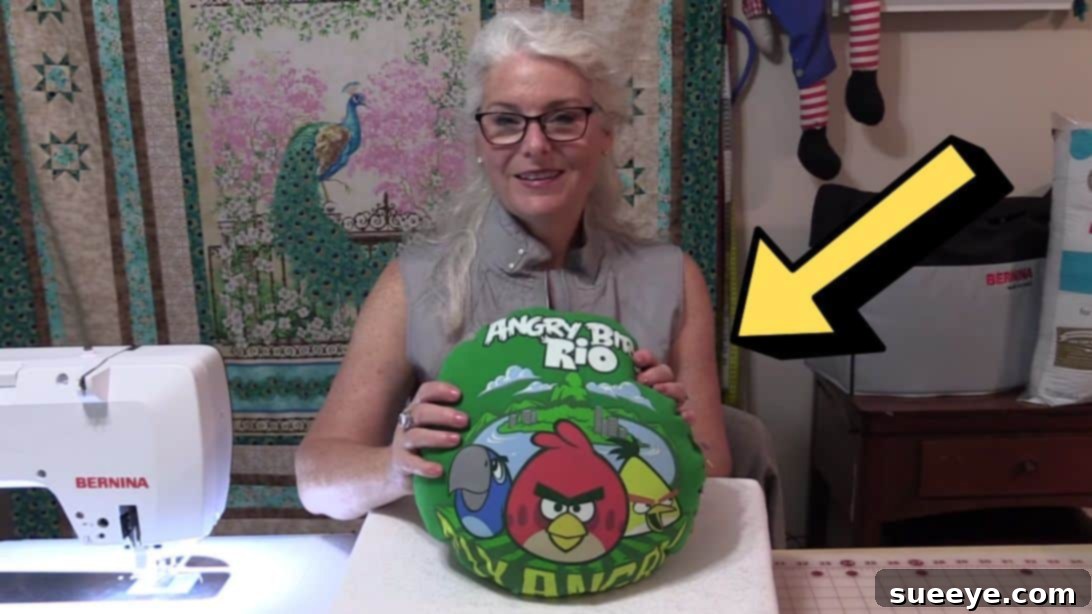
Transform Your Old T-Shirt into a Cozy Pillow: An Easy DIY Sewing Project
Do you have a collection of old t-shirts with sentimental value, perhaps from concerts, vacations, or cherished events, gathering dust in your closet? Instead of letting them go to waste, why not give them a new purpose and transform them into unique, comfortable pillows? This rewarding upcycling project is not only environmentally friendly but also incredibly simple, making it perfect for sewing enthusiasts of all skill levels, especially beginners.
Inspired by the clear instructions from SewVeryEasy on YouTube, this guide will walk you through the entire process. With just a few basic sewing materials and straightforward steps, you can create a personalized accent pillow that adds character and a touch of nostalgia to any room. Let’s dive into how you can turn those beloved old tees into cozy, custom home decor.
Why Upcycle Your Old T-Shirts into Pillows?
Beyond the joy of crafting, repurposing old t-shirts into pillows offers numerous benefits:
- Sustainability and Eco-Friendliness: By upcycling, you actively reduce textile waste, diverting clothes from landfills and lessening your environmental footprint. It’s a small step towards a more sustainable lifestyle.
- Preserve Cherished Memories: An old t-shirt often holds precious memories. Turning it into a pillow allows you to keep those memories tangible and visible, rather than tucked away in a drawer. It’s a fantastic way to honor milestones, special events, or favorite brands.
- Personalized Home Decor: Store-bought pillows can be generic. A DIY t-shirt pillow, however, is truly unique. It reflects your personality, hobbies, and style, adding a distinctive touch that perfectly complements your home decor.
- Budget-Friendly Crafting: This project primarily uses materials you might already own—an old t-shirt and some basic sewing supplies. This makes it an incredibly cost-effective way to refresh your living space without breaking the bank.
- Beginner-Friendly Project: The steps involved are fundamental sewing techniques, such as cutting, simple straight stitching, and stuffing. It’s an excellent entry point for those new to sewing machines and a confidence booster for budding crafters.
- Creative Expression: While the core process is simple, there’s ample room for creativity. You can experiment with different pillow shapes, add embellishments, or combine multiple t-shirts for a patchwork effect, making each pillow a true work of art.
Embrace the satisfaction of creating something beautiful and functional from something old. This project isn’t just about making a pillow; it’s about storytelling, sustainability, and personal flair.
Essential Materials for Your T-Shirt Pillow Project
Before you begin sewing, it’s crucial to gather all your materials. Most of these items are readily available at craft stores or might already be in your sewing kit. Selecting the right tools and supplies will ensure a smooth and enjoyable crafting experience.
- An Old T-shirt: The star of your project! Choose a t-shirt that is clean, free from major damage (unless you plan to strategically patch it), and ideally made from cotton or a cotton blend. These fabrics are generally easy to work with and hold their shape well once stabilized. Consider the size of the t-shirt relative to your desired pillow size; a larger pillow will require a larger shirt.
- Scissors or Rotary Cutter and a Cutting Mat: For precise fabric cutting, sharp fabric scissors are a must. For those seeking even greater accuracy and efficiency, especially with straight lines, a rotary cutter paired with a self-healing cutting mat is highly recommended.
- Wax Paper (or Pattern Paper/Cardboard): This material will serve as your template. Wax paper is lightweight and easy to cut. Alternatively, you can use sturdy paper, cardboard, or even tailor’s pattern paper for creating your desired pillow shape.
- Marking Pen (or Fabric Chalk/Pencil): To accurately trace your pillow shape onto the t-shirt fabric without leaving permanent marks, use a washable fabric marking pen, tailor’s chalk, or a disappearing ink fabric marker.
- Fusible Fleece (or Medium-Weight Interfacing): This is a key ingredient for stabilizing the stretchy knit fabric of your t-shirt. Fusible fleece adds body, helps the pillow maintain its shape, and makes the t-shirt much easier to sew without stretching or distorting. Choose a medium-weight, iron-on variety.
- Poly-fil Fiberfill (or Other Stuffing Material): The traditional choice for creating soft, plush pillows. A good quality polyester fiberfill provides excellent loft and resilience. As alternatives, you could use shredded fabric scraps, leftover stuffing from old pillows, or even buckwheat hulls for a firmer, more supportive pillow.
- Needle and Matching Thread: A universal sewing machine needle (size 80/12 or 90/14) is suitable for most t-shirt fabrics. Select a durable polyester all-purpose thread that either closely matches the color of your t-shirt for an inconspicuous seam or contrasts for a decorative touch.
- Sewing Machine: While hand-sewing is an option for very small pillows or specific finishing touches, a sewing machine will significantly speed up the process, provide stronger seams, and yield a more professional finish for the main construction.
- Iron and Ironing Board: Essential for pressing the t-shirt fabric to remove wrinkles and, most importantly, for securely fusing the fleece to the fabric. A well-pressed fabric is easier to work with and results in a smoother final product.
Step-by-Step Guide: Crafting Your T-Shirt Pillow
Now that you have all your materials ready, let’s begin the exciting process of transforming your old t-shirt. Follow these detailed instructions carefully to ensure a beautiful and long-lasting finished pillow.
Step 1: Preparing Your T-Shirt and Creating the Pillow Template
This initial phase is critical for accurate cutting and setting the foundation for your pillow. Precision here will make the subsequent sewing steps much smoother.
- Inspect and Prepare Your T-Shirt: Lay your chosen old t-shirt flat on a clean, hard surface. Smooth out any wrinkles. Decide exactly which graphic, design, or portion of the t-shirt you want to feature prominently on your pillow. Ensure the chosen area is centered and appealing.
- Design Your Pillow Template: Take your wax paper or chosen template material. Place it directly over the desired design area on the front of your t-shirt. Using your marking pen, carefully trace the outline of your intended pillow shape and size onto the wax paper. Standard pillow sizes like 16×16 inches or 18×18 inches are popular, but you can choose any custom dimension or shape (square, rectangle, circle). This template will represent the *finished* size of your pillow.
- Cut Out the Template: Neatly cut along the lines you traced on the wax paper. This cutout is now your precise template, which you will use as a guide for cutting both the t-shirt fabric and the fusible fleece. Set it aside for immediate use.
- Disassemble the T-Shirt: Using your sharp scissors or rotary cutter, carefully cut the t-shirt into flat panels. Cut along the side seams, shoulder seams, around the neckline, and remove the sleeves and bottom hem. Your goal is to obtain flat pieces of fabric from both the front and back of the t-shirt that are large enough for your pillow.
- Press the Fabric Pieces: Using your iron, thoroughly press both the front and back t-shirt fabric panels. This step removes creases and ensures the fabric is smooth and flat, which is essential for accurate cutting and to prevent distortion when fusing the fleece. If your t-shirt has a screen-printed design, always press from the *backside* of the fabric to avoid damaging or melting the print. A pressing cloth can add an extra layer of protection.
Step 2: Fusing the Fleece, Sewing, Stuffing, and Finishing Your Pillow
With your t-shirt panels prepared, it’s time to bring your pillow to life through fusing, stitching, and stuffing.
- Cut Fabric and Fuse Fusible Fleece: Lay your prepared front and back t-shirt pieces flat, wrong side up. Place your wax paper template on top of each fabric piece, centering it over the desired design. Using your marking pen, trace around the template. Now, add your desired seam allowance (typically 1/2 inch or 5/8 inch) *around* the traced line, and cut out two identical pieces of t-shirt fabric. Next, take your fusible fleece. Using your template, cut out two pieces of fusible fleece that are the *exact same size* as your template (i.e., the finished pillow size, without seam allowance). Place one piece of fusible fleece (adhesive side down) onto the wrong side of one t-shirt panel, centering it. Repeat for the second t-shirt panel. Following the fusible fleece manufacturer’s instructions, use a warm iron to firmly press and fuse the fleece to the t-shirt fabric. This step is critical; it stabilizes the stretchy knit, making it much easier to sew accurately and ensuring the pillow holds its shape.
- Sew the Pillow Panels Together: Once the fleece is fused and the fabric has cooled, place your two t-shirt panels right sides together, aligning all raw edges precisely. Pin them securely in place around the entire perimeter, paying extra attention to curves or corners to prevent shifting. Using your sewing machine, stitch around the outer edges of the pillow. Use your chosen seam allowance (e.g., 1/2 inch). Crucially, remember to leave an opening of approximately 4 to 6 inches along one edge. This gap is essential for turning the pillow right side out and for stuffing it later. Make sure to backstitch at the beginning and end of your seam, and at both sides of this opening, to reinforce the stitching and prevent it from unraveling when you turn the fabric.
- Trim Seams and Turn Right Side Out: Carefully trim the seam allowances down to about 1/4 inch, especially if your t-shirt fabric is bulky. For square or rectangular pillows, clip the corners diagonally close to your stitching line (without cutting through it) to reduce bulk and create sharp, crisp corners when turned. For circular or curved pillows, make small notches or snips around the curve in the seam allowance to help it lie flat. Now, reach into the opening you left and gently pull the entire pillow cover right side out. Use a turning tool, a chopstick, or the blunt end of a pencil to carefully push out all the corners and edges, ensuring they are well-defined and smooth.
- Stuff Your Pillow: Begin stuffing your pillow cover with the poly-fil fiberfill. Start by pushing small handfuls of fiberfill into all the corners and edges first, ensuring they are firmly filled to avoid a saggy appearance. Gradually add more fiberfill, fluffing and distributing it evenly as you go, until the pillow reaches your desired firmness. Avoid overstuffing, which can make the pillow too hard and distort its shape, or understuffing, which can leave it feeling limp and lumpy. Take your time during this step to achieve a smooth, consistent, and comfortable fill.
- Close the Opening: Once your pillow is perfectly stuffed, the final step is to close the opening you left. You have two primary methods:
- Hand-Sewing (Invisible/Ladder Stitch): For a nearly invisible and professional finish, hand-sew the opening closed using a ladder stitch (also known as a blind stitch). Fold the raw edges of the opening inwards, aligning them with the previously sewn seam line. Use a needle and matching thread to meticulously stitch the opening closed, picking up small bits of fabric from each folded edge alternately, so the stitches are hidden within the fold.
- Machine Topstitching: For a quicker and more durable closure, you can machine topstitch the opening. Fold the raw edges inwards, pin them securely, and then stitch very close to the edge of the opening using your sewing machine. This will create a visible stitch line, which can be a decorative feature if desired, and offers a strong, secure closure.
Pro Tips and Creative Variations for Your T-Shirt Pillow
Take your t-shirt pillow project to the next level with these expert tips and inspiring ideas:
- Experiment with Pillow Shapes: Don’t limit yourself to basic squares or rectangles. Try creating a circular, heart-shaped, or even a star-shaped pillow. Remember that curved seams require careful cutting and slightly more intricate sewing to ensure a smooth finish.
- Combine Multiple T-Shirts: If you have several t-shirts with small graphics or patterns you love, consider cutting them into squares or strips and piecing them together to create a unique patchwork pillow. This is a fantastic way to honor many memories in one cozy creation.
- Add Embellishments: Before sewing your pillow panels together, personalize your pillow even further. You could appliqué additional fabric shapes, sew on decorative patches, add fringe or piping around the edges, or even embroider details to enhance the design.
- Consider a Removable Cover: While this tutorial creates a permanent pillow, you can easily adapt it for a removable cover. Simply add an invisible zipper or an envelope-style back closure to one of the back panels before sewing the sides together. This allows for easier cleaning and the ability to change covers seasonally.
- Troubleshooting Stretchy Fabric: Knit fabrics, like those found in t-shirts, can be notoriously stretchy and prone to distortion. The fusible fleece is your best friend here. Additionally, using a walking foot on your sewing machine can help feed the layers of fabric evenly, preventing puckering. Sewing with a slightly longer stitch length (e.g., 2.8-3.0 mm) can also minimize stretching.
- Care Instructions: Since your pillow is made from a t-shirt, it can likely be washed. To preserve its shape and the integrity of the stuffing, it’s generally best to machine wash on a gentle cycle with cold water. Tumble dry on low or, even better, air dry your pillow by laying it flat to prevent lumps and maintain its form.
- Use Non-Slip Underlay: When cutting stretchy fabric, placing a non-slip rug pad or a piece of shelf liner under your t-shirt fabric on the cutting mat can help prevent it from shifting, leading to more accurate cuts.
Conclusion: Your Upcycled Masterpiece Awaits!
Congratulations on completing your t-shirt pillow! You’ve successfully transformed an old, forgotten garment into a stylish, meaningful, and functional piece of home decor. This project is a testament to the power of DIY and upcycling, proving that with a little creativity and effort, you can breathe new life into items destined for disposal.
Beyond the tangible pillow you’ve created, there’s immense satisfaction in the process itself—the joy of crafting, the sense of accomplishment, and the knowledge that you’ve contributed to a more sustainable world. Your new t-shirt pillow isn’t just a cushion; it’s a conversation starter, a memory keeper, and a symbol of your resourcefulness.
We encourage you to continue exploring the world of upcycling and sewing. Each project offers a chance to learn, grow, and express your unique style. For more fantastic sewing tutorials and inspiration, don’t forget to visit SewVeryEasy’s YouTube channel, where you’ll find a treasure trove of creative ideas. Happy crafting, and enjoy your beautifully upcycled creation!