
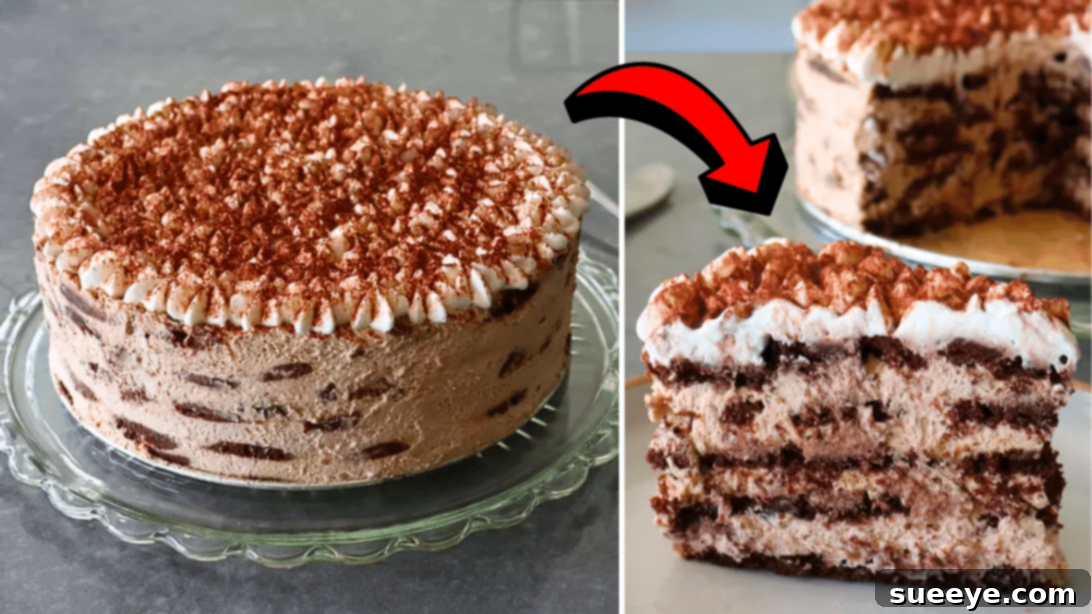
There’s something uniquely satisfying about a dessert that delivers incredible flavor without the fuss of an oven. Enter the icebox cake—a culinary marvel that simplifies indulgence. This no-bake wonder is a testament to the fact that you don’t need extensive baking experience or specialized equipment to create a truly memorable treat. Perfect for any occasion, from bustling parties to a quiet evening craving, icebox cakes promise effortless deliciousness that captures hearts and taste buds alike.
Today, we’re diving into a particularly enticing variant: the Mocha Chip Icebox Cake. Imagine the rich, deep notes of coffee mingling harmoniously with the comforting sweetness of chocolate, all in a creamy, chilled dessert. This recipe isn’t just easy; it’s a game-changer for anyone who loves the classic mocha combination but shies away from complex baking projects. It’s a delightful fusion of flavors and textures, with layers of luscious mocha cream and crisp chocolate chip cookies softening into a cake-like consistency as it chills. This particular version, inspired by the culinary brilliance of Food Wishes on YouTube, is guaranteed to become a household favorite.
Why Icebox Cakes Are the Ultimate No-Bake Dessert
Icebox cakes have a storied history, dating back to the early 20th century when home refrigeration became more common. They were conceived as convenient, cooling desserts, perfect for warmer climates or simply when an oven wasn’t an option. Their enduring popularity stems from several key advantages:
- Effortless Preparation: The primary appeal lies in their simplicity. No complicated techniques, no precise oven temperatures to monitor. If you can mix and layer, you can make an icebox cake.
- Perfect for Summer: When the weather heats up, the last thing many people want is to turn on a hot oven. Icebox cakes are chilled and refreshing, making them ideal for picnics, barbecues, and outdoor gatherings.
- Make-Ahead Convenience: These desserts actually improve with time. They require a significant chilling period, which means you can prepare them a day or even two in advance, freeing up your time on the day of your event.
- Versatility: The basic concept of layering cookies or wafers with a creamy filling is incredibly adaptable. You can experiment with countless flavor combinations, from classic chocolate and vanilla to fruit-infused creations.
- Kid-Friendly Activity: The layering process is simple enough for children to help with, making it a fun family activity that results in a delicious reward.
This Mocha Chip Icebox Cake exemplifies all these benefits, offering a sophisticated flavor profile with remarkably little effort.
The Irresistible Allure of Mocha Chip: A Flavor Sensation
The mocha flavor profile is a beloved classic, expertly blending the bold, earthy notes of coffee with the sweet, rich indulgence of chocolate. When translated into an icebox cake, this combination creates a dessert that is both invigorating and deeply comforting. The subtle bitterness of coffee cuts through the sweetness, preventing the cake from being overly cloying, while the chocolate provides a familiar and satisfying depth.
The addition of chocolate chip cookies to this mocha equation introduces an essential textural component. As the cake chills, the cookies absorb moisture from the cream, transforming from crisp biscuits into soft, cake-like layers. However, the chocolate chips within the cookies retain a slight chewiness, providing delightful pockets of concentrated chocolate flavor and an interesting contrast to the smooth cream. This interplay of textures and temperatures—cool, creamy, soft, and slightly chewy—is what makes each bite of the Mocha Chip Icebox Cake an absolute delight. It’s a dessert that truly speaks to both coffee aficionados and chocolate lovers, offering the best of both worlds in a single, magnificent slice.
Essential Ingredients for Your Delicious Mocha Chip Icebox Cake:
Crafting this exquisite icebox cake starts with a selection of readily available ingredients, each playing a crucial role in the final flavor and texture:
- 1/3 cup of white sugar: Provides the fundamental sweetness, balancing the bitterness of coffee and cocoa.
- 1 tsp of instant coffee powder: The star of our mocha flavor. Opt for a good quality instant espresso powder or fine-ground instant coffee for the best results. It dissolves easily and infuses a robust coffee essence into the cream.
- 1 tbsp of unsweetened cocoa powder: Adds the rich chocolate notes. Using unsweetened cocoa allows you to control the overall sweetness of the cake.
- 1 tsp of pure vanilla extract: A universal flavor enhancer that elevates and harmonizes the coffee and chocolate, adding a touch of aromatic warmth.
- 3 tbsp of coffee liqueur: This ingredient is key for a deeper, more complex coffee flavor and contributes to the cream’s smooth consistency. Kahlúa or Tia Maria are popular choices. For an alcohol-free alternative, you could use a strong brewed coffee, cooled, or a coffee-flavored syrup, though the nuanced flavor will be slightly different.
- 2 cups of heavy cream, cold: The backbone of our creamy filling. It’s imperative that the heavy cream is very cold, as this ensures it whips up properly into stiff peaks, giving the cake its structure and luscious texture.
- 12 oz of mascarpone cheese or cream cheese: Mascarpone cheese offers unparalleled richness and a silky texture. If mascarpone isn’t available, full-fat cream cheese can be used as a substitute, providing a slightly tangier flavor and denser texture, but still yielding a delicious result. Ensure it’s softened slightly to avoid lumps.
- 4 (8 oz) packages of chocolate chip cookies: These form the foundational layers of our “cake.” Choose your favorite brand of crisp chocolate chip cookies. The quantity is important to ensure you have enough for multiple layers and to fill in any gaps.
How to Make Mocha Chip Icebox Cake: A Step-by-Step Guide
Follow these detailed steps to create your own irresistible Mocha Chip Icebox Cake. Patience during the chilling phase is key to success!
Step 1: Preparing the Mocha Cream Base
Begin by assembling your initial cream mixture. In a large, clean mixing bowl, combine the white sugar, instant coffee powder, unsweetened cocoa powder, pure vanilla extract, coffee liqueur, and the very cold heavy cream. The coldness of the heavy cream is paramount here, as it allows the cream to whip up properly and hold its structure. Using a handheld mixer or a stand mixer fitted with a whisk attachment, beat the ingredients together on medium-high speed. Continue mixing until the mixture thickens considerably and reaches a consistency just before soft peaks begin to form. At this stage, the cream should be noticeably thicker but still somewhat fluid.
Step 2: Incorporating Mascarpone for Richness and Structure
Once your mocha cream base has reached the desired consistency, carefully add the mascarpone cheese (or cream cheese, if using). Fold it in gently at first to combine, then resume beating with the mixer. Continue to beat until stiff peaks form. Stiff peaks mean that when you lift the beaters, the cream stands up straight and holds its shape firmly. Be careful not to overmix, as this can cause the cream to become grainy or separate. Immediately after reaching stiff peaks, place the bowl of mocha cream mixture into the refrigerator to chill while you prepare your pan. Meanwhile, take a 9-inch springform pan and line its bottom with a circle of parchment paper. This step is crucial for easy removal of the finished cake.
Step 3: Layering the Mocha Chip Icebox Cake
Now comes the fun part: assembly! Retrieve your chilled mocha cream and prepared springform pan. Arrange approximately 8 whole chocolate chip cookies in a single layer at the bottom of the pan, forming the base. It’s okay if there are small gaps between the cookies. To fill these, strategically break a few additional cookies into smaller pieces and nestle them into the spaces, creating a solid, relatively even cookie layer. Next, scoop about a quarter of the mocha cream mixture over the cookie layer. Using an offset spatula or the back of a spoon, gently spread the cream evenly to the edges of the pan, ensuring it covers all the cookie pieces. Repeat this process three more times, creating three additional layers of cookies (filling gaps) and mocha cream. You should aim for a total of four cookie layers and four cream layers, finishing with a final layer of cream.
Step 4: Chilling and Serving Your Masterpiece
After your final layer of mocha cream has been spread, place another layer of whole chocolate chip cookies on top to finish the cake. Gently press down to ensure everything is settled. Once assembled, loosely cover the springform pan with plastic wrap, ensuring it doesn’t touch the top of the cake if possible. Place the cake in the refrigerator to chill for an extended period—ideally between 12 to 24 hours. This crucial chilling time allows the cookies to soften and absorb the moisture from the cream, transforming into a tender, cake-like texture, and allows the flavors to meld beautifully. When you’re ready to serve, carefully run a thin, sharp knife around the inner edge of the springform pan to loosen the cake from the sides. Release the springform, gently lift the cake, and remove the parchment paper. Slice the cake into desired portions, serve, and savor every delicious bite of this no-bake wonder!
Tips for a Perfect Mocha Chip Icebox Cake
Even though icebox cakes are straightforward, a few expert tips can elevate your Mocha Chip Icebox Cake from good to absolutely phenomenal:
- Quality Ingredients Matter: Since this is a no-bake recipe, the flavors of your raw ingredients shine through. Use high-quality instant coffee, rich cocoa powder, and fresh heavy cream for the best taste.
- Ensure Cream is Very Cold: This cannot be stressed enough. Cold heavy cream whips up faster and achieves stiffer peaks, resulting in a more stable and airy cream mixture. You can even chill your mixing bowl and beaters for 15 minutes before starting.
- Don’t Overmix the Cream: Once stiff peaks form, stop mixing immediately. Overmixing can cause the cream to separate and become lumpy or buttery, losing its smooth texture.
- Choose Your Cookies Wisely: While any chocolate chip cookie will work, a crisp, slightly thinner cookie will soften into a more “cake-like” texture. Avoid overly soft or chewy cookies that might become mushy.
- Patience with Chilling: The 12 to 24-hour chilling period is non-negotiable. This is where the magic happens, allowing the cookies to fully absorb the cream and the flavors to meld into a harmonious whole. Rushing this step will result in a less satisfying texture.
- Even Layers: Take your time to spread the cream evenly over each cookie layer. This ensures that every slice has a balanced ratio of cream to cookie and looks visually appealing.
Creative Serving Ideas and Storage Tips
Once your Mocha Chip Icebox Cake is perfectly chilled and ready, there are many ways to present and store it to maximize enjoyment:
Serving Suggestions:
- Classic Dusting: A simple dusting of unsweetened cocoa powder or instant coffee powder over the top adds an elegant finish and reinforces the mocha theme.
- Chocolate Shavings: Garnish with delicate curls of dark chocolate for added visual appeal and an extra hit of chocolate.
- Coffee Beans: A few whole roasted coffee beans can be strategically placed for decoration, hinting at the coffee flavor within.
- Whipped Cream Dollop: Serve each slice with a small dollop of plain whipped cream to add another layer of richness and texture.
- Fresh Berries: The slight tartness of fresh raspberries or strawberries can provide a wonderful contrast to the rich mocha flavors.
- Pair with Beverages: This cake pairs beautifully with a hot cup of coffee, a cold glass of milk, or even a shot of espresso after dinner.
Storage Tips:
- Refrigeration is Key: Due to the dairy content, the Mocha Chip Icebox Cake must always be stored in the refrigerator.
- Airtight Container: To keep it fresh and prevent it from absorbing odors from other foods, store any leftovers in an airtight container or cover the springform pan tightly with plastic wrap.
- Shelf Life: Properly stored, the icebox cake will remain delicious for 3-4 days in the refrigerator. In fact, some argue it tastes even better on the second day as the flavors continue to develop.
- Freezing: While primarily a refrigerated dessert, individual slices can be frozen for longer storage. Wrap each slice tightly in plastic wrap, then aluminum foil, and store in a freezer-safe bag for up to 2-3 weeks. Thaw in the refrigerator for a few hours before serving.
*All these images are credited to Food Wishes via YouTube. Give his channel a visit and subscribe for more amazing recipes and culinary inspiration!
Embrace the Joy of No-Bake Desserts
The Mocha Chip Icebox Cake is more than just a recipe; it’s an invitation to experience the joy of effortless dessert making. It proves that culinary masterpieces don’t always require hours in the kitchen or complex baking techniques. With its rich mocha flavor, delightful creamy texture, and the satisfying crunch of chocolate chips, this no-bake cake is destined to impress your guests and satisfy your cravings.
Whether you’re a seasoned baker looking for a refreshing change, a beginner eager to create something impressive, or simply someone who appreciates a delicious dessert without the oven, this recipe is a perfect choice. So, gather your ingredients, follow these simple steps, and prepare to indulge in a slice of chilled perfection. This Easy No-Bake Mocha Chip Icebox Cake Recipe is a true testament to simple ingredients coming together to create extraordinary flavor.