
Do you have a pair of old jeans gathering dust in your closet, too worn for wear but too sentimental to throw away? Before you consider discarding them, think about the incredible potential they hold for creative upcycling! Denim is a remarkably durable and versatile fabric, making it an ideal candidate for a myriad of DIY projects. Instead of contributing to textile waste, you can transform those beloved old jeans into something genuinely useful and stylish for your home.
Imagine giving your denim a new life as a charming Denim Storage Box, a unique Floral Bouquet, a practical Everyday Tote Bag, or even a trendy Fanny Pack. The possibilities are truly endless. Today, we’re diving into an exceptionally rewarding project: crafting a DIY multipurpose organizer. This brilliant idea, inspired by the talented creators at TaLe Germany on YouTube, offers a fantastic way to declutter and organize various items in your living space.
This organizer boasts four generously sized pockets. You can place books, craft materials, papers, and different things in this organizer and hang it on your wall. It’s perfect for stashing away everything from your favorite books and magazines to essential craft materials, important papers, or even small toys. Designed to be easily hung on any wall, it not only helps you keep things tidy but also adds a rustic, personalized touch to your home decor. It’s a testament to how simple repurposing can lead to incredibly functional and aesthetically pleasing results.
Why Upcycle Your Old Denim? The Benefits of Sustainable Crafting
Upcycling, the process of transforming old, discarded items into new products of higher value, is more than just a craft; it’s a commitment to sustainability. When you choose to repurpose old denim, you’re not just making something beautiful; you’re also making a positive impact on the environment. The textile industry is known for its significant environmental footprint, from water consumption to waste generation. By extending the life cycle of your clothing, you directly reduce demand for new production and divert materials from landfills.
Beyond the environmental advantages, upcycling denim offers numerous personal benefits. It’s incredibly cost-effective, allowing you to create functional household items without spending money on new materials. It encourages creativity and problem-solving, providing a fulfilling sense of accomplishment. Each piece you create is unique, bearing the marks of its previous life and your personal touch. Plus, denim’s inherent durability means your upcycled creations, like this organizer, are built to last.
This particular project is a prime example of accessible sustainability. It’s wonderfully easy and beginner-friendly, requiring only basic sewing skills and readily available materials. Instead of letting old clothes go to waste, you’re giving them a meaningful second act. Just like the DIY Small Denim Laundry Basket, this organizer showcases how everyday items can be reimagined with a little creativity. One of its most appealing features is its ease of maintenance: simply toss it in the washing machine, and it will emerge looking fresh and ready to serve its purpose again.
Essential Materials for Your Denim Organizer
Gathering your materials is the first exciting step in any DIY adventure. For this multipurpose organizer, the beauty lies in its simplicity and the use of repurposed items. Here’s what you’ll need:
- Old Jeans: The star of our project! Choose a pair that’s beyond repair or too small/large to wear. Darker denim can give a more sophisticated look, while lighter washes offer a casual vibe. The amount of fabric needed will depend on the size of your jeans, but generally, one adult pair is sufficient.
- Old Shirt or Excess Fabric: This will serve as the lining for your organizer. Using an old shirt (cotton is ideal for durability and washability) adds another layer of upcycling to your project. Alternatively, any sturdy scrap fabric you have on hand can work beautifully. This lining will give your organizer a neat finish, hide raw seams, and add a bit of extra structure.
Additional Recommended Tools (for a smoother process):
- Sewing Machine (with denim needle recommended for thick seams)
- Sharp Fabric Scissors or Rotary Cutter
- Measuring Tape or Ruler
- Fabric Chalk or Marker
- Pins or Fabric Clips
- Iron and Ironing Board
- Matching Thread (strong polyester thread is best for denim)
- Seam Ripper (just in case!)
- Rectangular Cardboard (optional, for added back support)
Step-by-Step Guide: Crafting Your Multipurpose Denim Organizer
Follow these detailed instructions to transform your old jeans into a functional and stylish wall organizer. Precision and patience are key to achieving a professional-looking finish.
Step 1: Preparing Your Denim Base
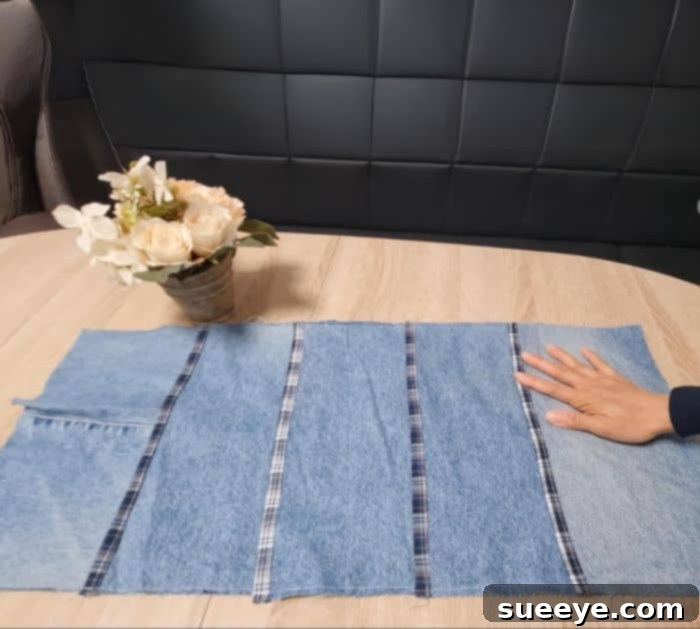
Begin by taking your old jeans. Lay them flat and carefully cut off both leg sections. To maximize your usable denim fabric, cut along the inseam and outseam lines of each leg. This will open up each leg into a flat, rectangular piece. Once you have two such pieces, place them right sides together, aligning the freshly cut edges, and sew them together along one long side. Use a sturdy stitch, ideally a straight stitch with a slightly longer stitch length, and a denim-specific needle if possible, as denim can be quite thick. This step creates a larger, continuous piece of denim fabric, forming the primary canvas for your organizer.
Step 2: Defining the Main Organizer Panel
With your newly sewn denim piece laid flat, ensure the longer dimension is horizontally in front of you. To create the main body of your organizer, we need a specific rectangular shape. Measure 13 inches from the center of one short edge. Mark this point. Now, draw a perfectly straight horizontal line from this mark across to the other short side, ensuring it’s parallel to the top and bottom edges. Carefully cut along this line. You should now have a robust, rectangular denim piece measuring approximately 13 inches in width, and the length will be determined by how much you were able to salvage from the jeans legs. This will be the back panel onto which the pockets will be attached.
Step 3: Crafting the Pocket Panels
From the remaining denim fabric, you will need to cut out four identical rectangular pieces that will form your pockets. Each pocket piece should measure 13 inches by 8 inches. Use a ruler and fabric marker to ensure precise measurements and straight cuts. Consistency in size is crucial here for a neat and symmetrical final product. These four pieces will provide ample storage once sewn onto the main panel.
Step 4: Preparing the Lining Fabric
Take your old shirt or chosen lining fabric and lay it out flat and smooth. Place the large rectangular denim fabric (from Step 2) directly on top of it, using it as a template. For the lining, you’ll need it to be 2.5 inches longer than your main denim piece, but the width should remain exactly 13 inches. This extra length is important as it will wrap around to create a neat, finished edge at the top of the organizer. Carefully cut out your lining fabric according to these dimensions, ensuring straight edges.
Step 5: Creating Professional Pocket Edges (Binding Strips)
From your remaining denim scraps or an additional piece of coordinating fabric, cut four strips, each measuring 2 inches wide and at least 13 inches long (or the full width of your pocket pieces). These strips will be used to create clean, finished top edges for your pockets. To prepare them, first fold each strip in half lengthwise, wrong sides together, and press firmly with a hot iron. Open the strip, then fold each raw long edge inwards towards the center crease you just created. Press again. Finally, fold the strip in half lengthwise once more, enclosing all raw edges. You should now have a neat, folded strip of fabric. Take one pocket fabric piece (from Step 3). Insert one long side of the pocket fabric into the fold of one prepared strip (this will be the top edge of your pocket). Stitch closely along the edge of the folded strip to secure it to the pocket. Repeat this process for all four pocket fabrics, ensuring that the top edge of each pocket has this clean, finished binding.
Step 6: Attaching the Pockets to the Main Panel
Now, it’s time to assemble the organizer. Lay your large rectangular denim fabric (the main back panel) flat. Carefully position your four prepared pocket fabrics on top, arranging them evenly with desired spacing. You can stack them slightly or place them with a small gap in between, depending on your preference for pocket depth. Use plenty of pins or fabric clips to securely hold each pocket in place. Begin stitching the pockets to the main panel, starting from the bottom edge of the very first pocket at the top. Sew along the bottom edge and up both vertical sides of the pocket. Continue this stitching pattern for all subsequent pockets, ensuring that your stitches are strong and straight. Double-check that you’re only sewing the pockets to the main panel and not through to the lining yet. This meticulous step ensures all items placed in the organizer will be held securely.
Step 7: Shaping the Top of the Organizer
To give your organizer an aesthetically pleasing and functional design reminiscent of an apron, fold the entire assembled denim piece in half lengthwise, ensuring all edges are aligned. From the top folded edge, measure down a few inches (e.g., 3-4 inches, adjust based on desired pointiness) along the fold, and mark a point. Now, draw a diagonal line from this mark on the fold out to the top corner of the opposite raw edge. Carefully cut along this diagonal line. When you unfold the denim, you will have a symmetrical, pointed top section, which not only looks professional but also makes it easier to hang.
Step 8: Attaching and Shaping the Lining
Lay your main denim organizer piece (with pockets attached and top shaped) face down. Place the pre-cut lining fabric (from Step 4) on top of the denim, aligning the bottom and side edges. Since the lining was cut 2.5 inches longer, it will extend beyond the pointed top of the denim. Carefully trim the lining fabric to precisely match the diagonal shape of the denim front panel, but leave the extra 2.5 inches at the very top. This extra length at the top needs to be prepared for binding. Fold the ends of this extended lining section twice towards the wrong side (about 0.5 inches each fold) and press firmly, then sew a neat hem. This creates a clean, finished edge for the top of the lining that will enclose the raw edges of the main organizer later. Pin the lining to the main denim piece, ensuring all raw edges around the perimeter are aligned.
Step 9: Final Assembly Stitching
With the lining securely pinned to the main denim piece, it’s time to stitch them together. Using a straight stitch, sew all the way around the perimeter of the organizer, leaving a small opening (approx. 3-4 inches) at the bottom or one side for turning it right side out. Ensure your seam allowance is consistent for a tidy finish. Once stitched, carefully clip the corners (but don’t cut through the stitches) and notch any curves if applicable, to help the fabric lay flat when turned. Turn the organizer right side out through the opening. Gently push out all corners and edges to ensure a crisp shape. Press the entire organizer with an iron, paying special attention to the seams. Finally, close the opening you left earlier by hand-stitching with a ladder stitch or by topstitching closely along the entire perimeter.
Step 10: Adding the Finishing Touches – Binding and Hanger
For an extra neat and durable finish, add a 2-inch wide binding all the way around the outer edge of your organizer. You can create this binding from leftover denim or a coordinating fabric, folding it similarly to how you prepared the pocket edges. Attach it carefully, ensuring it encases all raw edges beautifully. Next, create the hanger: cut a strip of denim approximately 8 inches long and 2 inches wide. Fold it lengthwise, press, and stitch the raw edges together to form a sturdy loop. Attach this loop securely to the top point of your organizer, reinforcing the stitches for strength, as it will bear the weight of your stored items.
Optional: Structural Support To ensure your organizer maintains its shape, especially when loaded with heavier items, you can insert a rectangular piece of cardboard into the back pocket created by the lining. Measure the internal dimensions of the back, cut a piece of sturdy cardboard to fit snugly, and carefully slide it in. This provides excellent rigidity and prevents sagging, keeping your organizer looking crisp and functional.
Personalize Your DIY Denim Organizer: Tips for Customization
While this guide provides a solid foundation for your multipurpose organizer, don’t hesitate to unleash your creativity and make it uniquely yours. Here are some ideas for personalization:
- Fabric Choices: Experiment with different washes of denim for a patchwork effect. For the lining, consider a patterned cotton fabric to add a pop of color or a fun design that complements your room’s aesthetic.
- Pocket Variations: You’re not limited to four identical pockets. You could make some pockets larger for magazines, smaller for pens, or even add a flap with a button closure for secure storage.
- Embellishments: Elevate your organizer with decorative touches. Sew on vintage patches, embroider a design, use fabric paint to add patterns, or attach decorative buttons and rivets for an industrial look.
- Hanger Style: Instead of a simple fabric loop, you could use a sturdy metal ring, a length of rope, or even a decorative wooden dowel inserted through loops at the top for hanging.
- Size Adjustments: Feel free to adjust the dimensions of the main panel and pockets to suit your specific storage needs. If you need a larger organizer for a craft room, use more denim; for a smaller one in a bathroom, scale down the measurements.
Conclusion: Upcycling for a Tidier and Greener Home
Creating this DIY multipurpose organizer from old jeans is a truly rewarding project. Not only do you get a highly functional and durable storage solution for your home, but you also contribute to a more sustainable lifestyle by giving new purpose to discarded textiles. This project exemplifies how simple acts of creativity can lead to significant positive impacts, both in decluttering your space and reducing environmental waste.
Whether you’re organizing your sewing supplies, keeping kids’ art materials in check, or simply tidying up your home office, this denim organizer offers a stylish and eco-conscious solution. It’s a fantastic beginner-friendly sewing project that builds confidence and delivers a tangible, useful outcome. So, raid your wardrobe for those old jeans, gather your tools, and embark on this wonderful upcycling journey. Share your creations and inspire others to embrace the joy of DIY and sustainable living!