
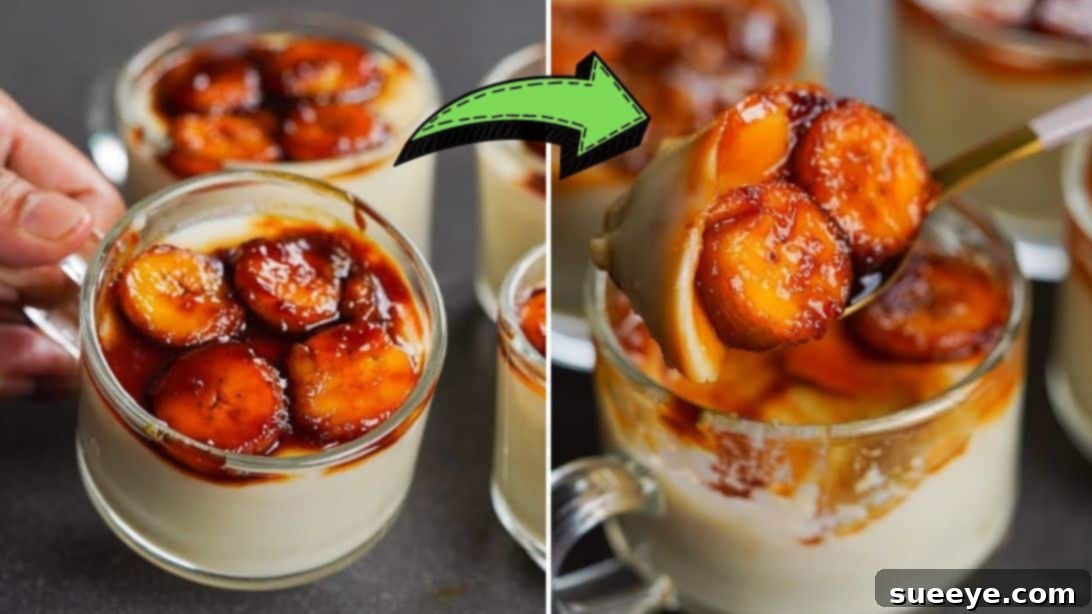
Prepare to revolutionize your perception of simple desserts with this extraordinary no-bake banana pudding cup recipe. Crafted to perfection and shared by the culinary innovators at N’Oven – Cake & Cookies on YouTube, this dessert is an absolute game-changer. It’s not just easy; it’s astonishingly delicious, making it the ultimate crowd-pleaser for any gathering, from casual family dinners to elegant parties. Both children and adults will find themselves reaching for seconds, unable to resist its creamy texture and delightful banana flavor. What truly sets this recipe apart is its incredible convenience: it’s a brilliant way to use up those ripe bananas lingering in your kitchen, requires no oven, and can be effortlessly prepared right on your stovetop. Say goodbye to complicated baking processes and hello to a hassle-free, utterly satisfying sweet treat that comes together in mere minutes. This recipe embodies the perfect blend of simplicity, taste, and versatility, proving that truly sensational desserts don’t always demand hours of labor.
This recipe is a testament to how humble ingredients can be transformed into something truly spectacular with minimal effort. Whether you’re a seasoned chef or a novice in the kitchen, you’ll find the steps straightforward and rewarding. The “no-bake” aspect is a huge advantage, especially during warmer months when turning on the oven is less than ideal, or when you’re simply short on time. It’s an ideal choice for last-minute dessert cravings or unexpected guests, allowing you to whip up a gourmet-tasting treat without any fuss. The combination of a silky-smooth banana pudding base and a luscious caramelized banana topping creates a symphony of textures and flavors that will tantalize your taste buds and leave everyone asking for the recipe. Dive into the world of easy, irresistible desserts with this delightful banana pudding creation, designed to bring joy and sweetness to any occasion.
Essential Ingredients for Your Delectable Banana Pudding Cups
Crafting this sensational no-bake banana pudding requires only a handful of everyday ingredients, proving that extraordinary flavors can stem from simplicity. We’ve divided the ingredients into two main sections: the rich, creamy pudding base and the irresistible caramelized banana topping. Each component plays a crucial role in building the layers of flavor and texture that make this dessert so special.
For the Creamy Banana Pudding Base:
- 2 Ripe Bananas: The star of our show! Choose bananas that are ripe with some brown spots, as these will be sweeter and easier to mash, imparting a richer, more intense banana flavor to your pudding. Overripe bananas are perfect for this, preventing food waste and maximizing taste.
- 2 cups of Milk: Full-fat milk will yield the creamiest, most decadent pudding, but you can opt for 2% or even a non-dairy alternative like almond or oat milk for a lighter version or dietary considerations. The milk forms the liquid base and contributes to the pudding’s luscious texture.
- 1/3 cup of Granulated Sugar: This provides the perfect level of sweetness, complementing the natural sugars in the bananas without overpowering them. Adjust to your preference, but this amount strikes a wonderful balance.
- ¼ cup of Cornflour (Cornstarch): The magical thickening agent! Cornflour is essential for achieving that classic pudding consistency – thick, smooth, and utterly spoonable. It ensures your pudding sets beautifully without the need for eggs or prolonged cooking.
For the Irresistible Caramelized Banana Topping:
- 1 Firm Banana: For the topping, we recommend a slightly firmer banana than those used for the pudding. This will allow it to hold its shape better when sliced and caramelized, providing a pleasant textural contrast to the soft pudding.
- 3 tablespoons of Granulated Sugar: This will transform into the golden, bubbly caramel, coating the banana slices in a sticky, sweet glaze. It’s the secret to that gourmet touch.
- 1 tablespoon of Water: A small amount of water helps dissolve the sugar evenly, initiating the caramelization process smoothly and preventing the sugar from burning too quickly.
- 1 teaspoon of Unsalted Butter: Added at the end of the caramelization, butter contributes a rich, nutty depth of flavor and a beautiful sheen to the caramel, making it even more appealing and luxurious.
Gathering these simple ingredients is the first step towards creating a dessert that will impress without stress. The beauty of this recipe lies in its accessibility and the way these humble components come together to form a truly extraordinary treat.
Step-by-Step Guide to Crafting Your Perfect Banana Pudding Cups
Follow these detailed instructions to create your delectable no-bake banana pudding cups. Each step is designed to be clear and easy to follow, ensuring a perfect result every time.
Step 1: Preparing the Velvety Banana Pudding Base
Begin by taking your two ripe bananas. Carefully peel off their skins, revealing the soft, sweet fruit within. Place the peeled bananas into a medium-sized mixing bowl. Using a sturdy fork, thoroughly mash the bananas until they reach a smooth, creamy consistency with minimal lumps. The riper the bananas, the easier this process will be, and the more intense the natural sweetness and flavor they will impart to your pudding. Once mashed, set these aside for a moment.
Next, retrieve a large, deep saucepan or pot. Place it on your stovetop and set the heat to medium to medium-high. Into this pan, pour the 2 cups of milk. Add the 1/3 cup of granulated sugar and the ¼ cup of cornflour. It is crucial at this stage to whisk these ingredients together vigorously and continuously until the cornflour is completely dissolved and no lumps remain. This initial whisking prevents lumps from forming as the mixture heats and thickens, ensuring a silky-smooth pudding.
Once the milk, sugar, and cornflour are well combined, gently fold in your previously mashed bananas. Give the entire mixture another good whisk, ensuring the mashed bananas are fully incorporated and evenly distributed throughout the liquid. Continue to cook this mixture over the medium to medium-high heat, stirring frequently with your whisk or a rubber spatula. The key here is patience; as the mixture heats, the cornflour will activate, causing the pudding to thicken. Keep stirring to prevent the bottom from scorching and to ensure even cooking. The pudding is ready when it reaches a thick, luscious consistency that coats the back of your spoon and gently bubbles. This usually takes about 8-12 minutes, depending on your stovetop’s heat.
As soon as the pudding has reached your desired thickness, remove the pan from the heat. Carefully pour the warm, creamy banana pudding evenly into small serving cups or ramekins. You can expect to fill approximately 4-6 cups, depending on their size. Set these filled cups aside on a cooling rack or a protected surface. Allow them to cool down completely to room temperature before moving them to the refrigerator. This step is vital to prevent condensation and ensure a perfect texture. While they are cooling, you can proceed to prepare the irresistible caramelized banana topping.
Step 2: Crafting the Caramelized Banana Topping and Assembly
For the topping, grab a separate clean and deep pan. Place it on your stove and set the heat to medium to medium-high. Add the 3 tablespoons of granulated sugar and the 1 tablespoon of water to the pan. Give them a good stir initially to combine the sugar and water. Then, resist the urge to stir further. Allow the mixture to heat gently until the sugar dissolves and begins to bubble. Watch closely as the mixture transforms from clear to a pale amber, then deepen to a rich, golden caramel color. This process typically takes about 3-5 minutes, but caramel can burn quickly, so remain attentive.
Once the caramel reaches a beautiful amber hue, remove the pan from the heat and immediately stir in the 1 teaspoon of butter. The butter will melt into the hot caramel, adding a wonderful richness and a glossy finish. Be careful as the mixture will be very hot and may bubble vigorously.
While your caramel is still warm, take your one firm banana. Peel off its skin, then slice it into even, round, bite-sized pieces, roughly ¼ to ½ inch thick. The uniform thickness will ensure they cook evenly. Carefully add these sliced banana pieces directly into the caramelized sugar mixture in the pan. Using a rubber spatula or tongs, gently toss the banana slices until each piece is beautifully coated in the warm, sticky caramel. Work quickly but gently to avoid mushing the bananas.
Now it’s time to assemble your masterpieces! Once the pudding cups have cooled sufficiently (they can be slightly warm, but ideally closer to room temperature), carefully scoop the caramelized banana slices from the pan and arrange them artfully on top of each pudding cup. Ensure an even distribution of those glistening, sweet banana pieces over the creamy base.
Your stunning and delicious no-bake banana pudding cups are now complete! Serve them immediately to enjoy the warmth of the caramel topping contrasting with the cool pudding, or chill them further in the refrigerator for at least 30 minutes to an hour for a truly refreshing dessert. Enjoy every luscious bite!
Serving and Storage Suggestions
To truly elevate your no-bake banana pudding cups, consider a few presentation and storage tips. For an extra touch of elegance, garnish each cup with a sprig of fresh mint, a sprinkle of toasted shredded coconut, or a dusting of cinnamon. A dollop of freshly whipped cream or a few chocolate shavings can also add another layer of flavor and visual appeal. These desserts are best enjoyed chilled, so if you’ve allowed them to cool completely at room temperature, transfer them to the refrigerator for at least an hour before serving to achieve the optimal refreshing taste and texture.
If you find yourself with leftovers – though that’s a rare occurrence with this irresistible treat! – cover the pudding cups tightly with plastic wrap or aluminum foil. They can be stored in the refrigerator for up to 2-3 days. While the flavors will remain delightful, the caramelized bananas might soften slightly over time. However, the pudding itself will maintain its creamy consistency beautifully.
Recipe Variations and Customizations
This 5-ingredient no-bake banana pudding cup recipe is wonderfully versatile, offering plenty of room for customization to suit your taste preferences or to add an extra twist.
- Spice It Up: A pinch of ground cinnamon or nutmeg added to the pudding base along with the cornflour can infuse a warm, comforting aroma and flavor that perfectly complements the bananas.
- Chocolate Lover’s Dream: Drizzle a little melted dark or milk chocolate over the caramelized bananas before serving. The combination of banana, caramel, and chocolate is simply divine. You could also mix a tablespoon of cocoa powder into the pudding base for a chocolate banana pudding.
- Nutty Crunch: Sprinkle some finely chopped toasted pecans, walnuts, or almonds over the top of the caramelized bananas for an added textural crunch and nutty flavor.
- Coconut Paradise: For a tropical twist, use coconut milk in place of regular milk for the pudding base. Top with toasted coconut flakes for an enhanced coconut experience.
- Biscuit Base: For an extra layer, crush some digestive biscuits or graham crackers and mix with a touch of melted butter. Press this mixture into the bottom of your serving cups before pouring in the pudding, creating a delicious crunchy base reminiscent of a cheesecake.
- Berry Blast: While bananas are the star, a few fresh berries like raspberries or blueberries could be added alongside the caramelized bananas for a burst of tartness and color.
Don’t be afraid to experiment with these variations to make this recipe truly your own. The core simplicity of the no-bake banana pudding makes it a fantastic canvas for culinary creativity.
*These amazing images are all credited to N’Oven – Cake & Cookies via YouTube. Check her other content and follow for more delightful recipes and inspiration!
The Ultimate 5-Ingredient No-Bake Banana Pudding Cup Dessert Recipe: Your New Favorite Sweet Treat
In conclusion, this 5-ingredient no-bake banana pudding cup dessert recipe is more than just a quick fix; it’s a testament to how simple ingredients, combined with a touch of passion, can create an unforgettable culinary experience. From its creamy, banana-infused pudding base to the warm, glistening caramelized banana topping, every spoonful offers a symphony of flavors and textures that will delight your senses. Its ease of preparation, requiring no baking and minimal effort on the stovetop, makes it an ideal dessert for any occasion, whether you’re hosting a grand party or simply craving a sweet treat after a long day.
Beyond its deliciousness, this recipe offers practical benefits, providing a clever and delicious way to utilize ripe bananas that might otherwise go to waste. It’s budget-friendly, time-saving, and delivers a gourmet result that belies its humble origins. We encourage you to try this recipe and discover for yourself the magic of this hassle-free dessert. Share it with loved ones, experiment with the suggested variations, and most importantly, savor every moment of its delightful taste. This banana pudding cup isn’t just a dessert; it’s an invitation to experience joy in the simplest, most delicious way possible. Enjoy creating and indulging in what is sure to become a staple in your dessert repertoire!