
The Ultimate Hot Cocoa Cookies: Your New Favorite Holiday Treat
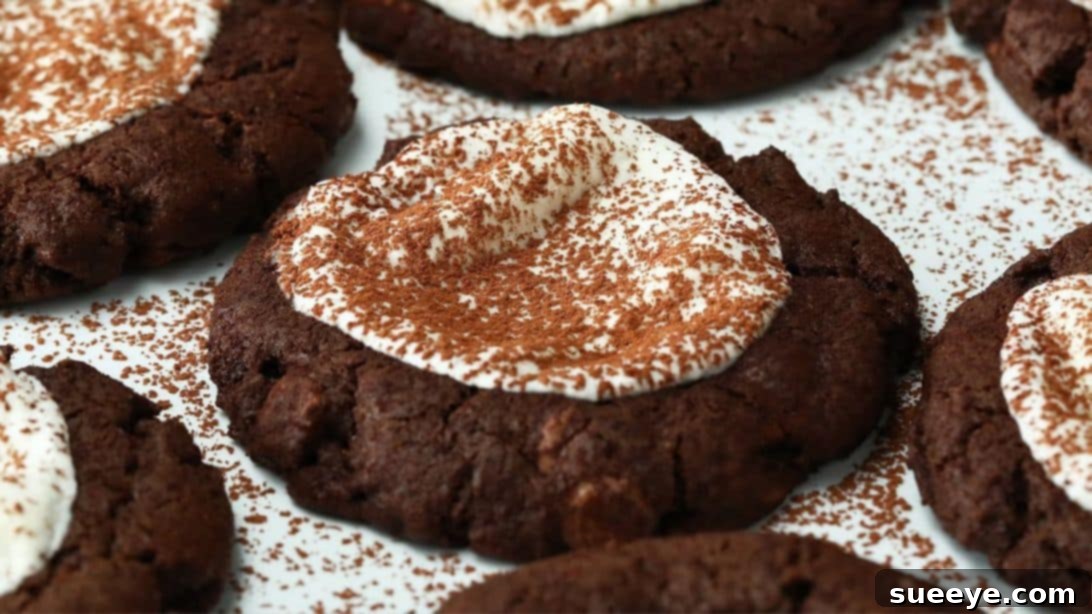
Who can resist the enchanting allure of a freshly baked cookie? Especially when it’s infused with the comforting essence of a warm mug of hot cocoa! These delightful Tasty-inspired hot cocoa cookies are destined to become a staple in your baking repertoire. From the very first glance, with their inviting chewy texture and glistening marshmallow topping, they promise a taste sensation that’s simply irresistible. This recipe consistently earns rave reviews, offering a rich, deep chocolate flavor that surpasses many conventional cookie recipes, perfectly complemented by pockets of gooey, melted marshmallow and a dusting of cocoa powder that makes each bite utterly heavenly.
Imagine your favorite cozy beverage transformed into a portable, delicious cookie. That’s exactly what these hot cocoa cookies deliver. They capture everything you cherish about a steaming cup of hot chocolate – the creamy sweetness, the robust cocoa notes, and the soft, cloud-like marshmallows – all in a convenient, cookie form. This makes them an absolutely perfect treat for the holiday season. Whether you’re looking for a heartfelt gift for friends and family, a show-stopping addition to a cookie exchange, or simply a comforting snack for a chilly evening, these Christmas cookies are guaranteed to be a hit. Don’t miss out on the opportunity to bake a batch at home and spread joy with this truly delicious dessert or snack.
RELATED: 7-Ingredient No-Bake Chocolate Oatmeal Cookie – For another easy and delightful chocolate treat, be sure to check out this quick no-bake option!
Why These Hot Cocoa Cookies Are a Must-Try
Beyond their undeniable deliciousness, there’s a certain magic to these hot cocoa cookies. They evoke a sense of warmth, nostalgia, and festive cheer that few other desserts can match. The combination of intense chocolate flavor with the unique texture of melted marshmallows creates an experience that’s both familiar and exciting. Unlike traditional chocolate chip cookies, the inclusion of cocoa powder directly in the dough, along with milk chocolate chips, ensures a multi-layered chocolate profile. The marshmallows, added during the baking process, transform into a sweet, slightly caramelized, and wonderfully gooey topping that perfectly mimics the top of a real hot cocoa drink. They’re not just cookies; they’re an experience, a miniature celebration in every bite.
Making them from scratch also allows you to control the quality of ingredients, ensuring the freshest, most flavorful outcome. Plus, the aroma that fills your kitchen while these are baking is an added bonus – it’s pure holiday bliss! This recipe is straightforward enough for novice bakers yet yields results that impress even the most seasoned dessert connoisseurs. Get ready to impress your loved ones and satisfy your sweet cravings with these exceptional hot cocoa cookies.
Essential Ingredients for Your Hot Cocoa Cookie Creation
Crafting the perfect hot cocoa cookie begins with selecting the right ingredients. Each component plays a vital role in achieving that rich flavor and ideal texture. Here’s a detailed look at what you’ll need to gather:
- 3/4 cup of Hershey’s cocoa powder (plus more for garnish): The heart of our chocolate flavor. Hershey’s provides a consistent, deep chocolate taste. An extra dusting at the end enhances both flavor and visual appeal, giving them that authentic hot cocoa look.
- 2 cups of all-purpose flour: The structural backbone of our cookies, providing the necessary body and chewiness.
- 1 teaspoon of baking soda: This leavening agent helps the cookies rise and spread slightly, ensuring a soft, tender interior.
- 1/2 teaspoon of salt: A crucial ingredient that balances the sweetness and intensifies the chocolate flavor, preventing the cookies from tasting overly sugary.
- 1 cup (2 sticks) of unsalted butter, softened: Essential for richness, flavor, and contributing to the cookies’ tender crumb. Ensure it’s softened to room temperature for proper creaming.
- 1 cup of granulated sugar: Provides sweetness and contributes to the crispy edges and chewy center of the cookies.
- 1/2 cup of light brown sugar: Adds a deeper, molasses-like flavor and helps keep the cookies moist and chewy due to its higher moisture content.
- 2 teaspoons of pure vanilla extract: A flavor enhancer that complements and rounds out the chocolate notes, adding warmth and complexity.
- 2 large eggs: Act as a binder, adding moisture and richness, contributing to the cookies’ structure and chewiness.
- 1 cup of Hershey’s milk chocolate chips: These melt into delectable pockets of creamy chocolate goodness, providing an extra layer of chocolatey indulgence.
- Approximately 20-24 standard-sized marshmallows: The iconic topping that melts into a gooey, sweet layer, transforming these into true hot cocoa cookies.
Step-by-Step Guide: How to Make Irresistible Hot Chocolate Cookies
Follow these detailed instructions to create your batch of spectacular hot cocoa cookies. Precision and care at each step will ensure the best possible results.
Step 1: Prepare Your Dry Ingredients
In a medium-sized mixing bowl, combine your dry ingredients: the rich 3/4 cup of Hershey’s cocoa powder, 2 cups of all-purpose flour, 1 teaspoon of baking soda, and 1/2 teaspoon of salt. Using a whisk, thoroughly blend these ingredients together until they are well combined and no streaks of unmixed flour or cocoa powder remain. This ensures even distribution of the leavening agent and flavor throughout the dough. Set this bowl aside for later.
Step 2: Cream Together Wet Ingredients
In a separate, larger bowl, add the softened 1 cup of butter, 1 cup of granulated sugar, and 1/2 cup of light brown sugar. Using an electric mixer (handheld or stand mixer with a paddle attachment), cream these ingredients together on medium speed until the mixture becomes light, fluffy, and pale in color. This process incorporates air, which is crucial for the cookies’ texture. Next, beat in the 2 teaspoons of vanilla extract and then add the 2 eggs, one at a time, mixing well after each addition until fully incorporated. Scrape down the sides of the bowl as needed to ensure everything is evenly mixed.
Step 3: Combine Wet and Dry Mixtures
Gradually add the dry ingredient mixture (from Step 1) into the wet ingredient mixture (from Step 2). Mix on low speed, or by hand with a spatula, until just combined. Be careful not to overmix the dough, as this can lead to tough cookies. Mix only until no dry streaks of flour are visible.
Step 4: Fold in Chocolate Chips and Chill the Dough
Gently fold in the 1 cup of Hershey’s milk chocolate chips using a spatula. Distribute them evenly throughout the dough. Once the chips are incorporated, cover the bowl with plastic wrap and place the dough in the freezer for about 10 minutes. This chilling step is important; it helps prevent the cookies from spreading too much during baking and allows the flavors to meld, resulting in a chewier cookie.
Step 5: Scoop, Shape, and Create Wells
While the dough is chilling, preheat your oven to 350°F (175°C) and line a baking sheet with parchment paper. This prevents sticking and ensures even baking. Remove the dough from the freezer. Using an ice cream scoop (a 2-tablespoon size works well), scoop rounded portions of the cookie dough and place them onto the prepared baking sheet. Make sure to space them about 2 inches apart to allow for spreading. With the palm of your hand, gently press each cookie ball flat. Then, using your index finger or the back of a teaspoon, create a small well or indentation in the center of each flattened cookie.
Step 6: Add the Marshmallows
Carefully place one marshmallow into the well you’ve created in the center of each cookie dough disc. There’s no need to press the marshmallow down; it will melt and expand beautifully during baking. Ensure each cookie has a marshmallow nestled in its center, ready to transform into a gooey topping.
Step 7: Bake to Perfection
Transfer the baking sheet to your preheated oven. Bake at 350°F (175°C) for approximately 10 minutes. Keep a close eye on them; the cookies are done when the edges are set and the marshmallows are puffed up, golden brown, and delightfully gooey. Baking times can vary slightly depending on your oven, so watch for these visual cues.
Step 8: Garnish and Serve
Once baked, carefully remove the hot cocoa cookies from the oven. While they are still warm, lightly sprinkle additional cocoa powder over the melted marshmallows and the surface of each cookie. This final touch not only enhances the chocolate flavor but also gives them that signature “hot cocoa” aesthetic. Allow the cookies to cool on the baking sheet for a few minutes before transferring them to a wire rack to cool completely. This helps them set and firm up, though they are undeniably delicious when served warm, allowing for maximum marshmallow gooiness!
Tips for Achieving the Perfect Hot Cocoa Cookies
- Don’t Overmix: Overmixing the dough after adding the flour can develop too much gluten, resulting in tough cookies. Mix only until the ingredients are just combined.
- Room Temperature Ingredients: Ensure your butter and eggs are at room temperature. This allows them to cream together properly, creating a smooth batter and a better cookie texture.
- Chill the Dough: Don’t skip the chilling step! It helps the cookies hold their shape, prevents excessive spreading, and enhances chewiness.
- Adjust Baking Time: Ovens vary. Keep an eye on your cookies, especially during the last few minutes. They should be just set at the edges, and the marshmallows should be puffed and lightly toasted. Overbaking can lead to dry cookies.
- Quality Cocoa: Using a good quality cocoa powder makes a significant difference in flavor. Hershey’s is a reliable choice for a rich, classic chocolate taste.
- Parchment Paper is Your Friend: Always line your baking sheets with parchment paper or a silicone baking mat. This ensures easy removal and prevents sticking, especially with the melted marshmallows.
- Even Scooping: Use an ice cream scoop to ensure all your cookies are roughly the same size. This promotes even baking.
Delicious Variations to Explore
While this classic recipe is a winner, don’t hesitate to get creative with your hot cocoa cookies:
- Mint Chocolate Hot Cocoa Cookies: Add 1/2 teaspoon of peppermint extract to the wet ingredients and use mint chocolate chips instead of milk chocolate chips.
- Spiced Hot Cocoa Cookies: Incorporate 1/2 teaspoon of cinnamon or a pinch of cayenne pepper into the dry ingredients for a subtle kick, mimicking traditional Mexican hot chocolate.
- Different Chocolate Chips: Experiment with dark chocolate chips, white chocolate chips, or even a mix of different chocolates for varying flavor profiles.
- Mini Marshmallows: If you prefer smaller marshmallow pockets, use mini marshmallows instead of standard ones, perhaps even scattering a few extra on top before baking.
- Chocolate Drizzle: Once cooled, melt some extra chocolate and drizzle it over the cookies for an extra decadent touch.
- Holiday Sprinkles: Add festive sprinkles to the top of the cookies before baking, especially if making them for a special occasion.
Serving and Storage Suggestions
These hot cocoa cookies are best enjoyed warm, straight from the oven, when the marshmallows are at their gooey peak. However, they are also delicious at room temperature.
- Pairing: Serve them with a tall glass of cold milk, a hot cup of coffee, or, for the ultimate experience, alongside a freshly brewed cup of hot cocoa!
- Storage: Store leftover cookies in an airtight container at room temperature for up to 3-4 days. For optimal freshness and gooiness, you can gently reheat them in the microwave for 10-15 seconds before serving.
- Freezing Dough: The unbaked cookie dough can be scooped into balls (without marshmallows), flattened, and frozen on a baking sheet. Once solid, transfer to a freezer-safe bag for up to 2-3 months. When ready to bake, thaw slightly, add marshmallows, and bake as directed, possibly adding a minute or two to the baking time.
- Freezing Baked Cookies: Baked and cooled cookies (without the final cocoa powder dusting) can also be frozen in an airtight container for up to 1 month. Thaw at room temperature and dust with cocoa powder before serving.
There you have it – a comprehensive guide to baking the most delightful hot cocoa cookies. This recipe promises not just a treat for your taste buds, but also a comforting and joyful baking experience. Whether you’re making them for a special occasion or simply to indulge your sweet tooth, these cookies are sure to bring smiles and warmth. Happy baking!