
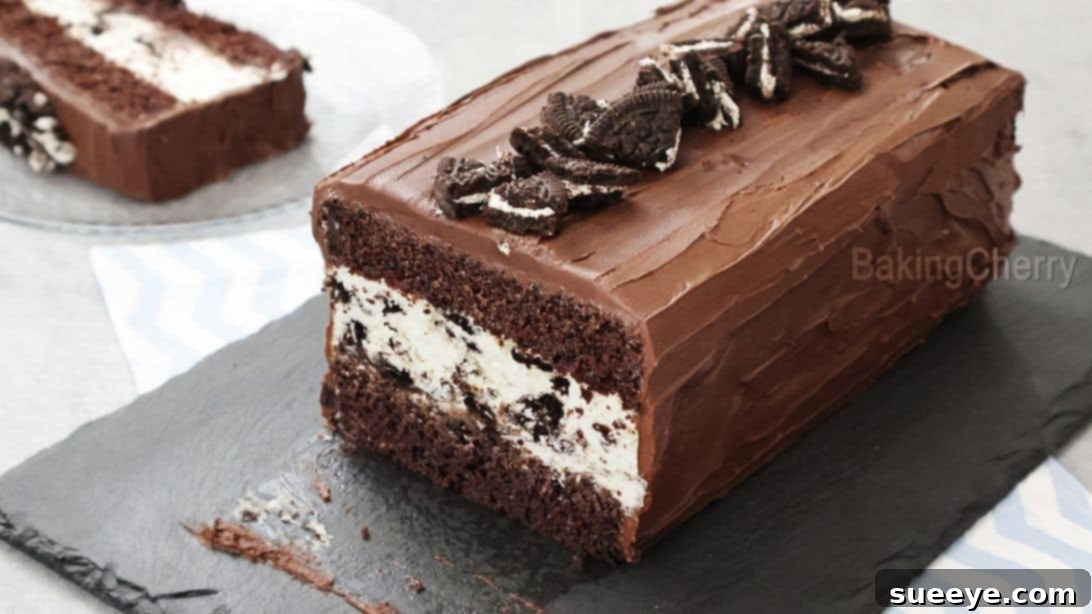
Indulge in the ultimate dessert experience with this exquisite Chocolate Cookies and Cream Cake, inspired by the talented Baking Cherry. This isn’t just a cake; it’s a symphony of textures and flavors designed to captivate every cookies and cream enthusiast. Imagine a rich, incredibly soft chocolate cake, perfectly complemented by a luscious, creamy cookies and cream filling, all enrobed in a glossy, decadent chocolate ganache. It’s the quintessential treat to elevate any occasion, satisfy the deepest sweet cravings, and impress guests with its homemade charm and professional finish. This chocolate cookies and cream cake recipe is truly a must-try for its unparalleled taste and surprisingly straightforward preparation.
From birthdays to holidays or simply a weekend indulgence, this cake stands out as a true masterpiece. The magic begins with a perfectly moist and airy chocolate cake base, offering a delightful contrast to the velvety smooth cookies and cream mousse, studded with generous chunks of your favorite sandwich cookies. The grand finale is the silky, rich chocolate ganache, adding another layer of chocolatey bliss that ties all the elements together. Each bite is a journey through layers of pure dessert perfection, making it a beloved classic that will undoubtedly become a staple in your baking repertoire. Get ready to bake a cake that looks as good as it tastes!
EXPLORE MORE COOKIES AND CREAM DELIGHTS:
- Craving a cool treat? Try these refreshing Cookies and Cream Pudding Pops.
- For a delightful twist on a classic, check out these chewy Cookies and Cream New York Style Cookies.
The beauty of this chocolate cookies and cream cake lies in its accessible approach, making it achievable for home bakers of all skill levels. You’ll master three main components: the tender chocolate cake, the irresistible cookies and cream filling, and the luxurious chocolate ganache. Don’t let the multi-layered description intimidate you; each step is designed for ease and enjoyment. The chocolate cake batter comes together with a simple mix of wet and dry ingredients, baked to perfection. The cookies and cream filling is a delightful blend of creamy and crunchy, achieved by beating just a few ingredients. And the crowning glory, the chocolate ganache, requires nothing more than melting chocolate with heavy cream and allowing it to cool to the ideal consistency. Prepare to amaze yourself and your loved ones with this incredible dessert!
Why This Chocolate Cookies and Cream Cake Is Your Next Baking Project
Beyond its undeniable deliciousness, this chocolate cookies and cream cake offers several compelling reasons to get baking. It’s an ideal recipe for home bakers of all skill levels, providing clear instructions that lead to stunning results. The combination of classic chocolate cake with the universally loved flavor of cookies and cream makes it a guaranteed crowd-pleaser for any gathering, from casual family dinners to elegant celebrations. It’s also incredibly versatile; while perfect as is, you can easily customize the decoration to suit different themes or personal preferences. Furthermore, baking this cake from scratch allows you to control the quality of ingredients, ensuring a fresher and more satisfying dessert than anything store-bought. Experience the immense satisfaction of creating a showstopping cake that tastes even better than it looks!
Essential Ingredients for Your Ultimate Chocolate Cookies and Cream Cake
Crafting this phenomenal cake starts with a selection of high-quality ingredients, each playing a crucial role in achieving the perfect flavor and texture. Pay close attention to the specified temperatures and measurements for the best results, as these details often make the difference between a good cake and an extraordinary one.
For the Rich and Moist Chocolate Cake Layers:
- 1/2 cup of whole milk: Provides essential moisture and enriches the cake’s flavor profile. Using milk at room temperature allows it to incorporate more smoothly into the batter without seizing the butter or other cold ingredients.
- 1/4 cup of vegetable oil: Contributes significantly to a tender crumb and helps keep the cake wonderfully moist for an extended period. Any neutral-flavored oil like canola or sunflower oil works well here.
- 1/2 teaspoon of pure vanilla extract: A key flavor enhancer that beautifully complements and deepens the chocolate notes. Opt for pure extract over imitation for the best taste.
- 2 large eggs at room temperature: Essential for structure, richness, and binding all the ingredients together. Room temperature eggs emulsify much better with other ingredients, leading to a more uniform and airy batter.
- 1 cup of all-purpose flour: Forms the structural base of your cake. Sifting it beforehand is highly recommended to aerate the flour and prevent lumps, contributing to a lighter and finer cake texture.
- 2/3 cup of brown or white sugar: Sweetens the cake to perfection and plays a vital role in moisture retention, keeping the cake soft. Brown sugar will add a subtle, deeper caramel note, while white sugar allows the chocolate to shine purely.
- 1/3 cup of unsweetened cocoa powder: The primary source of our deep, intense chocolate flavor. Using a good quality unsweetened cocoa powder will significantly impact the final taste of your cake.
- 1 teaspoon of baking powder: A powerful leavening agent that helps the cake rise beautifully, contributing to its desired light and airy texture.
- 1/2 teaspoon of baking soda: Reacts with the acidic components in the cocoa powder to create a tender crumb and provide additional lift to the cake. It’s crucial for the texture.
- 1/4 teaspoon of salt: Often overlooked, salt is critical for balancing the sweetness and enhancing all the other wonderful flavors in the cake. Do not skip it!
- 1/2 cup of warm water: Helps to “bloom” the cocoa powder, intensifying its chocolate flavor, and also thins the batter to the ideal consistency, ensuring a moist cake.
- 1 teaspoon of instant coffee: This secret ingredient is a game-changer! It doesn’t make the cake taste like coffee but profoundly deepens and enhances the chocolate flavor, making it richer and more complex.
For the Creamy and Crunchy Cookies and Cream Mousse Filling:
- 8 Oreo cookies: The absolute star of the mousse! They provide both the iconic flavor and delightful crunchy texture that makes this cake so irresistible.
- 1 cup of full-fat cream cheese (room temperature): Creates a rich, tangy, and incredibly smooth base for the mousse. Ensuring it’s completely softened at room temperature is crucial for easy, lump-free blending.
- 2/3 cup of powdered sugar: Sweetens the mousse to perfection and dissolves effortlessly, guaranteeing a silky-smooth texture without any graininess.
- 1 teaspoon of pure vanilla extract: A delightful and aromatic complement to the classic cookies and cream flavor, rounding out the sweetness.
- 3/4 cup of cold heavy cream: Whipped to stiff peaks, this ingredient provides the essential lightness and airy texture of the mousse. It absolutely must be very cold to whip properly and achieve the desired volume.
For the Decadent Chocolate Ganache Topping:
- 1 cup of semi-sweet chocolate: The luxurious foundation of your ganache. Using high-quality semi-sweet chocolate (chips or finely chopped bar chocolate) will yield the best flavor and a beautifully glossy finish.
- 1/2 cup of heavy cream (room temperature or slightly warmed): Melds seamlessly with the chocolate to create a smooth, pourable, and ultimately luscious topping. The temperature helps it combine without shocking the chocolate.
How to Craft Your Ultimate Chocolate Cookies and Cream Cake: A Step-by-Step Guide
Follow these detailed steps carefully to achieve a beautifully layered and delicious chocolate cookies and cream cake. Precision and patience are your best tools in baking, ensuring each component contributes to a magnificent final dessert!
Step 1: Begin with the Chocolate Cake Wet Ingredients
Start by combining all the liquid elements for your chocolate cake. In a large mixing bowl, thoroughly whisk together the milk, vegetable oil, pure vanilla extract, and two large eggs. Whisk vigorously until the mixture is completely homogenous, slightly frothy, and a pale yellow color. Set this bowl aside while you prepare the dry ingredients, ensuring they are ready to be smoothly incorporated.
Step 2: Sift and Prepare Dry Ingredients for the Cake
In a separate, even larger bowl, it’s crucial to sift together all the dry components. Combine the all-purpose flour, granulated sugar (or brown sugar), unsweetened cocoa powder, baking powder, baking soda, and salt. Sifting is not merely optional; it helps to aerate the flour, breaks up any lumps, and ensures that all leavening agents and flavorings are evenly distributed throughout, which is key for a consistent cake texture. Whisk these dry ingredients together thoroughly after sifting.
Step 3: Gently Combine Wet and Dry Cake Batters
Pour the carefully prepared wet mixture into the bowl of sifted dry ingredients. Using a spatula or a whisk, begin to gently stir until just combined. The key here is to avoid overmixing at all costs; excessive mixing can overdevelop the gluten in the flour, resulting in a tough, chewy cake rather than a tender one. A few small lumps in the batter are perfectly acceptable at this stage and will likely disappear during baking.
Step 4: Enhance Chocolate Flavor with Bloomed Coffee
In a small, heatproof bowl or mug, add the warm water and instant coffee. Stir diligently until the coffee granules are completely dissolved. This warm, strong liquid plays a crucial role: it helps to “bloom” the cocoa powder already in your batter, significantly intensifying its chocolate flavor without imparting a distinct coffee taste. Pour this dissolved coffee mixture into your cake batter and gently whisk until it is just incorporated. The batter will be relatively thin, which is the correct consistency for this recipe, ensuring a moist outcome.
Step 5: Bake Your Chocolate Cake to Perfection
Prepare an 8.5 x 4.5-inch loaf pan by lining it completely with parchment paper. Ensure you leave a generous overhang on the longer sides; these will act as convenient “handles” later for easy removal. Pour the prepared chocolate cake batter evenly into the lined pan. Bake in a preheated oven at 350°F (175°C) for approximately 30 to 35 minutes, or until a wooden skewer or toothpick inserted into the very center of the cake comes out perfectly clean. Keep a close eye on it to prevent any overbaking, which can dry out your lovely cake.
Step 6: Ensure the Cake Cools Completely
Once baked to golden perfection, carefully remove the cake from the oven. Using the parchment paper overhang, gently lift the cake out of the loaf pan and transfer it directly to a wire rack. It is absolutely critical to allow the cake to cool completely at room temperature. Attempting to slice or fill a warm cake will lead to crumbling, tearing, and a generally messy outcome. Patience at this stage is a virtue that will be rewarded with a perfectly structured cake.
Step 7: Prepare the Oreo Cookies for the Mousse Filling
While your chocolate cake patiently cools, you can begin preparing the star component of your mousse filling. Take 8 Oreo cookies and roughly chop them into quarters or smaller, irregular pieces. You want both substantial chunks for texture and some smaller pieces for flavor distribution. For a slightly cleaner mousse, you may sift the chopped cookies lightly to remove very fine crumbs, but a few crumbs are also welcome for added character. Set the chopped cookies aside, ready for integration.
Step 8: Create the Smooth Cream Cheese Base for the Mousse
In a clean mixing bowl, combine the softened full-fat cream cheese, powdered sugar, and vanilla extract. Using an electric mixer on medium speed, beat these ingredients together until the mixture is light, creamy, and completely smooth. It’s essential that no lumps of cream cheese remain, as this forms the luxurious base of your mousse. Remember to scrape down the sides and bottom of the bowl as needed to ensure all ingredients are thoroughly incorporated and evenly mixed.
Step 9: Gently Fold in Whipped Cream and Oreos for the Mousse
In a separate, chilled mixing bowl (ideally, chill your bowl and whisk attachments beforehand), pour the very cold heavy cream. Whip it using an electric mixer on high speed until stiff peaks form. Be diligent not to over-whip, as heavy cream can quickly turn grainy if beaten too long. Once stiff peaks are achieved, gradually and gently fold the whipped cream into the prepared cream cheese mixture until smooth and no streaks of either component remain. Finally, stir in the chopped Oreos, ensuring they are evenly distributed throughout the airy mousse. This gentle folding technique is crucial for maintaining the light and airy texture of the whipped cream, contributing to the mousse’s delightful mouthfeel.
Step 10: Level and Prepare the Cake Layers for Assembly
Once the chocolate cake is completely cool to the touch, use a long serrated knife to carefully level the top if it has domed during baking, creating a perfectly flat surface. This step ensures beautiful, even layers. Then, slice the cake precisely in half lengthwise, creating two distinct, even layers. To make the final assembly easier and prevent sticking, lightly moisten the inner side of your original baking pan (the same one used for baking the cake) with a little water and line it with new plastic wrap, allowing plenty of overhang on all sides. This creates a flexible mold for building your layered cake.
Step 11: Assemble and Chill Your Decadent Layered Cake
Carefully place one layer of the sliced chocolate cake into the plastic-lined pan. Spread the entirety of the delicious cookies and cream mousse filling evenly over this bottom cake layer, ensuring it reaches all the way to the edges. Gently place the second layer of chocolate cake squarely on top of the mousse. Cover the entire cake with the plastic wrap overhang and press down lightly to ensure the layers are snug and well-settled. Refrigerate the assembled cake for a minimum of 3 to 4 hours, or ideally, overnight. This chilling period is absolutely crucial for the mousse to set properly and firm up, allowing the flavors to meld beautifully, and making the cake stable and significantly easier to handle and slice cleanly.
Step 12: Prepare the Silky Smooth Chocolate Ganache Topping
To create the luscious chocolate ganache, place the semi-sweet chocolate (whether chips or finely chopped bar chocolate) and heavy cream into a microwave-safe bowl. Microwave the mixture in short 30-second intervals, stirring thoroughly after each interval, until the chocolate is fully melted and the mixture transforms into a smooth, glossy, and uniform ganache. Alternatively, you can achieve this by using a double boiler method over simmering water. Once melted, allow the ganache to cool slightly at room temperature, stirring occasionally, for about 20 minutes. It should thicken to a pourable but not runny consistency – this is the ideal state for coating your cake effectively without it all running off.
Step 13: Finish and Present Your Masterpiece Chocolate Cookies and Cream Cake
Once the cake is thoroughly chilled and the mousse filling is firm, carefully unwrap it. Gently invert the cake onto your chosen serving plate or cutting board. Carefully remove the plastic wrap. Pour or spread the prepared chocolate ganache evenly over the top of the cake, allowing it to drip attractively down the sides for a professional finish. For an extra flourish and to emphasize the flavor profile, you can top the cake with additional crushed or whole Oreo cookies. Keep the finished cake refrigerated until you are ready to serve. This ensures the mousse and ganache remain perfectly set and the cake holds its magnificent shape. When it’s time to enjoy, slice with a warm, sharp knife for the cleanest cuts, and prepare for rave reviews!
Expert Tips for a Perfectly Decadent Chocolate Cookies and Cream Cake
Achieving bakery-quality results at home is easier than you think when you follow these expert tips and tricks designed to elevate your baking experience:
- Ingredient Quality Matters Immensely: Always use good quality unsweetened cocoa powder and chocolate for the most profound and authentic chocolate flavor. Similarly, pure vanilla extract makes a noticeable difference compared to imitation versions.
- Room Temperature for Key Ingredients: For both the chocolate cake batter and the creamy mousse, ensure that your eggs, milk, and especially the cream cheese are at room temperature. This crucial step helps them emulsify properly, leading to a smoother, lump-free batter and a wonderfully creamy, consistent mousse.
- The Golden Rule: Do Not Overmix: Overmixing cake batter is a common pitfall that develops gluten excessively, resulting in a tough, dense cake. Mix only until the ingredients are just combined, and a few small lumps are perfectly acceptable.
- Keep Cream Cold for Whipping: For the mousse, it is paramount that your heavy cream is very cold. For even better results, consider chilling your mixing bowl and whisk attachments in the freezer for 10-15 minutes before whipping. This helps the cream whip up faster and achieve stiffer, more stable peaks.
- Proper Chilling is Non-Negotiable: The extensive chilling time for the assembled cake is not merely a suggestion; it’s absolutely crucial. It allows the mousse to set firmly, making the cake stable and incredibly easy to slice, and perhaps most importantly, it gives all the exquisite flavors time to meld beautifully together.
- Achieving Ideal Ganache Consistency: If your ganache appears too thick to pour smoothly, gently warm it slightly over a double boiler or in short microwave bursts. If it’s too thin, let it cool at room temperature and stir for a few more minutes until it reaches a pourable but clingy consistency. The ideal ganache should gracefully coat your cake without running off completely.
- Leveling the Cake for Aesthetics: A long, serrated knife works wonders for leveling and slicing your cake layers cleanly and evenly. Take your time to ensure perfectly flat layers for a professional, bakery-worthy appearance.
- Smart Storage Solutions: Store the finished chocolate cookies and cream cake covered tightly in the refrigerator for up to 3-4 days to maintain its freshness and integrity. For the best texture and flavor experience, allow the cake to come to room temperature for about 20-30 minutes before serving.
Exciting Variations to Personalize Your Cookies and Cream Cake
While this recipe for chocolate cookies and cream cake is absolutely perfect as is, baking is also an art form where creativity shines! Feel free to experiment and personalize your cake with these exciting variations:
- Unleash Cookie Customization: Don’t limit yourself to classic Oreos! Experiment with different types of sandwich cookies. Try Golden Oreos for a delightful vanilla twist, mint Oreos for a refreshing cooling sensation, or even other chocolate-covered biscuits to introduce new textures and flavors.
- Espresso Boost for Deeper Chocolate: For true chocoholics, adding a tiny pinch of instant espresso powder to your chocolate ganache can further intensify its chocolate flavor without imparting any noticeable coffee taste. It deepens the cocoa notes beautifully.
- White Chocolate Ganache Alternative: For a striking visual and flavor contrast, consider using a silky white chocolate ganache instead of dark chocolate. Simply follow the same ratio of white chocolate to heavy cream as you would for the semi-sweet ganache.
- Add Berries for a Burst of Freshness: A layer of fresh raspberries or thinly sliced strawberries placed between the cake and mousse, or artfully arranged as a garnish, can add a wonderful burst of fruity freshness, a touch of acidity, and vibrant color to cut through the richness.
- Create Individual Servings: Instead of baking in a loaf pan, divide the cake batter into cupcake tins for charming individual servings, or use smaller round cake pans to create a stunning multi-layered mini cake, perfect for smaller gatherings or personalized treats.
This chocolate cookies and cream cake isn’t just a dessert; it’s a celebration of flavor and texture, an experience waiting to be created in your own kitchen. The journey from separate, simple ingredients to a magnificent, layered confection is incredibly rewarding. With its deep, rich chocolate flavor, the creamy, delightful cookies and cream filling, and the luxurious, glossy ganache, it promises to be a memorable treat for anyone who tastes it. We wholeheartedly recommend you dive into this recipe, follow our detailed guide, and discover your new favorite way to celebrate the irresistible combination of chocolate and cookies and cream!