
There’s an undeniable magic to spending time outdoors, whether it’s the gentle rustle of leaves, the warmth of the sun, or the tranquil beauty of a starlit evening. For many, the arrival of summer heralds the perfect opportunity to embrace these moments, transforming backyards and gardens into personal havens. Picture this: a comfortable chair, a captivating book, and a refreshing drink in hand, all while bathed in the soft, ambient glow of outdoor lighting. This idyllic scene is precisely why summer stands out as a cherished season, a time when plans for outdoor enjoyment and creative DIY projects eagerly come to life.
Creating an inviting outdoor atmosphere often involves carefully chosen elements, and among the most essential for setting a relaxed mood is beautiful, functional lighting. When it comes to infusing your outdoor space with a touch of exotic charm and practicality, nothing quite rivals the allure of tiki torches. These iconic lights not only cast a warm, flickering glow but also offer the added benefit of keeping pesky insects at bay when fueled with citronella.
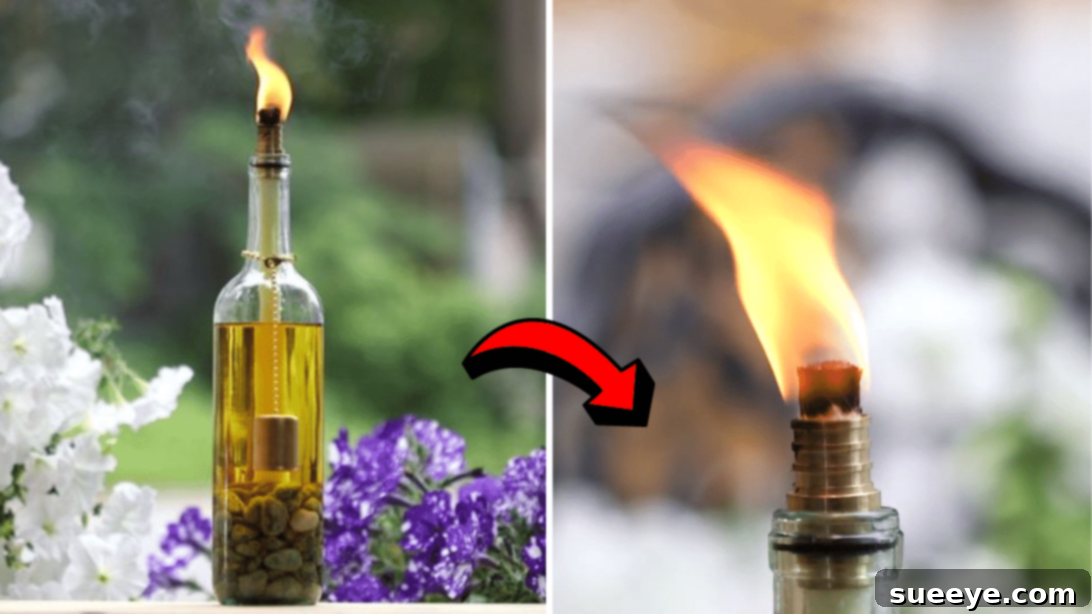
My passion for outdoor living naturally extends to sustainable crafting, which is why I’ve developed a fondness for collecting empty wine bottles. Far from being mere refuse, these versatile glass containers hold immense potential for a myriad of do-it-yourself ventures. Transforming them into elegant tiki torches is one such project that beautifully marries aesthetics with utility. If you’re inspired to craft your own unique outdoor lighting feature, you’re in the right place. This detailed guide, inspired by the creative insights of Savvy on YouTube, will walk you through the simple steps to create stunning wine bottle tiki torches that will elevate your outdoor ambiance.
RELATED: How to Repurpose Old Bottles into DIY Tiki Torches
Why DIY Wine Bottle Tiki Torches?
Beyond the simple satisfaction of making something with your own hands, crafting wine bottle tiki torches offers a wealth of benefits. It’s a fantastic way to add personalized charm to your garden, patio, or deck while being environmentally conscious and budget-friendly. Here’s why this project is a must-try:
Eco-Friendly Upcycling
Every wine bottle you repurpose is one less item in a landfill. This project champions the principles of upcycling, transforming what would be waste into a beautiful and functional decor piece. It’s a small but significant step towards sustainable living, allowing you to enjoy your favorite beverages guilt-free, knowing their containers have a second life.
Cost-Effective Outdoor Lighting
Store-bought tiki torches, especially those with unique designs, can quickly add up in cost. By utilizing empty wine bottles, you significantly reduce material expenses, making this a highly economical solution for enhancing your outdoor lighting scheme. Most of the materials required are inexpensive and readily available at hardware stores, making it an accessible project for everyone.
Customizable Ambiance
Wine bottles come in a variety of shapes, sizes, and colors, each offering a unique aesthetic. This diversity allows for endless customization possibilities. You can choose bottles that match your outdoor decor, or even decorate them further with paints, etching, twine, or embellishments to create a truly bespoke lighting fixture. The warm, dancing flame from a tiki torch provides a magical glow that instantly transforms any outdoor space into a cozy, inviting retreat.
Natural Insect Repellent
When filled with citronella torch fuel, these DIY tiki torches serve a dual purpose: they provide beautiful illumination and act as an effective repellent against mosquitoes and other bothersome insects. This makes them perfect for evening gatherings, allowing you and your guests to enjoy the outdoors without constant swatting.
Essential Materials for Your DIY Wine Bottle Tiki Torch:
Gathering your materials is the first exciting step in any DIY project. For this wine bottle tiki torch, you’ll find most items are easy to acquire. Here’s a detailed look at what you’ll need:
- Glass Wine Bottle: The star of our project! Opt for sturdy bottles. Different colors (clear, green, amber) will create varying light effects. Ensure it’s clean and label-free before you begin.
- Wick, for Tiki Torch: Specifically designed for outdoor torches, these wicks are typically made of fiberglass, which is durable and long-lasting, unlike cotton wicks that burn down. Ensure it’s long enough to reach the bottom of your bottle and extend slightly out the top.
- ½” x ¾” Reducing Connector: This critical piece acts as a stopper and wick holder. It needs to fit snugly into the mouth of your wine bottle. The ½-inch opening typically holds the wick securely, while the ¾-inch outer diameter helps it sit firmly in most standard wine bottle openings. These are commonly found in the plumbing section of hardware stores.
- Pea Gravel: Small, smooth stones that serve several purposes. They add stability to the bottle, preventing it from tipping over easily. They also displace some of the fuel, reducing the amount needed, and absorb a small amount of fuel, acting as a safety measure should the bottle accidentally tip. Alternatives like decorative glass pebbles or marbles can also work.
- Citronella Torch Fuel: The fuel for your flame! Citronella oil is renowned for its insect-repelling properties. Always use fuel specifically designed for outdoor torches, and follow all safety instructions on the product label. Never use highly volatile or flammable liquids like gasoline.
Crafting Your Wine Bottle Tiki Torch: A Step-by-Step Guide
This project is surprisingly straightforward and can be completed in just a few simple steps. Let’s get started:
Step 1: Preparing Your Wine Bottles
The first crucial step is to prepare your wine bottles. Begin by thoroughly washing the bottles with hot, soapy water to remove any residue. The next task is to meticulously remove all labels. This can be done by soaking the bottles in hot water with a little dish soap for an hour or more, then scrubbing off the softened labels. For stubborn adhesive, commercial label removers or a mixture of baking soda and oil can be effective. Once the labels are off, rinse the bottles completely and ensure they are bone dry, inside and out, before proceeding. Any lingering moisture could interfere with the fuel.
Step 2: Adding Gravel and Fuel
Once your bottles are clean and dry, it’s time to add the pea gravel. Carefully pour the gravel into each bottle, filling it approximately one-third of the way up. The gravel adds necessary weight to the base of the bottle, preventing it from toppling over easily in a breeze or accidental bump. After the gravel is in place, use a funnel to carefully pour the citronella torch fuel into the bottle. Fill the bottle until the fuel almost reaches the base of the neck, leaving a small air gap at the very top. Be precise and avoid overfilling, as this space is needed for the wick and connector. Always handle torch fuel in a well-ventilated area and away from open flames, and wipe up any spills immediately.
Step 3: Assembling the Wick and Connector
Now, take your ½” x ¾” reducing connector and firmly place it into the mouth of the bottle. It should fit snugly to prevent fuel evaporation and keep the wick secure. Next, carefully insert your tiki torch wick through the smaller opening of the connector. Gently push the wick down into the bottle until it reaches the bottom, ensuring it’s submerged in the fuel. Allow about ¼ to ½ inch of the wick to stick out from the top of the connector. This exposed portion will be lit, and this length is optimal for a steady, medium-sized flame. A longer wick might produce a larger, smokier flame, while a shorter one might struggle to stay lit.
Step 4: Soaking and Lighting Your Torch
With the wick in place, patience is key. Allow the wick to soak in the citronella fuel for at least 15-20 minutes before lighting. This soaking period ensures that the wick is fully saturated with fuel, allowing it to draw the liquid up efficiently for a consistent burn. Once the wick is thoroughly saturated, carefully light it with a long match or a lighter designed for candles or grills. Stand back as you light it, especially during the first burn. Enjoy the warm, inviting glow and the subtle aroma of citronella, knowing you’ve created a beautiful and functional piece of outdoor decor!
Safety Precautions and Maintenance for Your Tiki Torches
While DIY wine bottle tiki torches are a wonderful addition to any outdoor space, safety must always be your top priority. Follow these guidelines to ensure safe enjoyment:
Placement and Stability
Always place your tiki torches on a stable, flat surface, away from any flammable materials such as dry leaves, curtains, wooden structures, or overhanging branches. Ensure they are out of reach of children and pets. If you live in a windy area, consider placing them in a sheltered spot or using a stake designed to hold them securely in the ground.
Fuel Handling and Refilling
Torch fuel is flammable. Store it in its original container, in a cool, dry place, away from direct sunlight and heat sources, and out of reach of children. When refilling your torches, always allow them to cool completely before adding more fuel. Never attempt to refill a burning or hot torch. Wipe away any spills immediately to prevent fire hazards.
Supervision and Extinguishing
Never leave burning tiki torches unattended. Always supervise them, especially when children or pets are present. When you’re done enjoying your torches, extinguish them properly. Many outdoor torch fuels come with caps or snuffer caps; if not, you can gently blow out the flame or use a non-flammable cover to starve the flame of oxygen.
Wick Maintenance
Periodically inspect your wick. If it becomes too long or develops a mushroom cap of carbon, the flame might become excessively large or smoky. Trim the wick to about ¼ to ½ inch above the connector as needed to maintain a clean, optimal flame. A well-maintained wick will ensure a better burn and extend the life of your torch.
Weather Considerations
Do not use your tiki torches during strong winds or heavy rain. Wind can cause the flame to become erratic or even blow hot fuel particles, while rain can extinguish the flame or dilute the fuel. Bring your torches indoors or cover them when not in use to protect them from the elements and prevent fuel evaporation.
Personalizing Your Wine Bottle Tiki Torches
While a simple wine bottle tiki torch is charming on its own, there’s ample room for creative customization. Here are a few ideas to make your torches truly unique:
- Bottle Decoration: Experiment with painting the bottles using glass paint for a splash of color, or etch designs onto the glass for a sophisticated touch. Wrapping the neck with twine or raffia can add a rustic, natural feel.
- Stand Alone or Mounted: While tabletop use is common, you can also mount your torches. Use wrought iron stakes designed for tiki torches or craft a wooden stand to elevate them, integrating them seamlessly into your garden landscape.
- Varied Bottle Choices: Don’t limit yourself to standard clear or green wine bottles. Explore different bottle shapes and colors, such as cobalt blue or dark amber, to create a captivating medley of light and shadow.
Creating your own wine bottle tiki torches is more than just a DIY project; it’s an opportunity to infuse your outdoor living space with personality, warmth, and a touch of practical elegance. The flickering flames, combined with the gentle fragrance of citronella, will transform your evenings into memorable experiences. So, gather your materials, follow these simple steps, and get ready to illuminate your nights with these beautiful, handmade pieces.
We hope this guide inspires you to embrace the joy of upcycling and the art of outdoor decorating. Happy crafting!
*All these images are credited to Savvy via YouTube. Give their channel a visit and subscribe for more!