
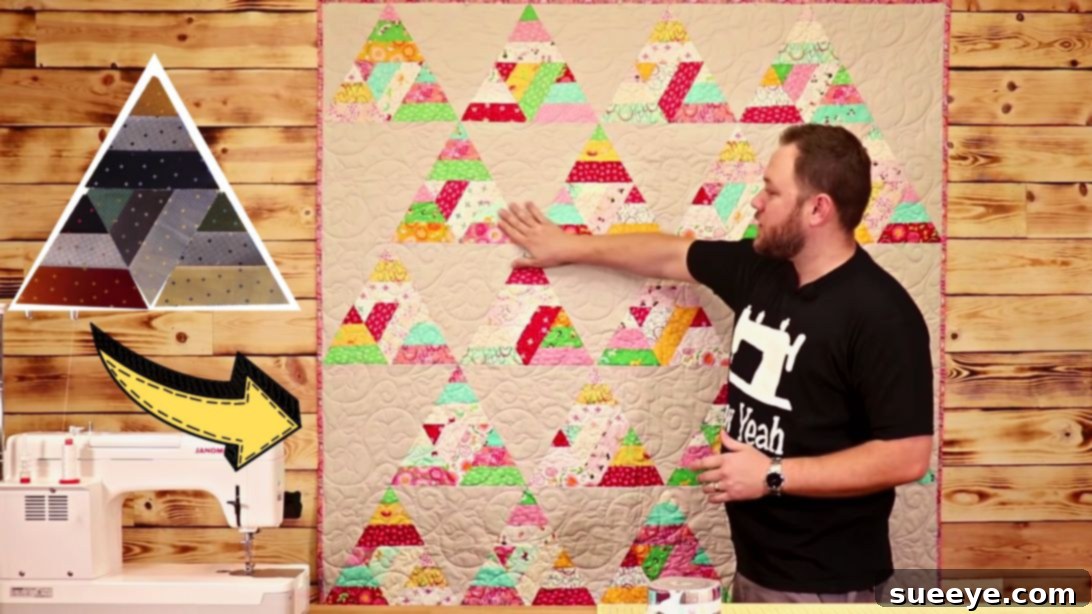
Embark on an exciting quilting journey with this stunning Pharaoh’s Quilt Block project, brought to life by the talented creators at Sew Yeah on YouTube. What makes this project truly exceptional is its surprising simplicity, making it an ideal choice for absolute beginners. Even if you’ve never touched a sewing machine for quilting before, you’ll be able to create a professional-looking quilt that will impress everyone. This tutorial focuses on using a single jelly roll, a pre-cut fabric bundle that simplifies the fabric preparation process significantly, allowing you to jump straight into the fun of piecing. By following the clear, step-by-step instructions provided here and supplementing them with the detailed video tutorial, you’ll master the techniques needed to construct beautiful triangular blocks with ease. Get ready to transform a few strips of fabric into a masterpiece!
The Pharaoh’s Quilt Block pattern, known for its intricate-looking yet surprisingly straightforward geometric design, offers a fantastic entry point into the world of quilting. Its captivating visual appeal belies the ease with which it comes together, making it a favorite among quilters seeking a project that delivers maximum impact with minimal fuss. The use of a jelly roll, typically consisting of 40 fabric strips measuring 2½ inches wide, not only streamlines your cutting process but also introduces a delightful variety of coordinated fabrics into your project, ensuring a harmonious and vibrant final product. This guide will walk you through everything from selecting your materials to the final stitches, ensuring a rewarding and successful quilting experience. Prepare to unleash your inner artist and create a quilt that radiates both warmth and intricate beauty.
Essential Materials for Your Pharaoh’s Quilt Block Project:
- 1 Jelly Roll or 40 Fabric Strips @ 2½ inches: A jelly roll is a collection of 40 coordinating fabric strips, each 2½ inches wide and typically 42 inches long (the width of fabric). This pre-cut format is incredibly convenient for beginners as it eliminates the need for extensive fabric cutting. If a jelly roll isn’t available or you prefer to use specific fabrics, you can easily cut your own 40 strips from various fabrics, ensuring each strip measures 2½ inches in width. Choose fabrics with a good contrast to make your design pop.
- 3¼ Yards of Background Fabric: This fabric will provide the negative space around your pieced blocks, allowing their vibrant patterns to stand out. Opt for a solid color or a subtly textured fabric that complements your jelly roll prints without competing with them. Cotton is usually the preferred choice for quilting due to its ease of sewing and durability.
- Batting Fabric (Optional for a full quilt, but highly recommended): Batting is the cozy middle layer of your quilt, providing warmth, loft, and dimension. Common types include cotton, polyester, wool, or blends, each offering different characteristics in terms of warmth and drape. While optional if you’re only making the block, it’s essential for transforming your blocks into a functional quilt.
- Backing Fabric (Optional for a full quilt, but highly recommended): The backing fabric forms the underside of your quilt, providing a finished look and adding another layer of visual appeal. It should ideally be a single piece or carefully pieced together to be slightly larger than your quilt top and batting. Choose a fabric that harmonizes with your quilt top.
- Large 60° Triangle Ruler (at least 12½ inches): This specialized ruler is crucial for accurately cutting the specific triangular shapes required for the Pharaoh’s Quilt Block. The 60-degree angle ensures precise piecing, which is key to a professional finish. A ruler of at least 12½ inches will accommodate the size of the triangles needed for this project. Precision in cutting is paramount for successful quilting.
- Sharp Scissors or Rotary Cutter and a Self-Healing Cutting Mat: A rotary cutter paired with a self-healing mat offers quick, accurate, and efficient fabric cutting, especially for multiple layers. Ensure your rotary blade is sharp for clean cuts. If using scissors, make sure they are fabric-specific and very sharp to avoid fraying or uneven edges.
- Iron and Ironing Board (for pressing): An iron is indispensable for pressing seams flat throughout the quilting process. Proper pressing prevents bulk, ensures accurate alignment of pieces, and contributes significantly to a polished final product. Remember to “press” (lift and place the iron) rather than “iron” (slide the iron back and forth) to avoid distorting your fabric.
- Sewing Machine: Any basic sewing machine capable of a straight stitch will suffice. Ensure it’s in good working order, with a fresh needle appropriate for quilting (e.g., a universal or quilting needle) and a supply of good quality thread that matches or blends with your fabrics.
- Downloadable Pattern: Make sure to click here to download and print the essential pattern. This will provide visual aids and critical measurements for your project, making it much easier to follow along.
Step-by-Step Directions for Crafting Your Pharaoh’s Quilt:
Step 1: Preparing and Cutting Your Jelly Roll Strips into Triangles
Begin by carefully opening your jelly roll. Take a moment to admire the array of fabrics. The beauty of a jelly roll lies in its pre-coordinated selection, but feel free to arrange and re-arrange the strips to your aesthetic preference. For this project, you’ll need to separate your strips into sets of three. When creating these sets, consider the visual impact: aim for a pleasing contrast or harmony between the three strips in each set. Once you’re satisfied with your groupings, take each set of three strips and sew them together lengthwise along their longest edges, using a precise ¼-inch seam allowance. This consistent seam allowance is critical for accurate piecing later on. After sewing each set, take them to your ironing board. Instead of ironing (which can stretch fabric), carefully “press” your seams. You can choose to press them open for less bulk or to one side, typically towards the darker fabric to prevent shadowing through lighter fabrics. The key is to achieve perfectly flat seams, which will make subsequent cutting and piecing much easier and more accurate.
Once your strip sets are sewn and pressed, it’s time to transform them into the unique triangular components of the Pharaoh’s Quilt Block. Using your large 60° triangle ruler, carefully align it with the edge of one of your pressed strip sets. The exact method for cutting the 6½-inch triangles will involve specific rotations and alignments with your ruler – consult the downloadable pattern and the video tutorial for precise visual guidance on this crucial step. Precision here is paramount; slight inaccuracies can compound and affect the overall shape of your quilt block. Take your time, cut carefully, and always ensure your ruler is stable. When you are finished cutting all your strip sets, you should have a total of 96 triangles. These triangles form the intricate star-like patterns within the Pharaoh’s Quilt Block. Now comes the exciting design phase: lay out your cut triangles on a flat surface, such as a design wall or a large table. Begin to arrange them so that they form larger, composite triangles, keeping the overall design of the Pharaoh’s Quilt Block in mind. A crucial design tip is to avoid placing triangles with similar patterns or colors directly adjacent to each other. This creates visual interest and ensures that each fabric’s unique qualities are highlighted. Experiment with different arrangements until you achieve a visually striking and balanced composition that pleases your eye.
Feel free to share your progress and inspire others by sharing your unique arrangements and fabric choices with fellow quilters!
Step 2: Assembling Your Quilt Blocks and Finishing Your Project
With your triangles meticulously laid out in your desired arrangement, it’s time to bring them together permanently. Begin sewing the individual triangles together, working carefully to maintain that consistent ¼-inch seam allowance. As you sew, pay close attention to the points of your triangles. Aim for perfectly matched points to ensure crisp, clean lines in your finished quilt blocks. Once you have sewn together the smaller triangles to form your larger, pieced blocks (each representing a component of the Pharaoh’s Quilt Block design), give them another gentle press to ensure all seams lie flat. This step prevents bulk and helps your blocks assemble smoothly. Repeat this process for all your pieced blocks until you have completed the required number of distinct Pharaoh’s Quilt Block units. The video tutorial offers invaluable visual guidance on the precise order and orientation for sewing these triangles, so refer to it frequently to ensure accuracy.
Next, you will introduce your background fabric to frame and highlight your pieced designs. From your 3¼ yards of background fabric, you will need to cut 36 large triangles. It is absolutely crucial that these background triangles are precisely the same size and shape as the large, pieced triangles you have just created from your jelly roll strips. Use your 60° triangle ruler to achieve this accuracy. These background triangles will serve to create the striking geometric contrast that defines the Pharaoh’s Quilt Block pattern, allowing your vibrant pieced sections to truly pop. Once all your background triangles are cut, you can begin the assembly of your quilt rows. Refer to the Sew Yeah video tutorial for a clear depiction of how these pieced blocks and background triangles interlock to form the distinctive rows of the quilt top. It’s often helpful to lay out your entire quilt top on a design wall or floor at this stage to confirm your arrangement before sewing. Sew your carefully arranged blocks and background pieces together into individual rows, maintaining that consistent ¼-inch seam allowance. Press the seams after each row is completed, alternating the direction of your pressed seams between rows if you pressed to one side, or pressing them open, to help “nest” them when you join the rows. This technique reduces bulk at the intersections and ensures your points align beautifully.
Once all your rows are sewn, it’s time to join them together to form your complete quilt top. Again, use a ¼-inch seam allowance and take care to align all your seams and points accurately. Pins are your best friend here! Pin generously at intersections to prevent shifting. After the quilt top is assembled and thoroughly pressed, the final stages involve creating a functional and durable quilt. This means layering your quilt top with the batting and backing fabric. Begin by placing your backing fabric right side down, then lay your batting smoothly on top, and finally, place your finished quilt top right side up on the batting. This three-layer “quilt sandwich” then needs to be basted together. Basting can be done with safety pins, basting spray, or long hand stitches, all designed to temporarily hold the layers together during the quilting process. Once basted, you can proceed to quilt the entire piece as desired. Quilting stitches, whether simple straight lines following seam lines (stitch-in-the-ditch), geometric patterns, or free-motion designs, serve to secure all three layers together and add texture and dimension to your quilt. After quilting, the final step is to trim the edges square and apply a binding fabric. Binding is a strip of fabric sewn around the perimeter of the quilt, neatly enclosing the raw edges of the quilt top, batting, and backing, giving your project a clean, durable, and professional finish. Congratulations, your beautiful Pharaoh’s Quilt is now complete, a testament to your newfound quilting skills!
*A heartfelt thank you goes out to Sew Yeah via YouTube for sharing these incredible images and the inspiring tutorial. If you found this project enjoyable and rewarding, we highly recommend exploring their other fantastic videos and tutorials. Their channel is a treasure trove of creative quilting ideas and expert guidance, perfect for expanding your skills and finding your next project. Be sure to visit their channel and subscribe for a continuous flow of quilting inspiration!
Mastering the Beginner-Friendly Pharaoh’s Quilt Block: A Quick and Rewarding Project
The Pharaoh’s Quilt Block project stands as a shining example of how accessible and enjoyable quilting can be, even for those just starting out. With its reliance on pre-cut jelly roll strips and a clever cutting technique, it minimizes the initial hurdles often associated with complex patterns. This tutorial has demonstrated that creating a quilt block with a sophisticated appearance doesn’t require years of experience; it simply requires clear instructions, a few essential tools, and a willingness to learn. The geometric precision of the Pharaoh’s Quilt Block, achieved through the strategic use of a 60-degree triangle ruler, results in a visually striking design that can be adapted for various projects, from decorative wall hangings to cozy throws and full-sized quilts. The “10 minutes” in the title refers to the speed at which individual blocks can come together once you’ve mastered the cutting and piecing technique, making it a surprisingly quick project overall.
By breaking down the process into manageable steps—from selecting and preparing your fabric to accurately cutting your triangles, piecing them together, and finally finishing your quilt—we’ve aimed to provide a comprehensive guide that builds confidence with each stitch. The emphasis on careful pressing, consistent seam allowances, and thoughtful layout design are fundamental quilting practices that, once learned through projects like this, will serve you well in all your future endeavors. Beyond just creating a beautiful object, quilting offers a meditative and creative outlet, a chance to work with your hands and see tangible results. We encourage you to embrace the process, enjoy the colors and textures of your fabrics, and take pride in every perfectly matched point and smoothly pressed seam. Whether this Pharaoh’s Quilt Block becomes a standalone statement piece or the foundation for a larger quilt, it’s a testament to what beginners can achieve with a little guidance and a lot of creativity. Dive in, enjoy the journey, and create something truly unique and handmade!