
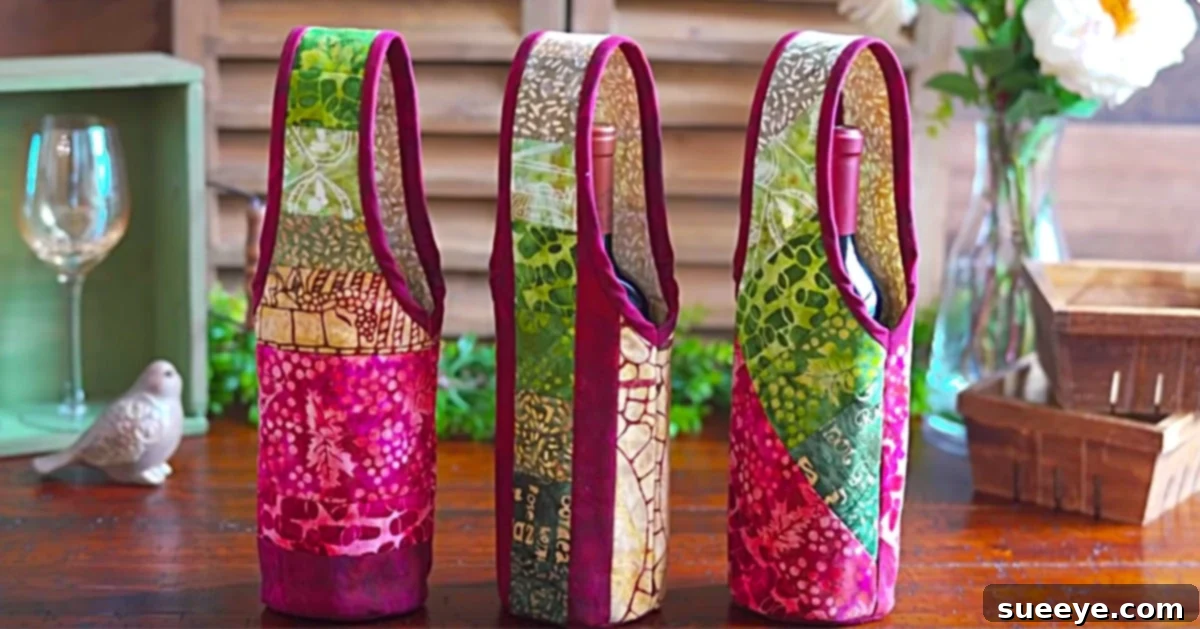
Crafting Joy: How to Sew Charming “Quilt As You Go” Wine Totes for the Holidays
There’s a unique warmth and magic that handmade creations bring to any home, especially during the holiday season. While I enjoy quilting throughout the year, the festive spirit of Christmas truly ignites my passion for sewing and crafting. It’s an opportunity to transform ordinary fabrics into extraordinary decorative pieces and thoughtful gifts that spread cheer. One of my absolute favorite techniques, particularly for quick and satisfying projects, is the “Quilt As You Go” method. This innovative approach not only simplifies the quilting process but also allows for creative scrap-busting, making it perfect for using up those cherished remnants from previous holiday projects.
Nothing says “homey and bright” quite like DIY accessories fashioned from patchwork remnants, imbuing your living space with incredible holiday flair. I often find myself with an abundance of Christmas-themed fabric scraps, some dating back years, and a collection of fantastic fat quarters acquired at unbeatable prices from sales. The challenge is always finding the perfect project to give these beautiful textiles new life. My search for a delightful Christmas quilting idea for my holiday living area led me down a delightful rabbit hole on YouTube. That’s where I discovered the ingenious “Quilt As You Go Wine Tote” pattern, and I was instantly captivated. The idea of combining practicality with festive charm, all while utilizing a technique I adore, was simply irresistible. I couldn’t wait to dive into this project and create some beautiful, handmade holiday gifts and decor.
Understanding the “Quilt As You Go” Method: Simplicity Meets Creativity
The core concept behind “Quilt As You Go” (QAYG) is revolutionary in its simplicity. Unlike traditional quilting, where you first assemble an entire quilt top, then layer it with batting and backing before quilting, QAYG integrates all these steps simultaneously. You are literally sewing fabric pieces directly onto your batting as you go, creating a quilted panel in one fluid process. This method is incredibly efficient, saves time, and is wonderfully approachable for quilters of all skill levels, especially beginners who might feel intimidated by multi-layer projects.
Imagine the ease: instead of handling three separate layers, you work with just two at a time, building your quilted fabric piece by piece. This technique is particularly fantastic for smaller projects like placemats, bags, and of course, wine totes, where managing large quilt sandwiches can be cumbersome. The QAYG approach also excels at showcasing individual fabric strips or squares, making it an ideal choice for a “scrappy” look, where a variety of patterns and colors blend harmoniously. This makes it perfect for finally giving purpose to those smaller fabric pieces that are too beautiful to discard but too small for larger endeavors.
Gathering Your Materials: Embracing the Scrappy Spirit
For this charming “Quilt As You Go” wine tote project, the beauty truly lies in its flexibility with fabric. You don’t need large cuts of fabric; in fact, it’s designed to be a fantastic stash-buster. My collection of Christmas fabric remnants, some from long-forgotten projects, combined with those amazing fat quarters I snagged on sale, proved to be the perfect starting point. The “scrappy style” allows you to mix and match various prints, patterns, and colors, creating a truly unique and personalized tote every time. Think about combining festive plaids, whimsical holiday motifs, glittery accents, and classic solids to achieve a rich, textural look. Even the smallest fabric remnants find a purpose here, contributing to the overall charm and character of the finished piece.
Beyond your chosen Christmas-themed fabrics, you’ll need a few other essential supplies. Batting is crucial, as it forms the foundation for your “quilt as you go” panels. A medium-loft cotton or polyester batting works well, providing just the right amount of structure and softness. Matching thread is always a good idea for a clean finish, but sometimes a contrasting thread can add an extra design element. Basic sewing supplies like a sewing machine, rotary cutter, cutting mat, ruler, pins, and an iron are, of course, indispensable. While I chose to follow the simple instructions I found online, for those who prefer a more guided approach or wish to purchase a coordinated fabric set, there are kits available, such as the Quilt-As-You-Go Wine Totes Gilded Blooms kit from Shabby Fabrics, which includes fabric and detailed instructions. However, for a truly personalized and budget-friendly experience, raiding your own fabric stash is often the most rewarding route.
The Creative Process: Step-by-Step “Quilt As You Go” Panels
The instructions for the “Quilt As You Go” method are surprisingly straightforward, making it an enjoyable process from start to finish. The first step involves preparing your batting. For the wine tote, you’ll cut your batting into the specific shape required for the tote body, as indicated by your chosen pattern. This shape typically resembles a rectangle that will form the main cylindrical part of the tote, plus a flat circle for the base. Precision here ensures a well-formed final product.
Building Your Quilted Fabric Panels
Once your batting is prepped, the fun begins. Take your first fabric strip and place it on one edge of the batting. This strip will serve as your foundation. Then, take a second fabric strip and place it right sides together with the first strip, aligning their edges. Stitch along this aligned edge, securing the two fabric strips to each other and, simultaneously, to the batting. This is where the magic of “quilt as you go” truly shines! After stitching, you’ll press the second fabric strip open, revealing a beautifully attached, flat piece of fabric that is already quilted to the batting. You are essentially building your quilted fabric, strip by strip, directly onto the batting.
Continue this process, adding subsequent fabric strips. Each new strip is placed right sides together with the previously sewn and pressed strip, stitched through all layers (fabric, fabric, batting), and then pressed open. For my Christmas wine tote, I chose to create diagonal quilted lines, which adds a dynamic and visually appealing texture. To achieve this, simply angle your fabric strips slightly as you attach them, ensuring they maintain a consistent direction for a cohesive look. The result is a series of interconnected fabric strips, already quilted to the batting, forming a sturdy and attractive panel. This method eliminates the need for extensive free-motion quilting or complex quilting designs, making it incredibly beginner-friendly.
Tips for Perfect QAYG Panels:
- Consistent Seam Allowance: Maintain an even seam allowance for each strip to ensure uniform width and a neat overall appearance.
- Pressing is Key: Pressing each strip open immediately after stitching is crucial. It flattens the seams, prevents bulk, and gives your quilted panel a professional finish.
- Trim as You Go: Periodically trim any excess batting or fabric edges to keep your panel neat and manageable, especially if you’re working with slightly irregular scrap pieces.
- Experiment with Layout: Don’t be afraid to lay out your fabric strips beforehand to visualize the final design. Play with color transitions and patterns to create an eye-catching effect.
Assembling Your Festive Quilted Wine Tote
Once you have completed your quilted panels using the “Quilt As You Go” method, the remaining steps to assemble the wine tote are surprisingly quick and gratifying. You’ll now have a beautiful, self-contained piece of quilted fabric that is ready to be transformed. The instructions typically guide you to cut out the specific shapes for your project from these quilted panels. For the wine tote, this usually involves trimming the main rectangular body piece to its final dimensions and cutting the flat circular base.
Bringing the Tote to Life:
- Sewing the Side Seam: First, you’ll join the short ends of your rectangular quilted panel, right sides together, to form a tube. This creates the main body of your wine tote.
- Attaching the Base: Next, carefully pin the flat circular base piece to the bottom edge of the fabric tube, matching raw edges. Take your time to ease the circle evenly around the curve, ensuring no puckers. Stitch all the way around, creating a strong and smooth seam that will support the wine bottle.
- Adding the Handle (Optional but Recommended): A sturdy handle elevates the functionality and aesthetic of the wine tote. You can create a handle from a strip of coordinating fabric, interfacing it for added strength, and then sewing it to the top edge of the tote. Ensure it’s securely attached with reinforced stitching.
- Finishing with Binding: The final touch that gives your wine tote a professional and polished look is the binding. Create or purchase a bias binding strip and apply it around the top raw edge of the tote. This not only conceals the raw edges but also adds a decorative frame. For a truly festive look, consider a contrasting or metallic binding fabric.
With these steps, your “Quilt As You Go” wine tote is complete! The satisfaction of seeing your fabric scraps and creative efforts culminate into such a charming and useful item is truly immeasurable. These totes are not just containers; they are expressions of personal style and thoughtful craftsmanship.
The Perfect Handmade Gift for Any Occasion
I genuinely hope you find as much joy in creating this project as I did. These quilted wine totes are incredibly cute and versatile, making them excellent gifts for a wide array of occasions. While I initially focused on Christmas-themed fabrics, the beauty of this project is its adaptability. Imagine a spring-themed tote filled with a bottle of rosé for a hostess gift, or a sophisticated geometric print holding a fine wine for a housewarming present. For birthdays, anniversaries, or even as a unique wedding favor, a handmade wine tote adds a personal touch that store-bought bags simply can’t replicate.
Beyond being fantastic gift wrappers, these totes also serve as wonderful decorative accents. A collection of them, perhaps in varying heights or designs, can adorn a holiday table or buffet, adding texture and warmth to your festive decor. They are a tangible representation of care and effort, conveying a heartfelt message to the recipient. So, whether you’re looking to declutter your fabric stash, create memorable gifts, or simply indulge in the meditative joy of quilting, the “Quilt As You Go” wine tote project is an absolute winner. Gather your fabrics, fire up your sewing machine, and prepare to spread some handmade holiday cheer!