
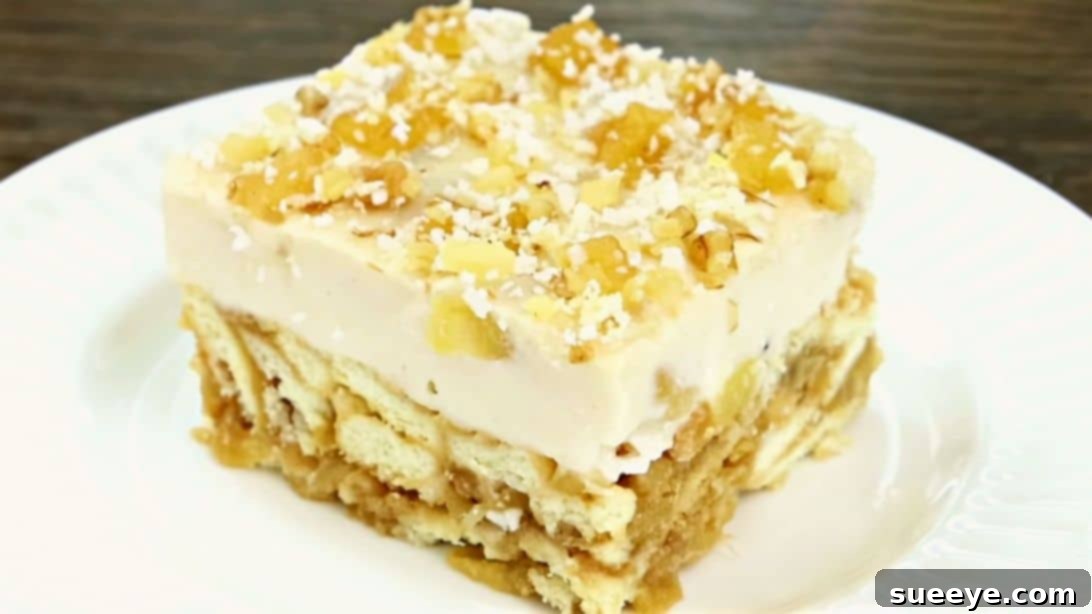
Effortless No-Bake Caramelized Apple and Cinnamon Delight
Prepare to discover your new favorite dessert! This incredibly easy, layered treat combines the comforting flavors of sweet caramelized apples and warm cinnamon, all without the need for an oven. It’s a truly delightful experience that promises a burst of flavor and a wonderfully satisfying texture in every bite. I’ve had the pleasure of making this myself, and it’s a guaranteed crowd-pleaser that delivers on its delicious promise. A huge thank you to Hands Touch on YouTube for inspiring this fantastic, fuss-free recipe!
Whether you’re looking for a quick dessert for an impromptu gathering, a comforting treat on a chilly evening, or simply a sweet indulgence that doesn’t demand hours in the kitchen, this no-bake apple dessert is your answer. Its simple preparation makes it perfect for beginners, while its sophisticated taste will impress even the most seasoned dessert connoisseurs. The harmonious blend of crunchy biscuit base, soft spiced apples, and luscious cream creates an unforgettable dessert experience that you’ll want to revisit again and again.
Ingredients:
For the Biscuit and Caramelized Apple Base:
This foundational layer provides a delightful crunch and a robust apple-cinnamon flavor that perfectly complements the creamy top. Selecting good quality biscuits is key here, as they form the backbone of your dessert.
- 1 cup of digestive biscuits (or similar plain, sweet biscuits)
- 2 medium-sized pieces of apple (Granny Smith for a tart contrast, or Fuji/Gala for sweetness)
- 2 tbsp of granulated sugar
- ¼ tsp of ground cinnamon powder
- 1 tbsp of unsalted butter
- 2 tbsp of finely chopped walnuts (or pecans for a slight variation)
For the Velvety Cream Mixture:
The creamy layer is what binds all the flavors together, offering a smooth, luxurious texture. Its subtle sweetness and hint of cinnamon make it truly irresistible.
- 1 medium-sized piece of apple
- 2 tbsp of unsalted butter
- 2 tbsp of granulated sugar
- A pinch of ground cinnamon powder
- 1 tbsp of additional granulated sugar (for the milk mixture)
- 1 cup of whole milk (full-fat milk will yield a creamier result)
- 2 tbsp of cornstarch (cornflour)
For the Irresistible Toppings:
These finishing touches add both visual appeal and an extra layer of texture and flavor.
- Additional chopped walnuts
- Desiccated coconut (for a tropical hint, optional)
Directions:
Crafting this no-bake dessert is a straightforward and enjoyable process. Follow these detailed steps to achieve a perfect layered treat every time.
Step 1: Prepare the Biscuit Base and First Apple Layer
Begin by creating the flavorful foundation of your dessert. Take the digestive biscuits and break them into smaller, irregular pieces. You can do this by hand or by placing them in a Ziploc bag and crushing them with a rolling pin for a finer crumb. Transfer these broken biscuits into a large mixing bowl, setting them aside for now. Next, meticulously peel and wash the two apples designated for this layer. Once clean, grate them using a coarse grater; this ensures they soften quickly and meld beautifully into the base.
Place a deep, large pan or skillet on your stove over medium heat. Carefully transfer the grated apples into the heated pan. To these, add 2 tablespoons of granulated sugar, ¼ teaspoon of cinnamon powder, and 1 tablespoon of unsalted butter. The butter will help in the caramelization process and add a rich depth of flavor. Stir all the ingredients together thoroughly, ensuring the apples are evenly coated. Allow this mixture to cook for approximately 12 to 13 minutes, stirring occasionally, until the apples have significantly softened and most of their moisture has evaporated, leaving behind a fragrant, slightly caramelized apple reduction.
Once the apple mixture is ready, remove it from the heat and add it directly into the bowl with the crushed biscuits. Introduce 2 tablespoons of finely chopped walnuts into the bowl, which will add a delightful crunch and nutty flavor to the base. Give everything a good, thorough mix until the biscuits are well coated with the apple mixture. This ensures every bite has a harmonious blend of flavors and textures.
Now, transfer this apple and biscuit mixture into your chosen casserole or baking dish (a 9×13 inch rectangular dish or an 8-inch round dish works well). Using the back of a spoon or your clean hands, press the mixture down firmly and evenly across the bottom of the dish. This creates a compact and stable base for your subsequent layers. Set this prepared base aside to cool slightly while you prepare the creamy filling. In a separate large mixing bowl, whisk together the cornstarch and milk until the mixture is uniform and completely free of lumps. This is crucial for a smooth cream; any lumps now will result in a grainy texture later. Set this cornstarch-milk slurry aside.
Step 2: Cook the Caramelized Apples and Prepare the Creamy Layer
For the second layer, begin by peeling the remaining apple and slicing it into small, uniform cubes. Place a clean, deep pan on the stove over medium heat. Melt 2 tablespoons of unsalted butter in the pan, allowing it to bubble gently. Add the cubed apple slices to the melted butter and sauté them for about 10 to 15 seconds. Then, sprinkle in 2 tablespoons of sugar and a pinch of cinnamon powder. Mix everything well, ensuring the apples are coated in the buttery sugar and spice mixture. Continue to cook over medium heat for approximately 8 to 10 minutes, stirring occasionally, until the apples become tender and translucent, and their natural juices have mostly evaporated, leaving them beautifully caramelized.
Once the apples are softened and caramelized, scoop out about a quarter to a third of these cooked apples and reserve them in a small bowl for garnish later. This will add a lovely textural and visual element to the top of your dessert. Now, grab the previously prepared cornstarch-milk mixture and give it another good stir to ensure the cornstarch hasn’t settled at the bottom. Pour this mixture directly into the pan with the remaining caramelized apples.
Continue cooking over medium heat, stirring continuously with a whisk or spoon. As the mixture heats up, the cornstarch will begin to activate and thicken the milk, creating a luscious, pudding-like cream. Add the final tablespoon of sugar to the mixture and continue stirring constantly until it reaches a thick, velvety consistency, similar to a pastry cream or custard. It should coat the back of your spoon without running off too quickly. Be patient and keep stirring to prevent scorching the bottom of the pan and to ensure a smooth, lump-free cream.
Immediately transfer this warm milk and apple cream mixture on top of the biscuit base in your dish. Use a spatula or the back of a spoon to gently wiggle and spread the cream evenly, ensuring it covers the entire biscuit layer. Now, arrange the reserved caramelized apple cubes evenly over the top of the cream. For an extra touch of texture and visual appeal, generously sprinkle some additional chopped walnuts and desiccated coconut over the entire dessert. These toppings add a wonderful contrast to the soft cream and apples.
Allow the assembled dessert to cool completely at room temperature for about 30 minutes to an hour before transferring it to the refrigerator. It is crucial to let it chill for at least 3 hours, or ideally overnight, to allow the cream to fully set and for the flavors to meld beautifully. The longer it chills, the firmer and more cohesive the dessert will become. Serve chilled and enjoy this exquisite no-bake creation!
Why This Easy No-Bake Apple Dessert is a Must-Try
There are countless reasons why this no-bake apple and cinnamon dessert will become a cherished recipe in your culinary repertoire. First and foremost, its “no-bake” nature is a significant advantage, especially during warm months or when oven space is limited. It simplifies the entire dessert-making process, making it accessible even for novice cooks. The combination of tender, spiced apples with a rich, creamy custard and a crunchy biscuit base offers a symphony of textures and flavors that is both comforting and sophisticated.
Moreover, apples and cinnamon are a classic pairing, evoking feelings of warmth and home. This dessert captures that timeless essence perfectly. It’s also highly adaptable; you can easily adjust the amount of cinnamon to your preference or even experiment with other spices like nutmeg or cardamom. The relatively quick preparation time, especially after the initial chilling, means you can enjoy a gourmet-tasting dessert without spending hours in the kitchen.
This recipe is also incredibly versatile for various occasions. It’s elegant enough for a dinner party, yet comforting enough for a casual family meal. It travels well, making it an excellent option for potlucks or picnics where refrigeration is available. Plus, the minimal effort required truly makes it a joy to prepare, leaving you more time to savor the moment with loved ones.
Tips for Perfection
- Apple Choice Matters: For the caramelized layers, a firm apple that holds its shape well when cooked is ideal. Granny Smith offers a lovely tartness that balances the sweetness, while Fuji or Gala apples provide a sweeter, milder flavor.
- Don’t Rush the Apples: Ensure the apples in both steps are cooked until truly softened and translucent. This maximizes their flavor and ensures a pleasant texture in the final dessert. Evaporating most of their juices also prevents a watery dessert.
- Lump-Free Cream is Key: When whisking the cornstarch and milk, make sure there are absolutely no lumps. Continue stirring constantly as the cream mixture cooks to prevent sticking and to achieve a silky-smooth consistency. If you find lumps, you can quickly pass the cooked cream through a fine-mesh sieve before pouring it over the base.
- Press the Base Firmly: A well-compressed biscuit base will prevent crumbling when serving and provide a stable foundation for the creamy layers.
- Chilling Time is Essential: Do not cut short the chilling time. This allows the cream to set properly and the flavors to fully meld, resulting in a firm, sliceable dessert. Overnight chilling is always recommended for the best results.
- Even Spreading: When layering the cream, gently spread it to avoid disturbing the biscuit base below. A rubber spatula works best for this.
Creative Variations and Customizations
While the original recipe is divine, feel free to unleash your creativity and customize this dessert to your liking:
- Biscuit Alternatives: Instead of digestive biscuits, try graham crackers, shortbread cookies, or even gingersnaps for a spicier kick.
- Nutty Twists: Experiment with different nuts like toasted pecans, almonds, or hazelnuts in the base and for topping.
- Spice It Up: Enhance the warm spice profile by adding a tiny pinch of nutmeg, cardamom, or even a touch of allspice to the apple or cream layers.
- Caramel Drizzle: For an extra indulgent treat, drizzle some homemade or store-bought caramel sauce over the top before serving.
- Chocolate Chips: A sprinkle of mini chocolate chips in the cream layer or as a topping can add an unexpected but delightful flavor dimension.
- Fruity Additions: While apple is the star, a handful of dried cranberries or raisins can be added to the biscuit base for extra chewiness and flavor.
- Cream Cheese Layer: For a richer, tangier cream, consider folding in softened cream cheese (about 4 oz) to the cooled milk mixture before layering.
- Individual Servings: Instead of a large casserole, assemble this dessert in individual ramekins or clear glasses for a beautiful presentation.
Serving and Storage Suggestions
This No-Bake Caramelized Apple and Cinnamon Delight is best served chilled, directly from the refrigerator. For an extra touch of indulgence, you can serve it with a dollop of whipped cream, a scoop of vanilla bean ice cream, or a light dusting of cinnamon. It pairs wonderfully with a warm cup of coffee, tea, or even a glass of sparkling cider.
To store any leftovers, cover the dish tightly with plastic wrap or aluminum foil and refrigerate. The dessert will remain fresh and delicious for up to 3-4 days. While it can be frozen for longer storage, the texture of the cream might change slightly upon thawing. If freezing, ensure it’s in an airtight container for up to one month. Thaw overnight in the refrigerator before serving.
Conclusion: Your Next Favorite No-Bake Apple Dessert Awaits!
This no-bake caramelized apple and cinnamon dessert truly embodies the essence of comfort food with an elegant twist. Its simplicity in preparation belies its rich, complex flavors and satisfying textures. From the crisp, buttery biscuit base to the soft, spiced apples and the smooth, creamy custard, every element comes together in perfect harmony to create a truly unforgettable experience. It’s a testament to the fact that you don’t need an oven to create something spectacular.
So, why wait? Gather your ingredients, follow these easy steps, and treat yourself and your loved ones to this magnificent dessert. It’s perfect for any occasion, promising smiles and satisfied palates with every single bite. Don’t forget to visit Hands Touch’s YouTube channel for more amazing culinary inspirations!
*All images for this recipe are graciously credited to Hands Touch via YouTube. We highly recommend visiting her channel and subscribing for a wealth of wonderful recipes and creative ideas!