
DIY Watering Can LED Cascading Lights: Create a Magical Outdoor Oasis
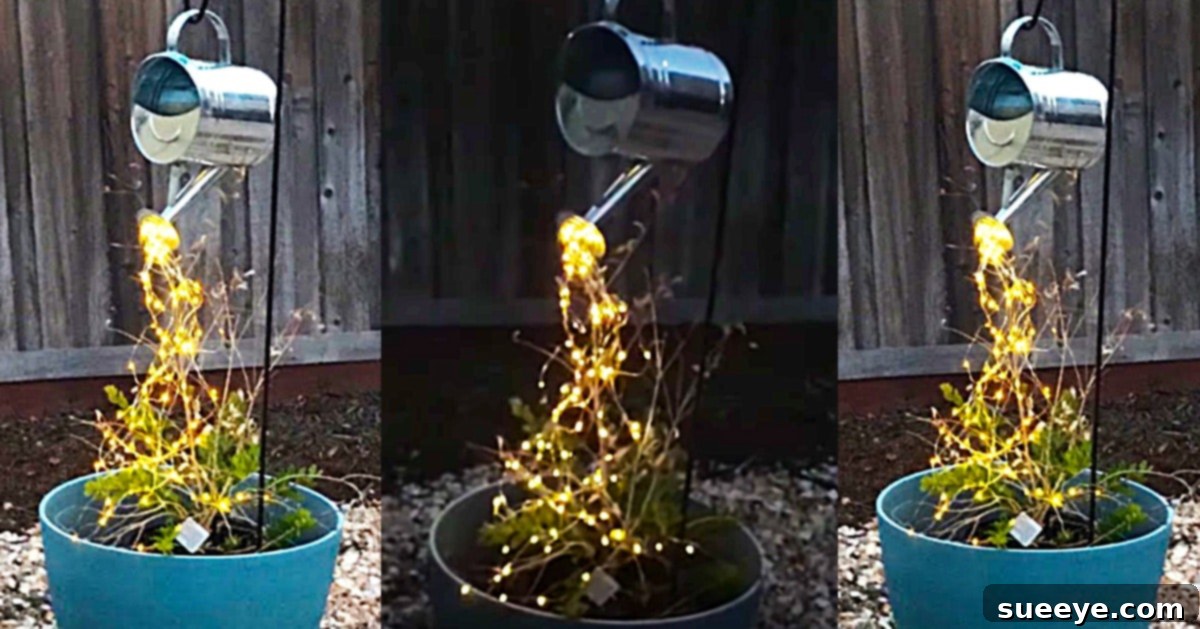
Imagine your garden or patio bathed in the soft, whimsical glow of lights that appear to pour from a watering can, mimicking shimmering water droplets. This enchanting visual is not a dream but an incredibly easy and rewarding DIY project that can transform any outdoor space into a magical haven. When I first encountered the watering can light video tutorial by Life At 50 & Beyond on YouTube, I was instantly captivated. This brilliant idea falls squarely into the category of both the cutest and simplest DIYs you’ll ever undertake.
With just a handful of readily available materials – primarily a watering can, a string of LED fairy lights, and a reliable hot glue gun – you can bring this captivating illumination to life. These cascading fairy lights cast a luminous and soft glow, perfect for adding ambiance to evening gatherings or simply enjoying a quiet moment outdoors. Opt for LED lights with a flickering option, and your display will astonishingly resemble real cascading water, adding an extra layer of enchantment. Whether placed on either side of your front door, nestled among garden plants, or illuminating a cozy patio corner, these unique lights are sure to spark joy and wonder every night.
Why Choose Watering Can LED Lights for Your Outdoor Space?
In a world of generic outdoor lighting, DIY watering can LED lights offer a refreshingly unique and personalized touch. Their appeal extends beyond mere aesthetics, providing several compelling reasons to make them your next home improvement project:
- Unparalleled Whimsy and Charm: The concept of lights pouring like water from a can evokes a sense of fairy tale magic, instantly elevating your garden or patio’s atmosphere. It’s an unexpected and delightful visual that captures attention.
- Budget-Friendly Elegance: Compared to designer outdoor fixtures, creating these lights is incredibly cost-effective. You repurpose common items and use inexpensive LED strings, making elegant lighting accessible to everyone.
- Remarkably Easy to Assemble: You don’t need to be a seasoned DIY expert to tackle this project. The steps are straightforward, requiring minimal tools and skills, making it perfect for beginners.
- Versatile Decor Solution: These lights aren’t limited to just one spot. They can enhance garden beds, line pathways, brighten up a porch, adorn a deck, or even serve as charming centerpieces for outdoor events and parties.
- Customization at Your Fingertips: From the type and color of your watering can to the style and hue of your LED lights, you have complete creative control. Match them to your existing decor or create a vibrant contrast.
- Energy Efficient Glow: LED string lights consume very little power, especially if you choose solar-powered options. This means beautiful illumination without a hefty increase in your electricity bill, making them an eco-friendlier choice.
Embracing this DIY project allows you to infuse your personality into your outdoor decor, crafting a space that feels truly yours – whimsical, inviting, and utterly magical.
Gathering Your Materials for Cascading Fairy Lights
Before you embark on this delightful DIY journey, gathering the right materials is crucial. While the basic list is simple, understanding your options can help you create the most effective and aesthetically pleasing watering can light display.
Essential Materials:
- 1 Watering Can: This is your primary vessel.
- Type: Metal watering cans (galvanized steel, copper, or painted) tend to offer a more rustic and durable look, often preferred for outdoor decor. Plastic cans are lighter and come in a vast array of colors, offering more immediate customization.
- Size and Spout: Consider the size relative to where it will be placed. Crucially, examine the spout. A can with multiple small holes in its spigot is ideal, as it allows for a more natural “water” effect when feeding through the LED wires.
- Aesthetics: New cans are fine, but a vintage or distressed can can add character. You can always spray paint a new can to match your desired aesthetic.
- 1 Set of LED String Lights: The heart of your cascading effect.
- Power Source:
- Solar-Powered: Highly recommended for outdoor use. They charge during the day and automatically light up at dusk, requiring no external power source or battery changes.
- Battery-Operated: Offer flexibility in placement but require battery replacements. Look for outdoor-rated battery packs.
- Plug-in: Best for areas near an outdoor outlet. Ensure they are specifically rated for outdoor use and use a weather-resistant extension cord if necessary.
- Light Features:
- Color: Warm white is popular for a cozy, fairy-like glow. Cool white offers a crisp, modern look. Multi-colored options are great for festive or themed displays.
- Flickering Mode: Essential if you want to create the illusion of flowing water. Many modern LED strings offer this feature, often controlled by a remote.
- Length: A longer string (e.g., 6-10 feet or more of lighted length) will allow for more “strands” of light to emerge from the spout, creating a richer, fuller cascade.
- Durability: Ensure your LED lights are weatherproof or waterproof (look for an IP rating like IP44 or higher) for outdoor longevity.
- Power Source:
- Hot Glue Gun & Glue Sticks: Your primary tool for securing the lights.
- Waterproof Glue Sticks: If available, opt for glue sticks designed for outdoor or waterproof applications to enhance durability against the elements. Otherwise, standard hot glue will work but may degrade faster outdoors.
- A Garden Hook or Shepherd’s Hook: To suspend your watering can.
- Height: Choose a hook tall enough to allow the lights to cascade freely and for the watering can to be at a visible, appealing height.
- Stability: Ensure the hook is sturdy enough to hold the weight of your watering can (even with the lights inside) and withstand wind.
- Design: Shepherd’s hooks come in various decorative styles that can complement your garden’s aesthetic.
Optional, but Recommended Materials:
- Silicone Sealant: For an extra layer of waterproofing around the wires exiting the spigot, especially if using standard hot glue.
- Small Zip Ties or Floral Wire: To discreetly secure the battery pack/solar panel inside or outside the watering can, and to manage excess wire.
- Wire Cutters: If you need to trim any non-essential wiring or separate strands (be careful not to cut the main circuit).
- Spray Paint (Outdoor Grade): If you wish to customize the color of your watering can to match your decor.
Having these items ready will ensure a smooth and enjoyable crafting experience, leading to a beautiful and lasting garden feature.
Step-by-Step Directions: Creating Your Cascading Light Masterpiece
Creating your watering can LED cascading lights is a straightforward process that yields stunning results. Follow these simple steps, inspired by the tutorial from Life At 50 & Beyond, to bring your magical garden lighting to life.
Step 1: Prepare Your Materials
Before you begin assembly, take a moment to prepare. Ensure your watering can is clean and dry. If you plan to paint your watering can, do so now and allow it ample time to dry completely according to the paint manufacturer’s instructions. Test your LED string lights to confirm they are working correctly, and have your hot glue gun plugged in and heated up.
Step 2: Position the LED String Lights Inside the Can
Carefully place the battery pack or solar panel component of your LED string lights inside the watering can. The goal is to secure this part discreetly while allowing the main string of lights to emerge. If it’s a solar panel, ensure it can catch sunlight if mounted on the can’s exterior, or consider where it will be if the can is suspended. For battery packs, you can secure them to the inside wall of the can with a small piece of hot glue or a zip tie to prevent them from rattling.
Unfurl the entire length of your LED string lights, gently coiling the majority of the string inside the watering can’s body. Leave enough length to extend through the spout, creating the desired cascading effect. The idea is to have plenty of lights available to feed through the spigot holes, making the “water” look dense and luminous.
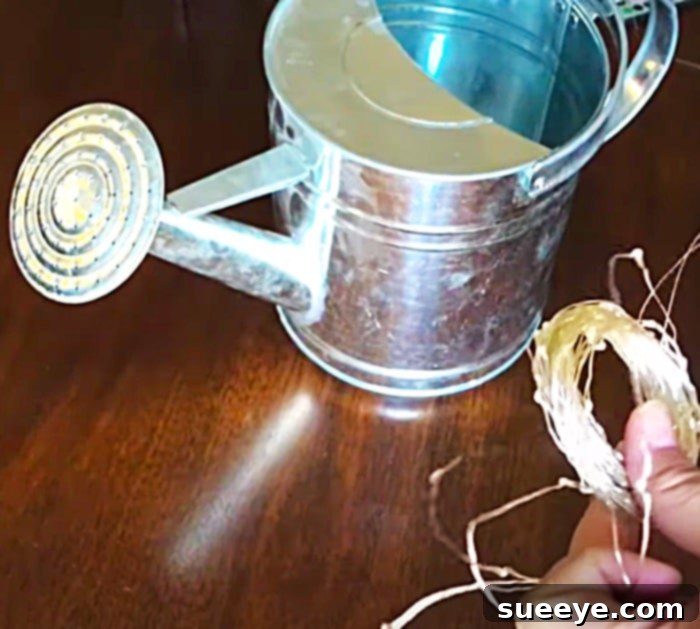
Step 3: Feed Lights Through the Spigot Holes
This is where the magic happens! Gently begin poking the individual LED wires or small clusters of wires down into the holes of the watering can’s spigot. Take your time to distribute the lights evenly across all available holes. The more holes you use, the more realistic and spread out your “water flow” will appear.
Once you have guided the desired number of wires through each hole, let them hang naturally. Experiment with different lengths to create a dynamic, flowing effect – some longer, some shorter, mimicking actual water droplets cascading. Don’t be afraid to adjust until you achieve a look you love.
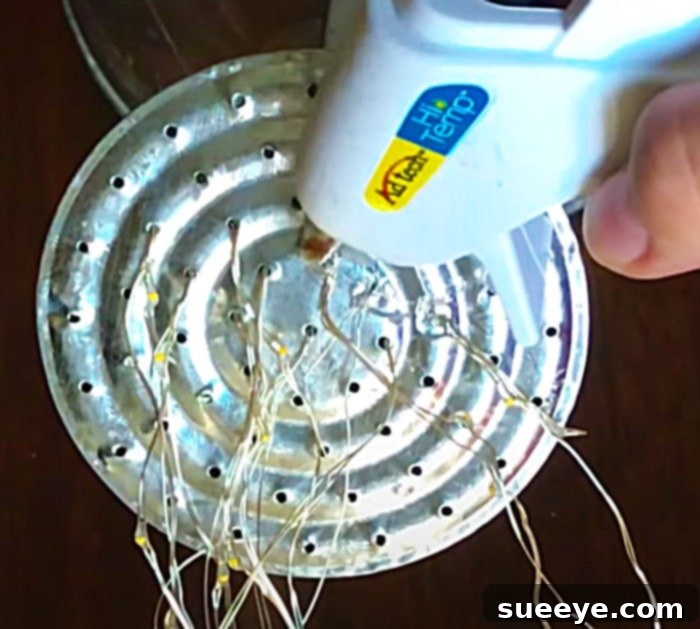
Step 4: Secure the Lights with Hot Glue
With the LED wires perfectly positioned in the spigot, it’s time to secure them. Apply a dab of hot glue around each wire where it exits the spigot holes. This serves two main purposes: it holds the lights firmly in place, preventing them from slipping back into the can, and it helps to seal the holes, offering some protection against moisture if you’re using outdoor-rated glue. Allow the glue to cool and harden completely.
For extra weather resistance, especially if your watering can will be exposed to significant rain, consider adding a thin layer of outdoor-grade silicone sealant over the hot glue once it’s dry. This creates a more robust waterproof barrier.
Step 5: Install Your Watering Can Light Display
Now, it’s time to choose the perfect spot for your enchanting creation. Drive your garden hook or shepherd’s hook firmly into the ground in your desired location. Ensure it’s stable and can support the weight of the watering can. Hang the handle of your newly decorated watering can onto the hook. Adjust the height and angle of the can so the cascading lights fall beautifully, creating the desired “pouring” effect.
Turn on your LED lights to admire your handiwork! Make any final adjustments to the drape of the lights or the can’s position to achieve the most magical and visually appealing display. You’ve successfully created a breathtaking piece of garden art!
Creative Variations and Design Inspiration
While the basic watering can light design is charming on its own, there are countless ways to customize and enhance your display to truly reflect your style and elevate your outdoor decor:
- Multiple Cans, Varied Heights: Instead of just one, consider using a cluster of two or three watering cans suspended at different heights. This creates a more dynamic and expansive light display, mimicking a miniature waterfall or a series of light streams.
- Color Theme Customization: While warm white is classic, don’t shy away from colored LED lights. Blue lights can enhance the water illusion, green can blend seamlessly into garden foliage, and multi-colored lights are perfect for festive occasions or a playful touch.
- Watering Can Makeover: Give your watering can a unique personality! Spray paint it in a vibrant hue, a metallic finish (like copper or silver), or distress it for a vintage, antique look. You could even stencil designs or hand-paint intricate patterns on its surface before adding the lights.
- Integrated Greenery: Enhance the natural feel by wrapping artificial ivy or small floral garlands around the shepherd’s hook or the handle of the watering can. For a living display, place potted plants or climbing vines at the base of the hook, allowing them to grow around and complement the lights.
- Seasonal and Holiday Themes: These lights are incredibly versatile for seasonal decorating. For Halloween, use orange or purple flickering lights and add some spooky cobwebs. During Christmas, adorn the can with miniature festive bows, pinecones, or red and green LEDs.
- Indoor Charm: Don’t limit these beauties to the outdoors! With battery-operated lights, a small watering can could make a whimsical addition to a sunroom, a child’s bedroom, or even as a unique centerpiece for an indoor table.
- Fairy Garden Addition: Integrate your watering can light into a larger fairy garden display. Position it to “water” miniature houses, tiny bridges, or other whimsical elements, bringing an extra layer of magic to the scene.
Let your imagination be your guide! These variations allow you to transform a simple DIY into a personalized work of art that perfectly complements your home and garden.
Maintenance Tips for Longevity and Brilliance
To ensure your enchanting watering can LED lights continue to glow brightly and withstand the elements, a little ongoing care goes a long way. Follow these maintenance tips to maximize their lifespan and beauty:
- Regular Battery Checks (for battery-operated lights): If you’re using battery-powered LEDs, keep an eye on their brightness. Dimming lights are a clear indicator that batteries need replacing. Consider rechargeable batteries for an eco-friendlier and more cost-effective solution.
- Solar Panel Cleaning (for solar lights): For solar-powered units, periodically wipe the solar panel with a soft, damp cloth to remove dust, dirt, and debris. A clean panel ensures maximum sun exposure and efficient charging, leading to brighter and longer-lasting illumination at night.
- Inspect Glue/Sealant: Over time, exposure to sun and rain can cause hot glue or sealant to degrade. Periodically check the spigot area where the wires are secured. If you notice any cracking or loosening, reapply hot glue or silicone sealant to maintain the integrity of the seal and secure the lights.
- Protect from Extreme Weather: While many LED lights are outdoor-rated, prolonged exposure to severe weather conditions (heavy storms, blizzards, extreme heat, or freezing temperatures) can shorten their lifespan. Consider bringing your watering can indoors during harsh weather events or covering it.
- Check for Wire Damage: Occasionally inspect the visible wires for any nicks, cuts, or fraying, especially if the can is in an area with high activity or exposed to wildlife. Damaged wires can affect performance or, in rare cases, pose a safety risk.
- Clean the Watering Can: If your watering can gets dirty, simply wipe it down with a damp cloth. Avoid harsh chemicals that might damage the can’s finish or the light wires.
- Winter Storage: If you live in an area with harsh winters, it’s best to store your watering can light indoors in a dry place during the off-season. This prevents frost damage, corrosion, and extends the life of both the can and the lights.
By dedicating a small amount of time to these simple maintenance tasks, your DIY watering can LED cascading lights will continue to cast their magical glow, enhancing your outdoor space for seasons to come.
Safety Considerations for Outdoor Lighting
While this DIY project is generally safe and straightforward, it’s important to keep a few safety considerations in mind, especially when dealing with outdoor electrical components and hanging objects:
- Use Outdoor-Rated Lights: Always ensure that any LED string lights you use for an outdoor project are explicitly rated for outdoor use. These lights are designed with weather-resistant casings and wiring to withstand moisture and temperature fluctuations.
- Waterproofing Connections: If using plug-in LED lights, ensure all electrical connections (plugs, extension cord connections) are housed in a waterproof outlet cover or a weather-resistant enclosure. Never expose unrated electrical connections to rain or moisture.
- Secure Installation of Hooks: The garden hook or shepherd’s hook should be firmly anchored in the ground. Test its stability by gently pulling on it before hanging the watering can. A wobbly hook could cause the can to fall, potentially damaging the lights or posing a hazard.
- Placement Away from Traffic: Position your watering can light in an area where it won’t be easily knocked over by pets, children, or garden equipment. Ensure the cascading lights don’t create a tripping hazard.
- Avoid Overloading Circuits (for plug-in lights): If you’re connecting multiple sets of plug-in lights, be mindful of your outdoor outlet’s capacity. Avoid overloading the circuit, which can lead to tripped breakers or fire hazards.
- Heat Check: While LED lights generally run cool, occasionally check the battery pack or solar unit for any unusual heat. If anything feels excessively hot, discontinue use and inspect for faults.
- Child and Pet Safety: Keep small components (like batteries if they come loose) and electrical wires out of reach of young children and curious pets to prevent accidental ingestion or entanglement.
By following these safety guidelines, you can enjoy your beautiful, handcrafted outdoor lighting feature with complete peace of mind, knowing it’s both stunning and secure.
Conclusion: Illuminate Your World with DIY Magic
The journey from a simple watering can and a string of LED lights to a mesmerizing cascade of “water” droplets is a testament to the power of creative DIY. This project is more than just adding illumination; it’s about infusing your outdoor space with a sense of wonder, charm, and personalized magic. It’s a testament to how easily you can transform the mundane into the magical, creating a visual delight that captivates and soothes.
Whether you’re looking to add a whimsical touch to your garden, create a romantic ambiance on your patio, or simply enjoy a unique piece of outdoor art, these DIY watering can LED cascading lights are an excellent choice. They are proof that beauty doesn’t have to be complicated or expensive. So gather your materials, follow these straightforward steps, and prepare to be enchanted as your very own custom-made waterfall of light brings a delightful glow to your evenings.
Embrace the joy of crafting and watch as your outdoor haven transforms into a radiant, fairy-tale landscape. Share your beautiful creations and inspire others to discover the simple magic of DIY!