
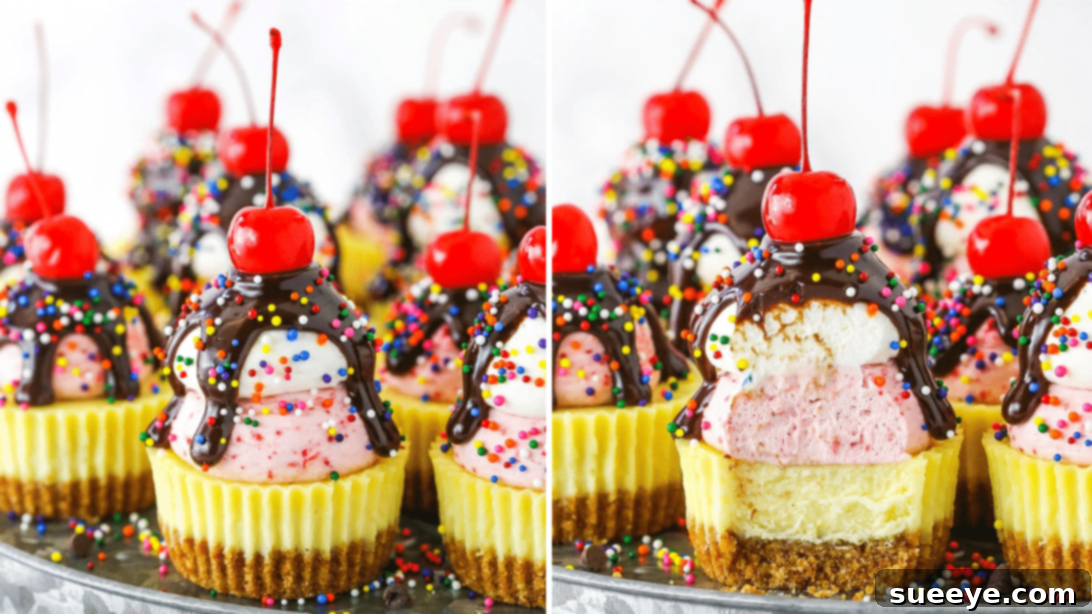
Prepare to delight your taste buds with a dessert that transcends the ordinary: **Ice Cream Sundae Mini Cheesecakes**! These aren’t just any cheesecakes; they’re a joyous fusion of creamy cheesecake and the playful charm of an ice cream sundae, all conveniently packaged in miniature form. Perfect for any gathering, these bite-sized treats promise a burst of flavor and fun that will have everyone reaching for more. Their individual portions make them an ideal choice for parties, family celebrations, or simply a special treat at home, eliminating the need for plates and forks. Get ready to impress your guests with these irresistibly delicious and visually stunning **mini cheesecakes** that effortlessly combine two beloved desserts into one unforgettable experience.
RELATED: Easy Mini Lemon Blueberry Cheesecakes Recipe
Crafting these delectable **Ice Cream Sundae Mini Cheesecakes** is a rewarding experience, and we’ll guide you through each step to ensure your success. This recipe is a fantastic way to elevate your dessert game without being overly complicated. For those who prefer visual instructions, a detailed video tutorial by Life, Love and Sugar on YouTube provides comprehensive guidance and additional tips, making the process even smoother. Follow our detailed instructions below to create these perfect **party desserts** that are guaranteed to be a hit!
Why You’ll Love These Ice Cream Sundae Mini Cheesecakes:
These **mini cheesecakes** stand out for several reasons, making them a must-try recipe for any dessert enthusiast. Firstly, their **individual serving size** is incredibly convenient, offering a perfectly portioned treat for each guest, which is ideal for parties and events. No more messy slicing or serving large cheesecakes! Secondly, the **unique flavor combination** of rich, creamy cheesecake infused with the beloved elements of an ice cream sundae creates a truly memorable dessert experience. You get the best of both worlds in every bite. Thirdly, they are surprisingly **easy to make**, even for novice bakers, especially with our clear instructions and the helpful video tutorial. Finally, their **stunning presentation** makes them a show-stopping centerpiece on any dessert table, inviting everyone to indulge in their delightful charm.
Essential Ingredients for Ice Cream Sundae Mini Cheesecakes:
To create these delightful **Ice Cream Sundae Mini Cheesecakes**, you’ll need a selection of fresh, high-quality ingredients for each component: the crunchy crust, the luscious cheesecake filling, the two varieties of light whipped cream, and the decadent chocolate sauce. Preparing your ingredients in advance and ensuring items like cream cheese and heavy cream are at the correct temperature will contribute significantly to the success of your dessert.
For the Irresistible Crust:
- ¾ cup of sugar cone or waffle cone crumbs (These crumbs are key to achieving that authentic ice cream sundae crunch and flavor, offering a delightful twist compared to traditional graham cracker crusts.)
- 2 tbsp of granulated sugar (Adds a touch of sweetness to complement the cones.)
- 4 tbsp of unsalted butter, melted (Binds the crumbs together, creating a firm and flavorful base.)
For the Velvety Filling:
- 12 oz of full-fat cream cheese, at room temperature (Using room temperature cream cheese is crucial for a smooth, lump-free filling. It blends much better with other ingredients.)
- ½ cup of granulated sugar (Provides the perfect balance of sweetness to the tangy cream cheese.)
- 2 tbsp of all-purpose flour (Acts as a stabilizer, helping the cheesecake set beautifully and preventing cracks.)
- ½ cup of sour cream (Adds a lovely tang and moisture, contributing to the cheesecake’s signature creamy texture.)
- 1½ tsp of pure vanilla extract (Enhances the overall flavor profile with its warm, aromatic notes.)
- 2 large eggs (Bind the filling together, providing structure and richness. Ensure they are also at room temperature for optimal emulsification.)
For the Classic Vanilla Whipped Cream Topping:
- ½ cup of heavy whipping cream, well-chilled (Cold cream whips up faster and holds its shape better.)
- 5 tbsp of powdered sugar (Sweetens the cream and helps stabilize it.)
- ½ tsp of pure vanilla extract (Infuses the whipped cream with a delightful classic flavor.)
For the Fruity Strawberry Whipped Cream Topping:
- ½ cup of freeze-dried strawberries (These provide intense strawberry flavor and a beautiful natural pink color without adding excess moisture.)
- ¾ cup + 2 tbsp of heavy whipping cream, well-chilled (The extra cream here accommodates the added volume of strawberry powder.)
- ½ cup of powdered sugar (For sweetness and stabilization.)
For the Decadent Chocolate Sauce & Garnishes:
- 3 oz of semi-sweet chocolate chips (Good quality chocolate will yield a richer, smoother sauce.)
- 6 tbsp of heavy whipping cream (Used to create a luscious ganache-like sauce.)
- Sprinkles (A quintessential sundae topping for visual appeal and a touch of fun!)
- Maraschino cherries, with stems (The classic finishing touch, adding a pop of color and traditional sundae flair.)
How to Make Ice Cream Sundae Mini Cheesecakes: A Step-by-Step Guide:
Creating these delightful **Ice Cream Sundae Mini Cheesecakes** involves several distinct stages, from crafting the perfect crust to assembling the final decorative touches. Each step is designed to build layers of flavor and texture, culminating in a dessert that is as beautiful as it is delicious. Pay attention to temperature and mixing techniques for the best results.
Step 1: Prepare the Crunchy Cone Crust
Begin by preheating your oven to 325°F (160°C). Line a standard 12-cup muffin pan with cupcake liners; these will make it easier to remove your finished cheesecakes. In a medium mixing bowl, combine the crushed sugar or waffle cone crumbs, granulated sugar, and the melted butter. Mix these ingredients thoroughly until the crumbs are evenly moistened and resemble wet sand. This ensures a consistent crust. Divide this mixture equally among the prepared cupcake liners, placing a spoonful into the bottom of each. Using the back of a spoon or your fingertips, press the crumbs down firmly to form a compact and even crust. This firm pressing is essential to prevent the crust from crumbling when the cheesecakes are served. Bake the crusts in the preheated oven for approximately 5 minutes. This quick bake helps to set the crust and enhance its flavor. Once baked, remove the pan from the oven and set it aside to cool completely while you prepare the cheesecake filling. Cooling prevents the crust from becoming soggy.
Step 2: Craft the Silky Cheesecake Filling
Reduce your oven temperature to 300°F (150°C). In a large mixing bowl, using an electric mixer on low speed, beat together the softened cream cheese, granulated sugar, and flour. Mix until the ingredients are just combined and smooth, making sure there are no lumps of cream cheese. It’s important not to over-mix at this stage, as too much air can cause the cheesecake to crack during baking. Scrape down the sides of the bowl with a spatula to ensure all ingredients are incorporated. Next, add the sour cream and vanilla extract, continuing to beat on low speed until just combined. Finally, gently beat in the eggs one at a time, mixing only until each egg is fully incorporated before adding the next. Remember to scrape down the sides of the bowl after each egg addition to maintain a uniform batter. Over-beating the eggs can incorporate too much air, which may also lead to cracking.
Step 3: Bake and Cool the Mini Cheesecakes
Carefully divide the creamy cheesecake filling among the prepared cupcake liners, filling each cup until it’s nearly full. Place the muffin pan back into the oven and bake for about 18 minutes. The cheesecakes should appear mostly set around the edges but may have a slight jiggle in the center. Once the baking time is complete, turn off the oven but leave the cheesecakes inside with the oven door closed for an additional 10 minutes. This gradual cooling in the residual heat helps prevent the cheesecakes from deflating or cracking. After 10 minutes, open the oven door slightly (about an inch) and let the cheesecakes cool inside the oven for another 15 to 20 minutes. This extended gradual cooling is a critical step for achieving smooth, crack-free tops. Once this cooling period is over, remove the pan from the oven and transfer the cheesecakes (still in their liners) to a wire rack to finish cooling to room temperature. Finally, transfer them to the refrigerator for at least 4 hours, or preferably overnight, to chill completely and set properly. Once thoroughly chilled, gently remove them from the pan and their liners, and proceed to prepare your delightful whipped cream toppings.
Step 4: Prepare the Decadent Whipped Cream Toppings
For the classic vanilla whipped cream, ensure your heavy whipping cream is very cold. In a large, chilled mixing bowl, combine the cold heavy whipping cream, powdered sugar, and vanilla extract. Beat the mixture on high speed using an electric mixer until stiff peaks form. The cream should be thick and hold its shape when you lift the beaters. Set this aside. For the vibrant strawberry whipped cream, first, finely crush the freeze-dried strawberries in a food processor until they form a fine powder. This ensures a smooth, flavorful cream without chunky bits. In a separate large, chilled bowl, combine the remaining cold heavy whipping cream, the strawberry powder, and the powdered sugar. Beat this mixture on high speed until stiff peaks form, similar to the vanilla whipped cream. The freeze-dried strawberries will impart a beautiful natural pink hue and an intense strawberry flavor. Having separate bowls and beaters (or cleaning them thoroughly between uses) is recommended to prevent flavor transfer.
Step 5: Craft the Silky Chocolate Sauce
For the essential chocolate sauce, place the chocolate chips in a small, heatproof bowl. In a small saucepan, heat the heavy whipping cream over medium heat until it just begins to simmer or shows small bubbles around the edges; do not let it boil vigorously. Pour the hot cream directly over the chocolate chips in the bowl. Let the mixture sit undisturbed for 1 to 2 minutes. This allows the heat from the cream to melt the chocolate chips thoroughly. After waiting, gently whisk the mixture until it becomes completely smooth, glossy, and uniform. If any chocolate chips remain, you can gently heat the bowl over a double boiler or microwave for a few seconds, then whisk again until perfectly smooth. Set the chocolate sauce aside to cool slightly, allowing it to thicken to a drizzling consistency.
Step 6: Assemble and Garnish Your Sundae Cheesecakes
Once all your components are ready and the cheesecakes are fully chilled, it’s time for the fun part: assembly! Transfer each whipped cream (vanilla and strawberry) into separate piping bags fitted with your preferred decorative tips. Pipe generous swirls of both whipped creams onto the top of each mini cheesecake, alternating or layering them as desired to create an appealing sundae effect. A combination of both colors looks especially festive. Next, artfully drizzle the prepared chocolate sauce over the whipped cream. Be as creative as you like with your drizzling pattern. Finally, complete the sundae transformation by generously scattering sprinkles over the chocolate sauce and placing a single maraschino cherry (with its stem, if available, for an authentic touch) on top of each cheesecake. These small details make a big impact on the presentation. Once garnished, place your beautiful **Ice Cream Sundae Mini Cheesecakes** back into the refrigerator until you are ready to serve them. Chilling ensures they remain firm and refreshing. Serve chilled and enjoy the delightful combination of flavors and textures!
Pro Tips for Perfect Mini Cheesecakes:
Achieving bakery-quality **mini cheesecakes** is easier with a few expert tips:
- Room Temperature Ingredients: Always ensure your cream cheese and eggs are at room temperature. This is the golden rule for cheesecakes, as it ensures a smooth, lump-free batter that emulsifies perfectly, leading to a creamy, consistent texture without overmixing.
- Do Not Overmix: Overmixing introduces too much air into the cheesecake batter, which can cause the cheesecakes to puff up excessively during baking and then collapse or crack as they cool. Mix only until ingredients are just combined.
- Gradual Cooling is Key: The staged cooling process (oven off, door closed, then door ajar) is crucial. Rapid temperature changes can cause cheesecakes to crack. Patience here will be rewarded with smooth, beautiful tops.
- Firmly Press the Crust: A well-packed crust is a sturdy crust. Pressing the cone crumbs firmly into the liners prevents them from crumbling when you remove the cheesecakes, providing a stable base for your sundae creation.
- Chill Bowls and Whisks: For stiff, stable whipped cream, chill your mixing bowl and whisk attachment in the freezer for 10-15 minutes before whipping the cold heavy cream. This helps the cream whip up faster and maintain its volume.
- Quality Freeze-Dried Strawberries: For the strawberry whipped cream, ensure the freeze-dried strawberries are completely pulverized into a fine powder. Any larger pieces could alter the texture of the cream.
- Patience with Chilling: While tempting to serve immediately, allowing the **mini cheesecakes** to chill in the refrigerator for at least 4 hours (or overnight) is non-negotiable. This time allows them to firm up completely, ensuring they hold their shape and develop their full creamy texture and flavor.
Customization and Flavor Variations:
One of the best aspects of these **Ice Cream Sundae Mini Cheesecakes** is their versatility. Feel free to experiment with different flavors and toppings to make them uniquely yours!
- Crust Alternatives: Instead of sugar cone crumbs, consider using crushed Oreo cookies for a chocolatey twist, graham crackers for a classic cheesecake base, or even shortbread cookies for a buttery flavor.
- Filling Flavors: Infuse your cheesecake filling with different extracts. A hint of almond extract or orange zest could add an interesting dimension. For a chocolate version, melt in a tablespoon or two of unsweetened cocoa powder with the cream cheese.
- Whipped Cream Creativity: Beyond vanilla and strawberry, you could make a chocolate whipped cream by adding cocoa powder, or a peanut butter whipped cream. Experiment with other freeze-dried fruits like raspberries or blueberries for different fruity creams.
- Sauce Options: While chocolate is classic, a warm caramel sauce, a vibrant berry compote (raspberry or cherry), or even a white chocolate ganache would be delicious alternatives or additions.
- Garnish Galore: The possibilities for garnishes are endless! Think toasted nuts (pecans, walnuts), mini chocolate chips, shredded coconut, mini marshmallows, fresh fruit slices, or even small pieces of your favorite candy bars.
- Seasonal Variations: Adapt these for holidays! Pumpkin spice filling and a maple whipped cream for autumn, or peppermint extract in the filling and crushed candy canes for Christmas.
Serving and Storage Suggestions:
To ensure your **Ice Cream Sundae Mini Cheesecakes** are enjoyed at their best, proper serving and storage are key. These individual desserts are designed for convenience and maximum flavor impact.
Serving:
Always serve these **mini cheesecakes** well-chilled. Their creamy texture and distinct layers are best appreciated when cold. Arrange them artfully on a platter or tiered stand to showcase their beautiful toppings and colors. Since they are mini, they are perfect for a dessert bar where guests can easily pick them up. Consider having extra sprinkles and cherries on the side for guests who might want to add more personal touches, enhancing the “sundae bar” experience.
Storage:
Store any leftover **Ice Cream Sundae Mini Cheesecakes** in an airtight container in the refrigerator. This will help maintain their freshness, prevent them from absorbing other odors, and keep the whipped cream from deflating. They will remain delicious for up to 3-4 days when properly stored. If you need to store them for longer, these cheesecakes also freeze remarkably well. Without the whipped cream and liquid toppings, they can be frozen for up to 1 month. To freeze, place the plain cheesecakes (without toppings) on a baking sheet until firm, then wrap each individually in plastic wrap and store in a freezer-safe container. When ready to serve, thaw them in the refrigerator overnight and then add your freshly whipped cream and garnishes.
These **Ice Cream Sundae Mini Cheesecakes** truly are a game-changer for anyone looking for an **easy party dessert recipe idea** that’s both impressive and incredibly tasty. With their delightful combination of flavors and textures, and the convenient mini format, they are sure to become a favorite in your recipe collection. Don’t hesitate to experiment with the various customization options to make them uniquely yours. We hope you enjoy making and sharing these wonderful treats!
*All image credit for these beautiful **Ice Cream Sundae Mini Cheesecakes** belongs to Life, Love and Sugar via YouTube. We highly recommend following and subscribing to her channel for more inspiring and delicious recipes!