
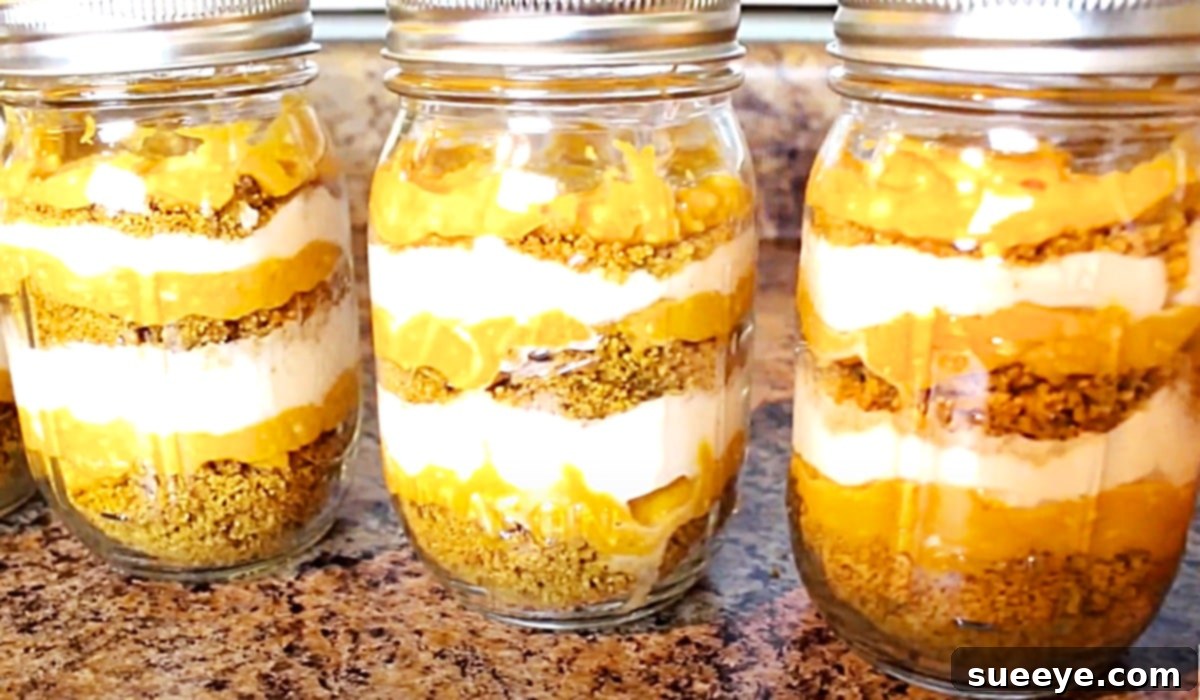
Delight your senses and impress your loved ones with an exceptionally charming and utterly delicious homemade treat: no-bake pumpkin pies served elegantly in mason jars. This ingenious idea, inspired by creative culinary minds like Kelly Lamich on YouTube, transforms a classic dessert into a convenient, portable, and visually stunning gift or individual serving. Perfect for autumn gatherings, holiday celebrations, or simply as a special surprise, these mini pumpkin pies combine the comforting flavors of fall with effortless preparation.
Forget the oven and the stress of traditional baking. This recipe embraces the “icebox pie” concept, requiring no baking whatsoever. All you need are a few basic ingredients for a classic pumpkin pie, a set of charming mason jars, and a desire to create something truly special. Not only do these make an exquisite presentation for guests, but they also offer a fantastic take-home gift that’s both thoughtful and delicious. Imagine serving a full-sized pie and then sending your guests off with their own individual, perfectly portioned pumpkin pie in a jar – it’s a memorable touch that truly elevates any occasion.
Beyond their aesthetic appeal, these mason jar pumpkin pies are incredibly practical. They offer portion control, reduce food waste, and are ideal for picnics, potlucks, or any event where individual servings are preferred. Their sealed nature makes them easy to transport and keeps them fresh, ensuring that every bite is as delightful as the first. Get ready to explore a world of simple elegance and irresistible flavor with this guide to crafting your own no-bake pumpkin pie mason jar wonders.
Essential Ingredients For Crafting Your Mason Jar Pumpkin Pies:
Creating these delightful no-bake pumpkin pies in jars begins with a selection of readily available ingredients, divided into three key components: the crunchy graham cracker crust, the smooth and spiced pumpkin filling, and the light, airy whipped cream topping. Each element plays a crucial role in building a harmonious flavor profile and texture.
For the Irresistible Graham Cracker Crust:
- **Mason Jars:** Choose standard 8oz (half-pint) or 16oz (pint) jars, depending on your desired serving size. Ensure they are clean and dry.
- **Graham Crackers:** One full package (approximately 10-12 sheets) will provide ample crumbs for a good number of jars. Look for plain or honey-flavored.
- **Ground Cinnamon:** 1 teaspoon of cinnamon adds a warm, aromatic spice that perfectly complements the graham crackers and pumpkin.
- **Brown Sugar:** 3 tablespoons of packed brown sugar lend a deeper, more molasses-rich sweetness to the crust than white sugar, enhancing its autumnal flavor.
- **Melted Unsalted Butter:** 1/4 cup (approximately 4 tablespoons) of melted butter acts as the binding agent, holding the crust together once chilled.
For the Creamy and Spiced Pumpkin Pie Filling:
- **Cream Cheese:** One 8-ounce package of full-fat cream cheese, softened to room temperature, is essential for a rich, smooth, and stable filling. This provides the “no-bake” structure.
- **Granulated Sugar:** 1/2 cup of white granulated sugar provides the primary sweetness for the pumpkin filling, balancing the earthiness of the pumpkin and tartness of the cream cheese.
- **Canned Pumpkin Puree:** One 15-ounce can of 100% pure pumpkin puree (be sure it’s not pumpkin pie filling, which already contains spices and sugar). This is the star ingredient, delivering the authentic pumpkin flavor.
- **Vanilla Extract:** 1 teaspoon of pure vanilla extract enhances all the other flavors, adding a touch of sophisticated warmth to the filling.
For the Light and Fluffy Whipping Cream Topping:
- **Heavy Whipping Cream:** 1 pint (2 cups) of cold heavy whipping cream (at least 36% milk fat) is crucial for achieving light, stable peaks. Ensure it’s very cold for best results.
- **Granulated Sugar:** 2 tablespoons of granulated sugar sweetens the whipped cream without making it overly rich, allowing the pumpkin flavor to shine.
- **Vanilla Extract:** 1 teaspoon of pure vanilla extract in the whipped cream complements the other components and adds an extra layer of flavor.
- **Optional Garnishes:** A pinch of ground nutmeg or cinnamon for dusting, or a sprinkle of chopped pecans for added texture.
Step-by-Step Guide: Crafting Your No-Bake Mason Jar Pumpkin Pies
This recipe transforms simple ingredients into an extraordinary dessert with just a few easy steps. The beauty of these no-bake pies lies in their straightforward preparation and stunning presentation. Follow these detailed instructions to create your own beautiful mason jar pumpkin pies, perfect for gifting or serving.
Step 1: Prepare the Graham Cracker Crust
Begin by preparing the foundation of your delicious pies: the graham cracker crust. Crush the graham crackers into fine crumbs. You can achieve this using a food processor for a fine, even texture, or by placing the crackers in a Ziploc bag and crushing them with a rolling pin. Aim for about 1 ½ cups of crumbs. In a medium bowl, combine the graham cracker crumbs with 1 teaspoon of cinnamon and 3 tablespoons of brown sugar, mixing thoroughly to ensure the spices and sugar are evenly distributed. Next, pour in 1/4 cup of melted butter. Mix everything together until the crumbs are moistened and resemble wet sand. This butter is crucial for binding the crust. Distribute the crust mixture evenly among your mason jars, typically about 2-3 tablespoons per jar, depending on their size. Press the mixture firmly into the bottom of each jar using the back of a spoon or a small tamper. Pressing it down well ensures a stable crust that won’t crumble apart. Place the jars in the refrigerator to chill while you prepare the filling; this helps the crust set.
Step 2: Create the Creamy Pumpkin Pie Filling
Now, let’s move on to the star of the show: the rich and flavorful pumpkin filling. In a large mixing bowl, combine the softened 8-ounce package of cream cheese with 1/2 cup of granulated sugar. Using an electric mixer (handheld or stand mixer), beat on medium speed until the mixture is light, fluffy, and completely smooth, with no lumps of cream cheese remaining. This step is vital for a silky-smooth filling. Once smooth, add the entire 15-ounce can of 100% pure pumpkin puree and 1 teaspoon of vanilla extract. Continue to beat on medium speed until all the ingredients are well incorporated and the mixture is uniform in color and texture. Be careful not to overmix, as this can incorporate too much air. Taste and adjust sweetness if desired, though the given amount provides a balanced flavor. Set aside, ready for layering.
Step 3: Whip Up the Fluffy Topping
No pumpkin pie is complete without a generous dollop of whipped cream! Ensure your heavy whipping cream is very cold, as this is key to achieving stiff peaks. In a clean, chilled mixing bowl (metal bowls chilled in the freezer for 10-15 minutes work best), pour 1 pint (2 cups) of cold heavy whipping cream. Add 2 tablespoons of granulated sugar and 1 teaspoon of vanilla extract. Using an electric mixer, start on low speed and gradually increase to high. Beat until soft peaks form, then continue beating until stiff peaks are achieved. Be careful not to overbeat, or you’ll end up with butter! The whipped cream should be light, airy, and hold its shape. For best results, use immediately or keep chilled until ready to assemble.
Step 4: Assemble Your Mason Jar Pumpkin Pies
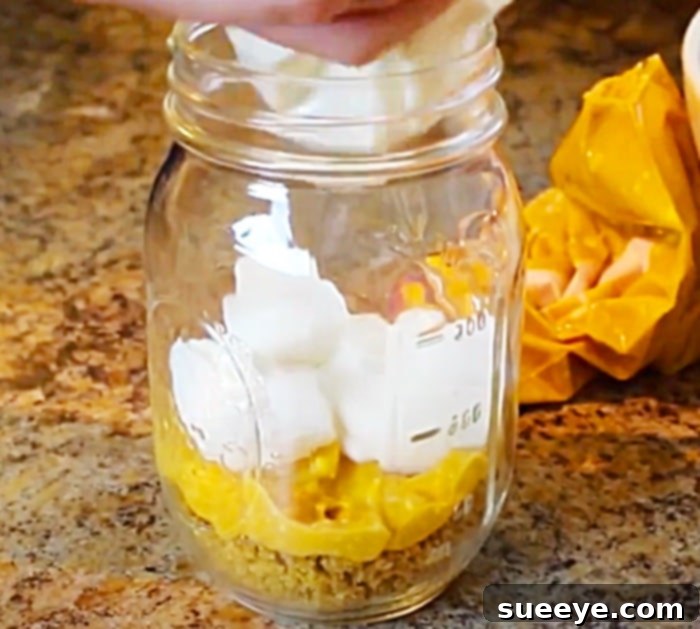
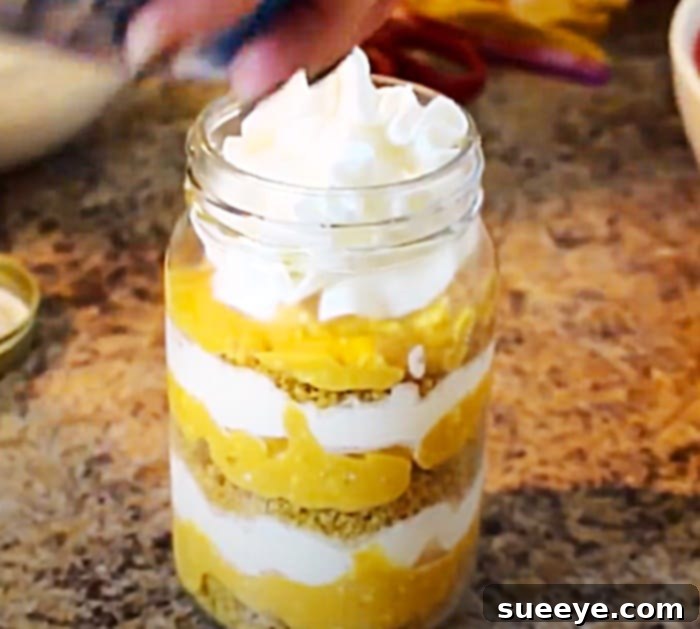
With all your components ready, it’s time for the fun part: assembly! Retrieve your chilled mason jars with the set graham cracker crusts. Using a spoon, or for a neater presentation, a piping bag fitted with a large round tip, carefully spoon or pipe a generous layer of the pumpkin pie filling over the crust in each jar. Smooth the top gently if needed. Leave some space at the top for the whipped cream. Next, pipe or spoon a beautiful swirl of your freshly made whipped cream on top of the pumpkin filling. You can create a simple dollop or an elaborate swirl for an extra touch of elegance.
Step 5: Garnish and Chill
To finish, sprinkle a tiny pinch of ground nutmeg or cinnamon over the whipped cream for a classic touch and visual appeal. You could also add a small candied pecan or a chocolate curl. Once garnished, securely fasten the lids onto your mason jars. This helps to keep the pies fresh and makes them easy to transport. Place the assembled pies in the refrigerator for at least 2-4 hours, or preferably overnight. Chilling is crucial as it allows the pumpkin filling to firm up completely and the flavors to meld beautifully. These pies will store wonderfully in the fridge for up to 3-4 days, making them perfect for advance preparation.
Expert Tips for Perfect Mason Jar Pumpkin Pies:
While this recipe is incredibly straightforward, a few expert tips can elevate your no-bake pumpkin pies from great to absolutely unforgettable. Paying attention to these details will ensure a smooth process and a delicious outcome every time.
- **Room Temperature Cream Cheese:** Always ensure your cream cheese is thoroughly softened to room temperature before mixing. This prevents lumps in your filling and ensures a silky-smooth texture. Cold cream cheese will result in a clumpy filling.
- **Cold Whipping Cream & Bowl:** For the best whipped cream, make sure both your heavy cream and your mixing bowl (and beaters!) are very cold. Chilling your bowl and beaters in the freezer for 10-15 minutes before whipping can make a significant difference in how quickly and stiffly the cream whips.
- **Avoid Pumpkin Pie Filling:** Always use 100% pure canned pumpkin puree, not pumpkin pie filling. Pumpkin pie filling already contains spices and sweeteners, which will alter the flavor profile of this specific recipe.
- **Even Crust Layer:** When pressing the graham cracker crust into the jars, use a consistent amount for each jar and press down firmly and evenly. This ensures a stable base that won’t crumble when you’re enjoying your pie. A small tart tamper or the bottom of a spice jar works wonders for this.
- **Neat Layering:** For a professional and appealing look, consider using a piping bag to pipe both the pumpkin filling and the whipped cream into the jars. This creates clean, distinct layers and prevents smudging on the sides of the jar.
- **Chilling Time is Crucial:** Do not skimp on the refrigeration time. A minimum of 2-4 hours is necessary for the filling to fully set and the flavors to meld. Overnight chilling is even better for optimal texture and taste.
- **Don’t Overmix:** While you want your cream cheese and pumpkin to be smooth, avoid overmixing the filling once the pumpkin is added. Overmixing can incorporate too much air, leading to a less dense and creamy texture. Similarly, stop whipping cream as soon as stiff peaks form to prevent it from turning granular or into butter.
- **Sealing for Freshness:** Tightly seal the mason jars with their lids immediately after assembly. This helps keep the pies fresh, prevents them from absorbing refrigerator odors, and makes them travel-friendly.
Customization and Creative Variations:
One of the joys of this mason jar pumpkin pie recipe is its versatility. While the classic version is undeniably delicious, you can easily customize it to suit different tastes, dietary needs, or occasions. Here are some ideas to spark your creativity:
- **Crust Alternatives:**
- **Gingersnap Crust:** Replace graham crackers with crushed gingersnap cookies for a spicier, more intense fall flavor.
- **Vanilla Wafer Crust:** For a milder, sweeter crust, use crushed vanilla wafers instead of graham crackers.
- **Gluten-Free Crust:** Opt for gluten-free graham crackers or a blend of almond flour and melted butter for a GF version.
- **Spiced-Up Filling:**
- **Pumpkin Spice Blend:** Add ½ teaspoon of a pre-made pumpkin pie spice blend (containing ginger, nutmeg, allspice, and cloves) to the filling for a richer, more complex flavor profile.
- **Maple Infusion:** Substitute a tablespoon or two of maple syrup for some of the granulated sugar in the filling for a natural, woodsy sweetness.
- **Exciting Toppings and Garnishes:**
- **Caramel Drizzle:** A swirl of homemade or store-bought caramel sauce over the whipped cream adds a luxurious touch.
- **Candied Pecans/Walnuts:** Sprinkle chopped candied nuts for extra crunch and sweetness.
- **Chocolate Shavings:** A few dark chocolate shavings can provide a delightful contrast.
- **Cream Cheese Frosting:** For an even richer experience, substitute a light cream cheese frosting for the whipped cream.
- **Cranberry Compote:** A small dollop of homemade cranberry compote can add a tart, fruity counterpoint.
- **Dairy-Free Options:**
- Use dairy-free cream cheese alternatives and coconut cream (chilled overnight, scoop out the thick cream) for the whipped topping. Ensure your graham crackers are also dairy-free.
- **Boozy Twist:**
- Add a tablespoon of rum, bourbon, or Kahlua to the pumpkin filling for an adult-friendly dessert.
Perfect for Any Occasion: The Versatility of Mason Jar Pies
These mason jar pumpkin pies are more than just a dessert; they are a statement of thoughtful preparation and culinary creativity. Their inherent convenience and charming presentation make them suitable for a wide array of events and purposes:
- **Homemade Gifts:** They shine as heartwarming homemade gifts for neighbors, teachers, colleagues, or as a thoughtful hostess gift during the holidays. Tie a ribbon around the jar and add a small tag for an extra personal touch.
- **Holiday Gatherings:** During Thanksgiving, Christmas, or any fall celebration, these individual pies are a welcome alternative to a large, traditional pie. Guests can easily grab their own dessert without the fuss of slicing and serving.
- **Party Desserts:** Hosting a casual get-together or a more formal dinner? Mason jar pies offer elegant individual portions, eliminating the need for plates and extra utensils. They are also perfect for outdoor picnics or barbecues.
- **Potlucks and Picnics:** Their portability makes them ideal for sharing at potlucks, family reunions, or enjoying on a picnic. The secure lids prevent spills and keep them fresh until ready to eat.
- **Meal Prep & Individual Treats:** For those who enjoy portion control or want a delicious treat throughout the week, these pies can be prepped in advance and stored in the fridge. Grab one whenever a craving strikes!
- **Baby Showers or Bridal Showers:** Customized with thematic ribbons or labels, they can serve as charming edible favors for special life events.
Storage and Shelf Life Recommendations:
Proper storage is key to maintaining the freshness and deliciousness of your no-bake mason jar pumpkin pies. Because they contain dairy products, refrigeration is absolutely essential.
- **Refrigeration:** Store the pies tightly sealed with their lids in the refrigerator. This not only keeps them fresh but also allows the filling to remain firm and the flavors to develop fully.
- **Shelf Life:** When stored correctly in the refrigerator, these no-bake pumpkin pies will remain fresh and delicious for up to 3-4 days. For optimal taste and texture, consume them within this timeframe.
- **Freezing (Not Recommended):** While some pies can be frozen, no-bake dairy-based fillings like this one often do not freeze and thaw well. Freezing can alter the texture of the cream cheese filling, making it grainy or watery upon thawing, and the whipped cream topping may lose its airiness. It’s best to enjoy these fresh from the fridge.
- **Serving Temperature:** These pies are best served chilled, directly from the refrigerator. Allow them to sit at room temperature for just 5-10 minutes before serving if you prefer the filling slightly less firm, but do not leave them out for extended periods.
Mason Jar Pumpkin Pie: A No-Bake Delight and Perfect Homemade Gift
In conclusion, these no-bake mason jar pumpkin pies represent the epitome of effortless elegance and seasonal delight. They offer all the beloved flavors of a traditional pumpkin pie in a uniquely convenient and charming format. Whether you’re seeking a stress-free dessert for a holiday feast, a thoughtful homemade gift, or simply a delightful individual treat to savor, this recipe delivers on all fronts. With minimal effort and no baking required, you can create a batch of these beautiful pies that are guaranteed to impress.
From the satisfying crunch of the graham cracker crust to the smooth, spiced pumpkin filling and the fluffy whipped cream topping, every layer is a testament to the comforting tastes of autumn. So, gather your ingredients, follow these simple steps, and prepare to enchant your taste buds and those of your lucky recipients. These mason jar pumpkin pies aren’t just a dessert; they’re an experience waiting to be shared and enjoyed.