
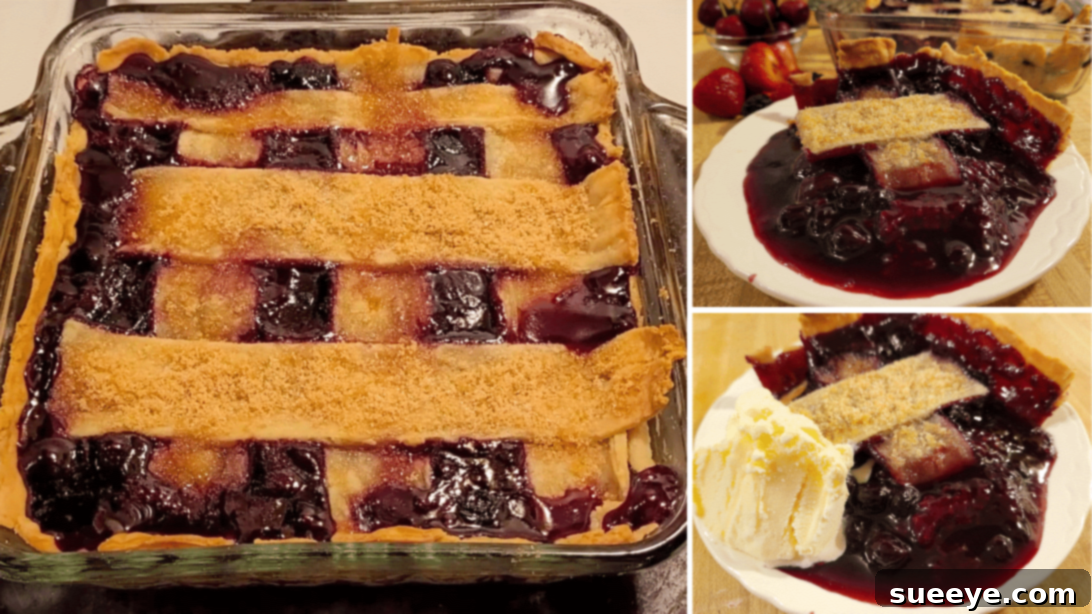
There’s something undeniably comforting and utterly delicious about a homemade cobbler, and among them, the **Cherry Berry Cobbler** stands out as an all-time favorite. This delightful dessert perfectly marries the vibrant tartness of mixed berries with the luscious sweetness of dark cherries, all nestled under a golden, tender crust. While often associated with the warm embrace of summer, its irresistible flavors make it a cherished treat that can be enjoyed any time of the year. Imagine a spoonful of warm, bubbling fruit filling, topped with a crisp, buttery crust – it’s a taste of pure joy that will have everyone asking for more.
If you’ve ever hesitated to bake a cobbler, this particular recipe is a game-changer. It’s incredibly simple to prepare, promising a perfect outcome every single time. We’re thrilled to share this no-fail method, championed by the talented Parnell The Chef, whose expertise ensures you’ll achieve bakery-quality results right in your own kitchen. Whether you’re aiming to impress your family with a stunning dessert or looking for a wholesome, crowd-pleasing treat for the kids, this **Cherry Berry Cobbler recipe** is guaranteed to earn you rave reviews and countless compliments. Its ease of preparation combined with its spectacular taste makes it an essential addition to any baker’s repertoire.
Why This Easy Cherry Berry Cobbler Will Become Your Go-To Dessert
What makes this particular **cherry berry cobbler** recipe truly special? Beyond its straightforward instructions, it’s the impeccable balance of flavors and textures. The combination of sweet dark cherries and a medley of mixed berries (think blueberries, raspberries, and blackberries) creates a complex yet harmonious fruit base. The addition of lemon juice brightens the fruit, preventing it from becoming overly sweet, while a hint of almond extract elevates the entire dish, adding a sophisticated depth that complements the berries beautifully. This isn’t just a dessert; it’s an experience.
Furthermore, the use of pre-made pie crusts simplifies the process dramatically, cutting down on preparation time without sacrificing quality. This means even novice bakers can achieve a perfectly flaky and golden top crust with minimal effort. The careful construction, including a pre-baked bottom crust, ensures every bite offers a delightful contrast: juicy, tender fruit filling below, and a perfectly crisp, never soggy, crust above. It’s the ideal sweet ending to any meal, a comforting snack, or a show-stopping centerpiece for your next gathering. Get ready to fall in love with homemade cobbler!
Ingredients for Your Perfect Cherry Berry Cobbler:
Crafting this magnificent dessert requires a few simple, yet essential, ingredients. Each component plays a crucial role in building the layers of flavor and texture that define a classic cobbler. For the fruit filling, you’ll need:
- 12 oz (approx. 340g) of dark sweet cherries, pitted. While fresh cherries are wonderful in season, high-quality frozen cherries can be used when fresh aren’t available. Ensure they are thawed and drained.
- 12 oz (approx. 340g) of mixed berries. This blend typically includes blueberries, raspberries, and blackberries, offering a delightful spectrum of tart and sweet notes. Frozen mixed berries work perfectly here, just be sure to thaw them.
- ½ cup (approx. 100g) of white granulated sugar. This sweetens the fruit and helps create that wonderful syrupy consistency.
- ½ cup (approx. 100g) of light brown sugar, packed. Brown sugar adds a deeper, more caramel-like sweetness and moisture to the filling.
- 2 tbsp of fresh lemon juice. A squeeze of lemon juice brightens the fruit flavors and balances the sweetness.
- 1/8 tsp of salt. A tiny pinch of salt enhances all the other flavors in the filling.
- ½ cup (approx. 120ml) of water. This helps create the initial liquid for the fruit to cook down in.
- ½ tsp of almond extract. This is a secret weapon that adds a lovely, subtle nutty note, complementing the cherries and berries beautifully.
- 2 9-inch ready-made pie crusts. Using store-bought crusts significantly simplifies the recipe without compromising on taste or texture.
For the Slurry (Thickening Agent):
To ensure your cobbler filling is perfectly thick and luscious, you’ll prepare a simple slurry:
- 2 tbsp of cornstarch. This provides the thickening power.
- 2 tbsp of water. To dissolve the cornstarch and prevent lumps.
For the Sugar Sprinkle (The Finishing Touch):
This sprinkle creates a beautiful, caramelized, and slightly crispy top on your crust:
- 1 tbsp of white granulated sugar.
- 1 tbsp of light brown sugar.
How to Make This Unforgettable Cherry Berry Cobbler: A Step-by-Step Guide
Creating this delicious cobbler is a straightforward process, broken down into manageable steps. Follow these instructions carefully, and you’ll be enjoying a warm, homemade dessert in no time.
Step 1: Preparing the Luscious Berry Filling
Begin by placing a medium-sized saucepan on your stove over medium heat. Into this pan, combine the generous amounts of dark sweet cherries and mixed berries. Pour in the water, white sugar, light brown sugar, fresh lemon juice, and a pinch of salt. Stir all these ingredients gently to combine them, ensuring the sugars begin to dissolve and coat the fruit. Bring this mixture to a rolling boil, then reduce the heat slightly and allow it to simmer for approximately 10 minutes. During this time, the fruits will soften, release their juices, and the flavors will begin to meld beautifully. While the fruit mixture is simmering, prepare your cornstarch slurry by whisking together the 2 tablespoons of cornstarch with 2 tablespoons of cold water in a small bowl until completely smooth and lump-free. Once the fruit has simmered, slowly pour the prepared slurry into the saucepan, stirring continuously to prevent clumping. This slurry will thicken your filling to the perfect consistency.
Step 2: Perfecting the Filling and Preparing the Crusts
After adding the slurry, continue to stir the fruit mixture for another minute or two, allowing it to thicken. Then, remove the saucepan from the heat and stir in the almond extract until it is thoroughly combined with the fruit filling. The almond extract adds a wonderful depth of flavor, enhancing the natural sweetness of the berries and cherries. Set the filling aside to cool slightly while you prepare the crusts. Take one of your 9-inch pie crusts and carefully place it into an 8×8-inch baking dish, pressing it gently to fit the bottom and sides. Using a fork, poke several holes all over the bottom of this crust. This crucial step, known as blind-baking, helps prevent the crust from becoming soggy once the fruit filling is added. Bake this bottom crust in a preheated oven at 350°F (175°C) for about 7 to 10 minutes, or until it’s lightly golden. Meanwhile, unroll the second pie crust and cut it into even strips, approximately 1-inch wide, which will form the lattice top. Gather any excess crust trimmings, cut them into smaller pieces, and gently fold these into your prepared fruit filling. This not only prevents waste but also adds lovely little pockets of baked pastry within the fruit.
Step 3: Assembling, Baking, and Serving Your Masterpiece
Once your bottom crust has been pre-baked and the fruit filling is ready, it’s time for assembly. Carefully transfer the rich cherry berry filling into the pre-baked crust within the baking dish, spreading it evenly. Now, arrange the crust strips you prepared earlier over the top of the filling to create a beautiful lattice pattern, as demonstrated in many instructional videos (like Parnell The Chef’s). This decorative top not only looks impressive but also allows steam to escape while baking. Once the lattice is complete, mix the 1 tablespoon of white sugar and 1 tablespoon of light brown sugar together, and generously sprinkle this mixture over the crust strips. This sugar sprinkle will caramelize and create a glistening, golden-brown, crispy top during baking. Place the assembled cobbler into your preheated oven at 350°F (175°C) and let it bake, uncovered, for approximately 45 to 55 minutes. You’ll know it’s ready when the crust is beautifully golden brown and the fruit filling is bubbling thickly around the edges. Allow the cobbler to cool for at least 15-20 minutes before serving; this helps the filling set and makes for easier serving. Serve warm, perhaps with a scoop of vanilla bean ice cream or a dollop of fresh whipped cream, for an utterly delightful experience. Enjoy every single comforting bite!
Tips for Success and Delicious Variations
To ensure your **Cherry Berry Cobbler** is always a triumph, consider these helpful tips:
- Fruit Quality: Always use ripe, high-quality fruit. If using frozen, thaw them completely and drain any excess liquid to avoid a watery filling.
- Preventing a Soggy Bottom: The blind-baking step for the bottom crust is crucial. Don’t skip it! It creates a barrier that helps keep your crust crisp.
- Slurry Smoothness: Whisk the cornstarch and water thoroughly until there are no lumps. A lumpy slurry can result in a lumpy filling.
- Cooling Time: Resist the urge to cut into the cobbler immediately. Allowing it to cool slightly helps the filling set, making it easier to serve and preventing a runny mess.
Looking to experiment? Here are some delicious variations:
- Spice It Up: Add a pinch of cinnamon, nutmeg, or a dash of cardamom to the fruit filling for an extra layer of warmth and complexity.
- Different Fruits: While cherries and mixed berries are classic, feel free to substitute with other seasonal fruits like peaches, apples, or even a pure blueberry cobbler. Adjust sugar levels based on the sweetness of your chosen fruit.
- Crust Design: If a lattice is too intricate, you can simply cut the top crust into squares or use cookie cutters to create fun shapes to top your cobbler.
- Nutty Crunch: For an added texture, sprinkle some chopped pecans or almonds over the fruit filling before adding the top crust.
This **Easy Cherry Berry Cobbler Recipe** is more than just a dessert; it’s a testament to the simple pleasures of home baking. It brings together vibrant flavors, delightful textures, and a comforting warmth that makes any moment special. It’s truly a recipe worth keeping in your collection!
*All image credit for this delightful recipe belongs to Parnell The Chef via YouTube. We highly recommend following and subscribing to his channel for more inspiring and delicious culinary creations!