
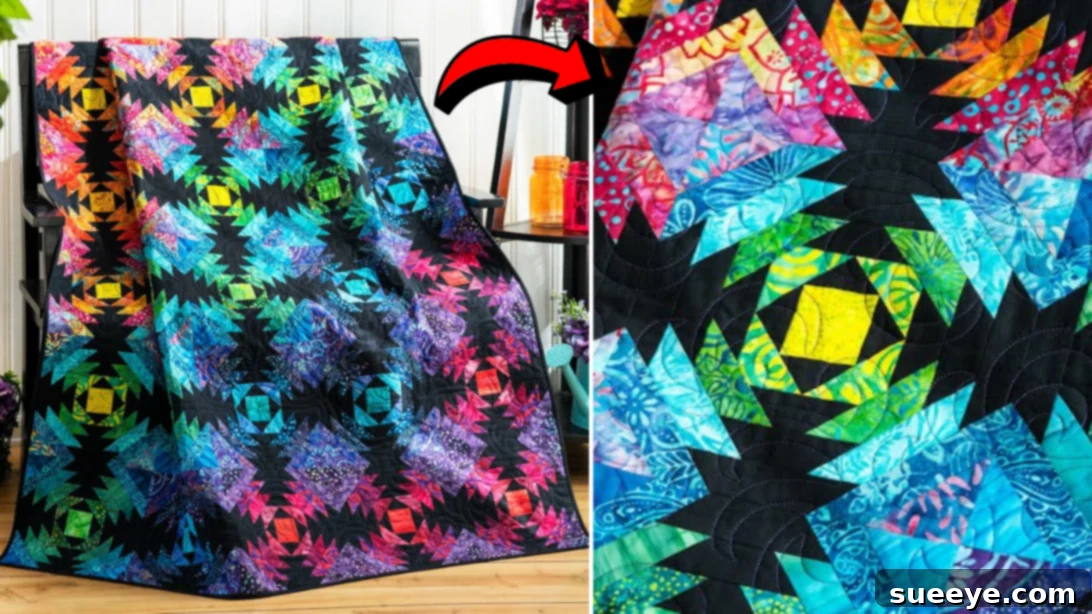
Embarking on a quilting adventure offers a unique blend of creativity and satisfaction, allowing you to transform beautiful fabrics into timeless works of art. There’s an undeniable joy in experimenting with diverse fabric prints and colors, bringing them together to form a cohesive and stunning design. For many quilters, the classic pineapple quilt block stands out as a favorite, offering a captivating geometric pattern that looks intricate but is surprisingly accessible to create. This tutorial, inspired by the expertise of Shabby Fabrics on YouTube, will guide you through crafting your very own pineapple quilt, perfect for showcasing those special fabrics you’ve been saving.
One of the most striking aspects of the pineapple quilt design is its versatility, especially when it comes to color choices. A personal favorite, and one that truly makes the quilt’s design “pop,” involves combining vibrant, colorful fabrics with a deep black background. This high contrast creates a dramatic effect, causing the intricate patterns and rich hues of your chosen prints to stand out even more. However, the beauty of quilting lies in personal expression; you might opt for a softer palette, coordinating pastels, or even a monochromatic scheme. Whatever your preference, the pineapple block offers a fantastic canvas.
RELATED: Easy Exploding Pineapple Quilt Block Tutorial
Whether you share this preference for bold contrast or are simply eager to explore a new and rewarding quilting technique, this guide provides all the fundamental steps for making a gorgeous pineapple quilt block. By following the detailed instructions and watching the accompanying video tutorial, you’ll discover just how straightforward this project can be. Even if you’re new to quilting, you’ll likely find yourself creating perfect pineapple blocks on your very first attempt – it’s that beginner-friendly! Prepare to enjoy the process of bringing your fabric visions to life, creating a cherished quilt that will be admired for years to come.
Why the Pineapple Quilt Block is a Quilter’s Delight
The pineapple quilt block is more than just a pattern; it’s a testament to geometric precision and visual impact. Its radiating square-in-a-square design creates a mesmerizing effect, often resembling the scales of a pineapple or a starburst. This classic block allows for endless variations in fabric placement and color, making each finished quilt truly unique. It’s a wonderful block for using up scraps, as it’s constructed from many small strips, yet it also shines with carefully chosen fat quarters or yardage. The process of building each block strip by strip is incredibly satisfying, watching the pattern emerge with every stitch. It’s a fantastic way to develop your precision cutting and sewing skills, both of which are foundational to successful quilting projects.
Essential Materials for Your Pineapple Quilt Block Project
Before diving into the creative process, gathering all your materials is crucial. High-quality tools and fabrics will not only make your quilting journey more enjoyable but also ensure a professional-looking finished product. Here’s a detailed look at what you’ll need for this beginner-friendly pineapple quilt block tutorial:
- Assorted Print Fabric: The heart of your quilt! Choose a variety of prints that appeal to you. For a striking contrast, select several colorful, patterned fabrics and a solid contrasting fabric (like black, as recommended) for the background strips. Consider pre-washing your fabrics to prevent shrinking and color bleeding, especially if you’re mixing different types or brands. High-quality quilter’s cotton is recommended for its ease of use and durability.
- Ruler: An essential tool for accurate cutting and measuring. A clear acrylic quilting ruler, at least 6×24 inches, is versatile for cutting strips and squaring up larger pieces. Smaller rulers, like a 6.5-inch square, can also be handy for specific measurements.
- Scissors or Rotary Cutter and a Cutting Mat: While fabric scissors are useful for smaller snips, a rotary cutter combined with a self-healing cutting mat is highly recommended for quilting. It allows for quick, precise, and straight cuts, which are vital for accurate quilt blocks. Always use a sharp blade and exercise caution for safety.
- Tracing Wheel (or Fabric Marking Pen): A tracing wheel can be used with carbon paper for transferring pattern lines onto fabric, though for this particular block, you’ll mainly be cutting strips to size. A fabric marking pen (washable or disappearing ink) can also be useful for marking stitching lines or alignment points if needed.
- Needle and Thread: Choose a high-quality 100% cotton thread that matches your fabric or is a neutral color like white or gray. A sharp, new needle in your sewing machine (e.g., a universal or quilting needle, size 80/12 or 90/14) will prevent skipped stitches and fabric snags.
- Iron, for pressing: An often-underestimated tool in quilting, the iron is crucial for “pressing” seams. Pressing (as opposed to ironing) involves lifting and placing the iron gently on the fabric to flatten seams, ensuring accurate block construction and a flat quilt top. A good steam iron will make a significant difference.
- Sewing Machine: Any basic sewing machine capable of a straight stitch will work perfectly. Ensure your machine is clean, oiled, and has a fresh needle installed. A walking foot can be helpful for quilting multiple layers later on, but isn’t strictly necessary for block construction.
- Pineapple Trim Tool: This specialized ruler is a game-changer for making pineapple blocks. It features marked guides that allow you to precisely trim each round of strips, ensuring perfect squares and consistent block sizes every time. While you can make pineapple blocks with a standard ruler, this tool greatly simplifies the process and enhances accuracy.
- Template: (Click here to download the template) The pattern template provides the exact measurements and cutting instructions for your fabric pieces. Downloading and printing this template accurately is the first step to ensuring your blocks are uniform and sew together beautifully. Always double-check print scale to ensure the template is the correct size.
How to Make a Pineapple Quilt Block: A Step-by-Step Guide
Creating this captivating pineapple quilt block is a methodical and rewarding process. Precision in cutting and sewing, coupled with proper pressing, will lead to stunning results. Follow these steps closely to construct your beautiful blocks:
Step 1: Preparing Your Fabric and Starting the Center
Begin by carefully cutting all your fabric pieces to the exact sizes specified in your downloaded template. Accuracy here is paramount, as it dictates the overall precision of your finished block. Once all your strips and squares are prepared, locate your center fabric square – this will be the foundation of your pineapple block. Take four of your black contrasting strips and, with right sides together, stitch one strip to each side of the center square. Use a consistent 1/4-inch seam allowance throughout this project to ensure your blocks square up correctly. Attaching these initial strips around the core square sets the stage for the radiating pattern to come.
Step 2: Pressing Seams and Initial Trimming for Precision
After stitching the black strips to the center square, it’s time to press your seams. Pressing is a critical step in quilting that ensures your blocks lie flat and square. Carefully press the seams away from the center fabric, or open, whichever method you prefer for flatness. Next, retrieve your specialized pineapple trim tool. Align the guides of the trim tool with the corners and edges of your newly sewn block unit, ensuring the block is centered and perfectly square within the tool’s markings. Using your rotary cutter, trim away the excess fabric around the perimeter of the block unit. This initial trim establishes the precise dimensions for the next layer of strips and maintains the block’s geometric integrity, making subsequent steps much easier and more accurate.
Step 3: Building the Block with Alternating Strips and Trimming
Now, you’ll begin to build out the iconic pineapple pattern. Take your print fabric strips and, working one round at a time, stitch them to all four sides of your trimmed block, again with right sides together and a consistent 1/4-inch seam allowance. After stitching each set of four print strips, press the seams. Then, using your pineapple trim tool, repeat the trimming process as you did in Step 2, squaring up the block after each addition. The key to the pineapple design is to continuously build the block by alternating between your black (or background) strips and your print fabric strips, always remembering to trim after each complete round. Continue this process until your block reaches the desired final size as indicated by your template. This alternating method creates the captivating visual depth and intricate layering characteristic of a pineapple quilt block. Refer to the video tutorial by Shabby Fabrics for a visual demonstration of the precise alignment and trimming techniques.
Step 4: Assembling Your Quilt Top and Finishing Touches
Once you’ve mastered making one pineapple quilt block, continue crafting more until you have enough blocks for your desired quilt size. Layout your finished blocks on a design wall or the floor to arrange them into a pleasing pattern. When you’re happy with the arrangement, stitch your blocks together into rows, and then stitch the rows together to form your complete quilt top. Pay attention to nesting your seams at the intersections to ensure your points align perfectly. After your quilt top is assembled, layer it with batting and backing fabric. Quilt the layers together using your preferred method – whether it’s hand quilting, machine quilting, or tying. Finally, add the binding around the edges to give your quilt a neat and durable finish. This step-by-step approach ensures that your beautiful pineapple quilt comes together smoothly, resulting in a cherished handmade item.
Tips for Quilting Success
- Measure Twice, Cut Once: Precision is the quilter’s best friend. Take your time with cutting to ensure all pieces are accurate.
- Consistent Seam Allowance: A perfect 1/4-inch seam allowance is crucial for blocks to fit together correctly. Practice on scraps if needed.
- Press, Don’t Iron: Lifting and placing the iron, rather than sliding it, prevents fabric distortion and keeps your blocks flat.
- Watch the Video: Visual learners will benefit immensely from watching the Shabby Fabrics tutorial. It clarifies complex steps like using the trim tool.
- Enjoy the Process: Quilting is a journey, not a race. Savor each stitch and the satisfaction of creating something beautiful with your own hands.
- Experiment with Colors: While the black background is stunning, don’t be afraid to try other color combinations. The pineapple block is incredibly forgiving and versatile.
Caring for Your Handmade Quilt
Once your beautiful pineapple quilt is complete, proper care will ensure it lasts for generations. For most cotton quilts, gentle machine washing on a cold, delicate cycle with a mild detergent is recommended. Avoid harsh chemicals or bleach. Tumble dry on low heat or, ideally, lay flat to dry to prevent shrinkage and maintain fabric integrity. For the first wash, especially with dark or vibrant fabrics, you might include a color catcher sheet to absorb any potential dye bleeding. Store your quilt folded or rolled in a breathable cotton bag in a cool, dry place, away from direct sunlight.
*All these images are credited to Shabby Fabrics via YouTube. Give her channel a visit and subscribe for more amazing quilting tutorials!
Your Next Beginner-Friendly Pineapple Quilt Tutorial Awaits!
With these detailed instructions and tips, you’re well-equipped to create a stunning pineapple quilt. This project is not just about making a quilt; it’s about learning new skills, expressing your creativity through fabric, and building confidence in your quilting abilities. The beginner-friendly nature of this tutorial means you can achieve professional-looking results even on your first attempt. So, gather your materials, fire up your sewing machine, and prepare to be delighted by the beautiful pineapple quilt you’re about to create. Happy quilting!