
In a world where security is paramount, the thought of safeguarding our cherished possessions often leads us down the path of expensive safes and complicated security systems. However, what if the most ingenious hiding spots were right under our noses, crafted from ordinary household items? These brilliant DIY secret hiding spots, inspired by the innovative minds at Household Hacker on YouTube, are not just life-changing but also incredibly clever. They offer a refreshing alternative to traditional security, leveraging the power of disguise to keep your valuables out of sight and out of mind.
Imagine being able to create a discreet compartment for your keys, jewelry, emergency cash, or important documents using items you already own. The beauty of these projects lies in their simplicity and accessibility. There’s no need to invest in costly store-bought safes or specialized containers when you can transform everyday objects into sophisticated, undetectable hiding places. This guide will walk you through six creative methods to craft your own homemade safes, ensuring your precious items remain secure without drawing unwanted attention.
Whether you’re looking to protect small sentimental items, spare keys, or even a stash of cash for a rainy day, these DIY solutions provide perfect concealment. They are incredibly budget-friendly, requiring minimal materials and tools, most of which you likely already have around your home. Prepare to be amazed by the sheer ingenuity behind these ideas, sparking a newfound appreciation for the hidden potential within your household items. Dive into the world of creative concealment and discover how you can enhance your home security with these resourceful and surprisingly effective secret spots!
RELATED: 13 Smart Ways To Hide Your Money Safely
6 Ingenious DIY Secret Hiding Spots for Valuables:
Discover how to transform common household items into secure, inconspicuous hiding places for your most valued possessions. These clever solutions will give you peace of mind without breaking the bank.
- The Classic Book Safe
- The Discreet Pringles Can Compartment
- The Camouflaged Plastic Bottle Hideaway
- The Outdoor Sprinkler Head Stash
- The Timeless Clock Concealment
- The Simple Outdoor Thermometer Cache
Step-by-Step Guide: Crafting Your 6 Secret Hiding Spots
#1: The Classic Book Safe – A Literary Lair for Your Valuables
The book safe is a timeless classic for a reason: it blends seamlessly into any bookshelf, making it virtually undetectable to prying eyes. For this project, select a hardcover book that is thick enough to accommodate your chosen container and preferably one that won’t be missed or frequently handled. An older, less interesting title is often the best choice for maximum discretion.
Detailed Steps: Begin by opening your chosen book and counting in about 20 pages from the front. This initial block of pages will serve as a natural cover, maintaining the book’s integrity. Clamp down the remaining pages tightly to prevent them from shifting during the cutting process. Next, measure and carefully trace the outline of the container you intend to place inside the book onto the top page of the clamped section. Precision is key here to ensure a snug fit. Using a sharp utility knife, meticulously cut out the traced shape, tearing through the paper layer by layer. Take your time, making multiple shallow passes rather than trying to cut through all at once, to achieve clean edges and avoid damaging the surrounding pages.
Once the compartment is cut, apply a generous amount of superglue or strong craft glue to the back and sides of your container. Also, apply glue to the inside edges of the cut-out section within the book. Carefully insert the container into the newly formed cavity, pressing it down firmly to ensure a strong bond. To prevent the remaining pages and the book’s cover from being accidentally glued, wrap them securely with aluminum foil or plastic wrap. Finally, clamp everything together again and apply glue to the sides of the pages around the cut-out section, sealing them together to form a solid block. Allow the book safe to dry for several hours, or even overnight, to ensure the glue sets completely. Once dry, your custom book safe is ready to house your smaller valuables like jewelry, memory cards, or emergency cash, blending perfectly with your other literary treasures.
#2: The Discreet Pringles Can Compartment – A Snack-Sized Security Solution
Who would ever suspect a snack can to be a hiding spot? The Pringles can safe is a brilliant illusion, leveraging the commonality of an everyday item to create a clever diversion. This method is ideal for hiding smaller items like rolled-up cash or keys within plain sight in your pantry or kitchen.
Detailed Steps: Start by flipping your Pringles can upside down. With extreme care and patience, slowly and gently remove the metal bottom of the can. The goal is to detach it cleanly without bending or creasing the can, as a damaged bottom will immediately raise suspicion. Once the bottom is removed, transfer some of the potato chips to a separate container. This creates space for your hidden compartment while allowing you to place a layer of real chips back on top later, maintaining authenticity. Take the removed bottom and trace its outline onto a piece of sturdy cardboard. Cut out this cardboard circle precisely. Apply hot glue around the sides of this cardboard cutout and carefully push it inside the can, pressing it firmly against the inside wall to create a new, false bottom. This creates the hidden compartment beneath it.
Next, find a small container, such as a medicine bottle or a small plastic vial, that is slender enough to fit snugly inside the can and beneath your new false bottom. Place your money, keys, or other small valuables into this container. Push this container firmly into the bottom of the can, positioning it below the cardboard false bottom. Finally, return some of the original Pringles chips back into the can, resting them on the cardboard. The original plastic lid will then cover the chips, making the can appear completely normal. Place it back on your pantry shelf with other snacks, ensuring it blends seamlessly with its surroundings. The Pringles can safe is a fantastic example of using misdirection for secure storage.
#3: The Camouflaged Plastic Bottle Hideaway – Hydration with a Secret
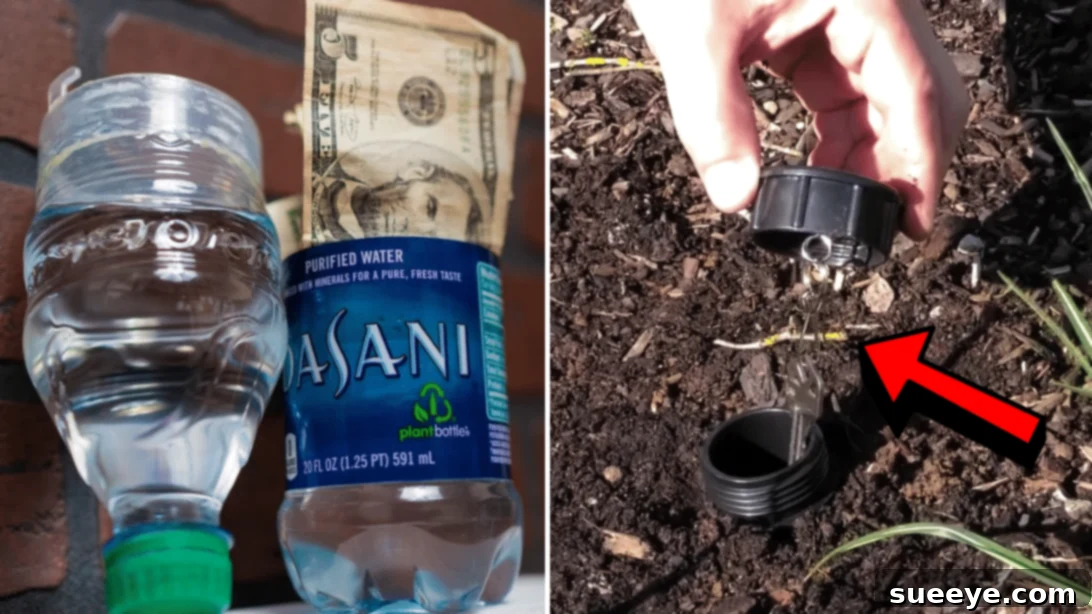
This ingenious hiding spot transforms an ordinary plastic water bottle into a discreet safe, perfect for outdoor or garage environments where it won’t be out of place. The trick lies in making it appear filled with water while actually concealing your valuables.
Detailed Steps: Begin by finding a small jar or container that has a diameter roughly the same as the plastic bottle you’re using. Empty out any water from the plastic bottle. To remove the label cleanly without leaving sticky residue, gently heat the label with a hairdryer for a few seconds. This will melt down the adhesive, allowing you to peel it off carefully. Cut the plastic bottle in half, ensuring a relatively straight and even cut. Fill the bottom half of the bottle with a small amount of water – just enough to create the illusion of a full bottle once assembled. Adhere your chosen jar or container inside this bottom half, ensuring it is waterproof and securely glued in place. This jar will hold your valuables.
Next, glue the original lid to the top half of the plastic bottle. Fill this top half with water as well. The goal is for both halves to appear full of water. Once both sections are prepared, carefully attach the top and bottom halves of the bottle together. You may need a strong waterproof adhesive or even a thin band of plastic tape around the seam, strategically placed where the original label would have been. Ensure the seal is as seamless as possible. Once assembled, the bottle appears completely normal and full of water, but it secretly contains your hidden items. This method works best for items that are not sensitive to moisture, or that are enclosed in a waterproof jar within the bottle. Store it in your car, garage, or even a gym bag for a cleverly disguised hiding spot.
#4: The Outdoor Sprinkler Head Stash – Garden Security at its Best
For those needing an outdoor hiding spot, a faux sprinkler head offers an incredibly clever and weather-resistant solution. This is perfect for stashing a spare house key or emergency cash, blending effortlessly into your lawn or garden.
Detailed Steps: Obtain a functional (or non-functional) sprinkler head that matches others in your yard, if applicable. Carefully unscrew the top portion of the sprinkler head to access its interior mechanism. Remove all the internal components, leaving an empty shell. Next, gently pop up the centerpiece of the sprinkler head – this is where your key will eventually be accessed from. Apply a strong superglue or epoxy around the outside of the string. Attach a durable string or fishing line firmly to the key you wish to hide. The other end of the string should be securely attached to the centerpiece of the sprinkler head, ensuring it’s strong enough to pull the key up when needed.
Carefully place the key and string back inside the empty sprinkler head, allowing the key to rest at the bottom. Pop the centerpiece back into its original position. Now, screw the sprinkler head onto a pipe adapter (a short PVC pipe section works well) and install it in an inconspicuous area of your lawn or garden. Choose a spot that isn’t regularly disturbed by gardening or foot traffic, and where a sprinkler head wouldn’t look out of place. The string attached to the centerpiece allows you to subtly lift the top, retrieve your key, and then easily push it back down, making it appear as a normal, albeit inactive, sprinkler head. This provides an excellent blend of outdoor concealment and relatively easy retrieval for those who know the secret.
#5: The Timeless Clock Concealment – Time for a Secret
A wall clock is a common household item, making it an ideal candidate for a hidden compartment. This project transforms a decorative clock into a secret safe for jewelry, small documents, or cash, accessible only to those who know its secret.
Detailed Steps: Begin by carefully removing the back panel of your chosen wall clock. Measure the dimensions of the clock’s interior and then cut out a backing piece from a picture frame or sturdy cardboard to fit snugly inside. This will form the base of your hidden compartment. Next, you can attach small shelves inside the back of the clock. These can be made from thin wood, plastic, or even folded cardboard, glued firmly in place. These shelves will help organize and secure your valuables within the clock. Now, glue a small hinge to the clock itself and to the newly cut frame piece. This hinge will allow the backing to swing open, revealing your hidden items. Choose a hinge that is small and discreet, preferably one that can be easily disguised or is less noticeable when the clock is closed.
Once the hinge is secured, place your valuables neatly on the newly installed shelves within the clock. Ensure they fit without bulging or making the clock feel unbalanced. Finally, close the clock, ensuring the hinged backing sits flush against the clock’s main body. You might consider adding a small magnetic latch or a simple hook-and-eye closure to keep it securely shut, preventing accidental openings. Hang the clock on your wall as usual. The beauty of this method is that the clock’s functional face remains intact, and anyone looking at it would simply see a timepiece, completely unaware of the treasures hidden behind its face. This method is particularly effective for items that need to be accessed occasionally but should remain out of sight.
#6: The Simple Outdoor Thermometer Cache – Easy Access, Perfect Disguise
For the simplest and most accessible outdoor hiding spot, the outdoor thermometer provides an incredibly effective and quick solution, especially for spare keys. Its common presence on porches, patios, or near windows makes it an excellent choice for a quick hide.
Detailed Steps: This hiding spot is truly effortless, requiring minimal modification. All you need is a standard outdoor thermometer, preferably one that attaches with suction cups or has a flat back. The key to its effectiveness is its utterly mundane appearance. Attach the suction cups (if they aren’t already fixed) to the back of the thermometer. Take your spare key and firmly tape it to the back of the thermometer. Use strong, weather-resistant tape, such as duct tape or electrical tape, to ensure the key remains securely attached and doesn’t fall off due to weather or movement. The tape should cover as much of the key as possible to provide a strong bond. Ensure the key doesn’t protrude too much, keeping a low profile.
Once the key is securely taped, simply stick the thermometer wherever you want it. Ideal locations include the outside of a window, on a glass door, or even on a metal surface near an entrance. The thermometer serves its primary function, displaying the temperature, while subtly concealing a crucial spare key. The simplicity is its strength; most people would glance at a thermometer for its reading and never suspect it of holding a secret. This method is best for keys that might be needed in an emergency by a trusted friend or family member, or for homeowners who frequently lock themselves out. It offers quick access while still being sufficiently hidden from casual observers, making it one of the easiest yet surprisingly effective secret spots you can create.
General Tips for Maximizing Your Secret Hiding Spots:
- Think Like a Thief (or a Forgetful Owner): The best hiding spots are those that don’t immediately scream “valuable.” Avoid obvious places like under the mattress or inside a sock drawer. Consider what an intruder would quickly check, and choose the opposite.
- Don’t Overdo It: While having multiple hiding spots is wise, avoid making too many or hiding too many valuable items in one place. Spread them out to mitigate risk.
- Keep it a Secret: The effectiveness of a secret hiding spot diminishes significantly if others know about it. Only share its location with trusted individuals if absolutely necessary.
- Consider the Environment: Ensure the chosen hiding spot protects your valuables from environmental factors like moisture, extreme temperatures, or pests. For example, documents in an outdoor sprinkler head might need an extra waterproof bag.
- Don’t Forget Where You Hid It: While the goal is secrecy, make sure you can remember the location! It might be helpful to keep a coded note or a mental map, especially if you have multiple hidden spots.
- Regularly Check: Periodically check your hiding spots to ensure they remain secure and your items are still safe and undamaged.
- Blend In: Make sure your DIY safe looks as natural as possible within its environment. A Pringles can full of chips on a shelf full of snacks is less suspicious than one sitting alone on a countertop.
*All image credit belongs to Household Hacker via YouTube. Follow and subscribe to his channel for more innovative and inspiring DIY ideas!
Empower Your Home Security with DIY Secret Safes
These six DIY secret hiding spots from Household Hacker demonstrate that home security doesn’t always require high-tech gadgets or professional installations. With a dash of creativity and a few common household items, you can create surprisingly effective and highly discreet places to protect your valuables. From the intellectual facade of a book to the deceptive simplicity of an outdoor thermometer, each method offers a unique way to outsmart potential intruders by blending into the everyday.
The satisfaction of knowing your prized possessions are safely tucked away in a homemade, invisible vault is truly invaluable. These projects not only save you money but also empower you to take an active role in safeguarding your peace of mind. So, gather your materials, watch the video tutorial for visual guidance, and embark on the journey of transforming ordinary objects into extraordinary secret safes. You’ll be amazed at how simple and effective these solutions are, and you might even discover a new passion for resourceful DIY security. Start building your secret arsenal today and enjoy the confidence that comes with clever concealment!