
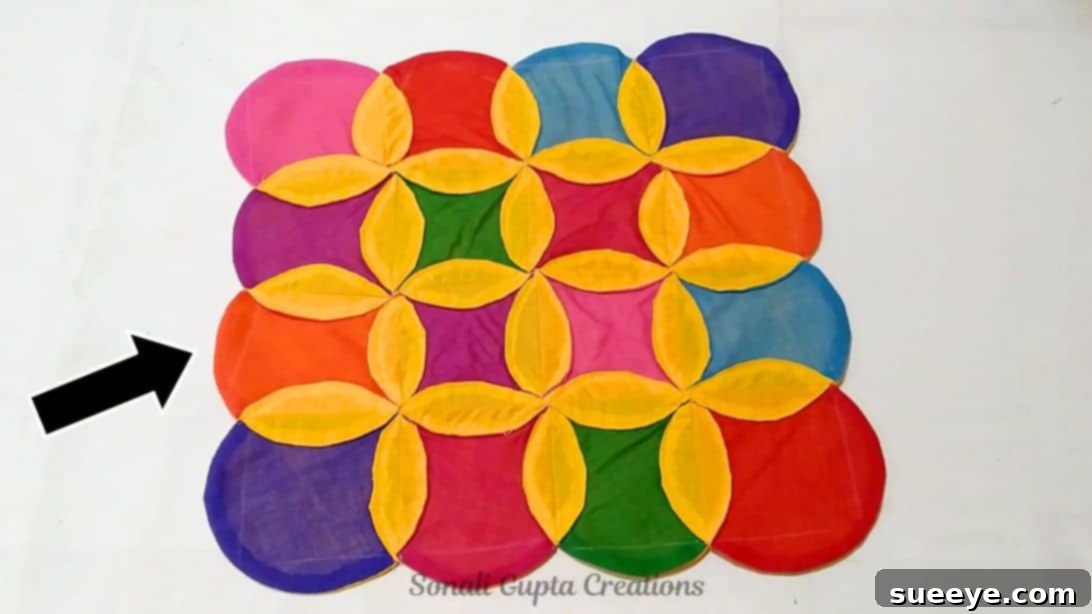
Transform Your Old Clothes into a Beautiful DIY Doormat: The Eco-Friendly Cathedral Window Project
Are you searching for an ingenious and sustainable way to repurpose old clothes that are no longer suitable for wear? Instead of contributing to overflowing landfills, imagine transforming those forgotten garments into a charming and practical doormat for your home. This project offers an exciting creative outlet, breathing new life into your textiles while providing a unique piece of home decor. What makes this particular DIY doormat so special is its foundation in the beloved Cathedral Window Quilt pattern – a design cherished by quilters for its elegant visual depth and stunning interwoven effect. Even if you’re a complete novice to the world of sewing, you’ll find this project surprisingly accessible. With clear, step-by-step guidance, anyone can create this beautiful doormat right at home. We’ll be drawing inspiration from the fantastic tutorial by Sonali Gupta Creations, ensuring a smooth and enjoyable crafting experience.
RELATED: Discover How to Make a Vibrant Rainbow Doormat
The global issue of textile waste is immense, with a staggering amount of thrown-out clothing ending up in landfills each year, where it can take hundreds of years to decompose. This contributes significantly to pollution and resource depletion. Repurposing your old clothes isn’t just a craft; it’s a conscious decision to participate in a circular economy, reducing waste and fostering sustainability. This particular project offers a dual benefit: it gives your old clothes a meaningful second life and provides you with a lovely, durable doormat that adds character to any entryway. Don’t let the intricate appearance of the Cathedral Window pattern intimidate you – trust us, the process is far simpler and more rewarding than it looks. We’ll guide you through each stage, from preparing your fabric to stitching the final details, ensuring you achieve a professional-looking result. Prepare to embark on a fulfilling DIY journey that transforms textile waste into a household treasure!
Why Choose the Cathedral Window Doormat?
The Cathedral Window pattern is renowned for its captivating visual effect, creating the illusion of three-dimensional windows and intricate frames. When applied to a doormat, this pattern offers several advantages:
- Aesthetic Appeal: The unique design adds a touch of sophistication and artistry to your doorway, making it more than just a functional item.
- Durability: The construction method, which involves multiple layers of fabric and robust stitching, results in a surprisingly resilient doormat capable of withstanding daily foot traffic.
- Upcycling Excellence: It’s an ideal project for using up a variety of fabric scraps and old clothing, allowing for a truly personalized and eco-friendly creation.
- Skill Building: While beginner-friendly, it introduces fundamental sewing techniques like cutting circles, sewing curves, and precise alignment, enhancing your crafting repertoire.
Essential DIY Doormat Materials
Gathering your materials is the first exciting step towards your new doormat. The beauty of this project lies in its simplicity and reliance on readily available items, especially those old clothes you’re ready to transform. Here’s what you’ll need:
- Old Clothes: This is the star of the show! Think old denim, cotton shirts, sturdy linens, or even light upholstery fabric. The key is to choose fabrics that are reasonably durable and can withstand some wear. Consider the colors and patterns – a mix can create a vibrant, eclectic look, or you can stick to a specific color palette for a more coordinated finish. Ensure your clothes are clean and pressed before cutting.
- 6-inch Circle Template: A sturdy template is crucial for consistent sizing. You can find pre-made templates at craft stores, or simply use a household item like a small plate, lid, or even a compass to draw a perfect 6-inch circle on cardboard to create your own template. Precision here will lead to a more uniform final product.
- Sharp Scissors: Good quality fabric scissors are indispensable for clean, precise cuts. Dull scissors can fray fabric and make cutting difficult, impacting the overall neatness of your circles and squares.
- Sewing Machine: While theoretically possible to hand sew, a sewing machine will make this project significantly faster, more consistent, and much stronger. Any basic sewing machine capable of a straight stitch will work perfectly.
- Ruler: A standard ruler or a quilter’s ruler will be essential for accurately cutting your initial fabric squares and for precise measurements throughout the project.
- Fabric Marker or Chalk: This will be used to trace your circles and mark alignment points on your fabric. Choose a marker that is easily visible on your chosen fabrics and that will either disappear with heat/water or can be cut away by your seam allowance.
- Iron and Ironing Board: Not listed in the original, but absolutely critical for pressing seams and ensuring a flat, professional finish.
- Thread: All-purpose polyester thread that matches or complements your fabric colors.
How to Make a Doormat Using Old Clothes: Step-by-Step Guide
This tutorial breaks down the intricate-looking Cathedral Window pattern into manageable steps. Pay close attention to the details, especially regarding precise cutting and seam allowances, as these contribute significantly to the final look and durability of your doormat.
Step 1: Prepare Your Fabric Squares
Begin by preparing the foundational units of your doormat. Take your chosen old clothes and cut them into 7-inch squares. The extra inch beyond your 6-inch circle template accounts for the seam allowance and the unique folding technique of the Cathedral Window pattern. Aim for as much precision as possible when cutting these squares; consistency in size will ensure your doormat comes together neatly. You’ll need a good number of these squares, depending on the desired size of your doormat. For a typical entryway doormat, you might need anywhere from 20 to 40 squares, creating a mat roughly 4-5 rows of 4-5 circles.
Step 2: Crafting Your Fabric Circles
Now, let’s turn those squares into the essential circular components. Take two of your 7-inch fabric squares and place them right sides together. This means the side of the fabric you want to be visible in the finished product should be facing inwards. Place your 6-inch circle template directly on top of the stacked squares and meticulously trace around it with your fabric marker or chalk. Once traced, carefully cut out the circles through both layers of fabric. Next, using your sewing machine, sew all the way around the traced circle with a precise 1/4-inch seam allowance. This smaller seam allowance helps maintain the curve and reduces bulk. After sewing, carefully cut small slits all around the curved edge of the circle, making sure not to cut through your stitch line. These slits will help the fabric curve smoothly when turned right side out. Finally, cut a small cross shape in the center of one layer of the sewn circle – this opening will allow you to flip the fabric right side out. Turn the circle right side out through this opening, gently pushing out the seam for a smooth edge. Press the edges flat with an iron for a crisp finish. Repeat this entire process for all your remaining pairs of squares, creating numerous identical fabric circles.
Step 3: Marking the “Window” Lines
This step is crucial for establishing the distinctive “window” effect of your doormat. Take one of your pressed fabric circles. Fold it exactly in half, pressing the fold line with your iron. Then, fold it in half again, creating another pressed fold line perpendicular to the first. When you unfold the circle, you should see four distinct fold lines, marking the quarter points of your circle. These folds define the center of each side of what will become a hidden square. Use your fabric marker or chalk to lightly draw a square that connects the middle point of each of these four sides. This square outline doesn’t need to be perfectly symmetrical with the overall circle; its purpose is to guide your stitching in later steps. Refer to the provided image for a clear visual example of how this square should be marked within the circle. Repeat this marking process for all the fabric circles you have created.
Step 4: Assembling Your Doormat Rows
With your circles marked, it’s time to begin forming the structure of your doormat. Select four of your prepared circles and arrange them in a single row on a flat surface. It’s imperative that the marked squares on each circle are perfectly aligned. The precision here will dictate the neatness of your final pattern. Take the first two circles in your row and carefully align their marked square lines. Using these lines as a guide, sew the two circles together. The stitching should go along one side of the marked square on each circle, effectively joining them at that specific seam. Continue this process, adding the third and then the fourth circle to form a complete row of four interconnected circles. Once your first row is complete, repeat this entire process three more times, creating a total of four identical rows, each comprising four circles. You now have the building blocks of your doormat!
Step 5: Joining the Doormat Rows
Now that you have four completed rows of circles, the next step is to join them to form the full doormat. Lay out your first row, and then carefully place your second row directly beneath it, ensuring that all the marked squares and the “window” lines are perfectly aligned both horizontally and vertically. The points where the circles from adjacent rows meet are crucial for creating the seamless Cathedral Window effect. Sew the rows together, again using the bottom marked lines of the upper row and the top marked lines of the lower row as your precise guide. This stitching will connect the rows, forming a grid of circles. Continue this process for all four rows, progressively building your doormat. The goal is to create a consistent, sturdy grid that will form the base of your decorative pattern. Refer to the photo below to visualize this crucial joining process.
Step 6: Revealing the Cathedral Window Pattern
This is where the magic happens and your doormat truly comes to life! Once all your rows are sewn together, it’s time to reveal the beautiful Cathedral Window pattern. Take your assembled mat to the ironing board. Carefully press all the seams open. This means you will separate the seam allowance on either side of each stitch line and press it flat. As you press, you will notice the fabric naturally wants to fold and create the characteristic “flower” or “window pane” shapes. Gently manipulate the fabric, pushing out the points and curves to fully define each “leaf” or “pane” of the pattern. The pressing is absolutely essential for a crisp and professional finish. After pressing, go back with your sewing machine and carefully top stitch along the outer edge of each “leaf” or folded section. This topstitching not only secures the folds, preventing them from unraveling or shifting, but also adds a decorative element and significantly increases the durability of your doormat. Take your time with this step, ensuring your topstitching is neat and even. Once complete, stand back and admire your handiwork – your stunning Cathedral Window doormat is ready!
Tips for a Perfect Doormat
- Fabric Choices: Experiment with different fabric textures and weights. Denim and canvas are excellent for durability. Cotton blends offer a softer feel. Consider color gradients or contrasting patterns for a more dynamic look.
- Precision is Key: While it’s a DIY project, accurate cutting and consistent seam allowances will make a huge difference in the final appearance. Use a rotary cutter and mat for even greater precision if you have them.
- Pressing Power: Don’t underestimate the power of a good iron! Pressing at each stage not only makes subsequent steps easier but also ensures a flat, professional-looking finish.
- Non-Slip Backing: For added safety, consider sewing a non-slip backing fabric or applying a non-slip spray to the underside of your finished doormat.
- Customization: Feel free to adjust the size of the initial squares and circles to create a smaller mat for a bathroom or a larger one for a grand entryway. You can also vary the number of rows and columns.
Caring for Your Upcycled Doormat
To ensure your beautiful, handmade doormat lasts for years to come, proper care is essential. Since it’s made from fabric, it will eventually need cleaning. Most fabric doormats can be spot-cleaned with a mild detergent and water. For a deeper clean, if your chosen fabrics allow, you can gently machine wash it on a delicate cycle with cold water, then air dry flat to maintain its shape. Avoid harsh chemicals or high heat drying, which can damage the fabric and stitching. Regular shaking or vacuuming will help remove loose dirt and debris, keeping your doormat looking fresh and vibrant.
Conclusion: Turn Old Clothes into a Doormat and Embrace Sustainable Crafting
You’ve now transformed a pile of old clothes into a beautiful, functional, and conversation-starting doormat using the elegant Cathedral Window pattern. This project is a testament to the power of creative repurposing and sustainable living. Not only have you given worn-out garments a second life, saving them from a landfill, but you’ve also created a unique piece of home decor that reflects your personal style and commitment to eco-conscious choices. The satisfaction of crafting something beautiful and useful with your own hands is truly immense. We hope this detailed guide has inspired you to look at your old textiles with new eyes and to continue exploring the wonderful world of DIY and upcycling. Get ready to welcome guests with a doormat that’s not just practical, but also a meaningful work of art!