
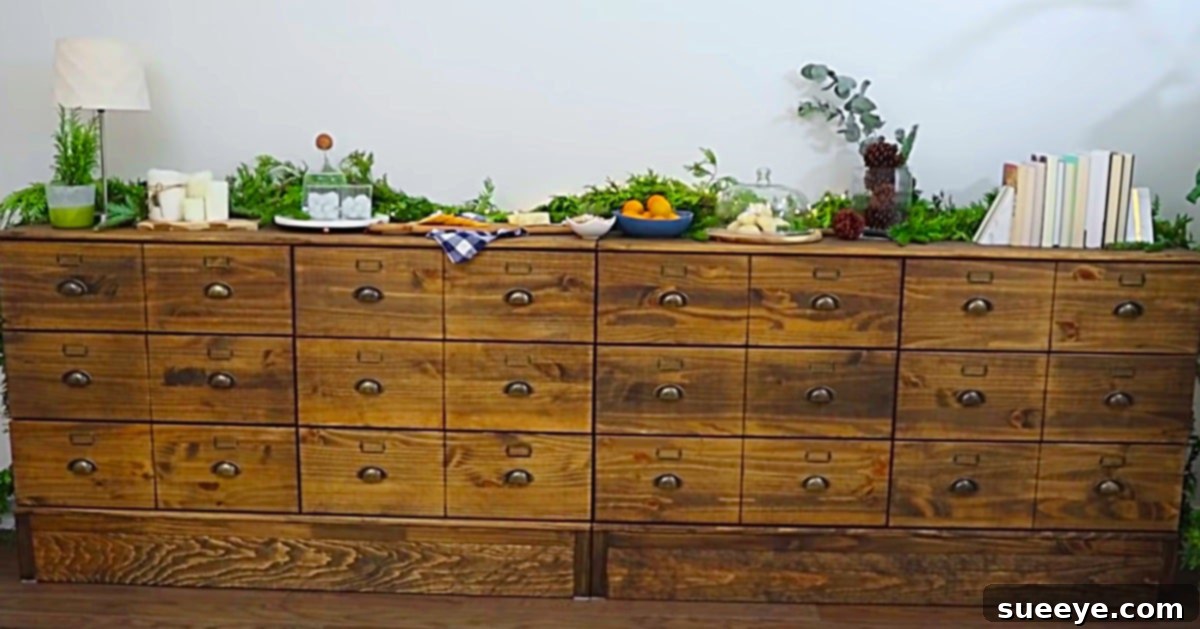
Have you ever found yourself enchanted by the timeless allure of an apothecary dresser? These magnificent pieces, with their myriad of small drawers and rich, aged character, evoke a sense of history, mystery, and meticulous organization. They are the epitome of old-world charm, capable of transforming any space into something truly special. However, the dream of owning one often collides with the harsh reality of their price tag. Authentic antique apothecary cabinets can cost a small fortune, often running into thousands of dollars, while even modern reproductions can set you back as much as $6,000 or more. For many, this places such a cherished item firmly in the realm of unattainable aspirations.
But what if you could achieve that same majestic look, that same vintage appeal, for a fraction of the cost? Thanks to the ingenuity of the DIY community, an “IKEA hack” offers a brilliant solution. This popular approach allows you to transform a standard, affordable IKEA dresser into a breathtaking apothecary cabinet that looks like it cost a fortune. Far from being a complicated carpentry challenge, this project is surprisingly accessible, making that dream apothecary dresser a tangible reality for even novice DIY enthusiasts.
Achieve Old-World Charm on a Budget: Your Ultimate IKEA Hack for a Stunning DIY Apothecary Dresser
This article will guide you through the process of creating your very own large, majestic apothecary dresser, significantly reducing the financial barrier that often accompanies such a desire. While the original inspiration for this hack often utilizes two IKEA dressers, costing around $600 in total (or $300 each), the beauty of this project lies in its flexibility. You’re not confined to IKEA; any dresser you might unearth on platforms like Craigslist or Facebook Marketplace can serve as a perfect foundation. Furthermore, the concept scales beautifully, working wonderfully for grand, statement pieces or even charming miniature versions. Get ready to unlock the secrets to a gorgeous, custom piece of furniture that reflects your personal style and appreciation for classic design.
Why an Apothecary Dresser is a Must-Have for Your Home
Beyond their undeniable aesthetic appeal, apothecary dressers offer unparalleled functionality. Their design, characterized by numerous individual drawers, makes them ideal for superior organization. Imagine having a dedicated space for everything from craft supplies, stationery, and small tools to accessories, jewelry, or even spices in a kitchen setting. They bring order to clutter while simultaneously adding a unique decorative element to a living room, entryway, home office, or even a spacious bedroom. This DIY project isn’t just about saving money; it’s about crafting a bespoke storage solution that perfectly blends vintage charm with modern utility.
Essential Materials and Tools for Your Transformation
To embark on this exciting furniture transformation journey, you’ll need a thoughtful selection of materials and tools. Most items are readily available at hardware stores, craft shops, or online, ensuring a smooth project from start to finish.
Choosing Your Base Dresser: The Foundation of Your Apothecary Cabinet
- IKEA Dressers: Options like the IKEA Malm, Hemnes, or Tarva series are popular choices due to their clean lines and affordable price points. For a large apothecary dresser, two dressers placed side-by-side or stacked could create an impressive scale.
- Alternative Dressers: Don’t limit yourself to IKEA. Any sturdy dresser with flat drawer fronts can be repurposed. Look for solid wood pieces on Craigslist, Facebook Marketplace, or at thrift stores. Even “furniture in the raw” (unfinished wood furniture) provides an excellent canvas for this project, often requiring less prep work than a previously painted or stained piece. Ensure the drawers are in good working order.
Finishing Supplies for that Vintage Appeal
- Wood Stain: A quality wood stain is crucial for achieving the aged, rich look typical of antique apothecary cabinets. Brands like Minwax offer a wide range of colors, from dark walnuts to deep cherries, that work exceptionally well. Consider an oil-based stain for deeper penetration and durability.
- Pre-Stain Wood Conditioner: Especially important for softer woods or when using an oil-based stain, conditioner helps ensure an even stain application, preventing blotchiness.
- Clear Topcoat/Sealer: A polyurethane (oil or water-based), polycrylic, or furniture wax will protect your stained finish and add a subtle sheen.
- Applicators: High-quality bristle brushes for stain and topcoat, or foam brushes for a smoother finish. Lint-free rags or old cotton cloths for wiping off excess stain.
Essential Tools for Precision and Craftsmanship
- Saw: A circular saw or a simple hand saw will be needed to score the drawer fronts. If using a circular saw, ensure you have the appropriate safety gear and a straight edge guide. A scoring knife can also be used for lighter lines.
- Angle Ruler / Speed Square: Essential for accurate measurements and ensuring straight lines when scoring the drawer fronts.
- Measuring Tape and Pencil: For precise marking and measurement.
- Drill and Drill Bits: Necessary for attaching the hardware. Select a drill bit size appropriate for your screw width.
- Sandpaper: Various grits (e.g., 120-grit for initial sanding, 220-grit for smoothing between coats of stain/topcoat) for preparing surfaces and refining the finish.
- Safety Glasses and Gloves: Always prioritize safety when working with tools and chemicals.
Authentic Apothecary Hardware
- Apothecary Brass Cabinet Pulls: These classic cup pulls or bin pulls instantly lend an antique feel. Choose a finish that complements your chosen stain color (e.g., aged brass, oil-rubbed bronze).
- Apothecary Screw-In Card Holders: These small, often brass or antique bronze frames, allow you to label each “drawer” (or faux drawer), enhancing the authentic look and adding a touch of practical charm.
Step-by-Step Guide to Your Apothecary Dresser Transformation
Follow these detailed steps to bring your vision of an apothecary dresser to life. Patience and precision are key to achieving a professional, old-world look.
Step 1: Prepare Your Dresser Foundation
Begin by assembling your IKEA dresser according to the manufacturer’s instructions. If you’re using an existing dresser, ensure it’s clean, stable, and all drawers function smoothly. For previously finished dressers, light sanding (with 120-grit sandpaper) may be necessary to rough up the surface, allowing the new stain or paint to adhere better. If it’s raw wood, a light sanding with 220-grit sandpaper will smooth out any imperfections and prepare it for staining.
Step 2: The Art of Faux Drawer Fronts – Scoring for Authenticity
This is where the magic truly happens, transforming large, flat drawer fronts into the appearance of multiple smaller apothecary drawers. Carefully measure the exact middle of each of your drawer fronts, both horizontally and vertically. Use your pencil to make a light mark. Then, using an angle ruler or a straight edge and your saw, make a very light scoring cut along these measured lines. The goal is not to cut through the drawer but to create a shallow, visible groove that mimics the seam between two separate drawers. Ensure your cuts are straight and consistent across all drawer fronts for a cohesive look. This optical illusion is incredibly effective in achieving the desired aesthetic.
Step 3: Imparting Vintage Character with Stain
Once your scoring is complete, it’s time to apply the stain. If you’re using raw wood or have sanded down to raw wood, apply a pre-stain wood conditioner first, following the product instructions. This step is crucial for an even, professional finish, especially on pine or other softwoods. Next, apply your chosen wood stain generously, working in small sections and always moving in the direction of the wood grain. Allow the stain to penetrate for a few minutes (check product recommendations), then wipe off any excess with a clean, lint-free cloth. For a deeper color, apply additional coats, allowing adequate drying time between each. Minwax stains are a popular and reliable choice for this type of project, offering rich, consistent color. Ensure the entire dresser, especially the scored drawer fronts, is evenly stained.
Step 4: Adorning with Authentic Hardware
With your stained dresser dry and beautiful, it’s time to add the defining features: the apothecary hardware. Measure carefully to the exact middle of each *faux* drawer front and mark where your apothecary drawer pulls will be placed. You’ll want to ensure consistent spacing and alignment across all drawer fronts for a polished look. Drill pilot holes slightly smaller than your screw width to prevent wood splitting. Attach your brass cabinet pulls securely. Then, similarly, position your screw-in cardholders (often placed slightly above or below the pulls, or centered on the faux drawer sections) and attach them. These small details are incredibly important for conveying that authentic old-world style.
Once all the hardware is attached, you can optionally apply a clear topcoat (like polyurethane or polycrylic) for added durability and protection. This step is highly recommended, especially for furniture that will see regular use. Allow ample time for it to cure completely before placing items on or in your new dresser.
Advanced Tips for a Flawless Finish and Customization
To truly elevate your DIY apothecary dresser, consider these expert tips:
- Achieving Depth and Distress: For an even more authentic aged look, lightly sand the edges and corners of the dresser after staining, before applying a topcoat. This technique, known as distressing, reveals the lighter wood underneath, mimicking natural wear and tear. You can also add subtle nicks and scratches for character.
- Sealing and Protecting Your Investment: A durable topcoat is vital. Water-based polycrylic dries quickly and offers a clear finish, while oil-based polyurethane provides a warmer amber tone and superior scratch resistance. Alternatively, a good furniture wax can give a soft, hand-rubbed finish.
- Customization Ideas: While stain offers a classic look, don’t shy away from paint! A deep forest green, navy blue, or even a distressed cream can create a unique apothecary style. Experiment with different hardware finishes – pewter, matte black, or antique bronze can also look stunning. You can also use stencils to add faux labels or decorative motifs to the drawer fronts.
Styling Your New Apothecary Dresser
Once your masterpiece is complete, the fun continues with styling! Your DIY apothecary dresser is a versatile piece that can enhance various rooms:
- Living Room Statement: Place it against a prominent wall, adorned with vintage books, botanical prints, or unique curios. It becomes an instant conversation starter and a functional storage hub.
- Entryway Organizer: Perfect for stashing keys, mail, gloves, and other everyday essentials, keeping your entryway tidy and stylish.
- Home Office Storage: Organize office supplies, documents, and craft items in a sophisticated manner, transforming a mundane workspace into an inspiring sanctuary.
- Craft Room Utility: An ideal solution for categorizing threads, beads, tools, and other crafting necessities, keeping everything accessible and neat.
- Bedroom Charm: Offers unique storage for accessories, linens, or even as a distinctive bedside table.
This project is not just about building furniture; it’s about crafting a piece that tells a story, adds character, and provides practical elegance to your home. It’s a testament to the fact that high-end style doesn’t always have to come with a high-end price tag.
Your Dream Apothecary Dresser Awaits!
The desire for an old-world apothecary dresser is entirely understandable given its unique charm and versatile functionality. This IKEA hack, or indeed any dresser makeover, provides a fantastic and affordable avenue to achieve that cherished aesthetic without breaking the bank. By following these straightforward steps, even with minimal DIY experience, you can transform a simple dresser into a sophisticated, vintage-inspired apothecary cabinet that looks like a genuine antique. The satisfaction of crafting such a beautiful and functional piece with your own hands is truly immense. Embrace your inner artisan, gather your materials, and prepare to bring a touch of timeless elegance into your home!