
Imagine enjoying fresh, organic potatoes harvested right from your backyard, patio, or even balcony! The idea of cultivating your own food might seem daunting, but what if we told you it’s incredibly simple and can be done using materials readily available and inexpensive? This comprehensive guide will show you how to effortlessly grow a bountiful harvest of potatoes using an ordinary laundry bin. Forget traditional garden beds; container gardening with laundry bins offers a flexible, efficient, and surprisingly productive way to grow your favorite spuds.
This clever method is perfect for beginners, those with limited space, or anyone looking for a fun, budget-friendly gardening project. You can source most of your supplies from local discount stores, making it an accessible venture for everyone. Prepare to be amazed at how easy it is to grow delicious, home-grown potatoes that taste infinitely better than store-bought varieties. Follow along with our step-by-step instructions, inspired by insightful tutorials like those from Wicked SIPPERS TRIPPERS & FLIPPERS on YouTube, and get ready to enjoy the fruits (or rather, tubers!) of your labor.
Why Choose Laundry Bins for Growing Potatoes?
Container gardening, especially with laundry bins, presents numerous advantages for potato cultivation:
- Space-Saving Solution: Ideal for small gardens, patios, balconies, or urban environments where ground space is limited.
- Portability: Bins can be easily moved to follow the sun or protect plants from adverse weather conditions.
- Excellent Drainage: With a few drilled holes, laundry bins provide superior drainage, crucial for preventing potato rot.
- Pest and Disease Management: Growing in containers can help isolate plants, making it easier to manage soil-borne pests and diseases.
- Weed Control: Significantly reduces weeding compared to traditional garden beds.
- Easy Harvesting: When it’s time to harvest, simply tip the bin over for quick and clean access to your potatoes.
- Budget-Friendly: Laundry bins are a remarkably inexpensive alternative to specialized potato grow bags or raised beds.
Materials You’ll Need:
Gathering your materials is the first exciting step in your potato growing journey. You’ll be surprised how few items are required for such a rewarding yield.
- Laundry Bins: Opt for sturdy plastic bins, ideally with some flexibility, from a dollar store, Walmart, or any discount retailer. Look for bins that are at least 15-20 inches deep for optimal potato growth.
- Organic Potting Soil: High-quality, well-draining organic potting mix is essential. Avoid heavy garden soil, which can compact and hinder tuber development. A good potting mix provides aeration and nutrients.
- Seed Potatoes: These are not regular grocery store potatoes (which may be treated to prevent sprouting). Purchase certified disease-free seed potatoes from a garden center or online supplier. They often come in varieties specifically bred for container growing.
- Paper Bags: Brown paper grocery bags work perfectly. You’ll need several to line the bin and build up layers.
- Scissors: For cutting the paper bags.
- ¼-inch Drill Bit and Drill: For creating essential drainage holes in the laundry bin.
Step-by-Step Directions to Grow Your Own Potatoes:
Step 1: Preparing Your Laundry Bin for Planting
Proper preparation of your laundry bin is crucial for the success of your potato crop. Potatoes require good drainage to prevent rot and promote healthy growth.
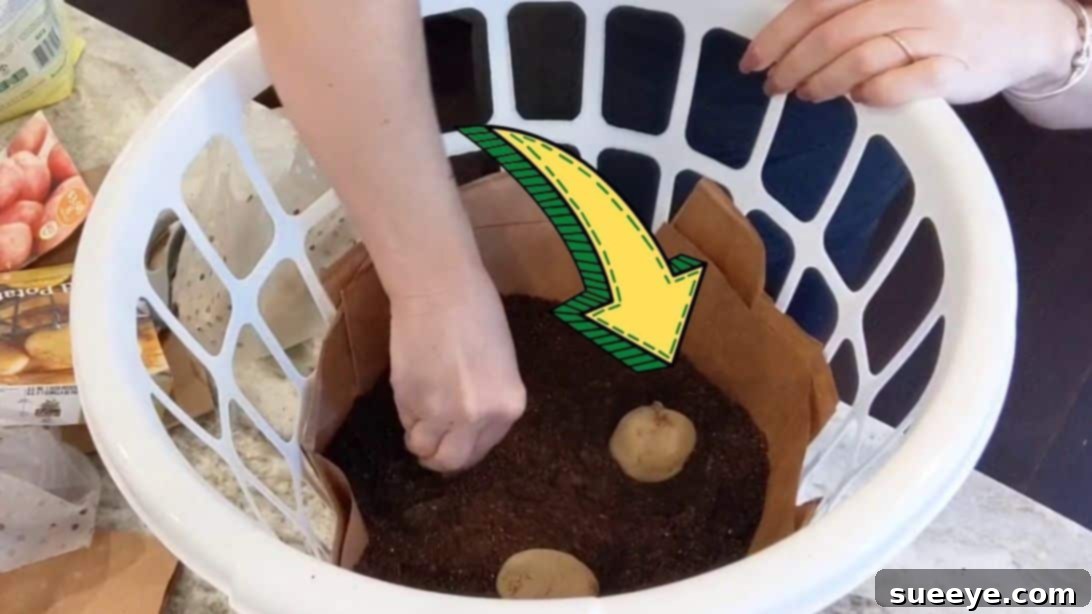
Begin by using your drill and a ¼-inch drill bit to create several drainage holes at the bottom of the laundry bin. Aim for about 4-6 evenly spaced holes to ensure excess water can escape easily. Next, take your paper bags and cut them open to create flat sheets. Line the bottom of the bin with a few layers of these paper bag sheets. Extend the paper lining up the sides of the bin as well, covering any gaps or larger holes in the bin’s mesh. This acts as a barrier, preventing your precious potting soil from seeping out while still allowing water to drain. Once the bin is lined, pour about 2 to 3 inches of your organic potting soil into the bottom, spreading it evenly. If the sides still have larger gaps, add more layers of paper bag around the perimeter to secure the soil.
Step 2: Planting Your Seed Potatoes
Now comes the exciting part: introducing your seed potatoes to their new home! For best results, place 3 pieces of seed potatoes onto the soil layer you’ve just created. Ensure that any ‘eyes’ or developing sprouts (often called ‘chits’) are facing upwards. If your seed potatoes are large, you can cut them into smaller pieces, ensuring each piece has at least 1-2 eyes. Allow cut pieces to “cure” for a day or two in a dry, cool place before planting to prevent rot. Once placed, use more cut paper bag pieces to line the sides of the bin again, just above the current soil level, preparing for the next layer of soil. Pour an additional 4 inches of potting soil over the seed potatoes, covering them completely. Gently spread the soil evenly. Give the newly planted soil a thorough watering to settle it and provide essential hydration. Finally, place your prepared bin in a location that receives at least 6-8 hours of direct sunlight daily and where temperatures are consistently warm. Within a few weeks, you should observe small green shoots emerging from the soil – a sign of healthy growth!
Step 3: The Art of Hilling – Encouraging More Potatoes
As your potato plants grow taller, you’ll notice their leafy green stems reaching for the sun. This is where “hilling” comes in, a vital technique for maximizing your potato yield. Once the green shoots are about 6-8 inches tall, it’s time to add more soil. Gently add another 4-6 inches of potting mix around the stems, covering them almost completely, leaving only the top few inches of foliage exposed. This process encourages the plant to produce more tubers along the buried stem, leading to a much larger harvest. Continue this hilling process every time the plant grows another 6-8 inches, until the soil level reaches about 2-3 inches from the top rim of the laundry bin. Remember to keep the paper bag lining extended upwards to contain the new soil layers. Always water thoroughly after hilling to help the soil settle and provide moisture to the newly covered stems.
Step 4: Ongoing Care and Maintenance for Healthy Growth
Consistent care is key to a flourishing potato crop. Your potato plants will thrive with adequate sunlight, water, and occasional feeding.
- Sunlight: Ensure your bin receives at least 6-8 hours of direct sunlight per day. If needed, rotate the bin or move it to a sunnier spot.
- Watering: Potatoes require consistent moisture, especially during flowering and tuber development. Check the soil moisture daily by sticking your finger about an inch deep. If it feels dry, water thoroughly until you see drainage from the bottom holes. Avoid overwatering, which can lead to rot, but also prevent the soil from drying out completely.
- Fertilization (Optional): While good potting soil provides initial nutrients, you might consider a balanced organic liquid fertilizer every 2-4 weeks, especially once the plants start flowering. Follow the product instructions for dilution and application.
- Pest and Disease Watch: Keep an eye out for common garden pests like potato beetles or aphids. Hand-picking or using organic insecticidal soap can manage most issues. Healthy plants are generally more resistant to disease. Ensure good air circulation around the plants to prevent fungal problems.
Step 5: Harvesting Your Delicious Homegrown Potatoes
Knowing when to harvest your potatoes is crucial for flavor and storage. Typically, potatoes are ready for harvest 70-120 days after planting, depending on the variety and growing conditions.
Look for signs that your plants are maturing: the foliage will start to yellow, wither, and eventually die back. This indicates that the plant has put all its energy into developing the tubers underground. Once the tops have completely died back, stop watering and wait for another 1-2 weeks. This waiting period allows the potato skins to “set” or toughen, which improves their storage life. To harvest, simply tip the laundry bin onto a tarp or a cleared patch of ground. Gently sift through the soil to reveal your hidden treasure of potatoes! Be careful not to bruise them with sharp tools. Brush off excess soil, but avoid washing them immediately, as this can reduce their storage potential.
Post-Harvest and Storage Tips
After harvesting, allow your potatoes to “cure” for a week or two in a cool, dark, well-ventilated area (around 50-60°F or 10-15°C). Curing helps heal any minor nicks and thickens the skins, further enhancing their storage life. Once cured, store your homegrown potatoes in a cool, dark, and humid place, ideally in burlap sacks, mesh bags, or perforated bins to allow for air circulation. Avoid storing them in direct sunlight or warm areas, as this can cause them to sprout or turn green (which indicates solanine production and makes them inedible). Properly stored, your laundry bin potatoes can last for several months!
Common Questions & Troubleshooting for Your Potato Patch
Even with simple methods, questions can arise. Here are some common queries and tips:
- Why are my potatoes green? Green areas on potatoes indicate exposure to light and the production of solanine, a bitter and potentially toxic compound. This can happen if potatoes are too shallow in the soil or if the soil erodes. Ensure proper hilling and deep planting. Always cut away green parts before cooking.
- My plants aren’t flowering. Is that bad? Not necessarily. While flowering indicates maturity, some potato varieties may not flower extensively, or they might flower at different stages. Focus more on the foliage dying back as an indicator for harvest.
- What if I don’t have seed potatoes? While certified seed potatoes are best, you can try sprouting organic grocery store potatoes. Cut them into pieces with eyes and let them cure. However, success isn’t guaranteed, and they might carry diseases.
- Can I reuse the soil? It’s generally not recommended to reuse soil for potatoes in the same container next season, as it can deplete nutrients and harbor potato-specific diseases. It’s better to refresh with new potting mix or amend heavily with compost.
How To Grow Potatoes In A Dollar Store Bin: A Rewarding Experience
Growing potatoes in a dollar store laundry bin is more than just a gardening hack; it’s a testament to how accessible and enjoyable growing your own food can be. This method empowers you to produce fresh, delicious, and healthy potatoes with minimal investment and effort, regardless of your space limitations. From the initial planting to the joyous moment of unearthing your homegrown harvest, each step offers a satisfying connection to nature and a delicious reward.
So, why wait? Grab a laundry bin, some seed potatoes, and a bag of potting soil, and embark on your own container potato gardening adventure today. You’ll be delighted by the ease and abundance this simple trick brings to your home garden. Happy growing!