
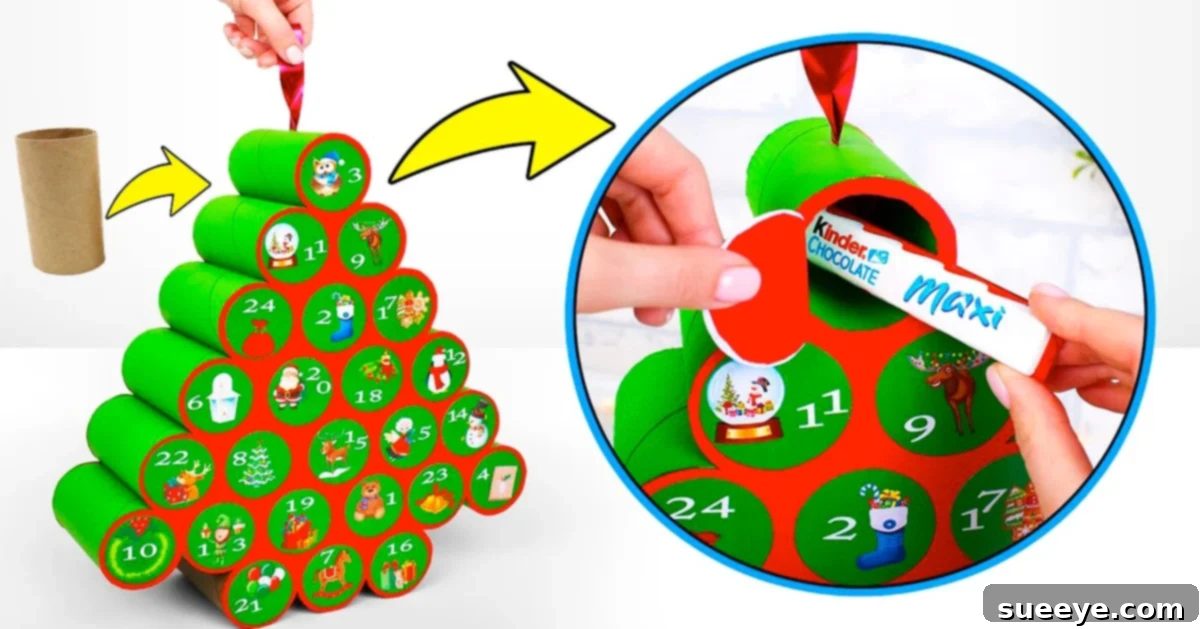
The holiday season brings with it a unique sense of magic, anticipation, and the joy of counting down to Christmas Day. Few traditions capture this excitement quite like an advent calendar. Far more than just a simple countdown, an advent calendar offers a daily dose of delight, revealing a small surprise or message as December progresses. While store shelves are brimming with countless options, there’s a special charm and profound meaning that comes from crafting your own. This article will guide you through making a wonderfully creative and budget-friendly DIY advent calendar from toilet paper rolls, inspired by a delightful tutorial from Slick Slime Sam on YouTube. It’s an excellent way to add a personal touch to your holiday decorations and offer unique, sweet gifts to family and friends, making the wait for Christmas truly unforgettable.
Embarking on a DIY project for the holidays not only fosters creativity but also provides an opportunity to personalize gifts and decorations in a way that mass-produced items simply cannot. Imagine tailoring each day’s surprise to the recipient’s tastes, creating a truly bespoke experience. Moreover, this particular craft champions sustainability by repurposing everyday items like toilet paper rolls, transforming potential waste into a cherished holiday keepsake. It’s a fantastic activity for all ages, perfect for a cozy afternoon of crafting with loved ones, adding an extra layer of warmth and togetherness to your festive preparations.
Essential Supplies for Your Recycled Advent Calendar
Before diving into the creative process, gathering all your materials is key. Many of these items you might already have around your home, especially if you’re a fan of crafting or have a stash of recycled goods. Here’s what you’ll need to construct your very own personalized advent calendar:
- Paper Rolls or Toilet Paper Rolls: These are the stars of our project! Start collecting them well in advance. You’ll need about 24-25 rolls for a full advent calendar.
- Green Paint and Brown Paint (or Any Colors You Prefer): Traditional Christmas colors work beautifully, but feel free to experiment with whites, silvers, blues, or even pastels to match your home’s decor. Acrylic paints are usually best for paper.
- Red Poster Paper (or Cardstock): This will serve as the backing for your calendar and perhaps some decorative elements. Other colors like gold, silver, or a contrasting green can also be used.
- Hot Glue Gun and Glue Sticks: Essential for quick and strong adhesion, ensuring your calendar structure is sturdy.
- Pencil: For marking, tracing, and drawing.
- White Glue (PVA Glue): Useful for finer details, attaching paper elements, or if you prefer a slower-setting, less intense adhesive than hot glue.
- Scissors: For cutting paper rolls, poster paper, and ribbon.
- Glue Stick: Ideal for attaching lightweight paper decorations or numbers.
- Small Presents for the Advent Calendar: Think tiny candies, miniature toys, personalized notes, stickers, small chocolates, or even puzzle pieces that reveal a bigger picture by Christmas.
- Ribbon: For hanging your calendar or adding decorative bows. Choose a festive color and material.
- Paper Cutter (Optional but Recommended): For clean, straight cuts on your poster paper.
- Christmas Stickers or Print Outs: To number your calendar days and add extra festive flair. Glitter, sequins, and small beads are also great additions.
Step-by-Step Guide to Crafting Your DIY Advent Calendar
Creating your advent calendar is a rewarding process that allows for plenty of creative freedom. Follow these detailed steps to build a beautiful and functional Christmas countdown:
1. Prepare Your Paper Rolls
Begin by gathering all your toilet paper rolls. If you’re using paper towel rolls, cut them into segments approximately 4-5 inches long, or the standard length of a toilet paper roll. Ensure all pieces are roughly the same size to create a uniform look for your calendar compartments. For toilet paper rolls, no cutting is necessary; their natural size is perfect. Before painting, make sure your rolls are clean and dry. This initial preparation sets the foundation for a well-structured and aesthetically pleasing advent calendar.
2. Paint the Rolls with Festive Colors
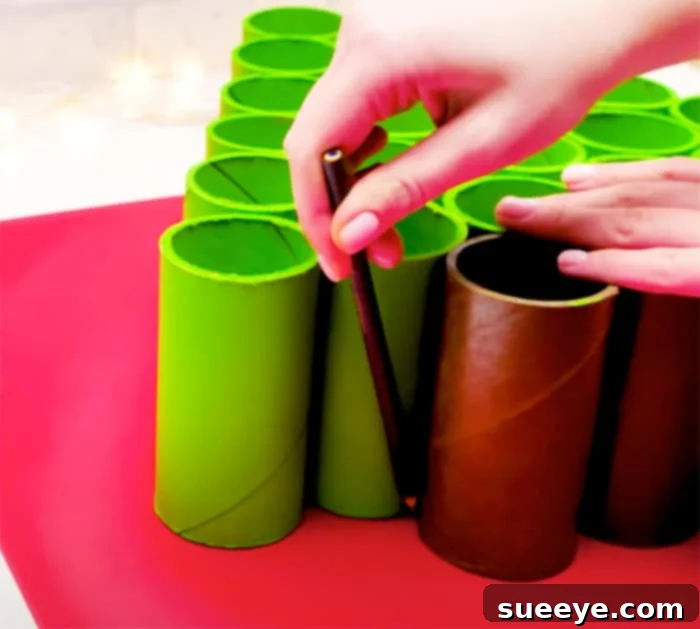
Now for the fun part: painting! Take your collection of paper rolls and apply green paint to the majority of them. Aim for a rich, festive green that evokes the spirit of a Christmas tree. For the bottom row of your calendar, which will serve as the tree stump, paint a few rolls with brown paint. You might need two coats of paint to achieve full, even coverage. Allow ample time for each coat to dry completely before proceeding to the next step. If you’re feeling adventurous, consider incorporating different shades of green or even adding a touch of glitter paint for extra sparkle. This step truly transforms humble paper rolls into vibrant components of your holiday display.
3. Assemble the Christmas Tree Structure
Once your painted rolls are thoroughly dry, it’s time to assemble them into the shape of a Christmas tree. This is best done on a flat, protected surface. Begin by arranging the brown-painted rolls in a single row at the bottom – these will be your tree stump. Above this, start building your tree shape with the green rolls, forming a pyramid. A common structure involves rows like 1 (stump) – 3 – 4 – 5 – 4 – 3 – 2 – 1 or similar, depending on the number of days you want to include (typically 24 or 25). Use your hot glue gun to carefully glue the rolls together, ensuring they are securely attached to one another. Work row by row, making sure each roll is aligned and firmly bonded to its neighbors. The hot glue provides a strong, fast-drying hold, crucial for the stability of your advent calendar tree.
4. Create the Backing Panel
With your tree structure assembled, you’ll need a sturdy backing to hold everything in place and prevent gifts from falling out. Place your assembled tree structure onto your chosen poster paper (e.g., red poster paper). Carefully trace the outline of the entire tree shape, including the stump, onto the paper using your pencil. Once traced, cut out this shape precisely with scissors or a paper cutter. Apply a generous amount of hot glue or strong white glue to the back edges of your assembled paper rolls, then carefully press the poster paper cutout onto the back, ensuring a firm and secure attachment. This backing will give your calendar structural integrity and a clean finish.
5. Prepare and Insert Your Gifts
Before you seal off the compartments, it’s time for the most exciting part: filling your advent calendar! Gather all the small presents you’ve prepared. These could be candies, miniature toys, stickers, temporary tattoos, small notes, or even pieces of a larger puzzle. Carefully insert one gift into each toilet paper roll compartment. Try to distribute the gifts evenly or strategically place special items on key days, like Christmas Eve. Ensure that the gifts are small enough to fit comfortably without deforming the rolls. This step is where your personalized touch truly shines, as you curate a unique daily surprise for the recipient.
6. Create and Attach the Daily Doors
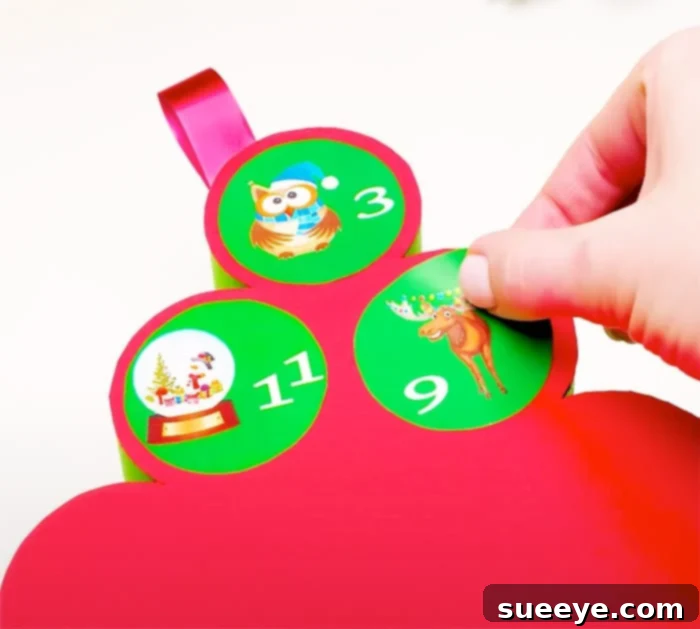
Once all your gifts are nestled inside, you need to create the “doors” for each day. Cut small circles or squares from decorative paper or cardstock – these should be slightly larger than the opening of each toilet paper roll. On each of these small paper cutouts, write or affix the numbers 1 through 24 (or 25, if you’re including Christmas Day). You can use festive stickers, hand-drawn numbers, or printed designs. Apply a small dab of white glue or glue stick to one side of each paper cutout and gently press it over the opening of its corresponding toilet paper roll. The key here is to use just enough glue so that the door stays shut but can be easily poked through or torn open each day. You might even create a small tab or handle on some doors for easier opening. Ensure that the front and back walls are now completely secured, effectively sealing the gifts inside their individual compartments.
7. Decorate and Personalize Your Advent Calendar
Now that the structure is complete and the gifts are hidden, it’s time for the final decorative touches! This is where you can truly let your creativity soar and make your advent calendar uniquely yours. Adorn the front of the calendar with additional Christmas stickers, glitter, small bows made from ribbon, or even tiny handmade ornaments. You could add a sparkling star to the top of the tree. If you want to hang your calendar, attach a sturdy loop of ribbon to the top back of the poster board. Consider writing a festive message on the calendar’s base or adding the recipient’s name for an extra personal touch. The possibilities for personalization are endless, making each advent calendar a one-of-a-kind creation.
Why Choose a DIY Advent Calendar?
Beyond the simple act of crafting, there are numerous compelling reasons to opt for a homemade advent calendar:
- Unmatched Personalization: Store-bought calendars are generic. A DIY version allows you to tailor the aesthetic, colors, and, most importantly, the gifts inside to the recipient’s specific tastes, hobbies, or needs. From tiny chocolates for a sweet tooth to small trinkets for a collector, the possibilities are endless.
- Sustainable and Eco-Friendly: By utilizing recycled toilet paper rolls, you’re giving new life to materials that would otherwise be discarded. This commitment to sustainability not only reduces waste but also instills valuable eco-conscious practices, making your holiday celebrations greener.
- Cost-Effective Holiday Fun: Crafting an advent calendar from recycled materials is significantly more economical than purchasing a pre-made one. Many of the supplies are inexpensive or readily available at home, allowing you to allocate your holiday budget to the gifts themselves rather than the packaging.
- A Cherished Family Activity: The process of making a DIY advent calendar can become a delightful annual tradition. Gathering family members, young and old, to paint, glue, and decorate fosters bonding, creativity, and creates lasting memories that go beyond the finished product.
- Adds Meaning to the Countdown: Each day’s opening becomes a more thoughtful and anticipated event when you know the effort and love that went into creating the calendar. It transforms a simple countdown into a heartwarming experience, filled with personal touches.
Creative Gift Ideas for Your Advent Calendar Compartments
The beauty of a DIY advent calendar lies in the ability to fill it with truly thoughtful and personalized surprises. Here are some inspiring ideas for small gifts that fit perfectly into your toilet paper roll compartments:
- Sweet Treats: Mini chocolate bars, candy canes, gummy bears, wrapped caramels, or homemade cookies.
- Small Toys & Trinkets: Lego minifigures, tiny cars, bouncy balls, erasers, marbles, toy animals, or miniature puzzle pieces (revealing a full image on Christmas Day).
- Craft Supplies: Glitter packets, unique buttons, colorful beads, small spools of ribbon, mini stickers, or temporary tattoos.
- Personalized Notes & Affirmations: Handwritten messages, inspirational quotes, riddles, jokes, or clues leading to a larger gift.
- Self-Care Minis: Lip balm, small sachets of tea, tiny bath bombs, or travel-sized lotions.
- Festive Fun: Christmas-themed stickers, small cookie cutters, mini ornaments, or paper chains to assemble.
- Experience Vouchers: Small coupons for “movie night,” “extra story before bed,” “hot chocolate date,” or “help with chores.”
Embrace the Joy of a Handcrafted Holiday Countdown
In conclusion, this DIY advent calendar crafted from humble toilet paper rolls offers a wonderfully creative, sustainable, and personal way to celebrate the holiday season. It’s an excellent opportunity to utilize those stocked-up rolls, transforming them into a beautiful and functional piece of holiday decor. Each small compartment is perfectly sized for delightful treats like candies, small toys, or personalized written letters, making every day of December a unique discovery. By choosing to create this homemade advent calendar, you’re not just counting down to Christmas; you’re building memories, fostering creativity, and embracing a more meaningful, eco-conscious approach to holiday traditions. So gather your supplies, unleash your inner crafter, and embark on a festive project that promises joy throughout the entire month of December!