
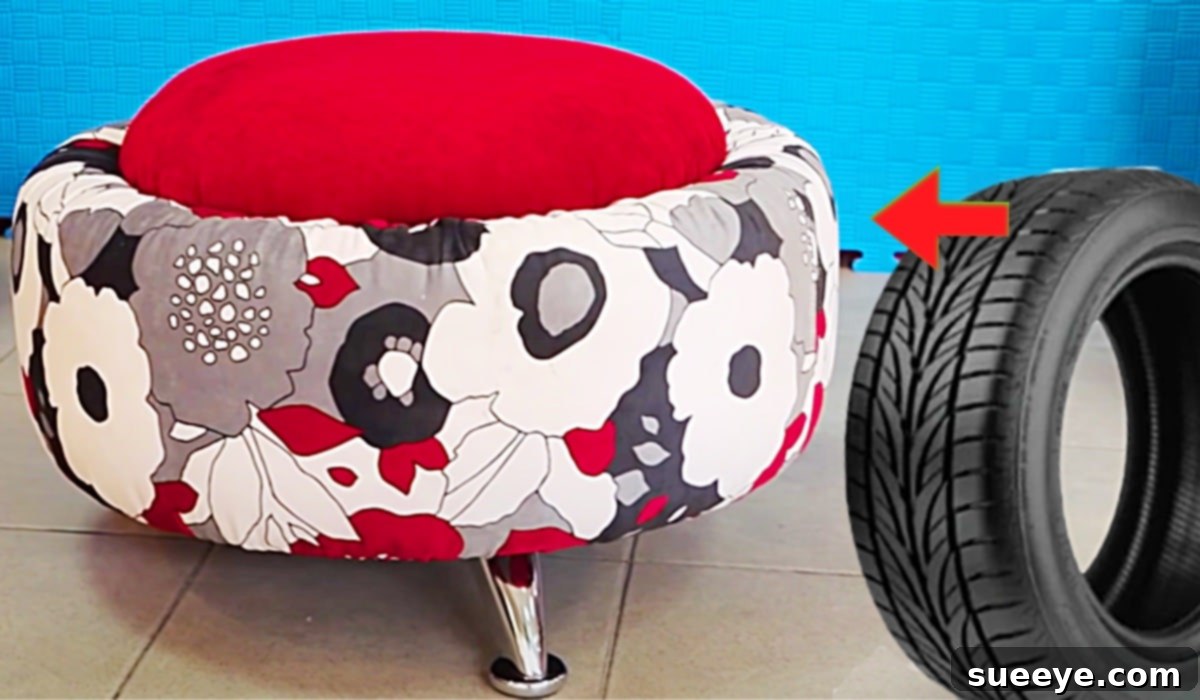
Transforming discarded items into beautiful and functional pieces for your home is an incredibly satisfying endeavor, and few projects offer as much charm and practicality as a DIY tire stool. Just recently, while browsing a quaint local shop with my family in Dripping Springs, Texas, I encountered my very first tire stool. I was instantly captivated by its unique appeal and couldn’t wait to discover how to create one for my own living room at our ranch. My immediate thought was to delve into YouTube for inspiration and guidance, and it didn’t take long to find the perfect tutorial. Among the search results, a magnificent DIY stool crafted entirely from recycled tires by Melnitsa TV on YouTube stood out. Its ingenuity and aesthetic struck me, making me exclaim, “Wow, what a brilliant idea!” The prospect of upcycling an old tire into a stylish, plush piece of furniture for sustainable home decor was incredibly exciting. I quickly gathered the necessary materials, eager to embark on this fantastic journey of creative recycling and bring a touch of personalized comfort to my home.
How To Make A Plush Stool With An Old Tire: An Eco-Friendly DIY Furniture Project
Creating your own upholstered stool from a recycled tire is an accessible and rewarding DIY project that combines sustainability with stylish home decor. This comprehensive guide will walk you through each step, inspired by the innovative design from Melnitsa TV, ensuring you can craft a durable, comfortable, and unique piece of furniture for any room in your house.
Why Choose a DIY Tire Stool?
Beyond the simple joy of crafting, opting for a DIY tire stool offers numerous advantages. Environmentally, it’s a fantastic way to repurpose an item that would otherwise contribute to landfills, promoting eco-friendly living and reducing waste. Old tires are notoriously difficult to dispose of and can take hundreds of years to decompose, making their transformation into functional furniture a truly green initiative. Economically, this project is incredibly cost-effective. Instead of purchasing an expensive new stool, you can create a high-quality, customized piece for a fraction of the price, utilizing materials that are often readily available or inexpensive. Furthermore, a tire stool is exceptionally durable and sturdy, built on the inherent strength of the tire itself. This ensures your creation will withstand daily use for years to come. Aesthetically, the customization possibilities are endless. You can choose fabric that perfectly complements your existing decor, select legs that match your style, and even adjust the level of padding for personalized comfort. This project isn’t just about making a stool; it’s about making a statement about your commitment to sustainability, creativity, and personal style within your living space.
Materials and Tools For Your Recycled Tire Stool:
- An Old Tire: A standard car tire works best. Ensure it’s thoroughly cleaned of any dirt, grease, or debris. A clean tire will ensure better adhesion and a smoother finish.
- Batting: Polyester fiberfill batting or upholstery batting will add softness and shape to the tire’s sides. You’ll need enough to wrap around the entire circumference.
- Spray Adhesive: A strong, multi-purpose spray adhesive designed for fabric and foam will be essential for securing the batting and foam to the tire.
- Fabric: Choose a durable upholstery fabric that suits your home decor. You’ll need a generous amount to cover the entire tire and the top cushion. Consider patterns, textures, and colors that reflect your personal style.
- A Staple Gun: An essential tool for securing the fabric firmly to the plywood base and around the tire. Heavy-duty staples are recommended.
- A Round Piece of Plywood (or Particleboard): This will form the sturdy top and bottom of your stool. You’ll need two pieces, cut to fit snugly inside the tire’s rim or slightly larger for an overhang. Approximately 1/2 inch to 3/4 inch thickness is ideal for durability.
- 2-inch Foam Sheet: This high-density foam will provide the comfortable padding for the stool’s top. Ensure it’s cut to the same diameter as your plywood top.
- Screw-on Legs: Four decorative screw-on legs will elevate your stool and complete its furniture aesthetic. Choose legs with pre-drilled holes for easy attachment to the plywood base.
- Drill and Screws: For attaching the plywood base and legs securely.
- Measuring Tape and Scissors: For accurate measurements and cutting fabric.
Step-by-Step Directions For Crafting Your Tire Stool:
This project, as beautifully demonstrated by Melnitsa TV on YouTube, transforms a mundane object into a plush piece of furniture through a series of straightforward steps. Attention to detail at each stage will ensure a professional and lasting result.
Step 1: Prepare the Tire and Batting
Begin by ensuring your tire is spotless. Wash it thoroughly with soap and water, then let it dry completely. Any residual dirt or oil can prevent the adhesive from bonding properly. Once clean, take your spray adhesive and apply an even coat to the exterior sidewalls of the tire. Work in sections to prevent the adhesive from drying prematurely. Immediately after spraying, carefully wrap the batting around the entire circumference of the tire. Pull the batting taut as you go, smoothing out any wrinkles or bumps. Overlap the ends slightly and secure them with more spray adhesive or a few staples if necessary, aiming for a consistent, smooth layer that covers all exposed rubber surfaces. This batting layer provides an initial layer of softness and helps to create a more rounded, furniture-like profile.
Step 2: Construct the Padded Top
Take one of your round plywood pieces and the 2-inch foam sheet. Apply spray adhesive to one side of the plywood and carefully adhere the foam sheet to it, ensuring it’s perfectly centered. Allow the adhesive to cure according to the manufacturer’s instructions. Next, cut a circular piece of your chosen upholstery fabric. This fabric piece should be significantly larger than your foam-covered plywood disk, allowing for ample material to wrap around the foam and plywood and be stapled underneath. Place the foam-side-down onto the wrong side of your fabric. Starting from one point, begin pulling the fabric up and over the foam and plywood edge, stapling it securely to the underside of the plywood. Work your way around the circle, pulling the fabric taut and evenly, ensuring there are no creases on the top surface. Create small pleats or gathers as needed to manage the excess fabric, securing each fold with a staple. This meticulous process ensures a smooth, professional-looking upholstered top.
Step 3: Upholster the Tire Body
Now, it’s time to cover the batting-wrapped tire with your chosen fabric. Cut a rectangular piece of fabric long enough to wrap around the entire circumference of the tire, plus an overlap, and wide enough to cover the batting and extend into the tire’s inner rim on both sides. Apply spray adhesive to the batting and carefully position your fabric. Starting from the top edge, smooth the fabric down and around the tire, ensuring a snug fit. Overlap the fabric ends neatly and secure them with adhesive or a discreet seam. Once the main body is covered, you’ll need to work the excess fabric into the inner rims of the tire on both the top and bottom. This can be tricky; make small cuts into the fabric to allow it to conform to the curves. Pull the fabric taut and use your staple gun to secure it firmly to the inner rubber of the tire. This step requires patience to achieve a clean finish, but it’s crucial for holding the fabric in place and giving your stool a polished look.
Step 4: Attach the Top and Base
With the tire body upholstered and the padded top ready, it’s time to assemble. Place your upholstered tire right-side up. Carefully position the padded plywood top onto the tire. Ensure it’s centered and aligned. You can use a strong construction adhesive or drill pilot holes through the plywood top into the tire’s inner rim (being careful not to go through the outer fabric) and secure it with screws. For the bottom, take your second round plywood piece (which serves as the structural base for the legs). Position this plywood piece inside the bottom rim of the tire. Drill pilot holes through this bottom plywood into the tire’s inner rim and secure it firmly with screws. This base provides a stable platform for attaching the legs and seals off the bottom of the tire, preventing anything from falling inside.
Step 5: Add the Legs
Finally, attach the screw-on legs to the bottom plywood base. Most screw-on legs come with pre-drilled holes or mounting plates. Position the four legs equidistant from each other and close to the edge of the plywood base for maximum stability. Use a drill to drive screws through the leg mounting plates into the plywood, ensuring they are tightly fastened. Double-check that all legs are secure and the stool sits level. If needed, you can add felt pads to the bottom of the legs to protect your floors.
Tips for a Perfect Recycled Tire Stool:
- Tire Selection: Opt for a tire that is not too large or too small. A standard passenger car tire is often ideal. Avoid tires with severe damage or excessive wear as they might compromise the structural integrity.
- Cleaning is Key: Thoroughly cleaning the tire cannot be overstated. Any dirt or grease will prevent adhesives from bonding correctly and can lead to fabric peeling over time.
- Fabric Choice: Upholstery fabric is designed for durability and wear, making it the best choice. Consider fabrics with some stretch for easier wrapping, especially around curves.
- Adhesive Application: Apply spray adhesive in well-ventilated areas. Use even coats and follow the drying times recommended by the manufacturer for optimal adhesion.
- Staple Smartly: When using the staple gun, pull the fabric taut before stapling. Overlap your staples slightly for extra security, especially where there’s tension.
- Safety First: Wear gloves when handling spray adhesive and a mask if working in an enclosed space. Be careful with sharp tools like scissors and staple guns.
This is a truly wonderful and rewarding project that not only gives an old tire a new lease on life but also adds a personalized, comfortable, and sustainable piece to your home. Enjoy the process of creating your unique plush stool!