
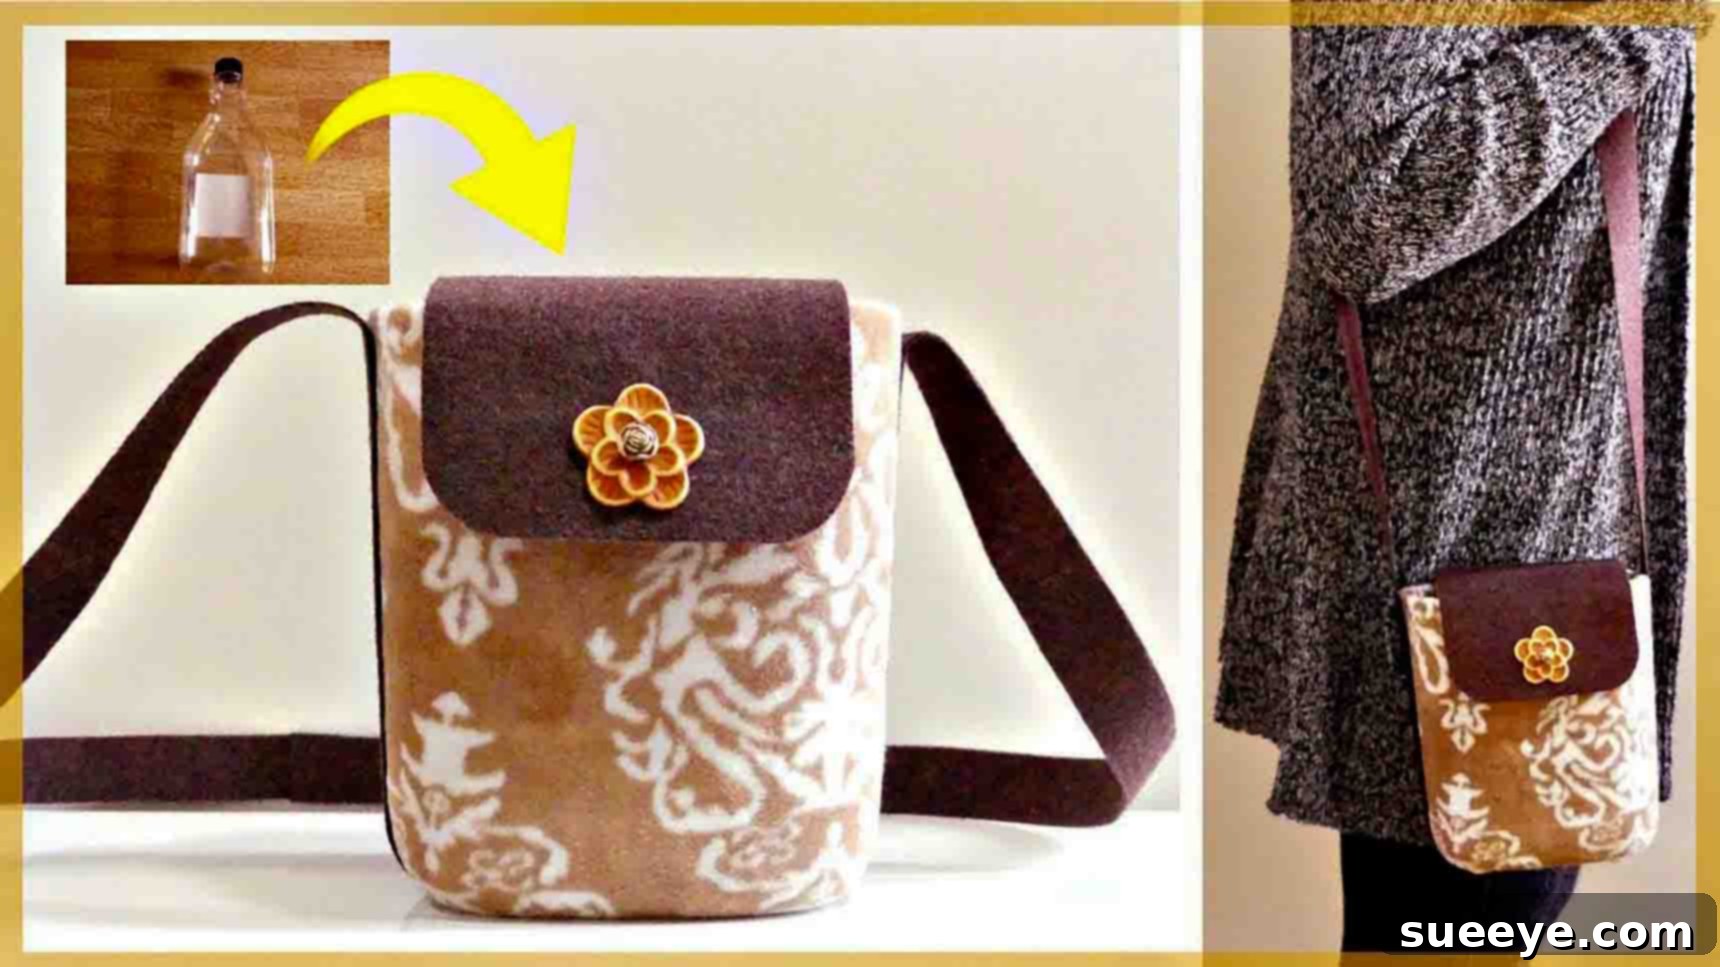
Craft Your Own Eco-Friendly Style: The Ultimate DIY No-Sew Upcycled Bag
Are you looking for a fun, creative project that doesn’t require a sewing machine? Do you have a passion for sustainable living and giving new life to old items? If so, you’re in for a treat! This incredible no-sew DIY bag, inspired by the brilliant minds at Ire Heart Crafting on Youtube, is an absolute game-changer. It’s not just a craft; it’s a statement – a testament to how easily we can transform everyday discarded items into fashionable and functional accessories. This project stands out as a personal favorite because it beautifully marries creativity with recycling, offering a simple yet impactful way to contribute to a greener planet while unleashing your inner artisan.
Forget complicated patterns and intricate stitching. This DIY project is designed for everyone, from crafting novices to seasoned pros. The core concept revolves around upcycling common household items: a large plastic juice bottle, a pair of old leggings you no longer wear, and some basic crafting supplies like felt fabric and hot glue. The beauty of this bag lies in its simplicity and the satisfaction of knowing you’ve created something stylish and useful from materials that might otherwise end up in a landfill. It’s an incredibly rewarding weekend activity, perfect for engaging friends, family, or even a solo creative escape. Get ready to transform and impress with your very own handcrafted, eco-chic accessory!
Why Choose This Upcycled No-Sew Bag Project?
In a world increasingly focused on sustainability, this DIY no-sew bag offers numerous benefits beyond just creating a trendy accessory. Firstly, it’s incredibly **eco-friendly**. By repurposing a plastic bottle and old leggings, you’re actively reducing waste and extending the lifecycle of materials, which is a core principle of upcycling. This small act contributes to lessening demand for new resources and decreasing landfill accumulation.
Secondly, it’s remarkably **cost-effective**. Most of the primary materials – the plastic bottle and leggings – are items you likely already have at home, turning potential waste into valuable resources. This means you can create a unique, personalized bag without spending a fortune on new supplies, making it an accessible craft for any budget.
Thirdly, its **simplicity** is unmatched. The “no-sew” aspect removes a significant barrier for many who might feel intimidated by traditional textile crafts. With just a few cuts, some hot glue, and a little creativity, anyone can achieve fantastic results. It’s a confidence-boosting project that yields a tangible, useful item.
Finally, this project offers immense **customization potential**. While the basic structure is provided, you have complete freedom to choose the color and pattern of your leggings, the type of felt, and the embellishments. This allows you to create a bag that truly reflects your personal style, making it a unique fashion statement that no one else will have. It’s more than just a bag; it’s a conversation starter about creativity and conscious consumption.
Materials:
Gathering your materials is the first exciting step in any DIY adventure. For this particular no-sew bag, you’ll find that most items are readily available, either in your home or at a local craft store. The beauty of upcycling means embracing what you already have!
- Large Plastic Juice Bottle: The sturdier the bottle, the better the structure for your bag. Look for those robust, square-ish bottles often used for juices, milk, or detergents. Ensure it’s thoroughly cleaned and dried before use.
- Old Leggings: This is your primary fabric for covering the bottle. Choose a pair that’s clean and perhaps has an interesting pattern or color you’d like to feature. The stretchiness of leggings makes them ideal for this project, allowing a snug fit.
- Thick Felt Fabric: This will be used for the bag’s strap and flap. Opt for a durable felt that can withstand daily use. Colors can match or contrast your leggings for added visual appeal.
- Flower Embellishments: Or any other decorative elements you fancy! Buttons, beads, ribbons, or even fabric scraps can be used to personalize your bag’s flap.
- Hot Glue Gun and Glue Sticks: Your best friend for this no-sew project. Ensure you have enough glue sticks as you’ll be using this extensively for secure attachments.
- Ruler: Essential for accurate measurements, especially when cutting felt for the strap and flap, ensuring a neat, professional finish.
- Pen or Fabric Marker: For marking cut lines on your felt and leggings.
- Velcro: A small strip or two will be needed to create a secure closure for your bag’s flap.
- Cutter or Utility Knife: For safely and precisely cutting the plastic bottle. Always use caution and cut on a protected surface. Sharp scissors can also work for the leggings and felt.
Directions:
Let’s get crafting! Follow these detailed, step-by-step instructions to bring your eco-chic no-sew bag to life. Take your time with each step, and don’t be afraid to add your personal touch.
Step 1: Preparing the Bottle and Crafting the Bag’s Body and Strap
Begin by thoroughly cleaning your large plastic juice bottle and ensuring it is completely dry. Any residue could affect the adhesion of the hot glue. Next, with careful precision, use your cutter or utility knife to remove the upper part of the plastic bottle. You’ll only need the sturdy, square or rectangular body of the bottle, from the middle down to the bottom. This will form the core structure of your bag, so aim for a clean, even cut. Safety first: always cut away from your body and consider wearing protective gloves.
Once your bottle is prepped, take one leg part of your old leggings. Insert the cut plastic bottle inside, pulling the fabric taut to ensure a smooth, wrinkle-free fit. Position the bottle so that the bottom of the leggings aligns with the bottom of the bottle, or slightly extends past it if you prefer a gathered look. Carefully cut the excess part of the leggings, leaving a small overhang (about 1-2 inches) at the top of the bottle. This overhang will be folded inside and secured. Apply hot glue along the inside rim of the bottle and fold the excess legging fabric over, pressing firmly to secure it. Repeat this process for the bottom if needed, ensuring the fabric is tightly affixed to the plastic bottle. This creates the main body of your bag.
Now, it’s time to create the essential strap for your bag. Using your ruler and pen, measure and cut two pieces of your thick felt fabric, each measuring approximately 1 inch wide by 28 inches long. The length can be adjusted based on your desired strap length – consider whether you want a shoulder bag or a cross-body style. Carefully glue both ends of these felt strips together with hot glue to create one continuous, strong strap. Then, position the strap evenly on the sides of your covered bottle (bag body). Apply a generous amount of hot glue to secure each end of the strap firmly to the inside top edges of the bag. Press and hold until the glue sets completely, ensuring the strap is robust enough to carry your essentials. This step transforms your covered bottle into a functional bag ready for its stylish finishing touches.
Step 2: Designing the Flap and Completing Your Bag
With the main body and strap complete, the next step is to craft the bag’s cover flap – an element that adds both functionality and aesthetic appeal. Take your thick felt fabric and cut a piece measuring approximately 4 inches by 8 inches. This size provides ample coverage for the top opening of your bag. Once cut, fold this felt piece in half lengthwise. Using scissors, carefully cut the corners of the folded edge into rounded edges. This creates a softer, more elegant look for your flap, moving away from sharp, angular lines. Unfold the felt piece to reveal your beautifully shaped cover.
Now, it’s time to add a personal touch with embellishments. Select your chosen flower embellishment (or any other decorative items like beads, sequins, or a cute patch) and attach it securely to the lower part of the felt paper flap using hot glue. Position it strategically so it will be visible and enhance the overall design when the flap is closed. Allow the glue to dry completely for a strong bond.
Finally, you’re ready to complete your custom no-sew bag. Position the felt flap over the opening of your bag, aligning the straight edge of the flap with the back top edge of the bag. Apply a generous line of hot glue along this back edge of the bag and firmly press the flap onto it. Ensure it’s centered and straight before the glue sets. This will serve as the opening and closing mechanism, protecting your bag’s contents. To secure the flap when closed, attach a piece of Velcro to the underside of the flap and a corresponding piece to the front of your bag. Ensure they align perfectly when the flap is closed. Press them firmly into place, allowing the hot glue to create a strong, lasting bond. With these final touches, your DIY no-sew bag is now complete and ready to show off!
Tips for a Perfect DIY No-Sew Bag
To ensure your no-sew bag project goes smoothly and yields the best results, consider these helpful tips:
- Safety First with Cutting: When cutting the plastic bottle, always use a cutting mat or a protected surface. A sharp utility knife can slip, so take your time and make several shallow passes if needed, rather than one deep cut.
- Hot Glue Mastery: Hot glue is your primary adhesive. Practice applying consistent, even beads of glue. Work in small sections, as hot glue dries quickly. For extra strength, apply glue to both surfaces you intend to join, then press them together firmly.
- Fabric Choice Matters: While old leggings are great, you can experiment with other stretchy fabrics like old t-shirts or tights. Just ensure they have enough give to smoothly cover the bottle without excessive bulk.
- Measuring is Key: Don’t eyeball measurements, especially for the felt strap and flap. Using a ruler and marking your lines with a pen will ensure straight cuts and a professional-looking finish.
- Personalize It: This is your bag! Don’t limit yourself to just flower embellishments. Consider using fabric paint, iron-on patches, beads, studs, or even contrasting felt shapes to make your bag truly unique.
- Reinforce Stress Points: The points where the strap attaches to the bag will endure the most stress. Apply extra glue in these areas and hold them firmly until completely dry to prevent detachment.
- Drying Time: Allow adequate drying time for all glue applications before moving on to the next step or putting the bag to use. This ensures maximum durability.
Unleash Your Creativity: Customization Ideas
The beauty of DIY projects lies in the freedom to personalize. While the core instructions provide a fantastic foundation, here are some ideas to make your no-sew bag truly reflect your style:
- Vary the Fabric: Instead of plain leggings, use patterned ones! Think stripes, polka dots, or even tie-dye. You could also mix and match different colored leggings for a patchwork effect.
- Alternate Embellishments: Beyond flowers, consider iron-on patches depicting your favorite characters, bands, or symbols. Buttons, studs, rhinestones, or even embroidery floss (if you don’t mind a little sewing for decoration) can add flair.
- Strap Styles: Experiment with wider felt straps for comfort, or try braiding multiple thin felt strips for a bohemian look. You could even cover the felt strap with a contrasting fabric for an added design element.
- Add Pockets: For extra functionality, hot glue a small felt pocket to the inside of the bag for keys or cards. You could even create a small exterior pocket on the back.
- Different Closures: While Velcro is easy, you could explore magnetic snaps (carefully glued in place), a button and loop closure, or even a simple ribbon tie for a different aesthetic.
- Fabric Paint or Markers: Once the legging fabric is secured, use fabric paints or markers to draw designs, write inspiring quotes, or create abstract patterns directly onto the bag.
- Vary Bottle Shape: While the tutorial suggests a square-ish bottle, a cylindrical bottle could create a different silhouette, perhaps a cute clutch or a mini tote.
Embrace Sustainable Style: Your DIY No-Sew Bag Tutorial Conclusion
Congratulations! You’ve not only created a stylish and functional accessory but have also contributed to the wonderful world of sustainable fashion and creative recycling. This DIY no-sew bag project, championed by Ire Heart Crafting, proves that you don’t need extensive crafting skills or expensive materials to make something truly special. It’s a fantastic example of how everyday items can be transformed with a little imagination and a lot of hot glue!
Each time you carry your unique, handcrafted bag, you’ll be showcasing your creativity, resourcefulness, and commitment to an eco-friendlier lifestyle. This project is a powerful reminder that upcycling isn’t just about saving money; it’s about making a positive impact on the environment, one beautiful creation at a time. So, go ahead, flaunt your new accessory, inspire others to craft, and continue exploring the endless possibilities of DIY and upcycling. Happy crafting!