
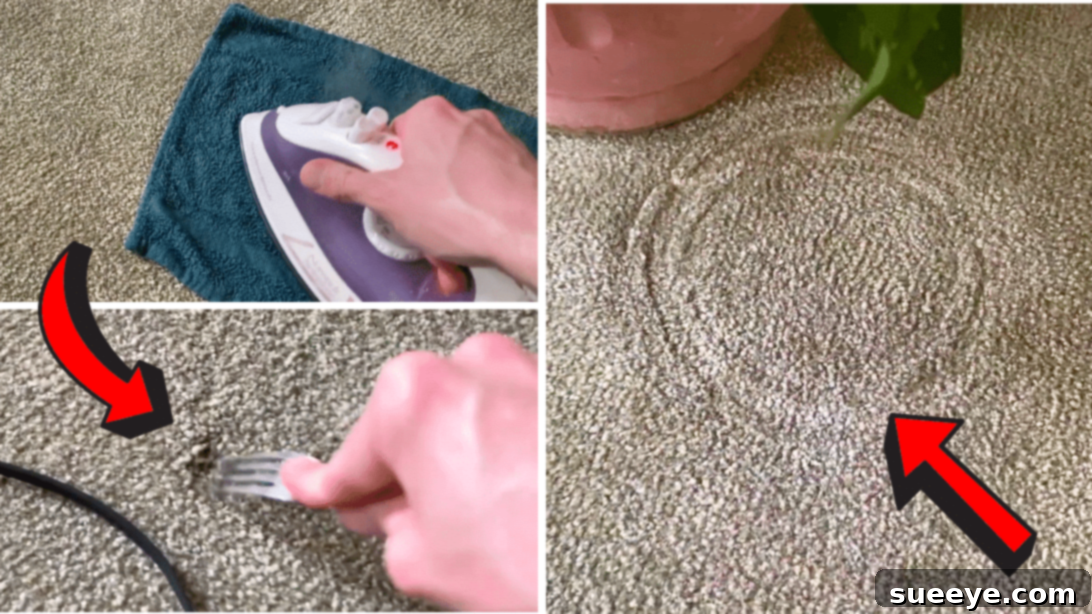
Every homeowner knows the struggle: after rearranging furniture or moving out a heavy piece, those tell-tale indentations are left behind on your beautiful carpet. These stubborn marks can be incredibly unsightly, detracting from the overall appeal of a room and making it look worn or uncared for. We recently faced this exact predicament after a significant furniture reshuffle, replacing old pieces and bringing in new ones. Moving the hefty items was challenging enough, but the real stress began when we noticed the deep, persistent dents carved into our carpet. Frustration mounted as we tried various methods to restore our carpet to its original plush glory, but most proved ineffective or too complicated.
Fortunately, a simple yet incredibly effective solution emerged: the iron method. This brilliant hack, popularized by creators like DIY with Michael Borders on YouTube, has proven to be a game-changer for countless individuals, ourselves included. It’s a testament to how simple household tools can solve common household dilemmas with surprising efficiency. If you’ve been battling persistent carpet indentations, prepare to be amazed by how easily you can make them disappear. Continue reading to discover how this ingenious iron method works and how you can apply it to revive your carpets.
Reclaiming Your Carpet: The Ultimate Guide to Removing Furniture Indentations
Carpet indentations, often referred to as “furniture dents” or “pressure marks,” are an all-too-common consequence of heavy items sitting in one place for extended periods. Whether it’s a bulky sofa, a grand bookshelf, or a sturdy dining table, the sheer weight compresses the carpet fibers and the underlying padding, leaving behind a noticeable depression. These marks not only disrupt the smooth, uniform appearance of your flooring but can also make a room feel less inviting. While moving furniture can refresh your living space, discovering these deep imprints can quickly turn excitement into exasperation. The good news is that these seemingly permanent dents are often reversible, and with the right technique, you can restore your carpet’s original texture and vibrancy without calling in expensive professionals.
Why Do Carpet Dents Form? Understanding Carpet Compression
To effectively tackle carpet indentations, it helps to understand why they occur in the first place. Carpet is composed of thousands of individual fibers, which are essentially tiny strands designed to stand upright, creating a soft, cushioned surface. Beneath these fibers lies the carpet backing, followed by a layer of padding, and finally the subfloor. When heavy furniture sits on the carpet, its weight presses down on the fibers and the padding. Over time, this constant pressure causes the fibers to bend and compact, losing their natural loft and “memory” to spring back. The padding beneath also compresses, contributing to the depth of the indentation. Synthetic fibers, such as nylon and polyester, tend to have better resilience than natural fibers like wool, but all carpets are susceptible to this compression to some degree. The goal of any removal method is to encourage these flattened fibers to stand back up and the compressed padding to regain its volume.
The Miracle of Steam: How the Iron Method Works to Restore Carpet Fibers
The iron method leverages the power of heat and moisture, specifically steam, to effectively reverse carpet compression. Think of it like this: dry, compacted carpet fibers are rigid and resistant to change. However, when introduced to steam, these fibers absorb the moisture and become more pliable. The heat from the iron, transferred through a damp cloth, gently warms the fibers, further relaxing them. This combination of heat and humidity causes the fibers to “relax” and allows them to expand back to their original shape. The steam also helps to plump up the underlying padding slightly. Once the fibers are softened and rehydrated, they are much more receptive to being fluffed up, allowing them to stand erect once again, erasing the indentation. This process is similar to how steam is used to de-wrinkle clothes, returning fabric to a smooth, uncompressed state.
Essential Materials for This DIY Carpet Restoration Hack
One of the many appealing aspects of this carpet indent removal hack is how few and common the required materials are. You likely already have most, if not all, of these items readily available in your home. There’s no need for specialized cleaning solutions or expensive equipment, making this a truly budget-friendly and accessible DIY project.
- An Iron: A standard household iron, preferably one with a steam setting, is ideal. If your iron doesn’t have a steam function, don’t worry, the damp towel will create the necessary moisture.
- Clean Towel or Rag: Choose a clean, white, or light-colored towel or rag to avoid transferring any dyes to your carpet. A microfiber cloth or an old t-shirt can work well. The towel should be thick enough to hold moisture without being overly saturated.
- Fork or Stiff-Bristled Brush: A common dinner fork works surprisingly well for gently lifting and separating carpet fibers. Alternatively, a stiff-bristled brush (like a carpet brush or a sturdy clothes brush) can also be used for fluffing.
With these simple tools in hand, you’re ready to transform those unsightly carpet dents back into smooth, uniform flooring. The process is straightforward, requires minimal effort, and delivers impressive results.
Step-by-Step Guide: How to Fix Carpet Indent Using the Iron Method
The “iron method” is an elegantly simple yet highly effective technique for erasing those stubborn furniture dents from your carpet. This guide breaks down the process into easy-to-follow steps, ensuring you achieve the best possible results. This method, as demonstrated by helpful DIY enthusiasts like Michael Borders on YouTube, leverages common household items to restore your carpet’s original texture.
Step 1: Prepare the Area
Before you begin, ensure the area around the indentation is clean. Vacuum the entire carpet to remove any loose dirt, dust, or debris that might be trapped within the fibers or the dent itself. This also helps to slightly loosen the fibers, making them more receptive to the treatment. Make sure the carpet is dry before you start adding moisture. Also, consider testing the method on an inconspicuous spot of your carpet first, especially if you have a delicate or natural fiber carpet, to ensure no discoloration or damage occurs.
Step 2: Dampen the Indentation with a Wet Rag
Take your clean towel or rag and wet it thoroughly with water. It should be damp, but not dripping wet. Gently squeeze out any excess water so that it’s moist enough to create steam but won’t soak your carpet. A good indicator is that when you hold it up, water shouldn’t be steadily dripping from it. Carefully place this damp rag directly over the carpet indentation, ensuring it completely covers the affected area. The moisture will begin to penetrate the carpet fibers, preparing them for the next step.
Step 3: Apply Heat and Steam with the Iron
Preheat your iron to a medium setting. If your iron has a steam function, ensure it’s turned on. Once heated, carefully place the hot iron directly onto the damp rag, pressing down gently. Move the iron slowly and continuously over the rag, just as you would when ironing clothes. The goal is to generate steam, which will permeate through the rag and into the carpet fibers, loosening their compressed state. Avoid holding the iron in one spot for too long, as this can scorch both the rag and the carpet beneath. Keep the iron moving, ensuring even distribution of heat and steam. After a minute or two, or once you feel the carpet fibers beneath the rag have softened and relaxed sufficiently, lift the iron and the rag.
Step 4: Fluff and Restore the Carpet Pile
Immediately after removing the iron and rag, while the carpet fibers are still warm and pliable, grab your fork or stiff-bristled brush. Starting from about an inch outside the indent and working your way inward, gently fluff the carpet fibers. Use an upward and outward motion, carefully lifting and separating the flattened strands. The warmth and moisture will have made the fibers more responsive, allowing them to be coaxed back into their upright position. This step is crucial for restoring the carpet’s original texture and making the indentations disappear.
Step 5: Repeat for Stubborn Dents
For particularly deep or stubborn indentations, a single application may not be enough. Don’t be discouraged if the mark isn’t completely gone after the first attempt. Simply re-dampen the rag, place it back over the dent, and repeat the ironing and fluffing steps. You might need to repeat the entire process several times, allowing the carpet to cool and dry slightly between attempts, until the indentation is no longer visible and the carpet pile looks uniform. Patience is key here, and consistent, gentle repetitions will yield the best results.
Pro Tips for Perfect Carpet Restoration
While the basic iron method is remarkably effective, a few additional tips can help you achieve even better results and ensure the longevity of your carpet.
- Choose the Right Iron Settings: For most synthetic carpets (nylon, polyester), a medium heat setting with steam is appropriate. For natural fibers like wool, use a lower heat setting and be extra cautious to prevent damage. Always use a damp towel as a barrier.
- The Best Towel Type: A clean, white, or light-colored terry cloth towel is ideal. Terry cloth is absorbent enough to hold moisture and thick enough to provide a buffer between the hot iron and your carpet, preventing direct heat exposure that could melt or scorch fibers.
- Dealing with Different Carpet Materials: Be more gentle with delicate or expensive natural fiber carpets. For synthetic carpets, which are generally more resilient, you can be slightly more confident, but always prioritize caution. Test on an unseen area first.
- Test in an Inconspicuous Area: This tip cannot be stressed enough. Before applying the iron method to a prominent dent, always try it out on a hidden corner of your carpet (e.g., under a sofa or in a closet). This will confirm that your carpet reacts well to the heat and moisture without any adverse effects like discoloration or melting.
- Combining with Other Methods: For very deep indentations, you might start with the ice cube method first. Place a few ice cubes in the dent and let them melt, allowing the water to naturally swell the fibers. Once the area is damp, blot excess water and then proceed with the iron method. This pre-treatment can sometimes make the iron method even more effective for extreme cases.
- Avoid Over-Saturating: While moisture is essential, too much water can seep into the carpet backing and subfloor, potentially leading to mold or mildew growth. Ensure your rag is damp, not soaking wet, and if using a spray bottle, use a fine mist.
- Allow to Dry Completely: After fluffing, let the carpet air dry completely before walking on it or placing anything back on the treated spot. This helps the fibers set in their new, upright position.
Safety First: Precautions When Using an Iron on Carpet
While the iron method is generally safe, it involves heat and electricity, so safety should always be your top priority. Adhering to these precautions will help prevent accidents and damage:
- Prevent Scorching and Melting: Never place a hot iron directly onto your carpet fibers. Always use a damp towel or rag as a protective barrier. Keep the iron moving and avoid leaving it stationary, even on the towel, for too long. Excessive heat can melt synthetic carpet fibers, leaving irreversible damage.
- Electrical Safety: Ensure your iron’s cord is in good condition and that you are using a safe electrical outlet. Avoid using the iron near sources of water (beyond the damp rag) to prevent electrical shock.
- Ventilation: While not strictly a chemical process, some steam can release slight odors from carpet fibers. Ensure good ventilation in the room.
- Supervision: Never leave a hot iron unattended, even for a moment. Keep children and pets away from the work area.
- Test, Test, Test: As mentioned, always test the method on an inconspicuous area of your carpet first. This is your best defense against unexpected reactions or damage.
Preventing Future Carpet Indentations
Once you’ve restored your carpet, you’ll want to keep it looking pristine. Preventing future indentations is often simpler than removing existing ones. Here are some proactive steps you can take:
- Use Furniture Pads and Coasters: Place furniture pads, coasters, or carpet protectors under the legs of heavy furniture. These distribute the weight more evenly over a larger surface area, significantly reducing pressure on individual carpet fibers.
- Regular Furniture Rotation: If possible, periodically rotate or slightly shift the position of your furniture. Even moving it a few inches every few months can prevent deep, long-term compression.
- Distribute Weight: For very heavy items, consider placing them on larger, flat bases that spread the weight over a wider area rather than on small, concentrated points.
- Vacuuming and Fluffing Regularly: Regular vacuuming not only cleans your carpet but also helps to lift and refresh the carpet pile. Use a vacuum with a beater bar or brush attachment to gently agitate the fibers and prevent them from settling too much.
- Carpet Scooters/Glides: When moving heavy furniture, use furniture sliders or scooters. These not only protect your carpet from tears and scuffs but also prevent new indentations from forming during the relocation process.
Related Carpet Care Hacks
Maintaining a beautiful carpet goes beyond just removing furniture indentations. For other common carpet woes, there are equally simple and effective DIY solutions. For instance, dealing with stubborn stains is another challenge many homeowners face. If you’re looking for another clever trick to keep your carpets looking their best, you might be interested in a unique approach to stain removal. Discover how household items can be repurposed for surprisingly effective cleaning:
RELATED: Easy Pot Lid and Dishwashing Tab Carpet Cleaning Hack
The frustration of discovering deep, unsightly indentations left by heavy furniture on your carpet is a common experience. However, as this comprehensive guide has shown, removing these marks doesn’t require professional help or expensive tools. The simple yet remarkably effective iron method harnesses the power of steam to relax and restore compressed carpet fibers, bringing your carpet back to its original plush condition. By following the step-by-step instructions, applying the pro tips, and prioritizing safety, you can easily erase those stubborn dents and rejuvenate your living space.
Remember, a little patience and a careful approach will yield impressive results, making your carpet look as good as new. Don’t let furniture indentations detract from your home’s beauty any longer. Grab your iron, a damp rag, and a fork, and get ready to witness the magic of this DIY hack. A huge thank you to DIY with Michael Borders via YouTube for inspiring this effective solution and for the amazing images that illustrate the process so clearly. We encourage you to visit his channel for more insightful DIY tips and tricks!