
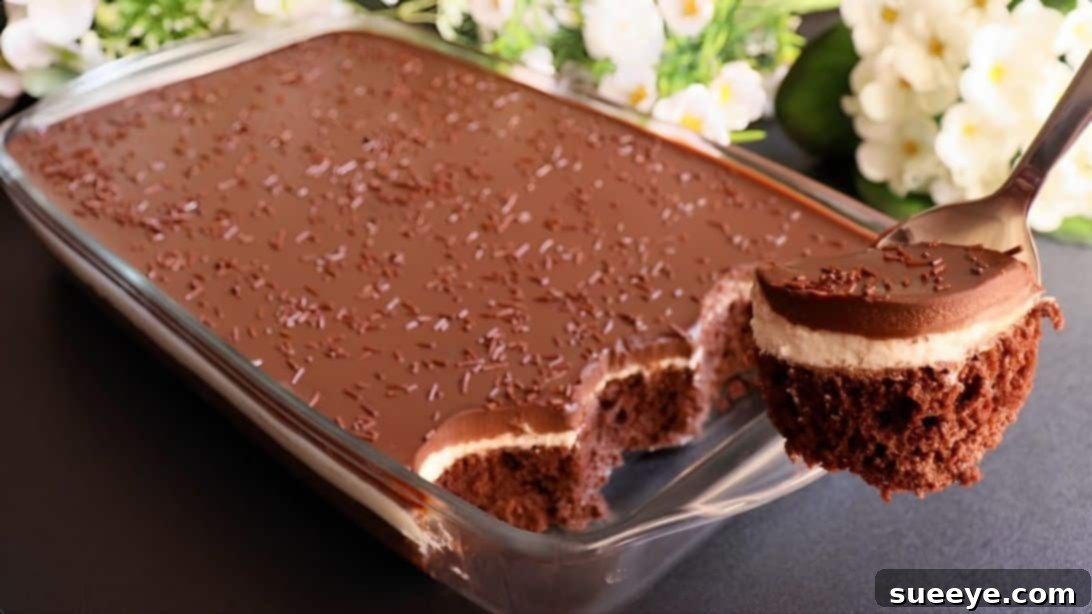
Prepare to delight your taste buds with an extraordinary chocolate dessert that truly lives up to its “melt-in-your-mouth” name. This irresistible recipe, originally shared by Quick Simple & Delicious, is destined to become a cherished family favorite. Imagine: a profoundly moist and rich chocolate cake serving as the foundation, generously crowned with not one, but two luscious layers of creamy and decadent chocolate goodness. It’s more than just a cake; it’s an experience, promising pure indulgence with every single bite. Perfect for celebrations, a cozy family gathering, or simply satisfying that intense chocolate craving, this layered chocolate masterpiece is surprisingly simple to create, yet yields professional-level results that will impress everyone.
Melt-in-Your-Mouth Chocolate Dessert: The Ultimate Layered Cake Recipe
This comprehensive guide will walk you through every step of crafting this magnificent dessert, from selecting the finest ingredients to mastering the art of layering. Get ready to bake a memory!
Ingredients for Your Decadent Chocolate Cake
Crafting this unforgettable melt-in-your-mouth chocolate dessert begins with gathering high-quality ingredients. Each component plays a crucial role in achieving the perfect balance of flavor and texture, from the moist cake base to the rich, creamy toppings. We’ve meticulously broken down the ingredients into distinct layers to ensure clarity and ease of preparation, ensuring you have everything you need for this decadent chocolate treat.
Cake Layer: The Moist Foundation
The heart of our dessert is a tender, deeply flavored chocolate cake. These ingredients combine to create a remarkably moist and airy sponge that’s robust enough to absorb the chocolate milk mixture, ensuring maximum deliciousness and a truly unforgettable texture.
- 2 Large Eggs: Essential for structure, richness, and contributing to the cake’s light, fluffy texture.
- 1 2/3 Teaspoons Vanilla Sugar: Adds a sweet, aromatic vanilla note that beautifully complements and enhances the deep chocolate flavor. If unavailable, use 1 2/3 teaspoons of pure vanilla extract and 1 2/3 teaspoons of regular granulated sugar.
- 1/4 Cup Granulated Sugar: Provides essential sweetness and aids in achieving a golden, tender crumb for the cake.
- 1/4 Cup Vegetable Oil: This key ingredient contributes significantly to the cake’s incredible moisture, ensuring it remains tender and delightful for days. You can substitute with other neutral-flavored oils like canola or sunflower oil.
- 1/4 Cup Plain Yogurt: A secret ingredient for ultimate moisture and a subtle tang that wonderfully brightens and enhances the chocolate flavor. Full-fat plain yogurt is highly recommended for the best texture and richness.
- 3 Tablespoons High-Quality Cocoa Powder: The star ingredient for the cake’s intense chocolate flavor. Opt for unsweetened natural cocoa powder to achieve a deep, rich, and authentic chocolate taste without excessive sweetness.
- 1/2 Cup All-Purpose Flour: The primary dry ingredient, providing the necessary structural integrity for the cake. Sifting the flour is a crucial step to prevent lumps and ensure a smooth, even batter.
- 1/2 Tablespoon Baking Powder: Our primary leavening agent, ensuring the cake rises beautifully and achieves a light, airy, and fluffy texture.
- 1 Teaspoon White Vinegar: This ingredient reacts with the baking powder to create extra lift and tenderness, making the cake wonderfully soft and palatable.
- A Pinch of Salt: A vital flavor enhancer that expertly balances the sweetness and truly brings out the profound depth of the chocolate. Do not skip this humble but powerful ingredient!
Milk Chocolate Mixture: The Secret to Extra Moisture and Flavor
This simple yet transformative mixture is what takes our chocolate cake from delicious to absolutely divine, infusing it with unparalleled moisture and an extra layer of chocolatey goodness, creating a truly melt-in-your-mouth experience.
- 3/4 Cup Whole Milk: The liquid base for our soaking mixture, providing a rich and creamy vehicle for the cocoa powder to dissolve and be absorbed by the cake.
- 1 Tablespoon Cocoa Powder: Adds a concentrated chocolate boost to the milk, ensuring every pore of the baked cake is saturated with deep, luscious chocolate flavor.
Cream Layer: Light, Airy, and Perfectly Sweet
A delicate, cloud-like layer that provides a beautiful contrast in both texture and flavor to the rich chocolate, adding a touch of elegance and a refreshing lightness to the dessert.
- 3/4 Cup Cold Whipping Cream (Heavy Cream): Absolutely essential for creating a stable, fluffy, and voluminous cream layer. Ensure it is very cold for optimal whipping results.
- 1 Tablespoon Granulated Sugar: Sweetens the whipping cream just enough to complement the other layers without overpowering the complex chocolate flavors.
Chocolate Glaze Layer: The Decadent Crown
The grand finale – a smooth, glossy, and intensely chocolatey layer that elegantly seals in all the flavors and provides a stunning, professional-looking finish. This layer requires careful preparation for that perfect sheen and a luxurious texture.
- 3/4 Cup Cold Whipping Cream (Heavy Cream): Used to create a luscious, pourable ganache-like topping that sets beautifully and adds to the richness.
- 1 Tablespoon Granulated Sugar: Adds a subtle touch of sweetness to the chocolate glaze, perfectly balancing its inherent richness.
- 100-150g Dark Chocolate (finely chopped or high-quality chocolate chips): This is the crucial ingredient for the rich chocolate glaze. Finely chopped dark chocolate (around 60-70% cacao content is ideal) will melt smoothly and create a luxurious ganache.
- Chocolate Sprinkles (optional): For a festive touch, visual appeal, and a hint of playful added texture on top.
*Note: The original recipe’s ingredient list for the chocolate layer omitted the specific amount of dark chocolate. For a rich, pourable ganache suitable for this layered dessert, we recommend using approximately 100-150 grams (about 3.5 to 5 ounces) of good quality dark chocolate, finely chopped. This will ensure a perfect consistency and intense chocolate flavor.
Step-by-Step Instructions: Baking Your Layered Chocolate Masterpiece
Follow these detailed steps carefully to achieve a perfectly moist, fluffy, and decadent melt-in-your-mouth chocolate dessert. Precision in baking ensures the best results and a truly impressive presentation.
Step 1: Preparing the Cake Batter – Combining Wet Ingredients
Begin by combining your essential wet ingredients to form a light and airy base for the cake. In a large, clean mixing bowl, crack the 2 large eggs. Add the 1 2/3 teaspoons of vanilla sugar and the 1/4 cup of granulated sugar. Using an electric mixer (or a stand mixer with a whisk attachment), beat these ingredients together on medium-high speed for 3-5 minutes until the mixture transforms into a pale yellow, thick, and wonderfully fluffy consistency. This crucial process incorporates a significant amount of air, which is fundamental for a light and tender cake. Gradually, in a slow and steady stream, add the 1/4 cup of vegetable oil while continuously beating until fully emulsified and smooth. Next, incorporate the 1/4 cup of plain yogurt, mixing gently on low speed until just combined. Be careful not to overmix at this stage, as excessive beating can toughen the cake; stop as soon as no streaks of yogurt remain visible.
Step 2: Incorporating the Dry Ingredients for Structure and Flavor
Now, it’s time to carefully add the dry components to your wet mixture. Over the wet ingredients in the bowl, sift in the 3 tablespoons of high-quality cocoa powder, 1/2 cup of all-purpose flour, and 1/2 tablespoon of baking powder. Sifting these dry ingredients together is paramount as it removes any potential lumps, ensuring a perfectly smooth batter and an evenly textured cake crumb. Gently whisk all the ingredients together using a spatula or a hand whisk until they are just combined and no dry streaks of flour are visible. Again, be very careful not to overmix; over-developing the gluten will result in a dense, chewy cake rather than a light, melt-in-your-mouth one. Finally, add the 1 teaspoon of white vinegar and a pinch of salt. Stir again briefly, just until the vinegar is fully incorporated. The vinegar will react with the baking powder, activating its leavening properties, which significantly contributes to the cake’s impressive rise and delightful tenderness.
Step 3: Baking the Moist Chocolate Cake to Perfection
Prepare your chosen baking mold for the oven. Thoroughly grease the interior of your baking dish (an 8×8 inch square pan or a 9-inch round pan works exceptionally well for this recipe) with butter or cooking spray. For even easier removal and clean slices, consider lining the bottom with a circle or square of parchment paper. Carefully transfer the prepared cake batter into the greased mold, spreading it evenly with an offset spatula or the back of a spoon to ensure a uniform bake. Preheat your oven to 356°F (180°C). Once your oven is fully preheated, place the baking mold into the center rack of the oven and bake for approximately 20 to 25 minutes. Baking times can vary slightly depending on your specific oven, so it’s wise to keep a close eye on your cake. The cake is perfectly ready when a wooden skewer or toothpick inserted into the very center comes out clean or with just a few moist crumbs attached. Avoid the temptation to overbake, as this is the key to maintaining maximum moisture and tenderness.
Step 4: Crafting the Milk Chocolate Soaking Mixture
While the cake is either baking or immediately after it comes out of the oven, prepare the special milk chocolate mixture that will infuse our cake with incredible moisture and an additional layer of rich flavor. In a small saucepan, combine the 3/4 cup of whole milk and 1 tablespoon of cocoa powder. Whisk these two ingredients vigorously until the cocoa powder is completely dissolved and no lumps remain, creating a smooth, homogenous chocolate milk liquid. Place the saucepan over medium heat and continue to gently whisk and warm the mixture until it is hot but not actively boiling. The objective here is to ensure the cocoa is fully incorporated and the liquid is perfectly warmed and ready to be absorbed by the warm cake. Remove the saucepan from the heat once warmed through.
Step 5: Infusing the Cake with Decadent Chocolate Moisture
As soon as the cake is removed from the oven and is still wonderfully warm, carefully transfer it to a cooling rack. Using a wooden skewer, a fork, or even a sturdy toothpick, generously and evenly poke holes all over the entire surface of the cake. Make sure to poke deep enough for the liquid to penetrate well into the cake’s crumb, but avoid going all the way through to the bottom of the cake. Immediately and evenly pour the warm milk chocolate mixture over the entire poked surface of the cake. The warm cake will readily absorb this luscious liquid, ensuring a delightfully moist, incredibly flavorful, and truly melt-in-your-mouth result. Set the cake aside on the cooling rack to cool completely at room temperature. This cooling process is absolutely vital before adding the subsequent layers, allowing the cake to fully absorb the liquid and set properly.
Step 6: Preparing the Light and Fluffy Cream Layer
Once the chocolate cake has completely cooled to room temperature, it’s time to prepare the first delightful topping layer. In a clean, thoroughly chilled mixing bowl, add the 3/4 cup of cold whipping cream and 1 tablespoon of granulated sugar. For optimal results, you can even chill your mixing bowl and whisk attachment in the freezer for about 10-15 minutes beforehand. Using an electric mixer with a whisk attachment, beat the cream and sugar on high speed until the cream becomes light, fluffy, and holds soft to medium peaks. It should be airy and spreadable but not stiff. Be very careful not to overbeat, or the cream might become grainy or even turn into butter. Gently transfer the beautifully whipped cream onto the cooled chocolate cake, spreading it evenly across the entire surface with an offset spatula or the back of a spoon. This layer adds a lovely contrast in texture and a refreshing lightness to the rich chocolate base.
Step 7: Creating the Decadent Chocolate Glaze Layer
Now for the showstopper: the rich, glossy chocolate glaze that crowns our dessert. In a small saucepan, gently warm the remaining 3/4 cup of whipping cream over medium-low heat until it just begins to simmer around the edges (tiny bubbles forming), but do not allow it to come to a rolling boil. Remove from heat immediately. Place your finely chopped dark chocolate (100-150g) in a heat-proof bowl. Pour the warm cream directly over the chocolate. Let it sit undisturbed for 2-3 minutes to allow the heat from the cream to thoroughly melt the chocolate. Then, add the 1 tablespoon of granulated sugar and slowly begin to stir with a spatula or whisk, starting from the center of the bowl and gently working your way outwards, until everything is completely melted and you have a smooth, glossy, and uniform ganache. Set this luxurious chocolate mixture aside and allow it to cool slightly, reaching a lukewarm temperature. This cooling step is critical to ensure the ganache sets correctly and doesn’t melt or disturb the delicate cream layer underneath. Once cooled to the right consistency (it should still be pourable but slightly thickened), gently and evenly pour it over the cream layer, making sure to cover the entire surface. You can help spread it evenly by carefully tilting the baking dish from side to side. To remove any potential air bubbles and achieve a perfectly smooth, mirror-like top, gently run a clean stick or skewer across the surface. If desired, immediately decorate with chocolate sprinkles or other desired toppings before the ganache fully sets.
Step 8: Chilling for Perfection and Elegant Serving
This final step is absolutely crucial for the dessert to set properly, for all the magnificent layers to meld harmoniously, and for the flavors to deepen beautifully. Carefully place your layered chocolate dessert into the refrigerator and let it chill for a minimum of 2 hours. For the absolute best results, an overnight chill is highly recommended, as it allows the ganache to firm up, the cake to become even more moist, and the flavors to fully develop, transforming it into that true melt-in-your-mouth experience. Once thoroughly chilled and set, remove from the refrigerator, slice into generous portions using a hot, clean knife (wiped between slices for neatness), and serve. Get ready for an explosion of chocolatey delight and a dessert that will earn you endless compliments!
Tips for a Perfect Melt-in-Your-Mouth Chocolate Dessert
Achieving baking perfection often comes down to a few key techniques and careful attention to detail. Here are some expert tips to ensure your layered chocolate dessert is nothing short of spectacular and consistently delivers that desired “melt-in-your-mouth” experience:
- Quality Ingredients are Paramount: Always use good quality cocoa powder and dark chocolate. The depth of flavor and overall luxuriousness of your dessert directly correlates with the quality of your chocolate products. Invest in the best you can find.
- Avoid Overmixing the Batter: When making the cake batter, especially after adding the flour, avoid overmixing. Overworking the gluten will lead to a tough, dense cake rather than a light, airy one. Mix until just combined.
- Properly Prepare Your Pan: Ensure your baking mold is thoroughly greased, and consider lining the bottom with parchment paper for extra insurance. This prevents sticking and makes for incredibly easy removal and clean slicing.
- Test Cake Doneness Accurately: Always test your cake with a toothpick or wooden skewer inserted into the center. If it comes out clean or with a few moist crumbs, the cake is ready. Overbaking is the enemy of moist cake!
- Use Very Cold Whipping Cream: For both cream layers, always use very cold whipping cream. Chilling your mixing bowl and whisk attachment in the refrigerator or freezer for 15 minutes beforehand can significantly help achieve stiffer peaks faster and more reliably.
- Observe Cooling Times: Ensure the cake is completely cool before adding the cream layer. Similarly, the chocolate glaze should be slightly cooled (lukewarm and slightly thickened) before pouring it over the cream. This crucial step prevents melting and ensures distinct, beautiful layers.
- Poke Evenly for Absorption: When poking the cake for the milk mixture, try to poke evenly across the entire surface. This ensures uniform absorption of the liquid and consistent moisture distribution throughout the cake.
- Patience with Chilling is Key: The chilling time is not merely a suggestion; it is essential. It allows the layers to set firmly, the flavors to meld beautifully, and the dessert to achieve its signature firm-yet-creamy, melt-in-your-mouth texture. Do not rush this step.
Variations and Customizations for Your Chocolate Masterpiece
While this melt-in-your-mouth chocolate dessert recipe is perfect and delightful as is, you can always put your unique spin on it to suit your personal taste or specific occasion. Here are some creative ideas to customize your layered chocolate masterpiece:
- Coffee Infusion for Depth: Add 1 teaspoon of instant espresso powder or finely ground coffee to the cake batter or the milk chocolate mixture. This deepens the chocolate flavor and adds a sophisticated, subtle coffee note that perfectly complements chocolate.
- Nutty Crunch and Texture: For an added layer of texture and flavor, sprinkle chopped toasted nuts (such as pecans, walnuts, or hazelnuts) between the cream layer and the chocolate glaze, or generously on top as a garnish.
- Bright Fruitful Delights: A thin layer of your favorite raspberry or cherry jam, or even fresh berries (like thinly sliced strawberries or whole raspberries), can be spread over the cake before the cream layer for a bright, fruity contrast to the rich chocolate.
- Refreshing Mint Chocolate: For a classic flavor combination, add a few drops of pure peppermint extract to the cream layer. This creates a refreshing mint-chocolate experience that is particularly popular during holidays.
- A Subtle Spicy Kick: For the adventurous palate, a tiny pinch of cayenne pepper or chili powder can be added to the chocolate glaze. This adds an unexpected and delightful warmth that enhances the chocolate’s complexity.
- Experiment with Different Chocolate Types: While dark chocolate is recommended, you can experiment with milk chocolate or even white chocolate for the ganache layer for a milder, sweeter flavor profile. Remember to adjust the sugar content accordingly.
- Boozy Bliss for Adults: For an adult twist, a tablespoon of your favorite liqueur (such as Kahlúa, Grand Marnier, Amaretto, or dark rum) can be added to the milk chocolate soaking mixture. This imparts a sophisticated depth of flavor.
Serving and Storage Suggestions for Optimal Enjoyment
Once your exquisite melt-in-your-mouth chocolate dessert has thoroughly chilled and set, it’s ready to be gracefully presented and enjoyed. For neat, clean slices that beautifully showcase the distinct layers, always run a sharp knife under hot water and wipe it clean between each cut. This simple trick makes all the difference.
- Optimal Serving Temperature: While best served chilled, allowing the dessert to sit at room temperature for about 10-15 minutes before serving can slightly soften the ganache and cake. This subtle warming enhances the “melt-in-your-mouth” experience by making the textures even more yielding and luxurious.
- Perfect Pairing Suggestions: This rich and decadent dessert pairs wonderfully with a freshly brewed cup of strong black coffee, a tall glass of cold milk, a scoop of vanilla bean ice cream, or even a sophisticated dry red wine (like a Zinfandel or Merlot) to cut through its sweetness.
- Storage Guidelines: To maintain its freshness and delightful texture, store any leftover dessert tightly covered with plastic wrap or in an airtight container. Keep it refrigerated for up to 3-4 days. While it’s undeniably best enjoyed fresh, the flavors can sometimes deepen and evolve beautifully over time.
- Freezing for Longer Enjoyment: This magnificent layered chocolate cake can also be frozen for future indulgence! Once fully set, wrap individual slices or the entire cake tightly in several layers of plastic wrap, then an outer layer of aluminum foil. It can be stored in the freezer for up to 2-3 months. To serve, simply thaw in the refrigerator overnight before bringing it to room temperature for a few minutes.
This layered chocolate dessert is more than just a recipe; it’s an invitation to create joy, celebrate special moments, and share unforgettable experiences with loved ones. Its rich flavors, moist and tender texture, and impressively elegant appearance make it an absolute showstopper for any occasion, proving that sometimes, the simplest pleasures, when executed with care, are truly the most profound. Happy baking, and prepare for an abundance of compliments and delighted smiles!