
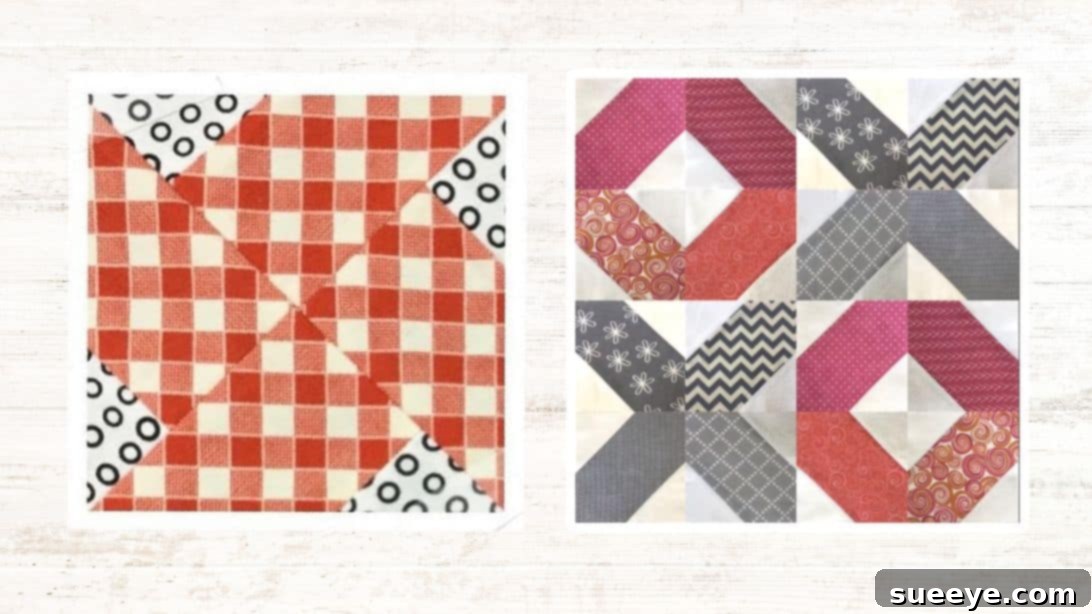
Embark on your next quilting adventure with two exquisite and remarkably simple quilt block designs: the enchanting Whirlwind and the classic Road to Tennessee. Whether you’re a seasoned quilter looking for quick, satisfying projects or a complete beginner eager to master fundamental techniques, these blocks are perfect for developing your skills and adding stunning visual interest to any textile creation. They are not only beautiful but also incredibly versatile, offering endless possibilities for unique quilt layouts. In this comprehensive guide, inspired by the expert instruction of Teresa DownUnder on YouTube, we’ll delve into the step-by-step process of creating these blocks, along with tips, tricks, and ideas for transforming them into magnificent quilts. Get ready to explore the joy of quilting, one perfectly pieced block at a time.
Quilting is an art form that blends creativity with precision, offering a therapeutic outlet and the immense satisfaction of crafting something beautiful and enduring. The Whirlwind and Road to Tennessee blocks are celebrated for their distinctive patterns and the relatively straightforward methods required to construct them. The Whirlwind block creates a dynamic, swirling effect with just two fabrics, making it an excellent choice for showcasing contrasting colors or prints. The Road to Tennessee block, on the other hand, offers a more intricate yet achievable design, built from larger squares framed by smaller ones, which can be arranged in countless configurations to tell a different story with each rotation. Let’s gather our materials and begin this exciting journey.
Before we dive into the specifics of each block, a word on general quilting best practices: precision is paramount. A quarter-inch seam allowance is the standard in quilting, and consistent application of this allowance will ensure your blocks come together accurately. Investing in quality tools, such as a sharp rotary cutter, a self-healing mat, and an acrylic ruler, will make the cutting process faster and more accurate. Proper pressing is equally crucial; pressing seams open or to one side can drastically affect how your blocks lay flat and how easily they join together. With these foundational principles in mind, let’s explore the Whirlwind block.
Mastering the Whirlwind Quilt Block
The Whirlwind quilt block is a delightful pattern that, true to its name, evokes a sense of motion and energy. It’s a fantastic block for beginners because it relies on simple strip piecing and diagonal cuts to achieve its impressive effect. This block is incredibly effective when using two fabrics with high contrast, allowing the “whirl” to stand out prominently. Imagine it as a focal point in a modern quilt, or repeating across an entire throw for a stunning, dynamic design.
Materials You’ll Need for One Whirlwind Block:
- Two pieces of fabric strips, each measuring 2-1/2 inches by 20 inches. For the most striking effect, choose two distinct fabric designs or colors that contrast well with each other. For example, a light solid and a dark print, or two vibrant prints that complement each other.
- Basic quilting tools: sewing machine, rotary cutter, cutting mat, acrylic ruler, iron, and pressing mat.
Step-by-Step Instructions for the Whirlwind Block:
- Prepare Your Fabric Strips: Begin by taking your two 2-1/2″ x 20″ fabric strips. Ensure they are neatly pressed and free of wrinkles. Place one strip directly on top of the other, right sides together. Align the edges perfectly, as precision at this stage sets the foundation for accurate blocks.
- Sew the Strips Together: Using your sewing machine, sew along one long edge of the stacked strips with a precise 1/4-inch seam allowance. This consistent seam allowance is critical for accurate block sizing. After sewing, gently press the seam open or to one side, depending on your preference and how it will minimize bulk in the final block. Pressing flat is key to a smooth finish.
- Cut into Squares: With your sewn strip set now forming a single, wider piece of fabric, use your rotary cutter and ruler to cut this strip into 4-1/2-inch intervals. You should be able to yield approximately four squares from your 20-inch strip set. Square up each piece carefully to ensure they are true 4-1/2 inch squares.
- Create the Triangles: Take each 4-1/2-inch square and place it on your cutting mat. Using your ruler, align it diagonally from one corner to the opposite corner. Make a clean cut with your rotary cutter. This action will divide each square into two perfect triangles. From four squares, you will now have eight triangles. These eight triangles will be enough to create two complete Whirlwind blocks.
- Assemble the Block Units: To form the Whirlwind pattern, you will arrange four of these triangles. Take two triangles from one square and two from another. Arrange them in a way that the central point creates the “whirl” effect. Typically, you will place two triangles with the fabric A (let’s say, the lighter fabric) facing a certain direction, and two with fabric B (the darker fabric) creating the opposing flow. Visualize the swirling pattern before you sew.
- Sew in Pairs: Once you have your desired arrangement, sew the triangles together in pairs. For example, sew two adjacent triangles along one short edge, using a 1/4-inch seam allowance. Repeat for the other pair of triangles.
- Join the Pairs: Now you have two larger units. Place these two units right sides together, aligning the seam where they will meet. Sew them together with a 1/4-inch seam allowance to complete the 4-patch unit that forms the Whirlwind block.
- Final Pressing: Once stitched, press the finished Whirlwind block carefully. Pressing from the back first can help to set the stitches, then flip it over and press from the front, ensuring all seams lie flat and the block is crisp and square.
Once you’ve made a few Whirlwind blocks, you’ll see how quickly they come together. Experiment with different color combinations and fabric patterns. A quilt made entirely of Whirlwind blocks creates an mesmerizing optical illusion, while using them as sashing or cornerstones can add unexpected bursts of movement to a larger, more traditional design. The simplicity and visual impact of this block make it a fantastic addition to any quilter’s repertoire.
Crafting the Road to Tennessee Quilt Block
The Road to Tennessee quilt block is a beloved classic, known for its dynamic, directional appearance that suggests movement and journey. It’s often compared to a variation of the traditional “Log Cabin” block due to its construction from smaller units built around a central element. This block is incredibly versatile, allowing you to create a multitude of larger patterns simply by rotating the individual blocks. Its construction might seem a bit more involved than the Whirlwind, but with careful attention to detail, it’s perfectly achievable for quilters of all levels. The beauty of this block lies in the interplay between a larger central fabric and smaller framing squares, offering ample opportunity for creative fabric pairing.
Materials You’ll Need for One Road to Tennessee Block:
- Eight pieces of 5-inch square fabric in varying designs or colors. These will form the central elements of your block.
- Sixteen pieces of 2-3/4 inch squares in a solid color, such as white, cream, or a preferred background color. This contrasting color will help to define the “road” effect.
- Essential quilting tools: sewing machine, rotary cutter, cutting mat, acrylic ruler, iron, pressing mat, fabric marker or pencil, and pins.
Step-by-Step Instructions for the Road to Tennessee Block:
- Prepare the Small Squares: Take each of your sixteen 2-3/4 inch solid squares. Using a fabric marker or pencil and your ruler, draw a diagonal line from one corner to the opposite corner on the wrong side of each square. These lines will serve as your sewing guide.
- Position Small Squares on Large Squares: Take one of your 5-inch patterned squares and place it right side up on your work surface. Now, select two of your prepared 2-3/4 inch squares. Place these smaller squares onto opposite corners of the larger 5-inch square, right sides together. The drawn diagonal lines should run in the same direction, extending from one corner towards the center of the large square. Secure each small square with a pin to prevent shifting.
- Sew Along the Diagonal: Using your sewing machine, carefully sew directly along the diagonal lines you drew on the smaller squares. Ensure your stitches are precise. This creates a stitched guide for your next step.
- Trim and Press: After sewing, take your rotary cutter and ruler. Cut 1/4 inch *away* from each stitched diagonal line, towards the outer corner. Discard the trimmed fabric (or save it for mini-projects if you’re feeling adventurous!). This trimming creates the clean lines of your block. Now, press the seams open or towards the darker fabric (if applicable) using your iron. The goal is to make the block lie as flat as possible. You should now have a larger square with two smaller fabric triangles forming new corners.
- Repeat for All Units: Repeat steps 2-4 for all eight of your 5-inch patterned squares. You will end up with eight identical block units, each featuring two “flying geese”-like corner elements.
- Assemble the Block: Now for the creative part! These eight units are the building blocks for your Road to Tennessee quilt block. The original video suggests assembling the first four blocks to form a circular pattern and the other four to form an ‘X’ pattern. However, the true magic of this block lies in its versatility. By simply rotating each of the eight units, you can achieve a vast array of designs.
- Circular Pattern: Arrange four units so that the smaller corner triangles create a continuous, swirling path in the center, forming a circular motif.
- ‘X’ Pattern: Arrange four units so that the smaller corner triangles point inwards, meeting at a central point to form an ‘X’ or cross shape.
- Other Variations: Experiment! You can create chevron patterns, diagonal lines, or even a zigzag “road” effect. Teresa DownUnder’s video provides numerous visual examples of how these eight units can be combined to create unique and captivating designs. Take your time to play with the layout on a design wall or floor before committing to sewing.
- Sew Units Together: Once you’ve chosen your desired arrangement, sew the units together in rows, and then sew the rows together to form your complete Road to Tennessee block. Always use a 1/4-inch seam allowance and press carefully after each seam to ensure accuracy and flatness.
The flexibility of the Road to Tennessee block makes it a fantastic tool for expressing your personal style. Consider using different fabric collections to create seasonal quilts, or stick to a cohesive color palette for a more elegant, unified look. The contrast between your 5-inch squares and 2-3/4 inch solids will significantly impact the visual flow of your “road.” Don’t hesitate to refer back to the video tutorial for visual guidance on assembly variations; it’s a treasure trove of inspiration for this dynamic block.
Bringing Your Quilt Project to Life
You’ve now learned the foundational steps for creating two beautiful and distinct quilt blocks: the Whirlwind and the Road to Tennessee. These blocks are not just individual units; they are the building blocks of larger, more complex quilts. Imagine a baby quilt made entirely of bright, cheerful Whirlwind blocks, or a sophisticated throw blanket featuring a repeated Road to Tennessee pattern in earthy tones. The possibilities are truly limitless.
As you continue your quilting journey, remember that practice makes perfect. Don’t be afraid to experiment with different fabric combinations, colors, and arrangements. Each block you create is an opportunity to refine your skills, from precise cutting and consistent seam allowances to careful pressing and creative assembly. For further inspiration and visual demonstrations, we highly recommend revisiting Teresa DownUnder’s original YouTube tutorial. Her clear instructions and visual examples are invaluable resources for both of these blocks and beyond.
So, what are you waiting for? Grab your fabrics, fire up your sewing machine, and start creating these wonderful blocks. Whether you choose the dynamic spin of the Whirlwind or the meandering path of the Road to Tennessee, you’re on your way to crafting a unique and cherished quilt. Happy quilting!