
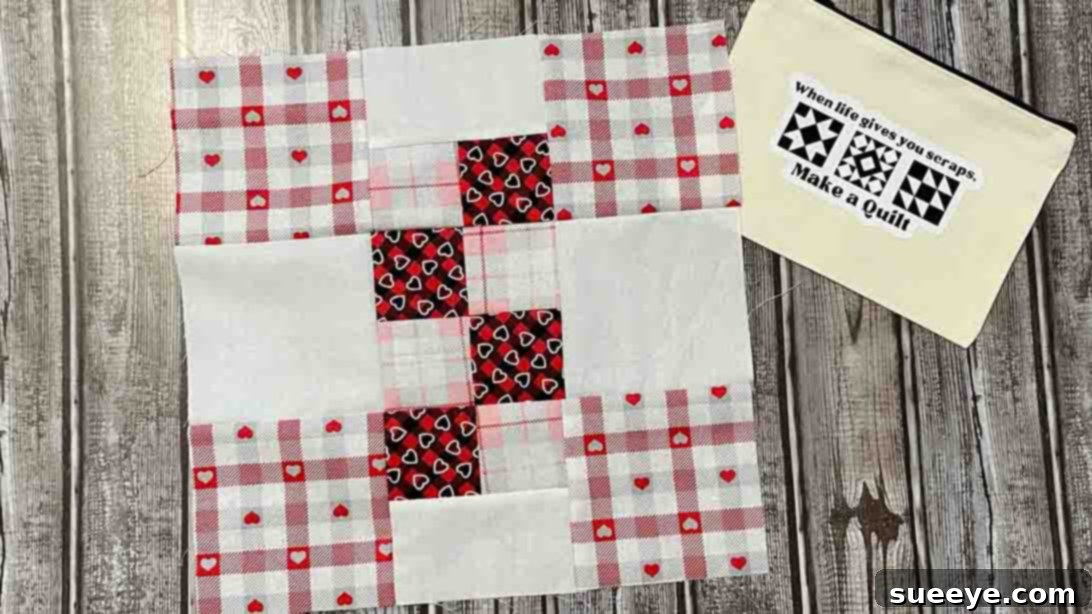
Master the Easy Sunset Light Quilt Block: A Beginner-Friendly Tutorial
Are you searching for your next inspiring quilting adventure? Look no further! This delightful Sunset Light Quilt Block, inspired by the fantastic tutorials from Cut and Create on YouTube, is the perfect project to ignite your creative spirit. While its intricate design might initially suggest complexity, you’ll be pleasantly surprised to discover that this is one of the most straightforward and satisfying quilt patterns you’ll ever encounter. Not only is it incredibly easy, but it’s also remarkably quick to assemble – you could have a beautiful block ready in well under an hour! This makes it an ideal project for both seasoned quilters looking for a fast finish and beginners eager to build their confidence with stunning results.
What makes this quilt block truly special is its incredible versatility, particularly when it comes to fabric choices. Imagine the vibrant hues of a setting sun, or the soft glow of a twilight sky, brought to life through fabric. While solid colors offer a clean, classic aesthetic, this pattern truly shines when you incorporate a mix of printed and bold fabrics. Experimenting with different patterns, scales, and textures adds depth and personality, making each block a unique work of art. The “light” effect of the sunset can be achieved by carefully contrasting light and dark fabrics, creating a dynamic visual flow within the block. Ready to transform your fabric stash into something extraordinary? Dive into this tutorial today and experience the joy of creating your own stunning Sunset Light Quilt Block. You’ll find detailed step-by-step instructions below, complemented by visual guides to ensure your success.
Why You’ll Love Crafting the Sunset Light Quilt Block
This particular quilt block offers numerous advantages that make it a favorite among quilters of all levels:
- Beginner-Friendly: With simple cuts and straightforward sewing techniques, it’s an excellent project for those new to quilting to practice foundational skills.
- Quick to Assemble: Unlike more complex patterns, this block comes together rapidly, providing the satisfaction of a completed project without a lengthy time commitment.
- Versatile Design: The Sunset Light block is incredibly adaptable. You can easily modify color schemes and fabric prints to create vastly different moods and aesthetics.
- Stunning Visual Impact: Despite its simplicity, the finished block creates a beautiful, eye-catching focal point, perfect for any quilt or standalone project.
- Skill Builder: It’s a fantastic way to hone essential quilting skills like accurate cutting, precise piecing, and effective pressing, all crucial for future projects.
- Perfect for Scrap Busting: Utilize smaller pieces of your favorite fabrics from your stash, turning remnants into a beautiful design.
Essential Quilting Tools and Supplies for Success
Before you begin cutting into your beautiful fabrics, ensure you have these fundamental quilting tools at hand. Having the right equipment makes the process smoother, more accurate, and ultimately more enjoyable, leading to a professional-looking finish for your Sunset Light Quilt Block.
- Rotary Cutter: A sharp rotary cutter (typically 45mm) is indispensable for achieving precise, straight cuts quickly and efficiently.
- Self-Healing Cutting Mat: Protect your work surface and prolong the life of your rotary blade with a high-quality self-healing cutting mat.
- Quilting Rulers: Clear acrylic rulers with distinct measurement markings are crucial for accurate cutting. A longer ruler (e.g., 6.5″ x 24″) is great for initial fabric strips, while a smaller square ruler (e.g., 6.5″ x 6.5″ or larger) is invaluable for squaring up blocks.
- Sewing Machine: A reliable sewing machine is a must. Ensure it’s in good working order and consider using a quarter-inch seam foot (also known as a 1/4″ presser foot) for consistent seam allowances.
- High-Quality Thread: Invest in good quality 100% cotton thread that complements your fabric colors. Matching thread color helps stitches blend in, while a contrasting color can add a design element if desired.
- Iron and Ironing Board/Pressing Mat: Essential for pressing seams flat and crisp. Proper pressing dramatically improves block accuracy and ensures your quilt lays beautifully. A pressing mat can be a great space-saver for smaller projects.
- Fabric Scissors: Keep a sharp pair of scissors specifically for fabric to snip threads, clip corners, or make occasional adjustments.
- Quilting Pins or Fabric Clips: To hold fabric pieces together securely before sewing. Long, sharp pins with flat heads are often preferred for quilting.
- Seam Ripper: Every quilter needs one! It’s an essential tool for those inevitable “oops” moments, allowing you to quickly and safely undo stitches without damaging fabric.
Materials for Your Sunset Light Quilt Block
Careful selection and accurate cutting of your fabrics are the first steps to a successful quilt block. For this particular design, we’ll use four distinct fabrics, labeled A, B, C, and D, to create the captivating “sunset light” effect. Feel free to choose colors that evoke a sunset for you – warm oranges, yellows, reds, fading into cooler blues or purples, or even a serene, monochromatic gradient. Remember to press your chosen fabrics before cutting to ensure they are smooth, wrinkle-free, and accurately measured.
Fabric A (Background/Light Accent – e.g., White, Cream, or a Very Light Tone):
This fabric provides the structural frame and often serves as a neutral background, allowing other colors to pop.
- 2 – 4 1/2″ squares
- 2 – 2 1/2 x 4 1/2″ rectangles
Fabric B (Printed/Main Contrast – e.g., a bold print, a medium tone, or a contrasting solid):
Fabric B will occupy the corners, offering a strong visual element that frames the central design.
- 4 – 4 1/2″ squares
Fabric C (Lighter Accent – e.g., a soft yellow, light orange, or a brighter print):
This fabric, combined with Fabric D, forms the intricate center of the block, contributing to the “light” effect.
- 2 – 2 1/2″ squares
Fabric D (Darker Accent – e.g., a deeper orange, rich red, muted purple, or a darker print):
Working in conjunction with Fabric C, Fabric D adds depth and contrast to the central four-patch units, enhancing the sunset gradient.
- 2 – 2 1/2″ squares
(All measurements provided are in inches and assume a standard 1/4-inch seam allowance. Ensure your seam allowance is consistent for a perfectly square block.)
Step-by-Step Directions: Crafting Your Sunset Light Quilt Block
Step 1: Precision Cutting and Pre-Assembly Layout
The foundation of any beautiful quilt block lies in precise cutting. Begin by carefully cutting all your fabric pieces according to the measurements listed above. We highly recommend using a sharp rotary cutter, a self-healing mat, and clear acrylic rulers for the most accurate results. Take your time with this crucial step, as accuracy here will make your sewing much smoother and your final block perfectly square. Inaccurate cutting is one of the most common reasons for blocks not coming together as expected.
Once all your pieces are meticulously cut, it’s immensely helpful to lay them out on a flat surface, such as your cutting mat, a design wall, or even the floor, to visualize the block before you start stitching. This pre-assembly layout allows you to confirm your color placement, ensure all pieces are oriented correctly, and catch any potential errors before they require the dreaded seam ripper! Here’s how to arrange your pieces to see the full “sunset light” effect:
- Start by placing the two Fabric A (4 1/2″ squares) on the immediate left and right sides of your central design area. These will act as vertical connectors.
- Next, position the two Fabric A (2 1/2″ x 4 1/2″ rectangles) on the top and bottom edges of where the central elements will be, aligning them neatly. These will serve as horizontal connectors.
- Now, place the four Fabric B (4 1/2″ squares) at each of the four corners of your layout. These pieces will frame the entire block, providing a strong outer boundary.
- Finally, for the very middle of the block, you will create two “four-patch” units. Arrange Fabric C (2 1/2″ squares) and Fabric D (2 1/2″ squares), alternating the colors to form these two distinct units. Envision them as the vibrant heart of your sunset, with lighter and darker elements creating dynamic contrast. For example, lay them out like a checkerboard: C, D in the first row, then D, C in the second row for each four-patch.
This visual check is invaluable for ensuring your design flows exactly as you envision it. It’s your last chance to swap out fabrics, adjust color placement, or correct any miscut pieces without any sewing involved, saving you time and frustration.
Step 2: Constructing the Central Four-Patch Units
With your layout confirmed and fabrics patiently waiting, it’s time to bring your Sunset Light Quilt Block to life at the sewing machine. We’ll start with the most intricate part, the central four-patch units, which will form the heart of your block’s captivating “light” effect. Remember to maintain a consistent 1/4-inch seam allowance throughout your sewing.
- Sew the Two-Piece Rows: Take your two Fabric C (2 1/2″ squares) and two Fabric D (2 1/2″ squares) that comprise one four-patch unit. Arrange them into two rows of two, alternating colors (e.g., C-D in the first row, D-C in the second). Stitch the squares in each row together with your consistent 1/4-inch seam allowance. For instance, sew C to D to form a short strip, and then D to C to form another short strip.
- Press the Seams: After sewing, press the seams of these two-piece rows. A common practice is to press seams towards the darker fabric to prevent “shadowing” on lighter fabrics. Alternatively, for units like these, pressing seams open can help reduce bulk at the intersection when joining rows. Choose a method and be consistent.
- Join the Rows to Form the Four-Patch: Now, take your two sewn rows and align them, carefully nesting your seams for a perfect match at the center. Pin them together, especially at the seam intersection, to prevent shifting. Stitch the two rows together to complete one four-patch unit.
- Final Pressing for Four-Patch: Give the completed four-patch unit a final, thorough press to ensure it lies flat and square. Repeat this entire process to create your second identical four-patch unit. You now have two perfectly constructed central elements.
Step 3: Attaching Fabric A Rectangles to Central Units
Now that your central four-patch units are complete and beautifully pressed, we will begin building outwards by integrating the lighter accent fabric, Fabric A.
- Prepare the Central Vertical Strip: Take one of your completed four-patch units. Carefully align and sew one of the Fabric A (2 1/2″ x 4 1/2″ rectangles) to the top edge of this four-patch unit, using your precise 1/4-inch seam. Pin if necessary to keep it aligned.
- Attach Second Rectangle: Repeat this for the bottom edge, attaching the second Fabric A (2 1/2″ x 4 1/2″ rectangle) to the bottom of the same four-patch unit.
- Press the Seams: Press your seams, typically towards the Fabric A rectangles to help keep the central four-patch area as flat as possible. You now have two identical rectangular units, each comprising a vibrant four-patch center with Fabric A rectangles above and below it. These will form the crucial central vertical strip of your quilt block.
Step 4: Building the Side Units with Fabric A Squares and Fabric B Corners
In this step, we’ll start forming the outer frame of the quilt block, bringing in the corner Fabric B pieces and the side Fabric A squares to create two identical vertical side units.
- Construct the Left Side Unit: Take one Fabric A (4 1/2″ square). This will be the central component of your side unit. Now, take two Fabric B (4 1/2″ squares). Align and sew one Fabric B square to the top edge of the Fabric A square, right sides together, using a 1/4-inch seam.
- Add the Bottom Fabric B Square: Similarly, align and sew the second Fabric B square to the bottom edge of the same Fabric A square.
- Press the Side Unit: Press the seams towards the Fabric B squares. You now have a vertical unit consisting of Fabric B – Fabric A – Fabric B. This forms one of your outer side columns.
- Construct the Right Side Unit: Repeat this entire process to create a second identical vertical side unit. You now have three distinct vertical units: the central unit (from Step 3) and two side units ready for final assembly.
Step 5: Final Assembly and Pressing of the Quilt Block
The final step brings all your carefully constructed units together to reveal the complete Sunset Light Quilt Block. Precision here is key to ensuring all your points meet beautifully and your block lies flat.
- Join the Left Side to the Center: Take your central unit (the four-patch with Fabric A rectangles from Step 3). Carefully align one of your side units (Fabric B-A-B from Step 4) to its left edge, ensuring all raw edges are even. Pin generously, paying close attention to any seam intersections, to hold the pieces securely in place and prevent shifting. Stitch this seam with your consistent 1/4-inch allowance.
- Press the First Seam: Press the seam you just sewed. You can press towards the outer side unit or open, depending on which method helps the block lay flatter and reduces bulk.
- Join the Right Side to the Center: Now, align the remaining side unit to the right edge of your partially assembled block. Pin it into place, matching raw edges and seam intersections meticulously. Stitch this final vertical seam.
- Final Pressing of the Block: Once all three vertical units are sewn together, give your entire quilt block a final, thorough press. Pressing is crucial for setting seams, ensuring your block lies perfectly flat, and squaring it up. You can press from the front, using a little steam if desired, to ensure a crisp, professional finish.
Congratulations! You have successfully completed your beautiful Sunset Light Quilt Block. Take a moment to admire your work – the blend of colors and patterns, and the immense satisfaction of a handmade creation. This block is now ready to be incorporated into a larger quilt project or showcased as a standalone piece.
Tips for Quilting Success and Making Your Block Shine
Achieving a professional-looking quilt block is all about attention to detail. Here are some extra tips to help you master the Sunset Light Quilt Block and elevate your quilting skills, ensuring every stitch contributes to a stunning final piece:
- Consistent 1/4-Inch Seam Allowance: This is the golden rule of quilting. A scant 1/4-inch seam (slightly less than 1/4 inch, accounting for the thread’s thickness) is often preferred, as it helps your finished units measure precisely. Practice on scrap fabric until your seams are consistently accurate. An accurate seam allowance is the cornerstone of successful block piecing.
- Pressing Matters Immensely: Do not skip or rush the pressing step after each seam or unit is sewn. Pressing seams correctly (either open to reduce bulk or to one side to nest seams) makes a huge difference in how flat your block lays and how accurately your points meet. Remember, “pressing” is not “ironing” – gently lift and place your iron, rather than sliding it, to avoid distorting your fabric.
- Chain Piecing for Efficiency: To save time and thread, especially when making multiple blocks for a larger quilt, try chain piecing. Sew multiple identical units one after another without lifting the presser foot or cutting the thread in between. You can then snip them apart when all units are sewn, significantly speeding up your process.
- Pinning for Precision: Use pins generously, especially when joining seams that need to match perfectly (like the center of your four-patch units or where multiple seams converge). Pin on either side of the seam intersection to keep fabrics from shifting, ensuring your points line up.
- Square Up Your Block: After the block is fully assembled and pressed, it’s a good practice to square it up. Use a square quilting ruler to trim your block to its final desired unfinished size (e.g., 8.5″ x 8.5″ or 12.5″ x 12.5″, depending on your fabric cuts). This ensures all your blocks will fit together perfectly when assembling your full quilt top.
- Thoughtful Fabric Choice Impact: The “sunset light” effect is highly dependent on your fabric choices. Play with gradients – from light to dark, or contrasting colors. Consider how different prints will interact with each other; sometimes a busy print needs a solid partner to truly stand out, while other times, a mix of subtle prints adds delightful texture.
- Good Lighting: Work in a well-lit area to minimize eye strain and ensure you can clearly see your fabric and stitch lines.
Unleash Your Creativity: Variations and Project Ideas
The beauty of the Sunset Light Quilt Block lies not only in its simplicity but also in its potential for endless variation. Once you’ve mastered the basic block, you’ll find countless ways to adapt it and integrate it into a variety of stunning projects. Here are some ideas to inspire your next creative leap and truly make this pattern your own:
- Color Palette Swaps for Different Moods:
- Sunrise Serenity: Instead of deep sunset hues, opt for soft blues, light pinks, and creams for a gentle, waking-up-to-the-day effect. This creates a calm and airy aesthetic.
- Ocean Depths: Explore shades of blue and green, perhaps with a touch of sandy beige or coral, to evoke calm ocean waters or a vibrant reef.
- Monochromatic Magic: Choose various shades of a single color (e.g., all blues from sky blue to navy, or greens from lime to forest) for a sophisticated, subtle, and incredibly elegant look.
- Seasonal Themes: Red and green for festive Christmas quilts, oranges and browns for cozy autumn projects, vibrant pastels for spring or Easter – the possibilities are endless for holiday-themed creations!
- High Contrast Modern: Use stark black and white with a single pop of bright color (e.g., neon yellow or electric blue) for a bold, contemporary statement.
- Fabric Texture and Print Play:
- Experiment with different fabric types, like shimmering batiks for a more painterly effect, or incorporate some linen blends for added tactile texture (just be mindful of how different fabric weights and weaves behave together during sewing).
- Mix solids with stripes, polka dots, ginghams, or small-scale florals for dynamic visual interest. Consider the scale of your prints – a large print might dominate, while smaller prints create a more unified texture.
- Utilize novelty prints for a fun, personalized touch, perhaps for a child’s quilt or a themed project.
- Beyond the Quilt: Creative Project Applications:
- Full Quilt Top: Of course, multiple Sunset Light Quilt Blocks sewn together make a stunning quilt. Arrange them in a simple grid, or rotate some blocks for a dynamic pinwheel-like or checkerboard effect. Add sashing between blocks for extra visual separation.
- Pillow Covers: One or two carefully pieced blocks can create a beautiful decorative pillow for your sofa, bed, or armchair, instantly upgrading your home decor.
- Wall Hanging: A single, beautifully crafted and carefully framed block can be a lovely piece of textile art for your home, especially if you feature intricate fabric selections.
- Tote Bag Embellishment: Incorporate a block into the front panel of a handmade tote bag for a personalized touch and a unique, stylish accessory.
- Table Runner: A row of three or five blocks, perhaps with coordinating borders, would make an elegant table runner for your dining area, perfect for seasonal decoration.
- Hot Pads or Trivets: A single block, backed with insul-bright and quilted, makes a charming and functional hot pad or trivet for your kitchen.
- Appliqué Background: Use the block as a background for a small appliqué design, adding another layer of visual interest.
Final Thoughts: Your Quilting Journey Continues
Congratulations on completing your Sunset Light Quilt Block! We hope this comprehensive tutorial has not only guided you through creating a beautiful piece but also deepened your love and appreciation for the art of quilting. The satisfaction of seeing your fabric selections transform into a cohesive and visually striking block is truly rewarding, a testament to your patience and creativity. This easy pattern, inspired by the wonderful instruction from Cut and Create, is a fantastic way to build confidence, practice fundamental quilting techniques, and unleash your unique artistic vision.
Remember, quilting is a continuous journey of learning, experimentation, and immense joy. Don’t be afraid to try new fabric combinations, adjust colors to suit your personal style, or even put your own unique spin on the design. Each block you create is a valuable experience, contributing to your growing skills and artistic sensibility. Embrace the process, learn from every stitch, and enjoy the meditative rhythm of fabric and thread.
We highly encourage you to visit the Cut and Create YouTube channel (please replace with the correct channel ID if known) for more inspiring quilting tutorials and to explore their amazing content. They are a wonderful resource for quilters. And don’t forget to share your finished Sunset Light Quilt Blocks with fellow quilters online – your beautiful creations might just inspire someone else to pick up a needle and thread and start their own quilting adventure!
Happy Quilting!