
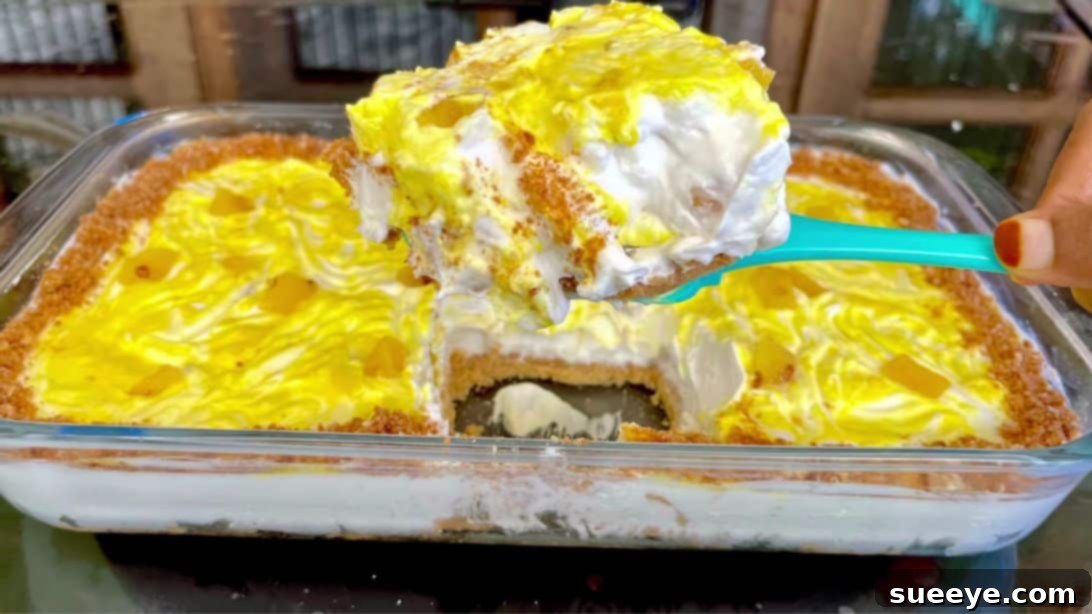
Craving a delightful dessert that doesn’t require hours in the kitchen or even turning on your oven? Look no further! This incredible no-bake pineapple cream pudding is the answer to your sweet tooth desires. Inspired by the brilliant recipe from Nuzha’s cook world on YouTube, this dessert is a true gem, perfect for any occasion. Whether you’re a seasoned baker or a complete novice, you’ll be amazed at how simple it is to whip up this magnificent treat with just a handful of ingredients. Its refreshing, creamy texture combined with the vibrant tang of pineapple makes it an irresistible dessert that your family and friends will absolutely adore. Get ready to impress with minimal effort and maximum flavor!
The beauty of this recipe lies in its simplicity and accessibility. Requiring only six core ingredients, it proves that you don’t need an elaborate pantry to create something truly special. The absence of baking makes it ideal for warm weather or for those times when you just want a quick, fuss-free dessert. From the crunchy biscuit base to the luscious pineapple-infused cream filling, every layer promises a burst of flavor and a satisfying texture. Dive into this guide to discover how to easily create this crowd-pleasing dessert, and prepare to add it to your list of go-to recipes!
Essential Ingredients for Your No-Bake Pineapple Cream Pudding
Gathering your ingredients is the first step towards creating this delightful dessert. The magic of this pudding comes from its short, simple list, proving that often, less is truly more when it comes to delicious recipes. Ensure all your ingredients are fresh and ready for an optimal outcome.
- 1 sachet of biscuits or crackers (approximately 200-250 grams), such as digestive biscuits, Graham crackers, or plain tea biscuits. These will form the crucial crunchy base of your pudding.
- 60 grams or ¼ cup of unsalted butter, melted. The butter binds the biscuit crumbs together, creating a firm and flavorful crust.
- 1 medium fresh pineapple, peeled, cored, and sliced into small chunks. Fresh pineapple provides the best flavor and texture, offering a bright, tropical note to the cream.
- ¼ cup of granulated sugar. This will be used to caramelize the pineapple chunks, enhancing their natural sweetness and creating a slightly jammy consistency.
- 1 cup of heavy whipping cream (at least 35% fat), kept well-chilled. Cold cream is essential for achieving light, airy, and stable whipped cream.
- 3 tbsp of sweetened condensed milk. This sweetens and enriches the cream filling, giving it a smooth, decadent texture without needing additional sugar.
Step-by-Step Guide to Crafting Your Perfect Pineapple Cream Pudding
Follow these detailed steps to effortlessly assemble your refreshing no-bake pineapple cream pudding. Each instruction is designed to guide you to a perfect dessert, highlighting the simplicity and joy of this recipe.
Step 1: Preparing the Irresistible Biscuit Crust and Sautéing the Pineapple
The foundation of any great no-bake dessert is its crust, and this recipe delivers a simple yet satisfying one. Begin by taking your chosen biscuits or crackers. You have a few options for crushing them: for a fine, uniform crumb, a food processor or blender works best. Simply add the biscuits to the appliance and pulse until they resemble fine sand. If you don’t have these tools, don’t worry! You can place the biscuits in a sturdy Ziploc bag, seal it, and then use a rolling pin or the bottom of a heavy pan to crush them into fine crumbs. The goal is a consistent texture, free of large pieces.
Once your crumbs are ready, transfer them into a spacious mixing bowl. Now, gently pour in the melted butter. The butter acts as the binding agent, holding the crumbs together to form a solid crust. Mix them thoroughly with a spoon or your hands until every crumb is moistened and evenly coated. The mixture should resemble wet sand. Transfer this buttered crumb mixture into your chosen serving dish – a pie dish, an 8×8 inch square dish, or individual ramekins work wonderfully. Press the mixture firmly and evenly across the bottom of the dish to create a compact crust. Ensure it’s level for a beautiful presentation. Once pressed, cover the dish with plastic wrap and place it into the refrigerator to chill for at least 30 minutes. This crucial step allows the butter to solidify, setting the crust firmly in place.
While your crust is chilling, it’s time to prepare the star of the show: the pineapple. Place a medium-sized pan on your stovetop over medium heat. Add the pineapple chunks and the granulated sugar to the pan. Toss them gently to combine, ensuring the sugar starts to coat the pineapple. As the pan heats, the sugar will dissolve and, combined with the pineapple’s natural juices, create a light syrup. Continue to cook, stirring occasionally, for about 5-7 minutes, or until the pineapple softens slightly and the liquid thickens into a glossy, beautiful glaze. This cooking process mellows the pineapple’s tartness and brings out its succulent sweetness, making it even more delectable in the pudding. Once done, remove the pan from the heat and allow the pineapple to cool completely to room temperature before proceeding to the next step. This prevents it from melting the whipped cream.
Step 2: Crafting the Creamy Filling and Assembling Your Dessert
With your crust chilling and pineapple cooling, it’s time to prepare the luscious cream filling that brings this pudding to life. In a separate, impeccably clean and dry mixing bowl, add your well-chilled heavy whipping cream. It’s crucial for the cream to be very cold for optimal whipping. Using an electric mixer (handheld or stand mixer with a whisk attachment) on medium-high speed, begin to beat the cream. Continue to beat until the cream starts to thicken and soft peaks form. This usually takes a few minutes, so be patient and avoid over-beating at this stage.
Once you have soft peaks, carefully pour in the sweetened condensed milk. The condensed milk not only adds a wonderful sweetness but also contributes to the smooth, rich texture of the filling, making it stable without the need for gelatin or eggs. Resume beating the mixture, this time on a slightly lower speed, until the condensed milk is fully incorporated and the cream reaches medium-stiff peaks – it should hold its shape well but still be light and airy. Be careful not to over-beat, or you might end up with a grainy texture or even butter!
Now, gently fold the completely cooled sautéed pineapple into the whipped cream mixture. Use a spatula to carefully fold the pineapple in, ensuring it’s evenly distributed throughout the cream without deflating the air you’ve incorporated. The goal is to combine them until just incorporated; do not overmix. The contrast of the sweet, tangy pineapple chunks within the cloud-like cream is what makes this dessert truly special. Set this delightful filling aside for a moment.
Retrieve your chilled biscuit crust from the refrigerator and carefully remove the plastic wrap. The crust should now be firm and ready to hold its creamy topping. Spoon the pineapple cream filling generously over the biscuit base. Using your spatula, spread the filling nicely and evenly all the way to the edges of the crust, creating a smooth and appealing surface. This is where your dessert really starts to take shape.
For an extra touch of elegance, you can decorate your pudding however you wish. A sprinkle of toasted coconut, a few fresh pineapple slices, a sprig of mint, or even a drizzle of caramel or white chocolate sauce can elevate its presentation. Once decorated, cover the dish again with plastic wrap or foil, and return it to the refrigerator. Allow the pudding to chill for a minimum of 4-6 hours, or ideally overnight. This extended chilling time is vital; it allows the cream filling to set completely and, perhaps more importantly, gives all the flavors a chance to meld together beautifully, resulting in a more harmonious and delicious dessert. Once thoroughly chilled and set, your magnificent pineapple cream pudding is ready to be served. Slice and enjoy the refreshing, tropical taste of this effortless creation!
Tips for a Flawless No-Bake Pineapple Cream Pudding
Achieving perfection with this no-bake dessert is incredibly easy, but a few expert tips can elevate your results from great to truly exceptional. Keep these pointers in mind for a consistently delicious outcome:
- Chill Your Cream and Tools: For the best whipped cream, ensure your heavy cream is very cold, straight from the fridge. Chilling your mixing bowl and whisk attachment for 10-15 minutes before whipping can also significantly help in achieving stiff peaks faster and maintaining stability.
- Don’t Overmix the Cream: While beating the cream, watch it carefully. Stop as soon as it reaches medium-stiff peaks. Overmixing can cause the cream to become grainy or even turn into butter, which you definitely don’t want in your pudding.
- Completely Cool the Pineapple: It is absolutely crucial that the sautéed pineapple is cooled to room temperature before you fold it into the whipped cream. Adding warm pineapple will melt the delicate cream, ruining the texture of your filling.
- Press the Crust Firmly: A well-compressed crust is less likely to crumble when you serve the pudding. Use the back of a spoon or your knuckles to press the biscuit mixture firmly and evenly into the dish.
- Allow Ample Chilling Time: Patience is a virtue, especially with no-bake desserts. The 4-6 hours (or overnight) chilling period is essential for the pudding to set properly, allowing the flavors to meld beautifully and the cream to firm up. Rushing this step will result in a soft, messy dessert.
- Taste and Adjust Sweetness: While the recipe provides guidelines, feel free to adjust the amount of condensed milk to your preference. If your pineapple is particularly sweet, you might use a little less, and vice versa.
Creative Variations and Serving Suggestions
While this 6-ingredient pineapple cream pudding is perfect as is, it also offers a fantastic canvas for creativity. Don’t hesitate to experiment with these variations to suit your taste or occasion:
- Fruit Swaps: Not a pineapple fan, or simply want to try something new? This recipe works beautifully with other fruits. Consider sautéing sliced mango, mixed berries (strawberries, blueberries, raspberries), or even peaches instead of pineapple. Adjust sugar as needed based on the fruit’s sweetness.
- Crust Alternatives: Experiment with different biscuit types for the base. Graham crackers are a classic choice, but vanilla wafers, shortbread cookies, or even chocolate cookies can create unique flavor profiles. For a gluten-free option, use gluten-free biscuits.
- Flavor Enhancements: Add a teaspoon of vanilla extract or a pinch of ground cardamom to the cream mixture for an extra layer of flavor. A little citrus zest (lime or orange) could also brighten up the filling.
- Individual Servings: Instead of one large dish, assemble the pudding in individual ramekins, dessert glasses, or small jars. This makes for elegant, pre-portioned desserts, perfect for parties or picnics.
- Tropical Toppings: Enhance the tropical theme with garnishes like toasted coconut flakes, a sprinkle of lime zest, a few fresh mint leaves, or a drizzle of passion fruit coulis just before serving.
Serving Suggestions:
This pineapple cream pudding is a delightful dessert for a wide range of occasions. It’s light and refreshing after a heavy meal, making it ideal for barbecues, potlucks, or family dinners. It also serves as a beautiful centerpiece for summer parties, birthdays, or any gathering where you want to offer something impressive yet fuss-free. Serve it chilled, directly from the refrigerator, ensuring each slice or scoop reveals the distinct layers of crunchy crust and creamy, fruity filling.
Why This 6-Ingredient Pineapple Cream Pudding is Your Next Go-To Dessert
In a world where time is precious, finding a dessert that delivers on taste, ease, and presentation is a true culinary victory. This 6-ingredient pineapple cream pudding is exactly that – a magnificent dessert idea that checks all the boxes, making it a recipe you’ll return to again and again.
Its undeniable appeal starts with its incredible simplicity. With only a few core ingredients, many of which you likely already have in your pantry, it demystifies the art of dessert making. You don’t need exotic components or specialized equipment; just everyday items transformed into something extraordinary. This makes it a perfect recipe for beginners, busy parents, or anyone looking for a stress-free yet utterly delicious treat.
The “no-bake” aspect is a game-changer, especially during warmer months or when you simply don’t want to heat up your kitchen. This convenience means less time fussing with ovens and more time enjoying the refreshing outcome. It’s an ideal make-ahead dessert, as it requires ample chilling time, allowing you to prepare it hours or even a day in advance, freeing up your time when guests arrive.
But beyond convenience, it’s the taste and texture that truly set this pudding apart. The crunchy biscuit base provides a delightful contrast to the silky, airy whipped cream filling. The star of the show, the sautéed pineapple, adds a burst of tropical sweetness and a pleasant tang that cuts through the richness of the cream, creating a perfectly balanced flavor profile. Each spoonful is a harmonious blend of sweet, creamy, and fruity, leaving a refreshing sensation that satisfies without being overly heavy.
Furthermore, its visual appeal is undeniable. The distinct layers create an elegant presentation that looks far more complex than it actually is. With minimal effort, you can create a dessert that appears to have come straight from a gourmet bakery. Garnishing with fresh pineapple chunks or a sprinkle of toasted coconut can elevate its look even further, making it a showstopper at any gathering.
In conclusion, this 6-ingredient pineapple cream pudding isn’t just a recipe; it’s an invitation to enjoy the simple pleasures of homemade desserts without the fuss. It’s refreshing, easy to make, and guaranteed to be a crowd-pleaser. We truly hope you love this recipe idea as much as we do, and that it brings a touch of tropical bliss to your table. Give it a try, and prepare to be enchanted!
*All image credit belongs to Nuzha’s cook world via YouTube. Follow and subscribe to her channel for more amazing and easy-to-follow recipes!