
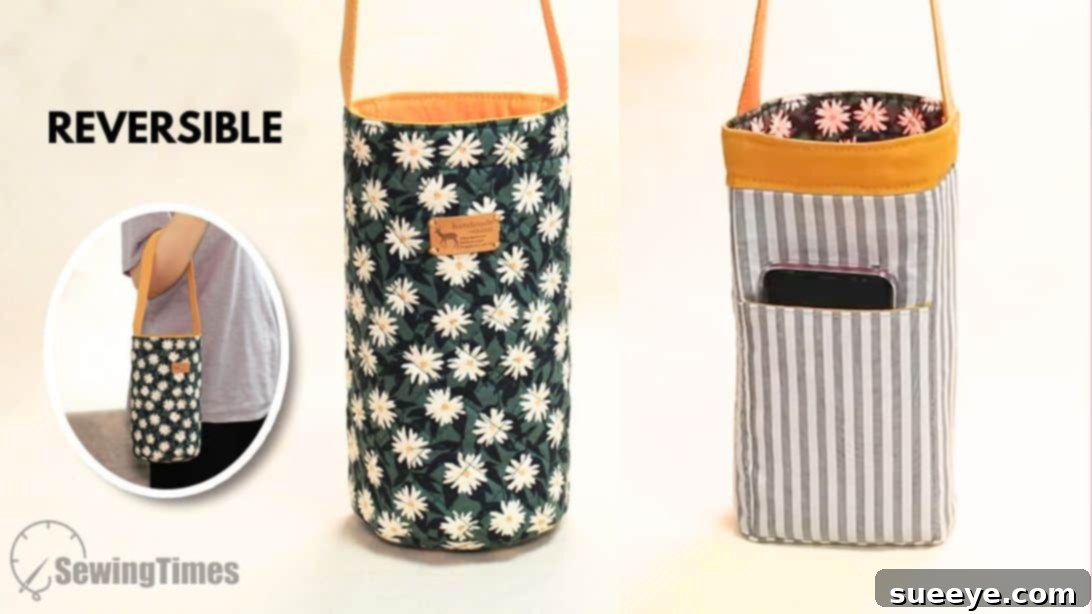
Are you constantly on the move and always have a water bottle by your side? If so, this innovative and practical sewing project is precisely what you need! Discover how to create your very own **DIY reversible water bottle holder bag** with this comprehensive guide, inspired by the fantastic tutorial from sewingtimes. This isn’t just any water bottle bag; it’s ingeniously designed to be fully reversible, offering two distinct looks in one, and critically, both sides feature convenient pockets. Imagine having a stylish, hands-free way to carry your water bottle, along with essential items like your phone, keys, cards, and even some cash.
The days of fumbling for your water bottle or struggling to carry all your essentials are over. This **fabric water bottle carrier** is the ultimate blend of functionality and personal style. Whether you’re heading to the gym, taking a leisurely walk, or navigating a busy day of errands, this bag ensures your hydration is always within reach and your valuables are securely stored. Its reversible design means you can easily switch up your style to match your outfit or mood, making it incredibly versatile.
RELATED: Explore another creative way to carry your tumblers with this DIY Macrame Tumbler Bottle Holder.
Don’t let the idea of sewing a bag intimidate you. This **DIY bottle carrier bag** project is far simpler than it appears, and this detailed guide will walk you through each step with clear, easy-to-follow instructions. One of the standout features of this design is the effortless access it provides; your bottle slides in and out smoothly, ensuring you can quench your thirst instantly. While the standard design includes a comfortable handle, you have the option to craft a longer, adjustable strap. This allows you to customize the length to your preferred carrying style – whether over the shoulder or as a crossbody bag – offering maximum comfort and adaptability. Get ready to embark on a rewarding sewing journey that results in a truly indispensable accessory for your daily life.
Why You’ll Love This Reversible Bottle Holder Bag
This isn’t just another craft project; it’s a solution to a common daily challenge. Here’s why this **sewn water bottle holder** will quickly become your favorite accessory:
- Unmatched Versatility: The reversible design offers two distinct aesthetic options, effectively giving you two bags in one. You can easily switch between patterns or colors to suit your outfit or mood, doubling your style possibilities.
- Hands-Free Convenience: Keep your water bottle secure and easily accessible without needing to hold it. This frees up your hands for other tasks, making it ideal for walks, hikes, shopping, or commuting.
- Smart Storage Solutions: Both sides of the bag feature functional pockets. These are perfect for keeping your phone, keys, wallet, cards, lip balm, or other small essentials organized and within reach. No more digging through a large bag!
- Eco-Friendly Choice: Encourages the use of reusable water bottles, helping to reduce plastic waste and promoting sustainable habits.
- Customizable & Personal: You choose your fabrics! This allows for endless personalization, making a statement that truly reflects your individual taste. Select vibrant prints, elegant solids, or a combination that sparks joy.
- Durable & Practical: Made from fabric, this holder is soft yet sturdy, providing a protective layer for your bottle while being comfortable to carry. It’s also easy to clean, ensuring longevity.
- Rewarding DIY Project: Experience the satisfaction of creating something beautiful and functional with your own hands. It’s an excellent project for both seasoned sewers and enthusiastic beginners looking to expand their skills.
Embrace the practicality and charm of a handmade accessory that keeps you hydrated and organized wherever you go. This **homemade bottle holder** is more than just a bag; it’s a testament to thoughtful design and the joy of crafting.
Essential Materials for Your DIY Reversible Bottle Holder Bag
Gathering your materials is the first exciting step in bringing your **custom water bottle bag** to life. Precision in cutting these fabric pieces is key to a professional-looking finish, so take your time with this stage. The different fabric types and interfacing work together to give your bag structure, durability, and a polished appearance. The fusible fleece, for instance, adds body and padding, ensuring your bottle is snugly protected.
Front Fabric (Choose two coordinating or contrasting fabrics for a truly reversible look):
- 1 piece of 4 1/2″ x 9 1/2″ rectangle fabric (A) – *Forms part of the main body’s exterior*
- 1 piece of 11 1/4″ x 9 1/2″ rectangle fabric (B) – *Forms the larger part of the main body’s exterior*
- 1 piece of 5 1/4″ x 4 1/2″ rectangle fabric (C) – *The bottom base of the exterior*
- 1 piece of 4 1/2″ x 5 7/8″ rectangle fabric (D) – *For the exterior pocket*
Handle and Top Edge Components:
- 1 piece of 4 1/2″ x 1 3/4″ rectangle fabric (E) – *Part of the top edge finish for one side*
- 1 piece of 11 1/4″ x 1 3/4″ rectangle fabric (F) – *Part of the top edge finish for the other side*
- 2 pieces of 4 1/2″ x 5 7/8″ rectangle fabric (G) – *These pieces will back the pockets*
- 18″ long x 2″ wide webbing strap (H) – *For the main carrying handle, providing strength and comfort*
Lining Fabric (Can be the same as front fabric or a complementary design for the reversible effect):
- 1 piece of 4 1/2″ x 8 1/4″ rectangle fabric (I) – *Corresponds to piece A for the lining*
- 1 piece of 11 1/4″ x 8 1/4″ rectangle fabric (J) – *Corresponds to piece B for the lining*
- 1 piece of 5 1/4″ x 4 1/2″ rectangle fabric (K) – *The bottom base of the lining*
- 1 piece of 4 1/2″ x 5 7/8″ rectangle fabric (L) – *For the lining’s pocket*
Fusible Fleece & Interfacing (Crucial for structure and durability):
- 1 piece of 4″ x 9″ rectangle fusible fleece (M) – *For piece A, adding body*
- 1 piece of 10 3/4″ x 9″ rectangle fusible fleece (N) – *For piece B, providing structure to the main body*
- 1 piece of 4 3/4″ x 4″ rectangle fusible fleece (O) – *For the bottom piece C, ensuring a sturdy base*
- 2 pieces of 4″ x 5 3/8″ rectangle Mid-weight woven fusible interfacing (P) – *For pieces D and L, giving crispness to the pockets*
Tools You’ll Need for Your Sewing Project
To ensure a smooth and enjoyable sewing experience, gather these essential tools:
- Sewing Machine: A basic machine is perfectly adequate.
- Fabric Scissors or Rotary Cutter and Mat: For precise and clean cuts.
- Pins or Fabric Clips: To hold fabric pieces together before sewing.
- Iron and Ironing Board: Crucial for pressing seams and applying fusible interfacing for a professional finish.
- Measuring Tape or Ruler: For accurate measurements and marking.
- Fabric Marker or Tailor’s Chalk: For transferring markings onto fabric.
- Thread: Polyester all-purpose thread that matches or complements your fabric.
- Seam Ripper: Essential for correcting any mistakes (every sewer uses one!).
How to Make a Reversible Bottle Holder Bag: Step-by-Step Guide
Follow these detailed instructions carefully to construct your beautiful and functional **sewn bottle sling**. Remember, taking your time with each step will yield the best results.
Step 1: Preparing the Bottom Base Pieces
Begin by taking fabric pieces C (exterior bottom), K (lining bottom), and fusible fleece O. On the fusible fleece piece O, locate and mark the center point on one of the long sides. From this center, measure and mark 2 inches outwards on both sides. Next, from the initial center mark, measure 1 1/4 inches down. At this new mark, rotate your ruler horizontally and mark the ends, creating a wider point. Repeat this process from the bottom center: measure 1 1/4 inches up and mark, then measure 2 inches on both sides from this mark. Connect these marked points with a smooth, curved line, forming a gentle arc, similar to a wide “U” shape. The length of this curved line should measure approximately 10 3/4 inches. Carefully cut along this marked curve.
Now, place fabric piece C and fabric piece K right sides together, with C positioned on top. Align the cut fusible fleece piece O on top of these two fabric layers. Using a warm iron, press firmly to adhere the fusible fleece to the wrong side of fabric C. Trim any excess fabric around the curved edge, leaving a precise 1/4-inch seam allowance. Finally, to add stability and texture, sew piece C (now with fusible fleece) in a crisscross pattern. These carefully shaped pieces will form the distinct bottom base of your reversible bag.
Step 2: Preparing Main Body Panels with Fusible Fleece
Retrieve fabric piece B (large front body panel) and carefully center fusible fleece N onto its wrong side. Press firmly with a warm iron until the fleece is securely bonded. Similarly, take fabric piece A (small front body panel) and center fusible fleece M onto its wrong side, pressing to adhere. Once bonded, flip both fabric pieces over to the right side and stitch a crisscross pattern across each piece. This step not only adds a lovely quilted texture but also provides additional stability and durability to the main body sections of your **fabric water bottle holder**.
Step 3: Crafting the Reversible Pockets
Gather fabric pieces D (exterior pocket), G (pocket backing – two pieces), L (lining pocket), and fusible interfacing P (two pieces). For each pocket, center one piece of fusible interfacing P onto the wrong side of D and L respectively, and press with an iron to bond them. These interfaced pieces will become the front panels of your pockets, giving them crispness. Next, place one interfaced D piece on top of one G rectangle, right sides together, aligning along one long edge (this will be the top edge of the pocket). Sew along this top edge. Open the fabric and fold it over so the right side of the D piece is visible, and the seam is hidden. Topstitch along this folded edge to create a clean, finished pocket opening. Repeat this entire process for the L piece and the second G rectangle, creating two reversible pocket units.
Step 4: Assembling the Top Edge Bands
Take fabric pieces I (small lining body panel) and E (top edge band), then J (large lining body panel) and F (top edge band). Place E on top of I, and F on top of J, ensuring right sides are together. Sew along the designated edge with a precise 1/4-inch seam allowance. After sewing, carefully press the seams open. This step helps to reduce bulk and creates a neater, more professional finish for the top edge of your bag’s main body and lining sections.
Step 5: Combining Main Body and Pocket Units
Now, let’s assemble the main vertical sections of your bag. Take one small pocket piece you created in Step 3 and place it on top of the long piece you prepared in Step 2 (B with N, or A with M, depending on which side you want as your primary exterior). Align the bottom edges perfectly. We will refer to this combined unit as “Unit A” (the exterior main body with its pocket). Perform the same action with the other small pocket piece from Step 3 and the long piece from Step 4 (I with E, or J with F). Let’s call this “Unit B” (the lining main body with its pocket). It’s crucial to ensure that the fabric choices for Unit A are consistent, and similarly for Unit B, to maintain the desired reversible aesthetic. Once assembled, sew along the sides and the bottom edge of the small pocket pieces, attaching them securely to their respective longer body panels. This forms the primary structure of your bag’s walls, complete with integrated pockets.
Step 6: Assembling the Exterior Bag Body
Take “Unit A” (your main exterior body panel with its pocket) and sew its long sides to the short sides of the large piece from Step 2 (this would be the combined B and N piece). This will start to form a cylindrical shape for the exterior of your bag. Next, carefully attach the bottom base piece C (the curved piece prepared in Step 1) to the bottom edge of this newly formed cylinder using a 1/4-inch seam allowance. Take your time to ease the curved edges together for a smooth finish. Once sewn, flip the entire exterior bag body right side out. This will give you the complete outer shell of your **reversible water bottle carrier**.
Step 7: Attaching the Webbing Strap
Now it’s time to add the carrying strap. Take your 18-inch webbing strap (H) and securely sew its ends to both sides of the top edge of the exterior bag body (the piece you just flipped right side out in Step 6). Make sure the strap is not twisted and is evenly spaced for comfortable carrying. Use strong stitches, such as a box stitch or multiple lines of straight stitching, to ensure durability, as this strap will bear the weight of your bottle and contents.
Step 8: Assembling the Lining Bag Body
Similar to Step 6, take “Unit B” (your main lining body panel with its pocket) and sew its long sides to the short sides of the large piece from Step 4 (the combined J and F piece). This will create the cylindrical shape for your lining bag. When sewing, remember to leave a small opening (approximately 2-3 inches) along one of the side seams. This opening is crucial for turning the bag right side out later. Finally, attach the bottom base piece K (the curved piece prepared in Step 1) to the bottom edge of the lining cylinder using a 1/4-inch seam allowance. Ensure the curve is eased in smoothly, just as you did with the exterior bag.
Step 9: Joining the Exterior and Lining
Carefully insert the exterior of the bag (which is currently right side out) inside the lining (which should be wrong side out). Align the top raw edges of both the exterior and lining perfectly, matching side seams if possible. Pin them together all around the top circumference. Sew along this top edge with a 1/4-inch seam allowance, joining the exterior and lining pieces. Once sewn, reach into the opening you left in the lining in Step 8 and gently pull the entire bag right side out through this opening. Once the bag is fully turned, carefully hand-stitch or machine-stitch the opening closed, ensuring a neat and invisible finish. This step brings both layers of your **reversible bottle holder** together.
Step 10: The Finishing Top Stitch
For a crisp, professional finish and added durability, topstitch around the entire top edge of your newly assembled bag. This stitch will secure the lining and exterior layers together, prevent stretching, and give your **fabric water bottle carrier** a polished, ready-to-use look. Take your time to ensure a straight and even stitch line. Congratulations! Your DIY Reversible Bottle Holder Bag is now complete and ready for all your adventures.
Customization Tips for Your DIY Bottle Holder Bag
One of the greatest joys of crafting is the ability to personalize your creations. Here are some ideas to make your **homemade water bottle holder** uniquely yours:
- Fabric Choices: Experiment with different fabric textures and patterns. Think about contrasting colors for the reversible sides, or choose a vibrant print for one side and a subtle solid for the other. Canvas, denim, or even laminated cottons (for a water-resistant lining) could be interesting choices.
- Adjustable Strap: Instead of a fixed webbing strap, consider adding hardware like D-rings and a slider to create an adjustable shoulder or crossbody strap. This offers even greater versatility in carrying options.
- Embellishments: Add embroidery, patches, or heat-transfer vinyl designs to one or both sides of your bag before assembly to truly personalize it.
- Pocket Variations: While the tutorial features simple open pockets, you could add a zipper closure to one of the pockets for extra security for valuables.
- Size Adjustments: If you have a particularly large or small water bottle, you can easily adjust the dimensions of the fabric pieces to custom-fit your preferred bottle. Remember to adjust all corresponding pieces proportionally.
This **DIY bottle holder bag** is not just a practical accessory; it’s a statement of your personal style and a testament to the joy of handmade goods. Enjoy carrying your water bottle in style and convenience!