
Is the continuous sound of running water from your toilet becoming a persistent nuisance? More than just an annoyance, a running toilet can be a significant source of water waste, silently adding dollars to your utility bill and impacting the environment. The good news is that often, this common household problem can be resolved with a few simple checks and adjustments, usually without the need for an expensive professional plumber. Many times, the solution is surprisingly straightforward and can be completed in mere seconds, requiring minimal tools and effort. This comprehensive guide will walk you through an effective, no-cost method to silence that running toilet, empowering you to tackle common home plumbing issues with confidence. Learn how to pinpoint the problem and apply a quick fix that can save you water, money, and peace of mind.
Before you even think about calling for professional help, let’s explore a practical, DIY approach. YouTube’s Seejanedrill offers a brilliant, straightforward tutorial that demonstrates how to address a running toilet without spending a dime. The beauty of this method lies in its simplicity and speed – you can often resolve the issue in under a minute! This approach perfectly exemplifies how understanding the basics of your home’s systems can lead to significant savings and a greater sense of self-reliance. Forget the myth that all plumbing issues require an expert; a proper diagnosis and a simple adjustment might be all that’s needed to restore tranquility to your bathroom.
RELATED: Toilet Tank Trick Plumbers Don’t Want You To Know
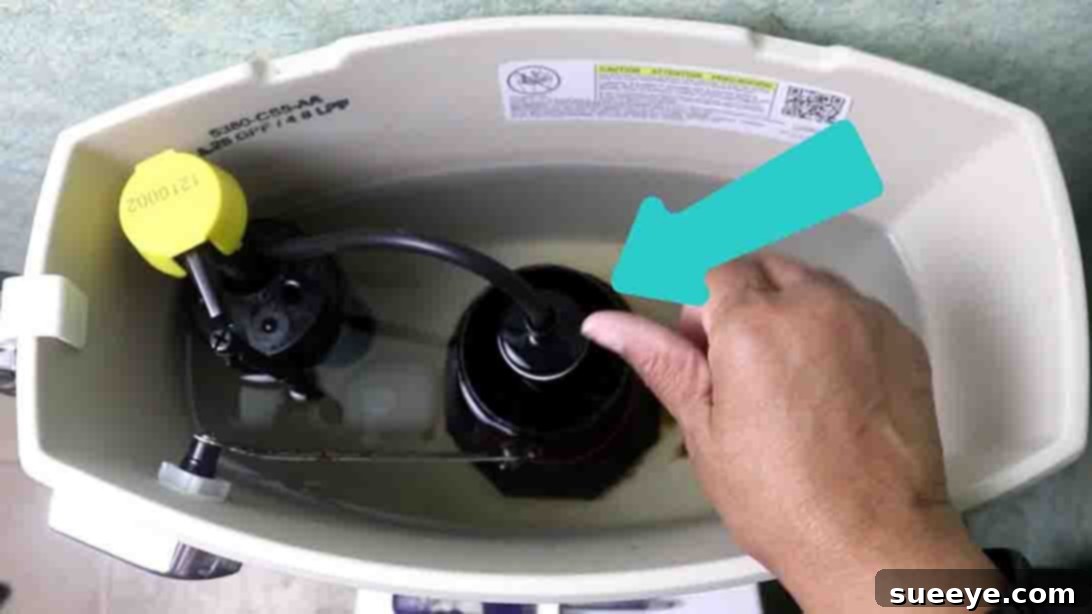
To begin, open up your toilet tank and take a careful look at its internal mechanisms. The initial step in solving any problem is accurate identification. By following Seejanedrill’s clear instructions, you’ll learn precisely where to focus your attention, effectively eliminating guesswork and saving valuable time. For this particular fix, you’ll only need one basic tool: a standard screwdriver. This minimal requirement makes this DIY repair accessible to virtually everyone. Are you ready to stop that incessant running water and reclaim your quiet bathroom? Let’s dive into the step-by-step instructions. Remember, mastering these simple home maintenance skills not only saves you money but also builds valuable knowledge. Consider sharing this invaluable tip with your friends and family – it’s a practical skill everyone can benefit from!
Step-by-Step Guide to Fixing a Running Toilet
Understanding the components inside your toilet tank is key to effective troubleshooting. The most common culprit behind a running toilet is an improperly set water level, which can cause the fill valve to continuously try to fill the tank even when it’s already full, or a faulty flapper that doesn’t seal properly. This guide specifically addresses the former – an issue with the water level regulated by the fill valve. Let’s get started with the repair process.
Step 1: Access the Tank and Adjust the Fill Valve
Carefully remove the lid of your toilet tank and set it aside in a safe place where it won’t be accidentally knocked over or damaged. With the lid off, you’ll see the inner workings of your toilet. Locate the fill valve assembly; this is typically a vertical column on one side of the tank, connected to the water supply line. On or near the top of this fill valve, you will find an adjustment screw or mechanism. This screw controls the height of the float, which in turn dictates the water level in the tank.
The goal is to adjust this screw so that the water level in the tank stops just below the overflow tube (the central standpipe) and at the manufacturer’s indicated waterline. If your toilet is currently running because the water level is too high, it means the fill valve isn’t shutting off properly. Turning the adjustment screw clockwise will generally raise the water level, causing the float to sit higher and the fill valve to shut off later. Conversely, turning it counter-clockwise will lower the water level, causing the float to drop sooner and the fill valve to shut off earlier. Make small, incremental turns (e.g., a quarter turn at a time) to avoid over-adjusting.
Step 2: Flush and Verify the Water Level
After making an adjustment to the fill valve screw, it’s crucial to test the results. Flush the toilet as you normally would. This will empty the tank and allow it to refill, giving you a clear indication of whether your adjustment was successful. As the tank refills, observe the water level closely. Wait for the filling process to complete and watch where the water ultimately settles. The goal is for the water to stop filling precisely at the correct level, which is typically about an inch below the top of the overflow tube. If the toilet stops running immediately after refilling, congratulations – you’ve likely solved the problem!
If the toilet continues to run, or if the water level appears too high or too low, you’ll need to repeat Step 1, making further minor adjustments. If the water level is still too high and causing the toilet to run, turn the screw a bit more counter-clockwise. If the water level is too low, resulting in a weak flush, turn the screw slightly clockwise. This verification step is essential for fine-tuning the adjustment and ensuring optimal toilet performance. Patience and careful observation during this stage will guarantee you achieve the perfect water level.
Step 3: Confirm the Water Level with the Manufacturer’s Mark
To ensure absolute precision and efficiency, always refer to the manufacturer’s recommended water level. Most toilet tanks have a mark on the side of the canister valve assembly or the tank wall itself, often indicated by a raised line, a sticker, or text such as “Water Line” or “WL.” This mark represents the optimal water level for your specific toilet model, designed to ensure an effective flush while preventing unnecessary water waste.
Once the toilet has refilled after your adjustment, visually compare the actual water level in the tank to this designated mark. The water should consistently reach this line and then stop filling completely. If the water level is significantly above this mark, the toilet will likely continue to run, wasting water by siphoning it down the overflow tube. If the level is too far below the mark, your toilet won’t flush efficiently, requiring multiple flushes and ultimately using more water. Achieving the correct water level is not just about stopping the running sound; it’s about maximizing water efficiency and ensuring your toilet operates as intended by its design. This final check confirms that your DIY repair is not only effective but also aligned with best practices for toilet maintenance.
Beyond the Quick Fix: Maintaining Your Toilet and Preventing Future Issues
While adjusting the fill valve is a remarkably effective and quick solution for many running toilet issues, it’s also important to understand other potential causes and how to maintain your toilet for long-term efficiency. Sometimes, the fill valve itself might be faulty and require replacement, or the flapper (the rubber seal at the bottom of the tank) might be worn out, stiff, or improperly seated, causing a slow leak into the bowl. To test for a flapper leak, you can add a few drops of food coloring to the tank water and wait 15-20 minutes without flushing. If the color appears in the toilet bowl, you have a flapper leak that needs attention.
Regular maintenance can prevent many common toilet problems. Periodically inspect the chain connecting the flush lever to the flapper; ensure it has a slight amount of slack, but not too much, as a chain that’s too long can get caught, preventing the flapper from sealing, and a chain that’s too short can keep the flapper partially open. Also, check the float arm or cup, which is part of the fill valve mechanism, to ensure it moves freely and isn’t obstructed. Mineral deposits from hard water can sometimes build up on these components, hindering their proper function. Occasional cleaning of the toilet tank can help prolong the life of its internal parts.
Knowing when to call a professional plumber is also part of smart home maintenance. If, after attempting these simple adjustments and checks, your toilet continues to run, or if you encounter other issues such as leaks from the base of the toilet, persistent clogs, or unusual noises, it might be time to seek expert help. These problems could indicate more complex issues with the toilet’s internal mechanisms, the wax seal, or even your home’s main plumbing lines, which are best addressed by someone with specialized tools and experience.
By taking a proactive approach to understanding and maintaining your toilet, you’re not just fixing an immediate problem; you’re investing in the longevity of your plumbing system, conserving valuable water resources, and saving money on potentially costly repairs. This simple guide to adjusting your toilet’s fill valve is a testament to how easily you can tackle everyday household issues, transforming you into a more empowered and knowledgeable homeowner. Embrace the DIY spirit and enjoy the quiet efficiency of a properly functioning toilet!