
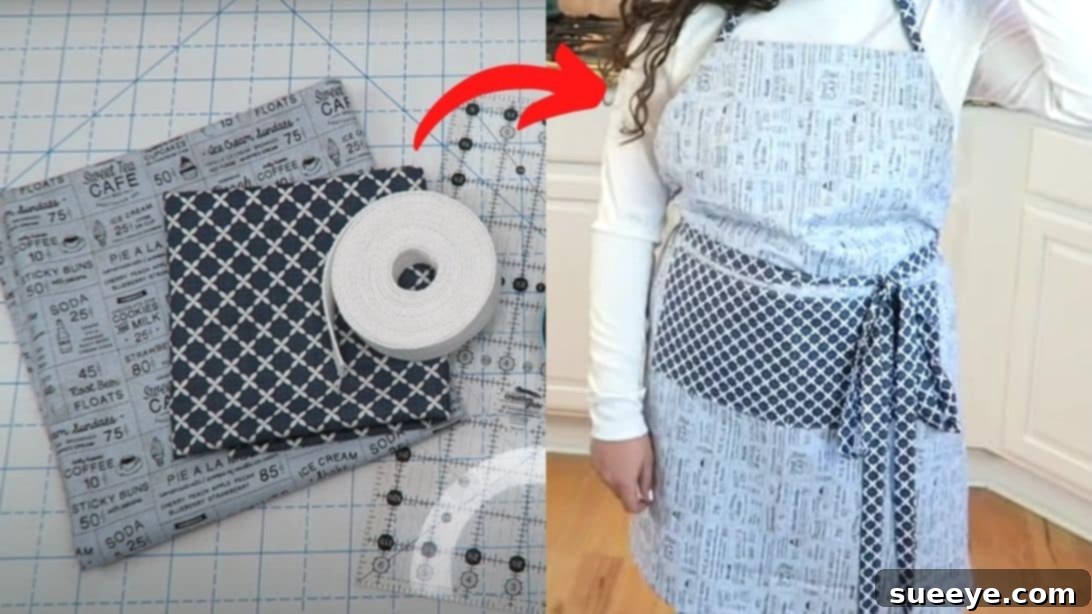
Embark on a delightful crafting journey and discover the immense satisfaction of sewing your very own apron! This comprehensive DIY guide is meticulously designed for beginners, offering a perfect blend of simplicity, affordability, and the joy of creating something beautiful and functional with your own hands. Whether you’re looking to hone your basic sewing skills, repurpose cherished fabric remnants, or simply desire a personalized kitchen or craft accessory, this project is an ideal starting point. Our sturdy yet elegant handmade apron is not only easy to construct but also fully adjustable, making it a versatile addition to any home. Dive into the world of fabric and thread, transform everyday materials into a practical masterpiece, and experience the pride of a successful handmade endeavor. A heartfelt thank you goes to the incredibly talented Erica Arndt from YouTube, whose inspiring creativity and clear instructions have made this wonderful tutorial possible.
Sew Your Own Stylish Apron: An Easy DIY Project for Beginners
Creating your own apron is more than just a sewing project; it’s an opportunity to express your personal style, embrace sustainable practices by upcycling fabrics, and develop valuable crafting skills. Imagine stepping into your kitchen or creative space adorned with an apron you’ve made yourself – it adds a touch of charm and personality that mass-produced items simply can’t match. This tutorial focuses on an approachable design that prioritizes ease of construction without compromising on durability or aesthetic appeal. We’ll guide you through each step, from selecting your fabrics to the final stitches, ensuring a smooth and enjoyable experience for even the most novice sewists. Get ready to transform ordinary fabric into an extraordinary, custom-made apron that you’ll cherish for years to come.
Why Sew Your Own Apron?
- Skill Development: Perfect for mastering fundamental sewing techniques like straight seams, hemming, and creating casings.
- Cost-Effective & Sustainable: Utilize fabric scraps, old curtains, or thrifted textiles to create a unique item, reducing waste and saving money.
- Personalized Style: Choose fabrics, patterns, and colors that truly reflect your taste and home décor.
- Durable & Practical: Handmade aprons often surpass store-bought versions in quality and longevity, providing reliable protection during cooking, gardening, or crafting.
- Thoughtful Gift Idea: A handmade apron makes a truly special and personal gift for friends and family.
Materials You’ll Need:
Before you begin your sewing adventure, gather all the necessary materials to ensure a seamless and efficient crafting process. High-quality tools and appropriate fabrics will make a significant difference in the final outcome of your apron.
- 1-yard Main Fabric: This will form the body of your apron. Cotton, linen, or a durable cotton blend are excellent choices due to their washability, breathability, and ease of sewing. Consider a fabric with a fun pattern or a solid color that complements your style.
- ½ yard Accent Fabric: Used for the pocket and straps, this fabric provides an opportunity to add a contrasting color, a complementary pattern, or a subtle texture. Choose a fabric with a similar weight and fiber content to your main fabric for best results.
- Sewing Machine: A standard sewing machine with basic straight stitch capabilities is all you need for this project. Ensure it’s in good working order and threaded correctly.
- Matching Thread: Select a high-quality polyester all-purpose thread that matches or coordinates with your main fabric. Using a contrasting thread can also be a design choice!
- Fabric Scissors or Rotary Cutter: Sharp fabric scissors are essential for clean, precise cuts. A rotary cutter paired with a cutting mat can offer even greater accuracy and speed, especially for straight lines.
- Ruler: A clear quilting ruler (like a 6×24 inch ruler) or a flexible tape measure will be invaluable for accurate measuring and marking.
- Fabric Marker or Chalk: Use this to transfer measurements and lines onto your fabric, ensuring accuracy before cutting and sewing.
- Fabric Clips and/or Pins: These are crucial for holding fabric layers together securely while sewing, preventing shifting and ensuring neat seams. Clips are great for thicker fabrics or when you want to avoid pin marks.
- Safety Pin: A large safety pin will be your best friend for threading the strap through the apron’s casing.
- Iron and Ironing Board: Pressing your fabric at various stages is key to achieving crisp, professional-looking seams and folds. Don’t skip this step!
Directions: Step-by-Step Apron Construction
Follow these detailed instructions carefully to bring your beautiful, handmade apron to life. Precision in measuring and attention to detail during pressing are crucial for a professional finish.
Step 1: Preparing and Cutting Your Fabric Pieces
Begin by laying out your main fabric on a large, flat surface. Ensure it is smooth and wrinkle-free. Carefully fold your main fabric in half lengthwise, aligning the selvage edges if present, or simply folding it evenly to create a double layer. Using your ruler and fabric marker, measure and cut the folded fabric to create a piece that is 32 inches long and 13 inches wide. This will form the main body of your apron. For the bib section, which is the upper part of the apron, keep the fabric folded. From the folded edge, measure and mark 6½ inches inwards. Then, from that 6½-inch mark along the folded edge, measure down 10½ inches. Connect these two marks with a diagonal line, creating a gentle curve or angle. Carefully cut along this marked line to shape the top corners of your apron bib, giving it a classic, flattering silhouette. Once cut, set this main apron body aside.
Next, take your accent fabric. This fabric will be used for the apron straps and the practical front pocket. Fold the accent fabric in half with the wrong sides together, ensuring any patterns are aligned if applicable. From this folded fabric, precisely cut four strips, each measuring 2½ inches wide. These strips will be joined together to create the long, adjustable apron strap. Set these four strips aside. Finally, unfold the remaining accent fabric and cut one rectangular piece measuring 8 inches by 17 inches. This larger piece will become your functional front pocket. Once all pieces are cut, take a moment to double-check your measurements to prevent any issues later on.
Step 2: Constructing the Straps and Preparing the Pocket
Now, let’s focus on creating the durable and comfortable apron strap. Take the four 2½-inch wide accent fabric strips you cut in Step 1. Place two strips right sides together, aligning one short end. Sew them together using a ¼-inch seam allowance. Repeat this process to join all four strips end-to-end, creating one very long strip of fabric. Press the seams open to reduce bulk and ensure a flat finish. Next, fold this long strap in half lengthwise, with the wrong sides together, and press firmly with your iron. This creates a clear center crease. Unfold the strap, then fold both raw long edges inwards towards the center crease by approximately ¼ inch. Press these folds meticulously. This technique encloses the raw edges, resulting in a clean and sturdy strap. Once both raw edges are neatly folded and pressed towards the center, fold the entire strap in half lengthwise again, enclosing those raw edges completely. Secure the folds with fabric clips or pins along the entire length of the strap to hold everything in place. With a ¼-inch seam allowance, sew along both long edges of the strap, from one end to the other. This double stitching not only secures the strap’s structure but also adds a professional touch and enhances its durability.
For the pocket fabric (the 8×17 inch piece), we need to create neat, finished edges. Lay the pocket fabric flat, wrong side up. Press all four edges inwards by approximately ¼ inch. This initial fold hides the raw edge. For a more substantial hem, you can fold the top edge (one of the 17-inch sides) over another ¼ inch, or even ½ inch, and press again, creating a double-fold hem. Secure these pressed folds with pins or clips. Using a ¼-inch seam allowance, sew along all four pressed edges of the pocket, stitching close to the inner fold. This creates a clean, durable hem around the entire pocket, ready for attachment to the main apron body.
Step 3: Finishing the Apron Body, Adding the Pocket, and Inserting the Strap
Retrieve your main apron fabric. We will now finish its raw edges. Lay the main fabric flat, wrong side up. Starting with the side edges and then the bottom edge, press all these raw edges inwards by approximately ¼ inch. This initial fold encloses the raw edge. You can sew a narrow hem along these three edges at this stage, stitching close to the folded edge, or wait until the casing is complete. The top curved edges of the bib do not require this initial ¼-inch fold as they will be enclosed by the casing.
Now, for the crucial top casing, which will house your apron strap. For the curved top edges of the main apron body, make the first fold of ¼ inch towards the wrong side and press it firmly. Then, fold another full inch over this initial fold and press again. This creates a channel for the strap. Carefully pin this double-fold hem in place along the entire top edge. Using a ¼-inch seam allowance, sew along the lower edge of this casing, stitching close to the inner fold. It is absolutely essential to leave a small opening, approximately 1 to 1½ inches wide, along one of the curved edges of the casing. This opening will allow you to insert and adjust your apron strap. Backstitch at the beginning and end of this opening to secure the stitches.
Next, it’s time to add your front pocket. Decide on the ideal placement for your pocket on the main apron body. Consider what you’ll be using the apron for – often, a position centered and slightly above the lower hem is practical. Once you’re happy with the placement, pin the pocket securely in place along its three sides (the two side edges and the bottom edge). Ensure it’s straight and even. Carefully sew the pocket onto the main apron fabric by stitching close to the hemmed edges, starting from one top corner, sewing down, across the bottom, and up to the other top corner. Reinforce the top corners of the pocket with a small triangle of stitches or backstitching to prevent tearing when in use.
Finally, it’s time to insert the long, finished strap into the casing. Attach a large safety pin to one end of your completed strap. Guide the safety pin, with the strap attached, into the opening you left in the apron’s top casing. Carefully work the safety pin and strap through the entire casing until it emerges from the other side. Once both ends of the strap are out of the casing, adjust the strap to your desired length and try on your apron. You can leave the strap ends open for tying, or you can create small loops and secure the ends with a few stitches to make it a continuous loop. Your beautiful, handmade apron is now complete!
*All these images are credited to Erica Arndt via YouTube. We highly recommend visiting her channel and subscribing for more inspiring and easy-to-follow sewing tutorials like this one.
Your Handmade Apron: A Symbol of Craft and Creativity
Congratulations on completing your very own handmade apron! You’ve not only created a practical and stylish accessory but also honed your sewing skills and contributed to a more sustainable lifestyle by repurposing fabric. This apron is more than just a piece of cloth; it’s a testament to your patience, creativity, and the joy of making something with your own two hands. Whether you wear it while baking, crafting, gardening, or entertaining, it will undoubtedly add a personal touch to your daily activities. Feel free to customize your apron further with embroidery, appliqué, or decorative stitches to truly make it your own. We hope this beginner-friendly tutorial has inspired you to continue exploring the wonderful world of sewing and embark on many more creative projects in the future. Happy sewing!