
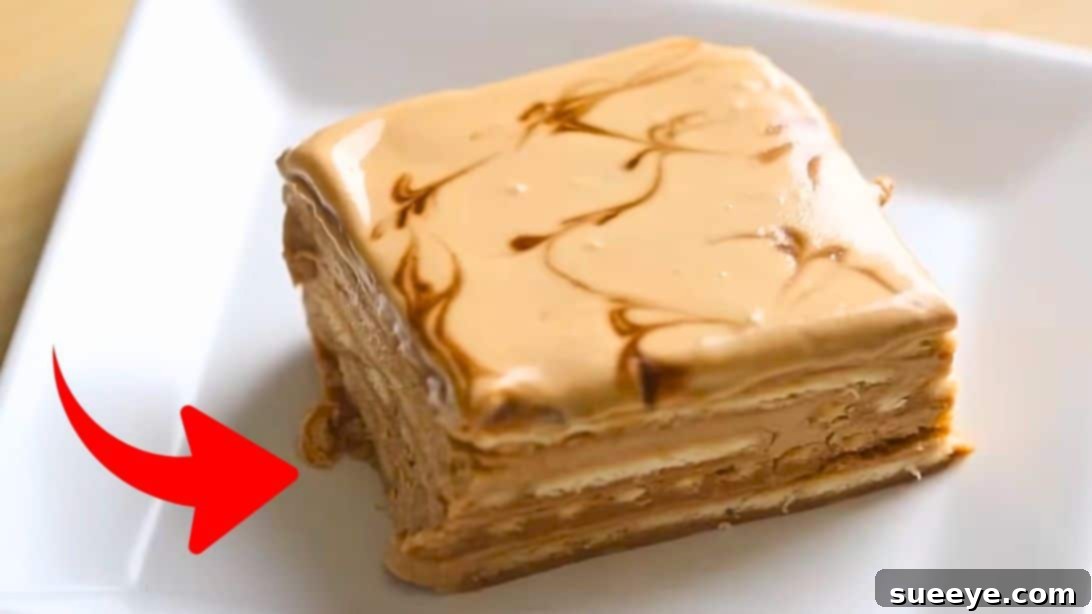
For coffee aficionados and dessert lovers alike, there’s nothing quite as satisfying as a treat that combines the rich, aromatic essence of coffee with a delightfully creamy texture. If you’re searching for an easy-to-make, incredibly delicious dessert that requires no baking whatsoever, then look no further than this sensational No-Bake Coffee Pudding. Inspired by the culinary experts at Cook’ omania, this recipe promises a heavenly experience with every spoonful. It masterfully balances sweetness with a subtle bitterness, creating a sophisticated flavor profile that truly melts in your mouth. Requiring just five simple ingredients, this dessert is not only inexpensive but also remarkably quick to assemble, making it the perfect indulgence for any day of the week, especially when you need a little pick-me-up after a long day.
Imagine coming home and knowing a perfectly chilled slice of this exquisite coffee pudding awaits you. It’s the ideal way to cap off a meal or enjoy a luxurious snack. Whether you’re a seasoned dessert maker or a complete beginner, this recipe is designed for effortless success. The steps are straightforward, and the results are consistently spectacular. Prepare to fall in love with this addictively delicious coffee pudding that’s guaranteed to become a staple in your dessert repertoire. Dive into the simple instructions below and discover how you can bring this delightful creation to life in your own kitchen.
Why You’ll Love This No-Bake Coffee Pudding
This isn’t just another dessert recipe; it’s a game-changer for anyone who adores coffee and appreciates simplicity. Here’s why this No-Bake Coffee Pudding will quickly become your go-to treat:
- Effortless Preparation: The biggest advantage is right in the name – no baking required! This means no oven preheating, no complex temperature controls, and no worrying about burnt edges. It’s perfect for hot summer days when you want a cool dessert without heating up your kitchen.
- Beginner-Friendly: With straightforward steps and common ingredients, this recipe is incredibly forgiving. Even if you’ve never made a dessert from scratch, you can achieve impressive results with this pudding.
- Irresistible Flavor Profile: The harmonious blend of robust coffee, creamy milk, and sweet condensed milk creates a flavor that’s both comforting and sophisticated. Each layer contributes to a multifaceted taste experience that’s hard to resist.
- Rich & Creamy Texture: The combination of all-purpose cream and condensed milk ensures a luscious, velvety texture that contrasts beautifully with the soft, coffee-soaked biscuits.
- Cost-Effective: Using only five basic ingredients, this pudding is an economical choice for a homemade dessert that tastes gourmet. You likely already have most of these items in your pantry.
- Perfect for Any Occasion: Whether you’re hosting a dinner party, planning a family gathering, or simply craving a personal indulgence, this coffee pudding fits the bill. It looks elegant enough for special events yet is easy enough for an everyday treat.
- Customizable: While delicious on its own, this pudding offers plenty of room for creative variations, allowing you to tailor it to your personal preferences.
Essential Ingredients for Your Coffee Pudding
One of the beauties of this no-bake recipe lies in its minimalist ingredient list. You only need five readily available items to create this masterpiece. Let’s take a closer look at each component and its role:
- 3 1/2 tablespoons of instant coffee powder (divided): This is the heart of our coffee pudding, providing that distinct, robust flavor. Using instant coffee makes the preparation quick and ensures easy dissolution. You can choose your favorite brand, from regular to espresso-grade instant coffee, depending on how intense you want the coffee flavor to be.
- 2 tablespoons and 1 1/2 cups of hot water (divided): Hot water is crucial for dissolving the instant coffee completely, creating both a concentrated coffee base for the cream mixture and a milder solution for soaking the biscuits.
- 1 1/2 cups of all-purpose cream: This provides the rich, creamy body of the pudding. All-purpose cream offers a lovely consistency and smooth mouthfeel. If all-purpose cream isn’t available, you can often substitute with heavy cream or whipping cream for a similar decadent result.
- 1/3 cup of condensed milk: Condensed milk serves a dual purpose here: it’s the primary sweetener and also contributes to the pudding’s velvety texture. Its thick, syrupy consistency helps bind the cream mixture together, giving it that luxurious feel.
- Coffee biscuits or digestive biscuits: These form the structural layers of your pudding, soaking up the coffee solution and becoming tender and cake-like. Digestive biscuits are a popular choice due to their subtle flavor and excellent absorbency. However, feel free to experiment with other plain biscuits like graham crackers, ladyfingers, or even plain shortbread for a different twist.
Step-by-Step Instructions: Crafting Your Coffee Pudding
Creating this delightful No-Bake Coffee Pudding is a journey of simple steps that culminate in an extraordinary dessert. Follow these detailed instructions to ensure a perfect outcome:
Step 1: Prepare the Concentrated Coffee Base
Begin by taking a small, clean bowl. Into this bowl, add two tablespoons of instant coffee powder. Pour in two tablespoons of hot water. Using a spoon or a small whisk, stir the mixture vigorously until all the coffee granules have completely dissolved and you have a smooth, concentrated coffee solution. This strong coffee base will infuse the cream mixture with a rich, deep coffee flavor. Set this aside for a moment. It’s also a good idea to reserve a very small amount of this concentrated coffee for garnishing later; a teaspoon should be sufficient for a decorative swirl.
Step 2: Craft the Creamy Coffee Mixture
Now, grab a medium-sized mixing bowl. Pour in 1 1/2 cups of all-purpose cream. Add 1/3 cup of condensed milk, which will provide the perfect level of sweetness and contribute to the pudding’s luxurious texture. Finally, add the concentrated coffee solution you prepared in Step 1 (excluding the small amount reserved for garnish). Using a whisk or an electric mixer on low speed, gently combine all these ingredients. Continue mixing until the components are thoroughly incorporated, and the mixture is smooth and uniform in color and consistency. Avoid overmixing; you just want everything well combined.
Step 3: Create the Biscuit Soaking Solution
In a separate mixing bowl, prepare the liquid for soaking your biscuits. Add the remaining 1 1/2 tablespoons of instant coffee powder. Pour in 1 1/2 cups of hot water. Stir diligently until every single coffee granule has dissolved, leaving you with a clear, fragrant coffee liquid. This solution should be warm, but not scalding hot, to allow the biscuits to absorb the liquid without becoming too soggy or falling apart immediately.
Step 4: Assembling the Layers of Delight
This is where your pudding takes shape! Choose a deep, small rectangular or square container – a loaf pan or a small casserole dish works wonderfully. Quickly dip each coffee biscuit or digestive biscuit into the warm coffee solution prepared in Step 3. Be careful not to over-soak them; a quick dip on both sides is usually enough, just to moisten them slightly. Arrange these soaked biscuits in a single layer at the bottom of your chosen container, ensuring they fit snugly and cover the entire base. Once the first biscuit layer is down, gently spoon about one-fourth of your creamy coffee mixture (from Step 2) over the biscuits. Spread it evenly using a spatula, ensuring every part of the biscuit layer is covered. Repeat this process: add another layer of soaked biscuits, followed by another layer of the coffee-cream mixture. Continue layering until you have built approximately 4 to 5 layers, ending with a final generous layer of the coffee-cream mixture on top.
Step 5: Add a Decorative Swirl
Take the small amount of concentrated coffee you reserved from Step 1. Drip a few small drops of this dark coffee solution onto the top layer of your pudding. Then, gently use a toothpick or the tip of a knife to swirl these drops into elegant patterns, creating a beautiful marbled effect on the surface. This not only adds a touch of visual appeal but also enhances the coffee aroma.
Step 6: The Crucial Chilling Period
Cover your container tightly with plastic wrap or a lid. Carefully place the pudding inside the refrigerator. This is a critical step for the pudding to properly set and for the flavors to meld beautifully. Allow it to chill for at least four to five hours, or ideally, overnight. The longer it chills, the firmer and more cohesive your pudding will become, and the biscuits will fully soften to a delightful cake-like texture.
Step 7: Slice, Serve, and Savor
Once the pudding is perfectly set and chilled, remove it from the refrigerator. If desired, you can dust the top lightly with cocoa powder or finely grated chocolate for an extra touch of elegance. Carefully slice the pudding into individual portions using a sharp knife. Serve immediately and delight in this yummy, no-bake coffee treat! It pairs wonderfully with a fresh cup of coffee or a glass of cold milk.
Expert Tips for a Flawless No-Bake Coffee Pudding
While this recipe is incredibly simple, a few expert tips can elevate your No-Bake Coffee Pudding from great to absolutely exceptional:
- Quality of Ingredients: Although humble, the quality of your instant coffee and cream can make a noticeable difference. Opt for a brand of instant coffee you enjoy drinking, as its flavor will be prominent in the dessert.
- Don’t Over-Soak Biscuits: A quick dip is all you need. Over-soaking will make the biscuits too soft and difficult to handle, potentially resulting in a mushy pudding rather than distinct layers. They will continue to absorb moisture from the cream mixture during chilling.
- Adjust Sweetness: The 1/3 cup of condensed milk provides a balanced sweetness. If you prefer a less sweet dessert, you can slightly reduce the condensed milk. For an extra sweet tooth, you could add a tablespoon more, but taste as you go!
- Adequate Chilling Time is Key: Do not rush the chilling process. The pudding needs ample time to set firm and for the flavors to fully develop and meld. An overnight chill is always recommended for the best texture and taste.
- Even Layers: Strive for even layers of biscuits and cream. This not only makes the pudding more visually appealing but also ensures a consistent texture in every bite.
- Experiment with Garnishes: Beyond the coffee swirl, consider a dusting of cocoa powder, grated dark chocolate, a sprinkle of chocolate shavings, or even a few whole coffee beans for an elegant presentation.
- Storage: Store any leftover pudding in an airtight container in the refrigerator for up to 3-4 days. It actually tastes even better the next day as the flavors deepen!
Delicious Variations to Elevate Your Pudding
One of the joys of cooking is customization, and this No-Bake Coffee Pudding is a fantastic canvas for your creativity. Here are some delightful variations you can explore:
- Chocolate Coffee Swirl: For an irresistible mocha twist, melt a quarter cup of dark chocolate chips and drizzle it over your cream layers before spreading. You can also add a tablespoon of cocoa powder to the cream mixture for a subtle chocolate base.
- Nutty Crunch: Add a layer of finely chopped toasted nuts, such as almonds, walnuts, or pecans, between the cream layers for an added textural dimension and nutty flavor.
- Liqueur Infusion: For an adult-only version, add a tablespoon of coffee liqueur (like Kahlua), rum, or brandy to your biscuit soaking solution. This will impart a sophisticated boozy note to your pudding.
- Spiced Coffee Pudding: A pinch of cinnamon, cardamom, or even a tiny dash of nutmeg added to the coffee or cream mixture can introduce a warm, aromatic complexity.
- Different Biscuits: While digestive biscuits are classic, try using ladyfingers (for a tiramisu-like feel), graham crackers, or even chocolate-flavored wafers for a different base flavor and texture.
- Cream Cheese Layer: For an extra rich and tangy layer, whip together 4 oz of cream cheese with 2 tablespoons of powdered sugar and a splash of vanilla. Spread a thin layer of this mixture in between your coffee cream layers.
- Topping Extravaganza: Before serving, top your chilled pudding with a generous dollop of freshly whipped cream, a drizzle of chocolate syrup, or a sprinkle of mini chocolate chips.
Discover More Culinary Delights with Cook’ omania
This incredible No-Bake Coffee Pudding recipe is just one example of the delicious and accessible creations shared by Cook’ omania. Their YouTube channel is a treasure trove of delightful video recipes that are not only easy to follow but also consistently deliver fantastic results. If you enjoyed crafting this coffee pudding and appreciate simple, yet heavenly, homemade treats, we highly recommend checking out their channel. Subscribe to their channel to stay updated with their latest culinary adventures and discover a world of delicious possibilities. You’re sure to find many more recipes worth trying that will impress your family and friends!
Irresistible No-Bake Coffee Pudding: Your New Favorite Dessert
From its simple ingredients to its straightforward preparation, this No-Bake Coffee Pudding is truly a culinary gem. It embodies the perfect marriage of convenience and indulgence, proving that you don’t need complicated techniques or fancy equipment to create something truly spectacular. Whether you’re a devout coffee enthusiast or simply someone who appreciates a rich, creamy dessert, this recipe is designed to captivate your taste buds and leave you yearning for more. So, gather your ingredients, follow these easy steps, and prepare to embark on a delightful journey into the world of no-bake desserts. Enjoy every delectable, melt-in-your-mouth bite of this irresistible coffee pudding!