
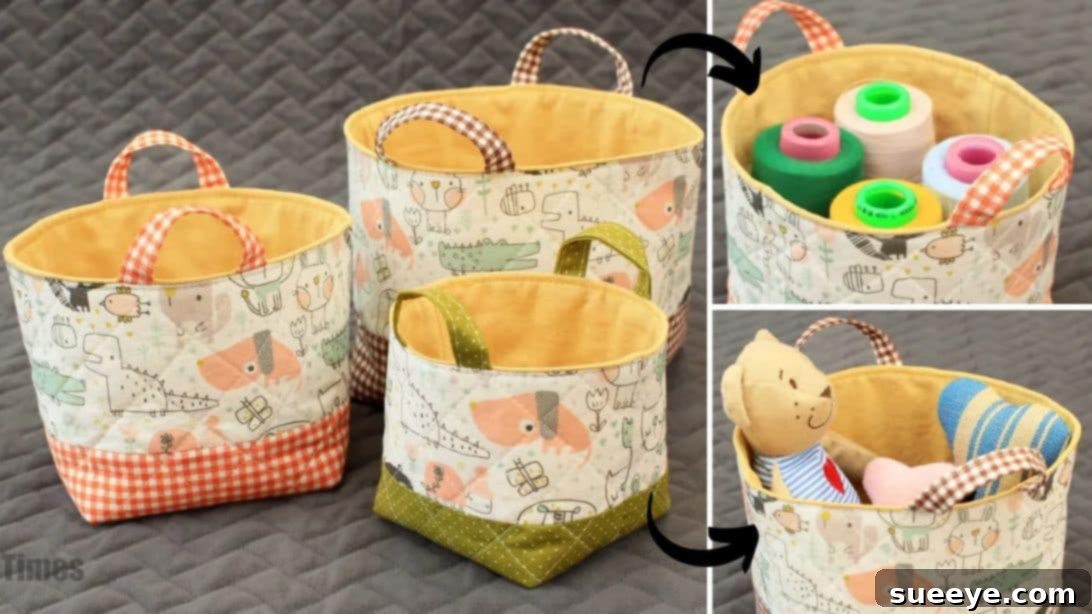
Do you often find yourself searching endlessly for those small, elusive items that seem to vanish into thin air? From loose change and craft supplies to hair ties and keys, every home has its collection of “random small objects” that can quickly lead to clutter and frustration. The solution is simple yet incredibly effective: dedicated storage. This is where the brilliant project idea by sewingtimes, shared on YouTube, truly shines. This mini fabric basket isn’t just super adorable and practical; it’s also a remarkably easy sewing project, making it absolutely perfect for beginners eager to hone their skills while creating something genuinely useful.
Easy Mini Fabric Basket Sewing Tutorial For Beginners: Master Your Craft and Organize Your Space
Embark on a rewarding sewing journey with this comprehensive tutorial for crafting a charming and functional mini fabric basket. Whether you’re new to sewing or looking for a quick, satisfying project, this guide will walk you through every step. Say goodbye to clutter and hello to beautifully organized spaces, all thanks to your own handmade creation. These versatile baskets are ideal for corralling small items in any room, adding a touch of personalized charm wherever they go.
Why Every Home Needs a Mini Fabric Basket
Clutter is a universal challenge, but it doesn’t have to be a permanent fixture in your home. Small fabric baskets offer an elegant and practical solution for managing the myriad tiny objects that accumulate daily. Unlike rigid plastic containers, fabric baskets bring warmth, texture, and a customizable aesthetic to your decor. They are lightweight, easy to store when not in use, and can be made to match any room’s color scheme or theme, transforming everyday organization into an act of personal expression.
Conquering Clutter with Style
Imagine a designated spot for your eyeglasses, remote controls, sewing notions, or even your pet’s small toys. A mini fabric basket provides just that – a charming receptacle that keeps essentials within reach while maintaining a tidy appearance. No more rummaging through drawers or scattering items across tabletops. These baskets are perfect for entryways to hold keys and mail, in bathrooms for toiletries, in craft rooms for supplies, or on nightstands for personal items.
The Joy of Handmade Organization
There’s a unique satisfaction that comes from creating something with your own hands, especially when it serves a practical purpose. This mini fabric basket project not only helps you organize your home but also builds fundamental sewing skills. It introduces concepts like working with different fabrics, applying fusible fleece, creating patchwork, and finishing with a neat lining – all essential techniques that will boost your confidence for more complex projects down the line. Plus, homemade items make thoughtful and personal gifts!
Essential Materials for Your Sewing Project
Gathering all your materials before you begin is key to a smooth and enjoyable sewing experience. For this mini fabric basket, you’ll need a selection of fabrics and basic sewing notions. Choosing your fabrics is one of the most exciting parts, allowing you to personalize your basket fully. Consider coordinating patterns and solids that complement each other and your home decor.
- Outer Fabric: This will be the main visible fabric on the exterior of your basket. Choose a durable cotton or canvas for good structure. A fun print can make your basket pop! You’ll need enough for the main body and bottom of the basket.
- Coordinating Outer Fabric: This smaller piece will be used for a decorative strip or detail on the outer fabric, creating a lovely patchwork effect. Select a color or pattern that harmonizes with your main outer fabric. This adds visual interest and a professional touch.
- Lining Fabric: This fabric forms the interior of your basket, providing a clean finish and added durability. Cotton is a great choice here too. You might opt for a solid color that picks up a hue from your outer fabrics, or a complementary print.
- Fusible Fleece: This is a crucial interlining material that provides structure, stability, and a soft, padded feel to your basket. It has an adhesive on one side that bonds to your fabric when ironed, eliminating the need for basting. Ensure you have enough to stabilize the main outer fabric pieces.
- Ruler: A clear acrylic quilting ruler is highly recommended for accurate cutting and measuring straight lines. Precision in cutting leads to a more professional-looking finished product.
- Marking Pen, Pencil, or Chalk: For transferring pattern markings or drawing guidelines directly onto your fabric. Ensure it’s erasable or disappears with heat/water.
- Scissors or Rotary Cutter and a Cutting Mat: A sharp pair of fabric scissors is essential. For even more precise and efficient cutting, especially of straight lines, a rotary cutter paired with a self-healing cutting mat is invaluable.
- Needle and Thread: All-purpose polyester thread in a color that matches or coordinates with your fabrics is perfect. You’ll use this for your sewing machine and potentially for hand-stitching the opening closed.
- Fabric Clips: These are wonderful for holding fabric layers together, especially thick ones, without distorting them like pins sometimes can. They’re particularly useful when attaching the handle.
- Iron, for pressing: An iron is non-negotiable for achieving crisp seams and a professional finish. Pressing as you go makes a huge difference in the final appearance of your basket.
- Sewing Machine: A basic sewing machine capable of a straight stitch is all you need for this project. Ensure it’s in good working order and threaded correctly.
Getting Started: Preparing Your Workspace and Fabrics
Before you dive into stitching, it’s beneficial to set up your workspace and prepare your fabrics. A clean, well-lit area will make your sewing experience much more enjoyable and efficient. Lay out your cutting mat, ruler, and marking tools. Ensure your sewing machine is threaded and ready, and your iron is accessible for pressing.
Choosing the Perfect Fabric Combinations
The beauty of this project lies in its customizability. Think about where your basket will live and what colors or patterns would best suit that space. You might choose a vibrant floral outer fabric with a subtle geometric coordinating fabric, and a solid lining that picks up one of the floral colors. Or perhaps a more minimalist approach with solid linen fabrics for a modern look. Don’t be afraid to experiment with different textures within the cotton family!
Understanding Fusible Fleece for Structure
Fusible fleece is what gives your fabric basket its shape and stability. It’s often overlooked by beginners but is a game-changer for projects like this. When ironing the fleece onto your fabric, ensure you follow the manufacturer’s instructions for temperature and pressing time. This creates a strong bond that prevents the fabric from collapsing, giving your basket a sturdy, professional finish.
Step-by-Step Directions to Create Your Mini Basket
Follow these detailed steps to construct your beautiful and functional mini fabric basket. Take your time with each stage, paying attention to seam allowances and pressing. Precision now will lead to a more satisfying result later.
Step 1: Constructing the Basket Body and Patchwork Detail
The first step focuses on creating the main exterior of your basket, incorporating a stylish patchwork element and stabilizing it with fusible fleece.
- Cut Your Fabrics with Precision: Begin by cutting all your fabric pieces and the fusible fleece according to the dimensions specified in the video tutorial by sewingtimes. Accuracy at this stage is crucial for a well-proportioned basket. You’ll have larger main outer fabric rectangles, smaller coordinating fabric rectangles, lining pieces, and fusible fleece pieces.
- Assemble the Patchwork: Take your smaller coordinating fabric rectangles and align one on top of each short side of your main outer fabric piece, right sides together. Ensure the raw edges match perfectly. Stitch these pieces together using a 3/8-inch seam allowance. This creates a decorative border on the exterior of your basket.
- Press the Seams Open: Carefully open the stitched fabric and flip it over to the wrong side. Using a hot iron, press the seams open. This flattens the seam allowance, reduces bulk, and creates a neat, professional finish that will look great from the inside and outside of your basket.
- Apply the Fusible Fleece: With the wrong side of your patchwork piece facing up, carefully center and place the fusible fleece on top. The adhesive side of the fleece should be against the fabric. Following the fleece manufacturer’s instructions, use your iron to press and bond the fleece to the fabric. Apply even pressure and heat.
- Trim and Topstitch the Patchwork: Once the fleece is fused, you’ll likely have some excess fleece or fabric peeking out from the seam allowances in the middle. Trim this excess down to a clean 3/8-inch seam allowance. Then, flip the fabric to the right side and topstitch along the edges of your patchwork design. The video demonstrates a crisscross pattern for a charming decorative touch, but a simple straight stitch close to the seam line also works beautifully. This topstitching not only secures the patchwork but also adds strength and a refined finish to your basket’s exterior.
Step 2: Adding the Handle, Lining, and Finishing Touches
This step brings all the components together, adding the handle, creating the lining, and shaping your basket into its final form.
- Prepare and Attach the Handle: Take your pre-cut fabric piece for the handle. Fold it lengthwise, press, and then fold the raw edges towards the center crease, pressing again. Stitch along both long edges to create a neat, finished strap. Position this handle on each long side of your patchwork outer fabric, ensuring it’s centered and placed symmetrically. Use fabric clips to hold the handle securely in place on the right side of the fabric, pointing inwards towards the center of the basket. Stitch the handle ends to the patchwork with a small seam allowance to secure them temporarily.
- Construct the Outer Basket: Fold your outer fabric (with the handle attached) in half, right sides together, aligning the raw edges. Stitch along the two longer sides, forming a tube. Leave the top and bottom open for now. Repeat this process for your lining fabric, but ensure you leave a small opening (about 2-3 inches) along one of the longer sides of the lining. This opening will be crucial for turning the bag right side out later.
- Box the Corners for Dimension: This technique gives your basket a flat bottom and shape. For both the outer fabric and the lining fabric, open up the bottom seam so that the side seam meets the bottom fold, forming a triangle. Measure and mark a line perpendicular to the seam, typically 1.5 to 2 inches from the point of the triangle (adjust based on desired basket depth). Stitch along this marked line, then trim off the excess triangle with a 3/8-inch seam allowance. Repeat for all four corners (two on the outer basket, two on the lining).
- Join Outer Basket and Lining: Turn the outer basket right side out. Keep the lining wrong side out. Insert the outer basket into the lining, so their right sides are facing each other. Align the top raw edges perfectly, matching side seams if possible. Pin or clip all around the top edge. Stitch around the entire top opening with a 3/8-inch seam allowance.
- Turn and Finish: Carefully pull the entire basket right side out through the small opening you left in the lining. Gently push out the corners of the basket to achieve a crisp shape.
- Close the Lining Opening: Once the basket is fully turned, hand-stitch the opening in the lining closed using a ladder stitch for an invisible finish, or machine stitch very close to the edge.
- Tuck and Topstitch: Neatly tuck the lining into the outer basket. Ensure the top edge is smooth and even. Press the top edge lightly with your iron. Finally, topstitch all along the top edges of the basket, about 1/8 to 1/4 inch from the folded edge. This secures the lining, gives a clean finish, and adds a professional touch to your handmade mini fabric basket.
Tips for Beginner Sewers
Embarking on a sewing project can be incredibly rewarding, especially when you arm yourself with a few fundamental tips. This mini fabric basket tutorial is designed for beginners, and with these pointers, you’ll find the process even smoother and more enjoyable.
Mastering Seam Allowances
A consistent seam allowance is the secret to a professional-looking project. For this basket, a 3/8-inch seam allowance is specified. Use the guides on your sewing machine’s needle plate to maintain this width. If your machine doesn’t have clear markings, you can place a piece of painter’s tape or a ruler as a visual guide. Practicing on scrap fabric before you start will help you get a feel for it.
The Power of Pressing
Pressing isn’t just ironing; it’s a critical step that shapes your fabric and helps your seams lie flat and crisp. “Press as you go” means taking your project to the ironing board after each significant seam or construction step. Don’t skip this! It makes a huge difference in the final appearance and how easily subsequent steps come together.
Troubleshooting Common Issues
Don’t get discouraged by small hiccups. If your stitches are uneven, check your machine’s tension and needle. If fabric bunches, ensure you’re not pulling or pushing it through the machine too hard; let the feed dogs do the work. If your corners aren’t sharp, try trimming the seam allowance very close to the stitching line at the point of the corner before turning, being careful not to snip the stitches.
Personalizing Your Mini Fabric Basket
Once you’ve mastered the basic construction, the possibilities for customization are endless. Your handmade basket can be a true reflection of your style and creativity.
Beyond Basic Fabrics: Exploring Patterns and Textures
While cotton is excellent for beginners, consider experimenting with other fabrics once you’re comfortable. Quilting cottons come in an astounding array of patterns. You could also try linen for a more rustic look, or even add a touch of faux leather or cork fabric for accents (though these may require a specialized needle and machine settings). Don’t be afraid to mix bold prints with subtle solids, or even create a truly unique patchwork design with multiple small fabric scraps.
Adding Embellishments and Unique Touches
Elevate your basket with simple embellishments. Consider adding a small fabric label with your name or a sweet message. You could machine embroider a simple design onto one of the outer panels before assembly, or hand-embroider a motif after the basket is complete. Attaching small buttons, charms, or even a decorative tassel to the handle can add an extra personalized flair. The beauty of DIY is making it truly yours!
Conclusion: Your New Favorite Storage Solution
Congratulations! You’ve successfully sewn a beautiful and functional mini fabric basket. This project not only equips you with a practical organizational tool but also enhances your sewing skills, making it an ideal choice for beginners. Now, those “random small objects” that once caused chaos have a stylish new home, handcrafted by you. Whether you use it in your craft room, bedroom, office, or gift it to a friend, your mini fabric basket is a testament to the joy and utility of handmade creations. Enjoy your tidy space, and happy sewing!
*All image credit belongs to sewingtimes via YouTube and her official website. Follow and subscribe to her channel for more inspiring and easy-to-follow sewing tutorials!