
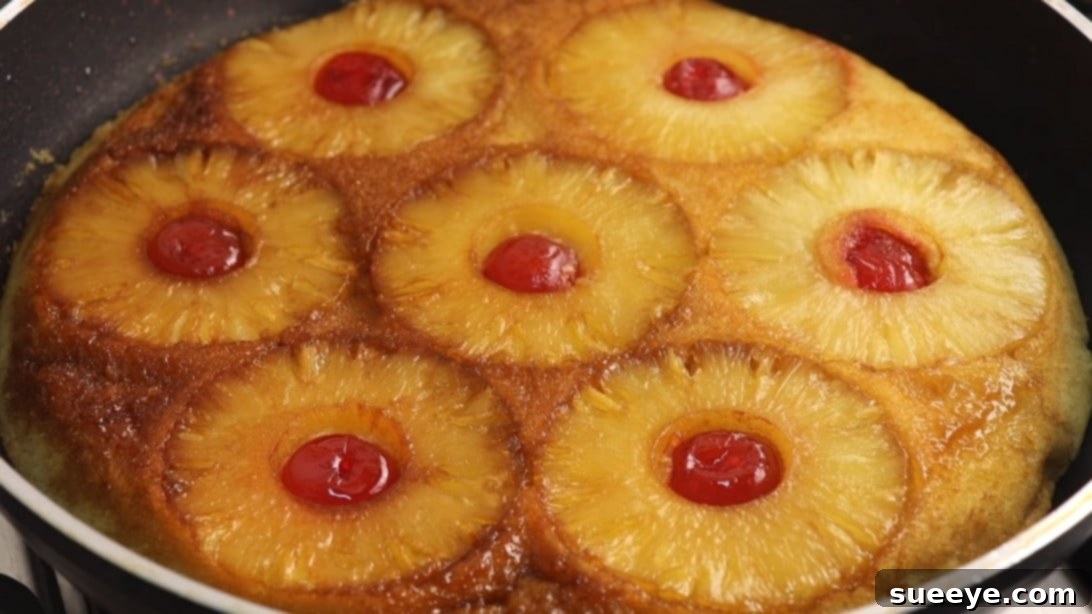
Are you craving a delightful, fruity dessert but lack an oven or simply don’t have the time for traditional baking? Imagine whipping up a gourmet-tasting cake in a fraction of the time, right on your stovetop! This incredible **No-Bake Pineapple and Cherry Cake recipe** is your ultimate solution for quick, delicious gratification. Forget long preheating times and intricate baking processes; with just a few common pantry ingredients and a simple pan, you can create a moist, flavorful cake crowned with sweet caramelized pineapple and vibrant cherries. This innovative recipe, inspired by the clever techniques shared by Quick Simple & Delicious on YouTube, is perfect for busy weeknights, spontaneous cravings, or impressing guests with minimal effort. Get ready to transform everyday ingredients into an extraordinary treat that will have everyone asking for more!
Why This No-Bake Pineapple & Cherry Cake Will Be Your New Favorite Dessert
This recipe isn’t just about making a cake; it’s about making dessert accessible, fast, and incredibly satisfying. Here’s why this **easy no-bake cake** marvel stands out as a must-try for any home cook:
- No Oven Required: Perfect for small apartments, dorm rooms, hot summer days, or when your oven is simply occupied. All you need is a stovetop and a good non-stick pan!
- Lightning Fast Preparation: From gathering ingredients to serving, this delicious cake can be ready in approximately 15-20 minutes, including cooking time. It’s the ideal **5-minute cake recipe** for those urgent dessert cravings.
- Simple, Accessible Ingredients: Most items like all-purpose flour, sugar, eggs, milk, oil, and canned pineapple are probably already in your kitchen pantry, making it a truly convenient option.
- Irresistible Flavor Profile: Enjoy the perfect balance of sweet, tangy pineapple, bright, juicy cherries, and a tender cake base, all enhanced by a rich, golden caramel topping. It’s a taste of tropical paradise in every bite.
- Impressive Presentation: The beautifully arranged caramelized fruit top makes for a stunning, elegant appearance, belying its incredibly easy preparation. It looks like it came from a professional bakery!
- Family-Friendly Treat: A delightful dessert loved by all ages, and safe to make with older children under supervision, making it a fun kitchen activity.
- Versatile & Customizable: Easily adapt this recipe with other fruits or spices to suit your preferences and seasonal availability.
Essential Ingredients for Your Stovetop Pineapple & Cherry Cake
Gathering your ingredients is the first exciting step towards creating this delightful dessert. The beauty of this **quick cake recipe** lies in its simplicity, utilizing staple items you likely already have on hand. For the best results and a smooth batter, ensure all ingredients are at room temperature, especially the egg and milk.
- 7 Pineapple Slices: Canned pineapple rings (in light syrup or juice, well-drained) work perfectly for convenience and consistent sweetness. Fresh pineapple can also be used, cut into uniform slices, but make sure they are not too thick. The natural sweetness and subtle tartness of pineapple are key to the cake’s vibrant flavor.
- 1 ½ Tablespoons of Butter: Unsalted butter is preferred to control the saltiness in the recipe, and it’s essential for creating that irresistible caramelized base. It adds richness and helps the sugar brown beautifully, forming a delicious, sticky layer.
- 1 Tablespoon of Sugar (for caramel): Granulated white sugar is ideal for caramelizing. This small amount transforms into a gorgeous, golden-amber, sticky layer that perfectly coats the fruit, adding depth of flavor and a beautiful sheen.
- ¼ Cup of Sugar (for batter): Another portion of granulated sugar, providing the essential sweetness and structure to the cake batter itself.
- 1 Large Egg: A single large egg acts as a crucial binding agent, contributing significantly to the cake’s structure, moisture, and tender crumb. Ensure it’s at room temperature for better emulsification with other liquids.
- A Pinch of Salt: Don’t skip this humble ingredient! Salt balances the sweetness and enhances all the other flavors in the cake, making them pop and preventing the cake from tasting bland.
- 1 Teaspoon of Liquid Vanilla Extract: Pure vanilla extract adds a warm, aromatic depth and a comforting fragrance to the cake, complementing the fruity notes of pineapple and cherry beautifully.
- ¼ Cup of Vegetable Oil: A neutral-flavored oil like canola, sunflower, or corn oil provides essential moisture and tenderness to the cake, keeping it soft and delicate without adding any heavy or overpowering flavor.
- ½ Cup of Milk: Any type of milk (dairy or non-dairy like almond or soy milk) will work perfectly. It contributes to the liquid content, helping to create a smooth, pourable batter and a wonderfully moist crumb.
- 1 ¼ Cup of All-Purpose Flour: The fundamental building block of our cake. Sifting the flour is highly recommended to prevent lumps and ensure a light, airy, and evenly textured cake.
- ½ Tablespoon of Baking Powder: This leavening agent is absolutely crucial for giving the cake its rise and tender, fluffy structure, especially vital since we are not using an oven.
- Candied Cherries (optional): These vibrant red cherries add a lovely pop of color and an extra touch of sweetness, making the cake even more visually appealing and delicious. Maraschino cherries, drained and patted dry, are a common and effective choice.
Step-by-Step Instructions: Crafting Your Perfect No-Bake Pan Cake
Follow these detailed steps carefully, and you’ll be enjoying your homemade, stovetop-baked masterpiece in no time. Precision and careful attention to heat are key for a perfectly cooked cake without the use of an oven.
Step 1: Preparing the Irresistible Caramelized Fruit Base
This initial step lays the delicious foundation for both the flavor and stunning presentation of your cake. The caramelized sugar creates a beautiful, glossy, and sticky topping for your cake once it’s flipped out of the pan.
Begin by placing a medium-sized non-stick pan (one with a lid that fits snugly is essential) over medium-low heat on your stovetop. Add the 1 ½ tablespoons of butter to the pan, allowing it to gently melt and spread evenly across the bottom surface. Once the butter is fully melted and shimmering, sprinkle 1 tablespoon of granulated sugar evenly over the melted butter. Continue stirring this mixture constantly over medium-low heat. Watch carefully as the sugar crystals dissolve and begin to transform, slowly turning into a beautiful, rich golden-amber caramel. This process usually takes a few minutes, so be patient and keep stirring to ensure the sugar melts evenly and prevents it from burning, which can make it bitter.
As soon as the caramel reaches that inviting golden hue, it’s time to add your pineapple slices. Carefully arrange the 7 pineapple slices in a single layer over the caramel, ensuring they are evenly spaced to cover the bottom of the pan as much as possible. Cook these slices gently for approximately 2 minutes. This brief cooking time allows the pineapple to soften slightly and absorb some of that wonderful caramelized goodness, infusing it with deep flavor. After 2 minutes, remove the pan from the heat and allow the pineapple-caramel base to cool slightly for a few moments. While it’s still warm but not scorching, gently place a candied cherry (or two, depending on your preference) in the center of each pineapple ring. This not only adds a lovely burst of vibrant color but also another layer of delightful sweetness that complements the pineapple.
Step 2: Crafting the Smooth and Fluffy Cake Batter
While your delightful fruit base is cooling, you can swiftly prepare the simple yet effective cake batter. The key here is to mix just enough to combine all the ingredients without overmixing, which can lead to a tough or dense cake.
In a spacious mixing bowl, crack the single large egg. Add the ¼ cup of sugar, a tiny pinch of salt, and the 1 teaspoon of liquid vanilla extract. Using a whisk, vigorously combine these ingredients until the mixture becomes light, frothy, and the sugar has largely dissolved. This aeration contributes significantly to a lighter and more tender cake texture.
Next, pour in the ¼ cup of vegetable oil and continue to whisk until it is thoroughly and smoothly incorporated into the egg mixture. The oil is vital as it adds essential moisture and richness, ensuring a wonderfully soft cake. Then, add the ½ cup of milk, stirring gently until it is fully blended into the wet ingredients. For the dry ingredients, place a fine-mesh sieve directly over your bowl and add the 1 ¼ cup of all-purpose flour and ½ tablespoon of baking powder. Sift these dry ingredients directly into the wet mixture. This step is absolutely crucial for preventing lumps in your batter and incorporating additional air, resulting in a significantly lighter and softer cake crumb.
Once all ingredients are in the bowl, whisk again, but this time, mix *just until* the flour is fully incorporated and you achieve a thick, smooth batter consistency. It’s important to avoid overmixing, as this can overdevelop the gluten in the flour, leading to a dense, chewy, or rubbery cake. A few small lumps are perfectly acceptable; it’s always better to under-mix slightly than to over-mix when it comes to cake batters.
Step 3: Stovetop Cooking for Perfect Doneness and Golden Perfection
Now comes the moment of magic: stovetop baking! This step requires careful attention to low heat to ensure an even cook without burning the bottom of your cake, giving it that perfect golden finish.
Gently and evenly pour the prepared cake batter over the pineapple and cherries in the pan. Use a spatula or the back of a spoon to carefully and evenly spread the batter, making sure it completely covers all the fruit slices. This creates a uniform layer that will cook consistently. Once the batter is smoothly spread, immediately cover the pan with its lid. The lid is absolutely essential as it traps the heat and steam within the pan, creating a convection-like, oven-like environment that cooks the cake thoroughly from all sides, allowing it to rise beautifully.
Cook the cake on very low heat for 10 to 15 minutes. The exact timing can vary slightly depending on your specific stove and the thickness of your pan, so vigilance is important. During this critical cooking period, resist the urge to lift the lid frequently, as this releases the trapped heat and steam, which can significantly prolong cooking time or result in an unevenly cooked cake.
Checking for Doneness: The Reliable Toothpick Test
After about 10 minutes of cooking on low heat, you can carefully lift the lid for a quick check. To determine if the **stovetop cake** is cooked through, gently insert a clean wooden toothpick or a thin skewer into the very center of the cake. If the toothpick comes out completely clean, with no wet batter clinging to it, your cake is perfectly ready! If there are crumbs or wet batter sticking to the toothpick, cover the pan again and continue cooking for another 2-3 minutes before checking again. Repeat this process until the toothpick comes out clean.
Flipping and Finishing Your Delicious Cake
Once the cake passes the toothpick test and is beautifully cooked, it’s time for the final, show-stopping touch. Lightly oil or butter a serving dish or a large, flat plate that is wider than your pan. This will prevent the cake from sticking when you flip it. Carefully place the oiled dish upside down directly over the pan. With oven mitts or thick kitchen towels to protect your hands, firmly hold both the pan and the dish together and swiftly invert them, turning the cake out onto the plate. The beautiful caramelized pineapple and cherries should now be facing upwards, forming a stunning top layer.
Now, gently return the empty pan to low heat. Carefully slide the cake back into the pan, this time with the cooked side down. Allow the cake to cook the top side (which was previously face up) for another 5 minutes. This crucial step ensures an evenly cooked cake with a slightly crisp, golden bottom layer and helps set the structure perfectly. After these final 5 minutes, your exquisite **No-Bake Pineapple and Cherry Cake** is perfectly cooked and ready to be served. Let it cool for a few minutes to allow the caramel to set slightly before slicing and enjoying this truly delightful homemade dessert!
Serving Suggestions and Delicious Variations for Your Easy Cake
This **No-Bake Pineapple and Cherry Cake** is absolutely delicious on its own, especially when served warm, allowing the rich caramel to remain slightly gooey and fragrant. However, you can elevate your dessert experience with a few simple additions:
- A Scoop of Vanilla Ice Cream: The classic pairing! The cold, creamy ice cream perfectly complements the warm, fruity cake, creating a delightful contrast in temperature and texture.
- A Dollop of Fresh Whipped Cream: Light and airy, freshly whipped cream adds a touch of elegance and balances the sweetness of the caramel and fruit.
- A Drizzle of Extra Caramel Sauce: For true caramel lovers, a little extra never hurts! You can use store-bought or a quick homemade caramel drizzle.
- Toasted Coconut Flakes: A wonderful tropical twist that enhances the pineapple flavor and adds a pleasant nutty crunch.
- A Sprinkle of Chopped Nuts: Toasted pecans or walnuts can add a delightful texture and earthy flavor.
Feeling adventurous? Here are some delicious variations to try, making this **easy dessert recipe** even more versatile:
- Peach or Apple Cake: Replace the pineapple with canned peach slices (well-drained) or thinly sliced apples (you might want to sauté apples briefly with a little butter and sugar before adding them to the pan).
- Berry Blast Cake: Incorporate blueberries, raspberries, or mixed berries with a touch of fresh lemon zest for a different, vibrant fruity profile.
- Spiced Comfort Cake: Add a pinch of cinnamon or nutmeg to the cake batter for a warm, comforting flavor, especially good when paired with apple or pear variations.
- Lemon Zest Infusion: Add a teaspoon of lemon zest to the batter for a bright, refreshing zing that cuts through the sweetness.
Conclusion: Your Go-To Recipe for Effortless, Delicious Dessert
Gone are the days when baking a cake meant a lengthy process confined to an oven. This **No-Bake Pineapple and Cherry Cake recipe** redefines convenience and deliciousness, offering a quick, simple, and utterly satisfying dessert experience right on your stovetop. Whether you’re a seasoned cook looking for a speedy treat or a kitchen novice eager to try something new, this recipe empowers you to create a beautiful, flavorful cake with minimal fuss and maximum enjoyment.
It’s the perfect solution for sudden sweet cravings, a delightful surprise for your family, or a charming treat for unexpected guests. So, grab your pan, gather your ingredients, and prepare to be amazed by how easily you can bring this irresistible **pineapple cherry cake** to life. Enjoy every sweet, fruity bite of your homemade, no-bake masterpiece!