
Enchanting Autumn: Transform Your Home with DIY Fall Leaf Decorations
As the vibrant colors of summer begin to fade, a new palette of rich reds, oranges, and golds emerges, signaling the arrival of autumn. This magical season invites us to embrace warmth, coziness, and the beauty of nature. What better way to celebrate fall than by bringing its splendor indoors? Harnessing the bounty of fallen leaves and other natural elements allows us to create stunning, personalized decorations that infuse our homes with an inviting autumnal glow. From charming centerpieces to rustic accents, these DIY projects are not only budget-friendly but also offer a wonderful opportunity to express your creativity and make your living space truly feel like a seasonal sanctuary.
Bringing Nature Indoors: The Beauty of Fallen Leaves
Fallen leaves are perhaps the most iconic symbol of autumn, and their natural beauty makes them an excellent, free resource for home decor. Instead of raking them away, consider collecting a selection of the most colorful and perfectly preserved leaves to incorporate into your decorating schemes. They offer incredible versatility, from simple arrangements to more elaborate crafts. Using natural elements not only connects your home to the outdoors but also provides a unique, organic texture and warmth that manufactured decorations often lack. Let’s explore how to put these natural treasures to good use, starting with an incredibly popular and adorable project.
Crafting Charming Mason Jar Lid Pumpkins: A Step-by-Step Guide
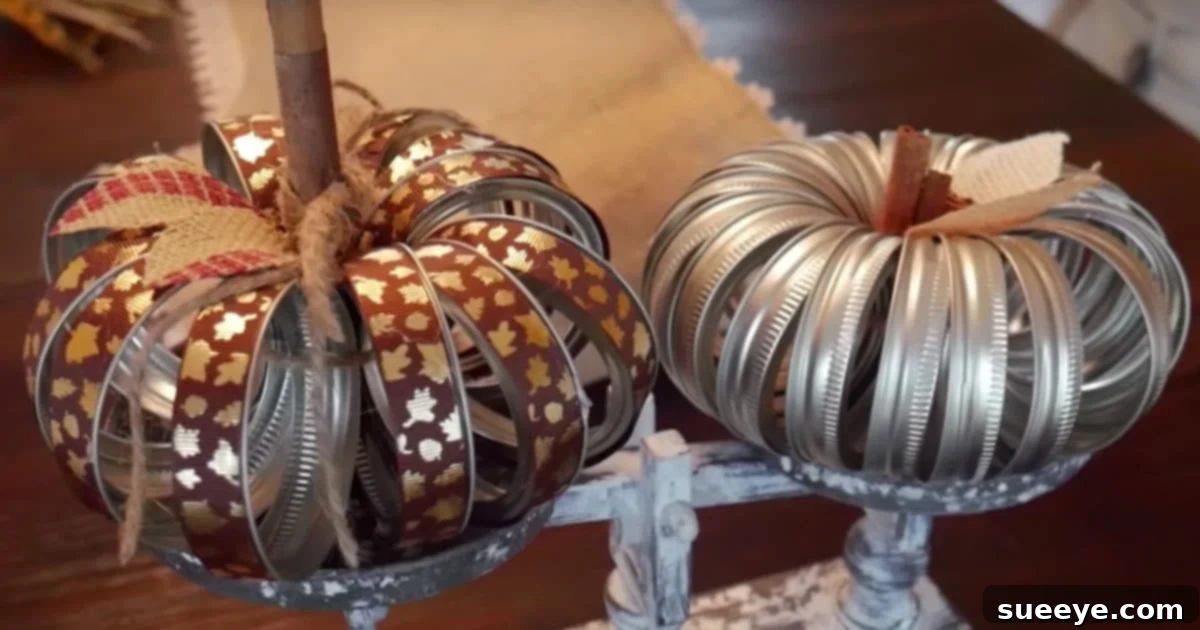
One of the most brilliant and endearing DIY fall projects that has captured the hearts of crafters everywhere is the creation of Mason jar lid pumpkins. These miniature, rustic pumpkins are surprisingly simple to make, highly customizable, and add an undeniable touch of autumnal charm to any space. I’ve admired these delightful creations for years, and finally decided it was time to craft some for my own home. They make fantastic centerpieces, mantel decorations, or thoughtful gifts. The beauty of this project lies in its simplicity and the endless possibilities for personalization. Let’s dive into how you can make your very own collection of these adorable fall accents.
What You’ll Need: Gathering Your Supplies
Before you begin, ensure you have all the necessary materials ready. Most of these items can be found around your home or at a local craft store, making this an accessible project for everyone.
- Mason Jar Lids: You’ll need the flat inner lids, typically 10-12 per pumpkin, depending on how full you want it to look.
- Craft Paint: Orange is classic, but consider other fall colors like burnt red, deep yellow, or even metallic gold.
- Paint Brushes: Small to medium sized for easy application.
- Hot Glue Gun and Glue Sticks: Essential for quickly and securely assembling the lids.
- Cinnamon Sticks: These will serve as the “stem” of your pumpkin and add a wonderful autumnal scent.
- Ribbons: Burlap ribbon, twine, raffia, or patterned fall-themed ribbons. Rick rack ribbon also adds a delightful touch.
- Optional Embellishments: Silk fall leaves, small twigs, jute twine, orange glitter paint for extra sparkle.
- Scissors: For cutting ribbons and other materials.
Step-by-Step Tutorial: Creating Your Own Autumnal Masterpiece
Follow these simple steps to transform ordinary Mason jar lids into captivating fall pumpkins:
Step 1: Prepare Your Lids
Begin by cleaning your Mason jar lids thoroughly to ensure good paint adhesion. Once dry, it’s time to add some color. Lay your lids flat on a protected surface. Using your craft paint, apply an even coat of orange (or your chosen color) to one side of each lid. For an extra touch of sparkle, once the base coat is dry, you can apply orange glitter paint over some of the lids, or even just around the edges. Allow ample drying time for all painted lids. This might require a second coat for vibrant color. This preparation step sets the foundation for your beautiful pumpkin, allowing each individual lid to contribute to the overall aesthetic.
Step 2: Assemble the Pumpkin Shape
This is where your pumpkin starts to take shape. Take two painted lids and apply a line of hot glue along one edge of the first lid. Carefully press the edge of the second lid onto the glued edge of the first, holding them together until the glue sets. Repeat this process, adding one lid at a time, until you have a long chain of connected lids. As you add more lids, gently curve the chain to start forming a circular shape. Once all your lids are connected in a circle, carefully glue the first lid to the last lid to close the loop, forming your pumpkin shape. Ensure the painted sides are facing outwards to create a cohesive look. The hot glue provides a strong and quick bond, essential for maintaining the pumpkin’s structure.
Step 3: Add the Natural Stem
Now it’s time to give your pumpkin its characteristic stem. Take a cinnamon stick and carefully insert it into the center opening of your assembled lid circle. You may need to apply a dot of hot glue to the bottom of the cinnamon stick and press it firmly into the center of the pumpkin to secure it in place. The cinnamon stick not only acts as a rustic stem but also releases a subtle, inviting aroma that enhances the autumnal atmosphere of your home. If you don’t have cinnamon sticks, a small twig from your yard can also work wonderfully, adding an equally natural touch.
Step 4: Embellish with Ribbons and Leaves
This is where you can truly let your creativity shine! Begin by tying a piece of burlap ribbon around the base of your cinnamon stick, securing it with a simple knot or bow. You can layer different ribbons, perhaps adding a piece of rick rack ribbon over the burlap for a playful texture, or a thin piece of jute twine for a more rustic feel. Some crafters also like to tuck small silk fall leaves or curled jute twine around the cinnamon stick and ribbon for an added touch of nature. The possibilities here are endless, allowing you to match the pumpkin’s style to your existing decor or create a unique statement piece.
Step 5: Personalize and Display
Once your Mason jar lid pumpkin is complete, the final step is to personalize it further and find its perfect spot for display. You can experiment with different paint colors for your lids – imagine a set in varying shades of orange, yellow, and red, or even some painted with subtle metallic accents. Consider using stencils to add small patterns or words to individual lids before assembly. These darling pumpkins make fantastic centerpieces for your dining room table, nestled among real leaves or small gourds. They also look wonderful arranged on a mantelpiece, brightening up a bookshelf, or grouped on an entryway table to greet guests with a warm, seasonal welcome. A collection of varying sizes and designs can create a truly captivating display.
Pro-Tips for Perfect Pumpkin Lids
- Hot Glue is Key: While craft glue can work, a hot glue gun offers immediate adhesion, which is crucial when assembling the curved structure of the pumpkin.
- Layering Paint: For a richer color, apply two thin coats of paint instead of one thick coat. Allow each coat to dry completely.
- Experiment with Textures: Don’t be afraid to mix and match different types of ribbons and natural elements. Jute, burlap, satin, and even yarn can create diverse looks.
- Vary Sizes: Collect lids from different-sized Mason jars (pint, quart) to create pumpkins of various dimensions, adding visual interest to your display.
- Safety First: When using a hot glue gun, always exercise caution and supervise children if they are participating in the craft.
Beyond Lid Pumpkins: Creative Fall Decor Ideas Using Leaves
While Mason jar lid pumpkins are undeniably charming, don’t limit your creativity! Fallen leaves offer a myriad of other possibilities for transforming your home into an autumnal wonderland. Here are more ideas to inspire your fall decorating:
Elegant Leaf Garlands
Gather a collection of colorful, well-preserved leaves. You can either string them together using a needle and strong thread or hot glue them onto a piece of twine or burlap ribbon. Drape these garlands over your fireplace mantel, across a window frame, or along a staircase railing for an instant touch of fall elegance. You can intersperse them with small fairy lights for a magical evening glow, or add pinecones and small berries for extra texture.
Rustic Leaf Candle Holders
Recycle old glass jars or simple glass candle holders by adhering dried leaves to their exterior. Use a decoupage medium or a thin layer of craft glue to attach the leaves, then seal them with another coat of the medium. Once dry, place a tea light or small LED candle inside. The flickering light will beautifully illuminate the leaf patterns, casting warm, inviting shadows and creating a cozy ambiance perfect for chilly autumn evenings.
Enchanting Leaf Luminaries
Similar to candle holders, leaf luminaries elevate the concept by covering larger glass jars (like quart-sized Mason jars) with an assortment of beautiful leaves. Arrange the leaves creatively, overlapping them slightly to create a mosaic effect. Once dried and sealed, these luminaries can be placed on your porch steps, along a walkway, or grouped on an outdoor patio table for a captivating display. They provide a gentle, welcoming glow that transforms any outdoor space into an enchanting autumn retreat.
Beautiful Pressed Leaf Art
Select your most vibrant and perfectly shaped leaves. Press them flat between heavy books for a few weeks until they are completely dry. Once pressed, arrange them creatively on a piece of cardstock or watercolor paper. You can create intricate patterns, a collage of colors, or a simple, elegant display of a single leaf. Frame your finished artwork in a simple wooden frame for a sophisticated, natural wall decoration that celebrates the fleeting beauty of the season. This personalized art piece can be a conversation starter and a lasting reminder of autumn’s splendor.
DIY Autumnal Signs
Transform a plain wooden board or piece of reclaimed wood into a custom autumnal sign. Paint a background color that complements your decor, then use stencils to add a festive phrase like “Happy Fall,” “Gather,” or “Autumn Blessings.” Finish the sign by hot gluing a cluster of dried leaves, small acorns, or mini pinecones to one corner or along the edge. These signs make charming additions to your entryway, living room, or even outdoor porch, instantly conveying a seasonal greeting.
Decorative Leaf Bowls and Vases
For a truly unique piece, create a decorative bowl or vase using leaves. This project typically involves using a balloon or an existing bowl as a mold. Coat your mold with plastic wrap, then adhere overlapping leaves using a decoupage medium. Once dry and firm, carefully remove the mold. The result is a stunning, natural leaf bowl perfect for holding potpourri, small gourds, or other fall treasures. A leaf-covered vase can also elevate a simple bouquet of seasonal flowers, making it even more special.
Why DIY Fall Decor?
Engaging in DIY fall decoration projects offers numerous benefits beyond just beautifying your home. Firstly, it’s incredibly **cost-effective**. Many materials, like fallen leaves, are free, and others, like Mason jar lids, can be repurposed or purchased affordably. Secondly, it allows for unparalleled **personalization**. Your decorations will be unique, reflecting your personal style and taste, making your home truly feel like your own. Thirdly, it’s an **eco-friendly** choice, promoting the use of natural and recycled materials rather than mass-produced plastic items. Furthermore, these projects can be a fantastic **family activity**, providing an opportunity for bonding and creating cherished memories. Finally, there’s an immense sense of **accomplishment** and pride in displaying something you’ve crafted with your own hands, especially when it contributes to the warm, inviting atmosphere of your home during the most beautiful time of the year.
Making the Most of Your Fall Decorations
Once your beautiful fall decorations are complete, strategic placement is key to maximizing their impact. Consider creating vignettes – small, artfully arranged groupings of objects – on your mantelpiece, coffee table, or sideboards. Combine your Mason jar lid pumpkins with other elements like real mini pumpkins, gourds, candles, and sprigs of dried berries or wheat. For dining room tables, a grand centerpiece featuring your handmade items alongside a runner of burlap or plaid fabric can create an impressive focal point. Don’t forget outdoor spaces! Leaf garlands can adorn your front door, and luminaries can line your walkway, extending a warm welcome to all who approach your home. The layering of different textures and colors, from the rustic charm of burlap to the shimmering sparkle of glitter, will create a rich and inviting tapestry that embodies the very essence of autumn.
As you embark on these creative journeys, remember that the goal is to enjoy the process and infuse your home with your unique touch. The warmth and charm that handmade fall decorations bring are truly unparalleled. So, gather your supplies, embrace the season’s bounty, and start crafting. Let your home reflect the breathtaking beauty and cozy spirit of autumn, making everyone who steps inside feel the magic of this special time of year. Happy crafting!