
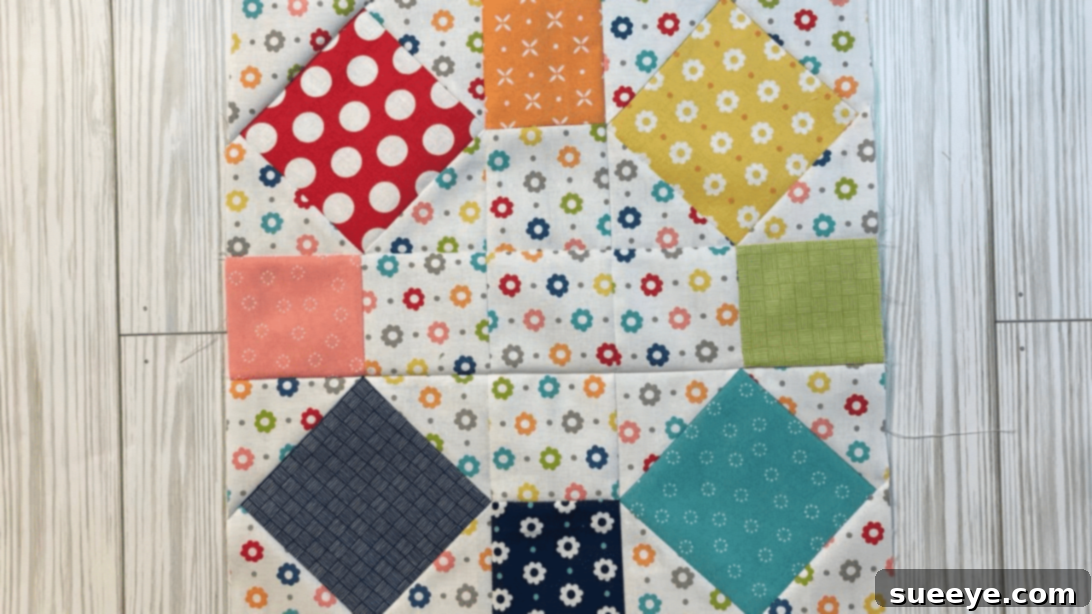
Mastering the Rainbow Circle Quilt Block: An Easy & Fun Tutorial for Quilters
Embark on a delightful quilting journey with one of the most accessible and visually stunning quilt blocks you can create: the Rainbow Circle Quilt Block. This ingenious design, brought to us by the creative minds at Cut and Create on YouTube, is a true gem for both seasoned quilters looking for a quick project and absolute beginners eager to dip their toes into the world of fabric artistry. Its simplicity belies its captivating aesthetic, making it an ideal starting point for anyone new to sewing or a fantastic way to quickly build up a quilt top.
What makes this particular quilt block stand out is its incredible versatility and ease of construction. You don’t need years of quilting experience to achieve a professional-looking result. Moreover, it’s an excellent project for utilizing those beloved fabric scraps and leftover pieces that often accumulate in a quilter’s stash. Instead of letting them gather dust, transform them into a vibrant and dynamic piece of art. Imagine a quilt bursting with a myriad of colors and patterns, each unique piece contributing to a harmonious whole. The more variations and contrasts you introduce, the more striking your finished quilt will be. This tutorial will guide you through every step, ensuring a smooth and enjoyable crafting experience. Let’s dive in and create something beautiful together!
RELATED: Discover another fantastic project: Easy 2-Block Rainbow Quilt Tutorial
Why Choose the Rainbow Circle Quilt Block?
Beyond its aesthetic appeal, the Rainbow Circle Quilt Block offers several compelling advantages that make it a favorite among quilters:
- Beginner-Friendly: The techniques involved are straightforward, focusing on precise cutting and consistent seam allowances, making it perfect for those learning the basics of quilting.
- Speed and Efficiency: Designed for quick assembly, you can piece together multiple blocks in a relatively short amount of time, allowing you to see your quilt top come together faster.
- Stash-Busting Potential: This block is a champion for using up small fabric scraps. It encourages creativity in combining different prints and colors, giving new life to otherwise unused fabric.
- Visually Dynamic: The clever arrangement of fabric pieces creates an optical illusion of circles and curves from straight lines, adding a sophisticated touch to your quilt design.
- Endless Customization: Experiment with color palettes, fabric textures, and block arrangements to create a truly unique quilt that reflects your personal style. From bold and bright to subtle and serene, the possibilities are limitless.
Essential Materials for Your Rainbow Circle Quilt Block:
Gathering the right tools and materials is the first step to a successful quilting project. Here’s what you’ll need, along with some tips for selection:
- Assorted Print Fabrics: This is where the “rainbow” comes in! Select a variety of colors and patterns. Consider how they will contrast or complement each other. Scraps from previous projects are ideal, offering a unique, eclectic look. For a cohesive quilt, ensure the fabrics are of similar weight and fiber content (e.g., all 100% cotton).
- Background Fabric: Choose a solid or subtle print fabric that will help your assorted prints pop. A neutral color like white, cream, light gray, or even black can provide a stunning contrast, allowing the vibrant “circle” elements to stand out.
- Marking Pen, Pencil, or Chalk: Essential for transferring your cutting lines onto the fabric. Test your chosen marker on a scrap piece of fabric to ensure it’s easily removable or will be hidden by your seam allowance.
- Ruler: A clear acrylic quilting ruler with precise measurements is highly recommended. These rulers, often non-slip, make accurate cutting much easier than a standard measuring tape.
- Scissors or Rotary Cutter and a Cutting Mat: For precise fabric cutting. A rotary cutter paired with a self-healing cutting mat allows for faster and more accurate cuts, especially for straight lines. If using scissors, ensure they are sharp and dedicated for fabric only.
- Fabric Pins: High-quality, sharp fabric pins are crucial for holding fabric layers securely in place before stitching. Fine, sharp pins will glide through fabric without snagging.
- Needle and Thread: Choose an all-purpose polyester or cotton thread that matches or blends with your fabrics. A sharp, appropriately sized needle for your sewing machine will prevent skipped stitches and fabric damage.
- Iron, for Pressing: An iron is your best friend in quilting! It ensures flat, accurate seams, which are vital for blocks to fit together perfectly. A good steam iron is invaluable.
- Sewing Machine: Any basic sewing machine capable of a straight stitch will work. Ensure it’s in good working order and you have fresh needles.
How to Craft Your Rainbow Circle Quilt Block: A Detailed Guide
Follow these detailed steps to construct your beautiful Rainbow Circle Quilt Block. Precision in cutting and pressing is key to a professional finish!
Step 1: Preparing and Assembling the First Sections
Begin by cutting all your chosen fabrics to the desired dimensions. While the original tutorial doesn’t specify exact sizes, a common starting point for individual blocks is a center square of 4.5 inches and two squares for the points measuring 2.5 inches. For the points, take two smaller squares (e.g., 2.5 x 2.5 inches) and carefully cut each one in half diagonally, from one corner to the opposite corner. This will yield four triangles from your two squares. These triangles will form the “points” of your block, creating the illusion of a circle.
Next, take your larger center square. To ensure perfect alignment, fold it in half and gently press the fold with a warm iron to mark its midpoint. Repeat this process for each of your fabric triangles, folding them in half along their longest edge (the hypotenuse) and pressing to mark their midpoints. This simple step will save you a lot of alignment headaches later on. Now, lay one fabric triangle on each side of the center square. Position them with their right sides facing together, carefully aligning the pressed midpoints of the triangles with the pressed midpoints of the center square. The raw edges of the triangles should extend slightly beyond the corners of the square, which is perfectly normal. Secure these pieces with fabric pins to prevent shifting during sewing. Using your sewing machine, stitch them in place along the edge where they meet the square, maintaining a precise ¼ inch seam allowance. Consistency in your seam allowance is paramount in quilting, as it ensures all your blocks will accurately fit together. Once stitched, press the seams open or towards the darker fabric to reduce bulk and create a flat, smooth finish.
Step 2: Completing the Block and Assembling Your Quilt
After pressing, you’ll notice a beautiful, flat seam. Gently smooth out any remaining creases to ensure the fabric lies perfectly flat. Now, repeat the exact same process from Step 1 on the remaining two empty sides of your center square. This means taking two more diagonal-cut triangles, aligning them with the midpoints of the square, pinning, stitching with a ¼ inch seam allowance, and then pressing the seams. By doing this, you will complete one full Rainbow Circle Quilt Block unit.
To create a full quilt, you’ll need to make many more of these individual quilt block units. This is where your creativity can truly shine! Experiment with different fabric variations for each block – try varying the background fabric, using a mix of bold and subtle prints, or sticking to a specific color family. Once you have a collection of blocks, lay them all out on a design wall or a large flat surface. This “designing” stage is crucial; it allows you to audition different arrangements, play with color placement, and visualize your final quilt before committing to stitching. As shown in the video tutorial, arrange all the pieces together to form your desired quilt top pattern.
When you are satisfied with the arrangement, begin stitching the blocks together. It’s often easiest to start by stitching the centerpieces of each row together first, then gradually adding the outer blocks to form complete rows. Next, stitch these completed rows to each other, forming the entire quilt top. Remember to press your seams as you go, after each seam is sewn. This continuous pressing ensures that your quilt top remains flat, square, and beautiful, making it much easier to quilt later on. The diligent practice of pressing will prevent puckering and ensure a professional finish. Continue this process until your entire quilt top is assembled, ready for batting, backing, and quilting!
Quilting Tips for a Flawless Finish:
- Pre-Wash Your Fabrics: While some quilters skip this, pre-washing can prevent fabric shrinkage and dye bleeding after your quilt is finished.
- Consistent Seam Allowance: This cannot be stressed enough. A consistent ¼ inch seam allowance is the cornerstone of accurate piecing. Consider using a ¼ inch presser foot if your machine has one.
- Pressing vs. Ironing: In quilting, we “press” seams, rather than “ironing” them. Pressing involves lifting and placing the iron, avoiding pushing the fabric, which can stretch or distort your pieces.
- Chain Piecing: For efficiency, especially when making multiple identical units, use chain piecing. Stitch one seam, then immediately feed the next unit under the needle without lifting the presser foot or cutting the thread in between. This saves time and thread.
- Square Up Your Blocks: After each block is completed, use your ruler and rotary cutter to “square it up” to the desired final dimension. This ensures all blocks are perfectly uniform and will fit together seamlessly.
- Audition Your Fabrics: Before cutting, lay out your chosen fabrics together to see how their colors and patterns interact. Take a photo to review the arrangement objectively.
- Safety First: Always use caution with rotary cutters. Keep your fingers away from the blade and use a fresh, sharp blade for clean cuts.
Creative Variations and Beyond:
The Rainbow Circle Quilt Block is incredibly adaptable. Once you’ve mastered the basic construction, consider these ideas to take your creativity further:
- Color Palettes: Instead of a rainbow, try a monochromatic scheme (shades of blue), analogous colors (blues and greens), or a complementary palette (yellows and purples) for a striking effect.
- Fabric Choices: Mix solids with prints, incorporate different textures like linen or flannel, or use novelty prints to tell a story.
- Block Size: Adjust the starting square dimensions to create larger or smaller blocks, which can drastically change the final look of your quilt.
- Layouts: Experiment with different arrangements of your finished blocks. Rotate them, create checkerboard patterns, or use sashing to separate them.
- Mini Projects: This block isn’t just for full-sized quilts! Use individual blocks to make throw pillows, tote bags, table runners, or even placemats.
Conclusion: Your Quilting Adventure Awaits
The Rainbow Circle Quilt Block is a testament to how simple techniques can yield stunning results. Its ease of construction makes it accessible for beginners, while its versatility offers endless creative possibilities for experienced quilters. This project is not only about creating a beautiful item but also about the joy of crafting, the satisfaction of seeing fabric transform under your hands, and the pride of making something uniquely yours. We hope this expanded tutorial inspires you to try your hand at this wonderful block. Remember, every stitch is a step forward in your quilting journey.
We extend our sincere gratitude to Cut and Create via YouTube for sharing this amazing quilt block idea. Do visit her channel for more inspiring and easy-to-follow quilting videos!