
Illuminate Your Autumn: A Complete Guide to DIY Marquee Pumpkins
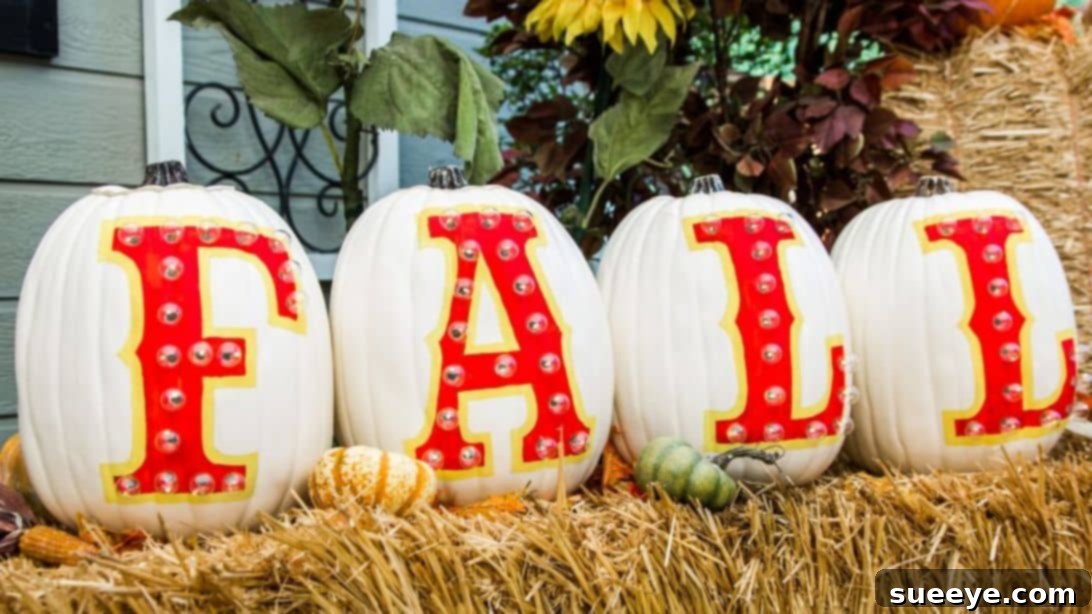
As the leaves begin to change and the crisp autumn air settles in, our thoughts naturally turn to cozy fall decorations. While traditional pumpkins hold their charm, there’s a unique and captivating trend that’s perfect for adding a personalized, warm glow to your seasonal display: DIY marquee pumpkins. These stunning lighted pumpkins are not only incredibly easy and fun to make but also offer endless possibilities for customization, allowing you to spell out any word, phrase, or letter you desire. Imagine “FALL,” “GATHER,” or even your family’s initial glowing softly on your porch or mantelpiece!
This comprehensive guide will walk you through every step of creating your very own marquee pumpkins, transforming ordinary gourds into extraordinary illuminated centerpieces. We’ll cover everything from selecting the right pumpkins and materials to detailed instructions for painting, drilling, and lighting. Get ready to embark on a delightful autumn craft project that promises to impress your guests and fill your home with a magical, festive ambiance. Let’s dive in and light up your fall!
The Allure of Marquee Pumpkins: Why They’re Your Next Favorite Fall Craft
Marquee pumpkins stand out in the crowded world of fall decor for several compelling reasons. First and foremost is their undeniable “wow” factor. The soft, twinkling lights embedded within the pumpkins create a sophisticated and inviting glow that instantly elevates any space, whether indoors or out. Unlike carved pumpkins that often have a limited lifespan, marquee pumpkins, especially when made with artificial gourds, can be enjoyed throughout the entire autumn season and even stored for years to come.
Beyond their aesthetic appeal, marquee pumpkins offer unparalleled personalization. Forget generic decorations; with this DIY project, you can truly make your decor speak to your unique style and message. Spell out holiday greetings, inspirational words, or simply beautiful seasonal phrases. This level of customization makes them perfect for various settings, from a cozy living room accent to a welcoming porch display for Halloween or Thanksgiving. They also serve as a fantastic alternative for those who find traditional pumpkin carving a bit too messy or challenging, offering a clean yet equally creative outlet for autumnal expression.
Gathering Your Creative Toolkit: Materials You’ll Need
Before you begin your exciting journey into marquee pumpkin creation, it’s essential to gather all your materials. Most of these items are readily available at craft stores, hardware stores, or even around your home, making this an accessible project for almost anyone. Having everything organized beforehand will ensure a smooth and enjoyable crafting experience.
- Pumpkins: Choose real or artificial pumpkins based on your preference for longevity and ease of handling. If using real pumpkins, select ones with a smooth, firm surface. For a consistent look, try to pick pumpkins of similar size, especially if you plan to spell out a multi-letter word. Artificial pumpkins offer durability and reusability for future seasons.
- Paint (White and Colored): A good quality acrylic or spray paint is ideal for priming your pumpkins. White paint provides a clean, bright base, making any subsequent colors pop. You’ll also need a contrasting color for your marquee letters, so choose a shade that complements your overall fall decor theme. Matte or satin finishes often work best for a rustic yet elegant look.
- Paintbrush: A flat brush for broad strokes and a finer brush for detailed work on the letters will be beneficial. If using spray paint for the base coat, ensure you have an appropriate, well-ventilated area.
- String Lights (LED): The magic of marquee pumpkins comes from their illumination. Opt for battery-operated LED string lights, as they are safer, cooler to the touch, and allow for flexible placement without needing an outlet. Fairy lights or larger bulb lights can both create beautiful effects, depending on the desired look.
- Pencil: A standard pencil is perfect for sketching your letters onto the pumpkin surface before painting. It allows for easy corrections and ensures your design is perfectly centered and spaced.
- Drill (with various drill bits): A power drill is crucial for creating the holes for your lights. Make sure you have drill bits that match the size of your chosen string light bulbs. A small pilot bit and progressively larger bits can help ensure clean, precise holes.
- Scissors: For cutting out your printed letter templates and any other light-duty tasks.
- Printed Letter Templates: Decide on the word or letters you want to display. Print them out in a bold, easy-to-trace font on standard 8.5 x 11-inch paper. Adjust the size of the letters to fit your chosen pumpkins.
Crafting Your Illuminated Masterpiece: A Step-by-Step Guide
Now that you have all your materials ready, it’s time to bring your marquee pumpkins to life! Follow these detailed steps carefully for the best results, and don’t hesitate to refer to the video tutorial by Hallmark Channel (linked in the attribution) if you need a visual guide.
Step 1: Pumpkin Preparation and Foundation
The first crucial step involves preparing your pumpkins to become the perfect canvas for your marquee design. This stage lays the groundwork for a professional and polished finished product.
Begin by selecting your pumpkins. If you’re using real pumpkins, carefully carve out the inside. This means cutting a hole at the top or bottom, scooping out all the seeds and fibrous material, and ensuring the interior is completely hollow. This step is essential for housing the light wires and battery packs. For artificial pumpkins, you can often skip this hollowing step, as many are already hollow or easily modified.
Next, it’s time to apply your base coat. Generously coat the entire exterior of each pumpkin with white paint. This serves as a primer, creating a clean, uniform surface that will make your letter colors more vibrant and consistent. Allow the paint to dry completely according to the manufacturer’s instructions, which may take several hours. Depending on the pumpkin’s original color and the paint’s opacity, you might need to apply a second or even a third coat to achieve full, even coverage. Patience during drying times is key to avoiding smudges and achieving a smooth finish.
While your pumpkins are drying, prepare your letter templates. Print out the letters for your chosen word or phrase. Ensure each letter is printed on a separate sheet (e.g., 8.5 x 11 inches) and scaled appropriately to fit the size of your pumpkins. Once printed, carefully cut out each letter, creating a stencil-like template. Position each cut-out letter onto a pumpkin, centering it as desired. Using your pencil, carefully trace around the edges of each letter onto the dried, white-painted pumpkin surface. Take your time to ensure the tracing is neat and accurate, as this will be the guide for your next painting step.
Step 2: Adding Color and Light
With your letters traced, it’s time to bring your marquee design to life with color and, of course, the enchanting glow of lights.
Using a paintbrush, carefully fill in the traced letters with your chosen contrasting paint color. Consider shades like metallic gold, shimmering silver, deep burgundy, or a classic matte black for a sophisticated look that complements the white pumpkin base. Apply the paint smoothly and evenly, paying close attention to the edges for a crisp, clean finish. Allow this paint to dry completely before moving on. Depending on the color and paint type, a second coat might be necessary to achieve full vibrancy and coverage.
Once the letter paint is dry, it’s time to mark the spots for your lights. Using your pencil, make small dots along the outline of each letter where you want the lights to be. Aim for even spacing and symmetry to create a visually appealing marquee effect. The number of lights will depend on the size of your letters and your string light length. Generally, spacing them about an inch or two apart works well.
Now, for the thrilling part: drilling the holes! Select a drill bit that is slightly larger than the bulbs of your string lights, ensuring the bulbs can pass through snugly but not fall out easily. Carefully drill a hole at each pencil marking. If using real pumpkins, be cautious as the shell can sometimes be brittle. For artificial pumpkins, they are typically easier to drill. Always drill slowly and steadily to avoid cracking the pumpkin or damaging the surface. Once all holes are drilled, carefully push the bulbs of your string lights through the holes from the outside of the pumpkin, securing the wires inside.
Arrange the excess wires and the battery pack neatly inside the hollow pumpkin, ensuring they don’t interfere with the stability of the pumpkin or block any light. For real pumpkins, you can place the battery pack on the bottom interior surface. For artificial pumpkins, there might be dedicated compartments or enough space to tuck them away. Once all the lights are in place and the wiring is managed, you’re ready to display your beautiful marquee pumpkins! Find the perfect spot, turn on the lights, and enjoy the warm, festive glow.
Elevate Your Design: Tips and Customization Ideas
Once you’ve mastered the basic technique, you can truly unleash your creativity and personalize your marquee pumpkins even further. Here are some tips for a flawless finish and ideas for unique design variations:
Pro Tips for a Flawless Finish
- Paint Quality Matters: Invest in good quality acrylic craft paint or spray paint for better coverage and durability. If using spray paint, work in a well-ventilated area and apply multiple thin coats rather than one thick coat to prevent drips.
- Precise Tracing: For intricate letters, you might consider using painter’s tape to create crisp edges for your painted letters. Remove the tape while the paint is still slightly wet for the cleanest lines.
- Drill Bit Selection: Always start with a smaller pilot hole if you’re concerned about cracking, especially with real pumpkins. Then, gradually increase the drill bit size until it’s just right for your lights.
- LED Lights are Best: LED lights are energy-efficient, produce very little heat (making them safer for pumpkins, especially real ones), and come in a wide range of colors and styles.
- Weatherproofing: If displaying your marquee pumpkins outdoors, consider applying a clear, waterproof sealant spray over the painted surfaces to protect them from moisture and extend their life, particularly for real pumpkins.
- Safety First: When drilling, always wear safety glasses. If using real pumpkins, be mindful of their uneven surfaces which can make drilling tricky. Secure the pumpkin firmly before drilling.
Unleash Your Creativity: Design Variations
- Wordplay: Beyond “FALL,” consider words like “AUTUMN,” “HARVEST,” “THANKFUL,” “GATHER,” or even “BOO!” for Halloween. You could also use initials or house numbers.
- Color Palettes: Experiment with different color schemes. Instead of white, try a base coat of matte black or a deep navy with metallic gold or silver letters for a modern, sophisticated look. Traditional autumn hues like orange, rust, and brown also work wonderfully.
- Font Styles: Don’t limit yourself to one font. Play with elegant script fonts, bold block letters, or fun, whimsical designs to match your personal style.
- Add Embellishments: For extra sparkle, apply glitter glue over your painted letters while they’re still wet, or use adhesive rhinestones for a touch of glam. Ribbons, burlap, or artificial fall leaves can also be added around the stem or base.
- Mixed Media: Combine painted letters with other decorative elements. For example, use vinyl decals for the letters if you’re not comfortable with freehand painting.
- Different Sizes and Shapes: Create a dynamic display by using pumpkins of varying sizes and shapes. Arrange them in a cluster, spelling a word across several pumpkins, or have one large pumpkin as a focal point.
Displaying Your Marquee Pumpkins: Creating a Festive Scene
Once your DIY marquee pumpkins are complete, the fun continues with finding the perfect place to showcase your illuminated creations. Their versatility means they can enhance almost any area of your home, both indoors and out.
Indoor Display:
Marquee pumpkins make captivating centerpieces for dining tables or coffee tables. They can also add a warm, inviting glow to your mantelpiece, bookshelf, or entryway console table. For a truly magical touch, place them on a windowsill to cast a soft light outwards. Consider arranging them alongside other fall elements like pinecones, colorful leaves, candles (safely!), or small decorative gourds to create a rich, layered display.
Outdoor Charm:
For a welcoming outdoor display, arrange your marquee pumpkins on your front porch, steps, or even nestled among your garden beds. The battery-operated lights make them ideal for areas without easy access to power outlets. If placing them outdoors, remember the weatherproofing tips mentioned earlier to ensure they withstand the elements. They are particularly stunning as evening falls, transforming your home’s exterior into a beacon of autumnal cheer.
Longevity and Care: Maximizing Your Marquee Pumpkin Enjoyment
To ensure your beautiful marquee pumpkins bring joy throughout the season and beyond, a little care goes a long way.
If you’ve opted for **real pumpkins**, their lifespan is naturally limited. To maximize their freshness, keep them in a cool, dry place away from direct sunlight and extreme temperatures. Cleaning the interior thoroughly after hollowing helps prevent premature rot. The added paint and sealant can also offer some protection. Discard them once they begin to soften or show signs of decay.
For **artificial pumpkins**, care is much simpler. These are designed for reusability. When the fall season concludes, gently wipe them clean with a soft cloth to remove any dust. Carefully remove the string lights if you prefer to store them separately, or you can leave them attached. Store your marquee pumpkins in a dry, dark place, such as a sturdy box or plastic bin, protected from crushing. This ensures they’ll be ready to glow brilliantly for many autumns to come, becoming a cherished part of your seasonal decor collection.
Whether real or artificial, always remember to turn off the battery-operated lights when not in use to conserve battery life.
These DIY marquee pumpkins are more than just a craft; they’re a statement of autumn beauty and personal creativity. With their radiant glow and customizable charm, they are sure to become a cherished part of your seasonal decor. This project is not only easy and enjoyable to create but also yields a stunning result that will bring warmth and festivity to your home. So gather your materials, follow these steps, and prepare to delight in the luminous magic of your handmade fall decorations. Happy crafting, and may your autumn be bright!
Special thanks to Hallmark Channel via YouTube for the inspiring video tutorial and images used in this guide. If you enjoyed crafting these marquee pumpkins, we highly recommend visiting their channel for more fantastic DIY project ideas and subscribing for endless inspiration!