
The Ultimate 2-Minute Drink Cooling Hack: Chill Your Beverages Instantly!
There’s nothing quite as disappointing as reaching for a refreshing drink, only to discover it’s lukewarm. Whether you’ve just come in from a hot day, are preparing for unexpected guests, or simply forgot to stock the fridge, a warm beverage can quickly dampen your spirits. While adding ice to a glass might seem like a quick fix, it often dilutes the flavor, leaving you with a watery, less enjoyable drink. And let’s be honest, sipping straight from a perfectly chilled bottle or can offers a far superior experience.
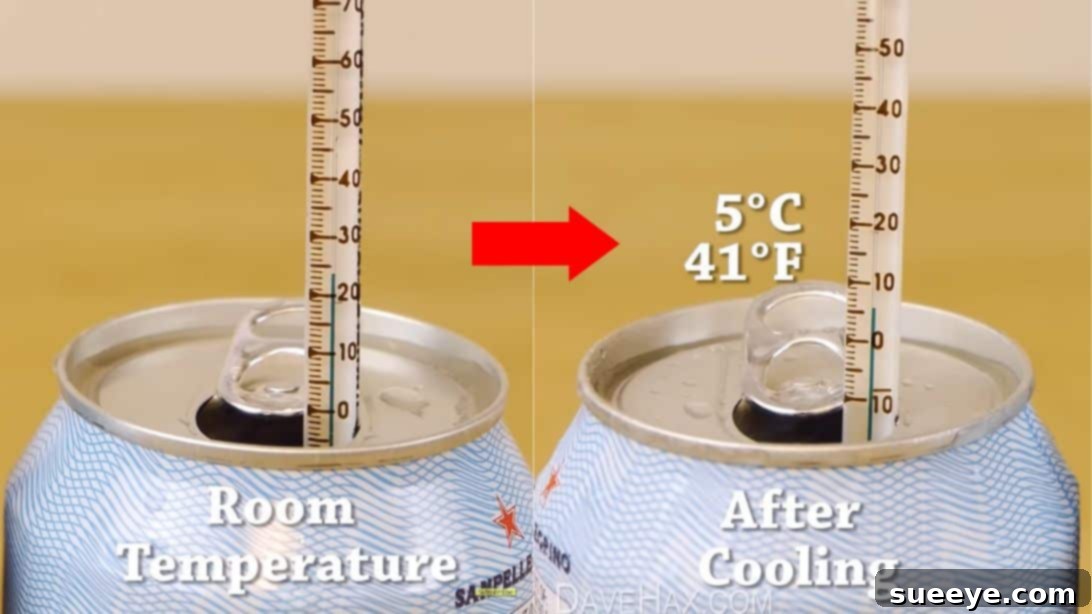
If you’re tired of waiting hours for your drinks to cool in the refrigerator or compromising taste with melting ice, you’re in luck! We’ve uncovered a remarkably simple yet incredibly effective drink cooling hack, famously demonstrated by DaveHax, that can transform a room-temperature beverage into an ice-cold delight in under two minutes. This isn’t magic; it’s pure science, and it’s a game-changer for anyone who loves cold drinks but sometimes struggles with planning ahead.
This ingenious trick requires no special equipment, no complex machinery, and no advanced culinary skills. In fact, you likely already have all the necessary components readily available in your kitchen: ice cubes, water, and common cooking salt. Yes, that’s right – salt is the secret ingredient that supercharges your ice bath, allowing you to achieve unprecedented cooling speeds. Prepare to impress your friends, rescue your parties, and enjoy perfectly chilled beverages whenever the craving strikes!
RELATED: 5 Cooler Hacks to Keep It Colder For Longer
The Science Behind the Speed: How Salt Supercharges Your Ice Bath
At first glance, the idea of cooling a drink in just two minutes with ice, water, and salt might sound too good to be true. Many people are skeptical until they experience the impressive results firsthand. However, there’s a fascinating scientific principle at play known as “freezing point depression,” a colligative property of solutions. Understanding this phenomenon will help you appreciate the cleverness of this simple hack.
When you add salt to water, it lowers the freezing point of the water. Pure water freezes at 0°C (32°F). However, a saltwater solution can remain liquid at temperatures well below 0°C. The salt molecules interfere with the water molecules’ ability to form the crystalline structure of ice, requiring an even lower temperature for freezing to occur. This means that your ice bath, instead of staying at a mere 0°C, can become significantly colder – sometimes as low as -10°C (14°F) or even colder, depending on the concentration of salt.
Why is this important for rapid cooling? Heat transfer occurs much more efficiently when there’s a greater temperature difference between two objects. A regular ice bath, while cold, is limited to 0°C. By adding salt, you create an ice-water slurry that is substantially colder. This ultra-cold mixture then draws heat away from your beverage at an accelerated rate. Furthermore, the liquid water in the slurry provides much better contact with the surface of your can or bottle than ice cubes alone, ensuring maximum thermal conductivity. The combination of a lower temperature and superior surface contact is what allows your drink to chill in mere minutes, making it a perfect solution for those last-minute cooling emergencies.
This simple chemistry lesson transforms a common kitchen ingredient into a powerful cooling agent, making this hack not just effective but also incredibly smart!
When This Instant Cooling Hack Becomes Your Best Friend
While the ability to chill a drink quickly is always a bonus, there are specific scenarios where this hack truly shines and proves to be an indispensable skill. Keep this tip in your back pocket for these moments:
- Unexpected Guests: You hear the doorbell ring, and voilà – friends or family are at your doorstep! You want to offer them a cold drink, but your fridge is empty. This 2-minute hack is your savior, allowing you to serve perfectly chilled beverages without any awkward delays.
- Spontaneous Gatherings and Parties: Hosting a barbecue, a game night, or a casual get-together? Running out of cold drinks is a common party foul. With this method, you can keep a steady supply of perfectly chilled beer, soda, or juice flowing, ensuring your guests are always refreshed.
- Post-Work or Workout Refreshment: Imagine coming home after a long day or an intense workout, craving an ice-cold soda or sparkling water. Instead of waiting an hour for the fridge to do its job, you can have that satisfying chill in moments.
- Outdoor Adventures: While the primary setup is indoors, this hack can be incredibly useful for camping trips, picnics, or beach outings if you have a cooler packed with ice and can add water and salt. It ensures that even if drinks aren’t pre-chilled, they can be made so on demand.
- Saving Refrigerator Space: If your fridge is overflowing, you can store extra drinks at room temperature and chill them instantly as needed, freeing up valuable space.
- Avoiding Dilution: Unlike adding ice directly to your glass, this method chills the entire can or bottle, preserving the original flavor and strength of your drink.
Once you try this rapid cooling technique, you’ll realize just how often it comes in handy, saving you time, frustration, and ensuring you always have a perfectly cold drink at your fingertips.
Here are more cooling hacks you might want to try: 7 Hot Weather Life Hacks To Keep You Cool
What You Need for Rapid Beverage Chilling
Gathering your supplies for this super-efficient cooling method couldn’t be simpler. You likely have these items around your home already:
- Large Bowl or Container: Choose a bowl that is deep and wide enough to comfortably submerge your drink (or multiple drinks) in. A mixing bowl, a bucket, or even a cooler will work perfectly. The larger the volume, the more effectively it can handle multiple items.
- Plenty of Ice Cubes: The more ice, the colder your bath will get and the longer it will stay cold. Aim to fill your bowl nearly to the top with ice.
- Cooking Salt: Any common household salt will do the trick – table salt, kosher salt, or even rock salt. You don’t need anything fancy; the chemical properties are what matter here.
- Cold Water: A small amount of tap water is needed to help dissolve the salt and create the slurry, maximizing contact with your beverage.
- Spoon or Stirring Utensil: Essential for thoroughly mixing the salt into the ice and water, ensuring the freezing point depression takes full effect.
- Your Beverage of Choice: Cans, glass bottles, or even small plastic bottles all work wonderfully with this method.
Your Step-by-Step Guide: How to Cool a Drink in 2 Minutes
Follow these simple steps precisely to achieve ice-cold perfection in record time. The key is in the preparation of your super-chilling ice bath.
Step 1: Prepare Your Ice Bath Foundation
Begin by placing a generous amount of ice cubes into your large bowl or container. Don’t be shy with the ice; the more you use, the more effective and longer-lasting your super-chilling bath will be. Fill the bowl almost to the brim with ice. Next, add just enough cold water to the bowl to cover about half to two-thirds of the ice. You want a slushy mixture, not just floating ice cubes.
Step 2: Introduce the Secret Ingredient – Salt!
Now for the crucial step: generously sprinkle a couple of tablespoons of cooking salt over the ice and water mixture. For optimal results, use about 2-3 tablespoons of salt for a medium-sized bowl, or more for larger containers. Immediately after adding the salt, use your spoon or stirring utensil to mix everything together vigorously. Stir until the salt is well incorporated and you can feel the mixture becoming significantly colder. You’ll notice the ice starting to melt, forming a very cold brine solution – this is exactly what you want!
Step 3: Submerge and Initial Chill
Carefully take your room-temperature can or bottled drink and completely submerge it into the ultra-cold ice bath. Ensure that the entire surface of the drink is in contact with the frigid saltwater slurry for maximum heat transfer. If you’re chilling multiple drinks, try not to overcrowd the bowl, as this can impede uniform cooling. Let the drink sit undisturbed in this icy embrace for approximately one minute.
Step 4: The Final Stir and Enjoy!
After the first minute, give your drink a quick stir within the ice bath. This helps to bring fresh, super-cold water into contact with the bottle or can’s surface, ensuring even and continuous cooling. Let it sit for one more minute. After this second minute, carefully remove your drink. You will immediately notice a significant drop in temperature – your beverage will be wonderfully cold and ready to enjoy! If you prefer your drink to be even colder, or if it started at a particularly high temperature, you can leave it in the ice bath for an additional minute or two, stirring occasionally.
This hack works equally well for virtually any canned or bottled drink, from sodas and sparkling waters to beers and juices. Always remember to give the exterior of the can or bottle a quick rinse under tap water after removing it from the salt solution, especially if you plan to drink directly from it, to avoid any salty residue.
Tips for Optimal Results and Troubleshooting
To ensure you get the best possible chill every single time, keep these additional tips in mind:
- Use Enough Ice: Don’t skimp on the ice. The more ice you have, the more “cold energy” is available to transfer to your drink. A generous amount ensures the ice bath stays colder for longer.
- Thorough Mixing is Key: Ensure the salt is fully dissolved and distributed throughout the water and ice. A well-mixed brine is essential for the freezing point depression to work effectively. If the salt isn’t mixed, you won’t get the desired ultra-cold temperature.
- Complete Submersion: Make sure your can or bottle is fully submerged in the ice-salt-water mixture. Any part of the drink left exposed will not cool down as quickly.
- Rotate or Stir: While the method specifies stirring the drink itself, gently rotating the can or bottle within the bath can also help expose all surfaces to the coldest parts of the mixture, promoting faster and more even cooling.
- Mind the Salt Quantity: While more salt generally means a lower freezing point, there’s a point of diminishing returns. Too much salt without enough water will just sit as granules. Aim for a visibly slushy, watery mixture rather than just ice and undissolved salt.
- Clean Your Drink: After removing your chilled beverage, it’s a good practice to quickly rinse the can or bottle under tap water to wash off any salty residue, especially if you’re drinking directly from the container’s lip.
- Consider Your Container: Metal cans tend to cool faster than glass bottles due to differences in thermal conductivity. However, both will chill remarkably quickly with this method.
By following these guidelines, you’ll consistently achieve perfectly chilled drinks in a fraction of the time, making warm beverages a distant memory.
Beyond the Chill: The Impact of This Simple Hack
The DaveHax drink cooling hack is more than just a quick fix; it’s a testament to how simple scientific principles can be applied to solve everyday problems with remarkable efficiency. It eliminates the frustration of waiting, reduces waste (no more diluted drinks!), and empowers you to be prepared for any spontaneous occasion. Whether you’re a seasoned host, a busy parent, or simply someone who appreciates a perfectly cold drink, this method will quickly become an indispensable part of your routine.
Say goodbye to lukewarm beverages and hello to instant, refreshing satisfaction. Give this ingenious hack a try, and you’ll wonder how you ever managed without it!