
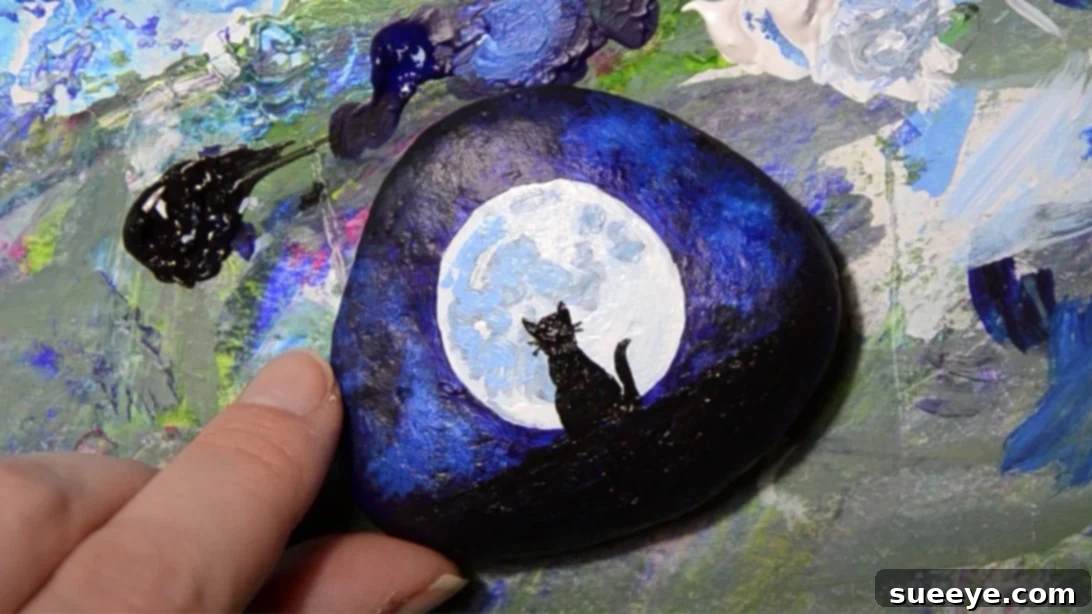
Whimsical Rock Art: Paint a Mesmerizing Cat and Moon Design
Rock painting has gracefully emerged as one of the most delightful and accessible hobbies today. It’s more than just a craft; it’s a journey into mindful creativity, a meditative art activity that transcends age and skill level. Imagine transforming an ordinary stone into a captivating piece of art, a small canvas carrying a story or a whimsical scene. This particular guide invites you to explore the enchanting world of rock painting by creating a charming cat silhouette against a serene moonlit sky – a design that promises to bring a touch of magic to any space.
Whether you’re a seasoned artist or picking up a brush for the first time, this project offers a wonderfully rewarding experience. Inspired by the engaging tutorial from Annamoon Fine Art’s YouTube channel, we’ll walk you through the process of crafting a design featuring a peaceful cat gazing at the moon. The final product is not only strikingly pretty and whimsical but also serves as a unique curio item, a heartfelt gift, or a charming decoration for your home. For cat enthusiasts especially, this project is purr-fectly suited to your passions!
The Allure of Rock Painting: A Meditative and Creative Escape
Beyond its aesthetic appeal, rock painting offers a wealth of benefits that contribute to well-being. It’s a fantastic way to disconnect from daily stressors and immerse yourself in a calming, focused activity. The repetitive motions of painting, the careful blending of colors, and the concentration required all contribute to a meditative state, promoting relaxation and reducing anxiety. It allows for a unique form of self-expression, where you can bring your imagination to life on a tangible, natural canvas.
Moreover, rock painting is incredibly accessible. The primary “canvas” is free, found in nature, and the materials required are relatively inexpensive, making it a hobby that anyone can embrace. It’s a wonderful activity for individuals, families, or even community groups, fostering connection and shared creativity. Once painted, these little artworks can be kept as cherished keepsakes, given as thoughtful gifts, or even hidden in public spaces as “kindness rocks” for others to discover, spreading joy and positivity. This cat and moon design, with its simple elegance, is an excellent entry point into this rewarding world of DIY art.
Selecting Your Canvas: Choosing the Perfect Rock
The foundation of any great rock painting project is, of course, the rock itself. While virtually any stone can be painted, selecting the right one can significantly enhance your creative process and the final outcome. Look for rocks that are:
- Smooth: A smooth surface provides an ideal, even canvas for your paints. Avoid overly bumpy or porous rocks, as they can absorb paint unevenly and make fine details challenging.
- Flat (or relatively flat): For designs like our cat and moon, a flatter rock might be easier to work on, especially when tracing circles or painting silhouettes. However, don’t shy away from irregularly shaped rocks; they can inspire unique compositions and add character to your art.
- Clean: Before priming, ensure your rock is thoroughly cleaned. Wash it with soap and water, scrubbing away any dirt, sand, or debris. Allow it to dry completely, ideally in the sun, to prevent moisture from affecting your paint adhesion.
- Appropriate Size: Consider the complexity of your design. For this cat and moon project, a rock that is at least 3-4 inches across will give you enough space to create the background and the silhouette without feeling cramped. Larger rocks can accommodate more intricate details, while smaller ones are perfect for quick, charming pieces.
Finding rocks can be an adventure in itself! Explore riverbeds, hiking trails, or even your own garden. Remember to respect local regulations when collecting natural materials and ensure you’re not disturbing ecosystems.
Materials: Gathering Your Artistic Arsenal
Before diving into the painting process, ensure you have all your supplies ready. Quality materials, even affordable ones, can make a significant difference in your experience and the longevity of your painted rock art.
- Rock: Your chosen, cleaned, and dried natural canvas. Remember, its unique shape can inspire your composition.
- Gesso (White): An essential primer. Gesso prepares the rock surface, making it smoother, less absorbent, and ensuring your colors appear vibrant and opaque. It also helps the acrylic paint adhere better and last longer, preventing the porous rock from “drinking” your paint.
- Bottle Cap (or compass/circular object): This will be your simple yet effective template for drawing a perfect circle for the moon. Various sizes can be used depending on your rock’s dimensions.
- Pencil: For sketching outlines before painting. A regular graphite pencil works perfectly, and its lines will be easily covered by the paint.
- Medium Flat Brush: Ideal for applying gesso, base coats, and larger areas of color like the night sky. A flat brush provides good coverage and sharp edges.
- Thin Detail Brush: Crucial for intricate work, such as outlining the cat silhouette, adding subtle details, or creating small stars. A fine-tipped brush will give you precision.
- Black Acrylic Paint: For the darkest parts of your night sky and the striking cat silhouette. Acrylic paints are water-based, dry quickly, and are durable once dry, making them perfect for rock art.
- Blue Acrylic Paint: To create the beautiful, atmospheric tones of the night sky. Having a couple of shades of blue (e.g., a dark blue and a medium blue) can add more depth and variation to your celestial background.
- White Acrylic Paint: For highlights, mixing lighter shades of blue, and creating the moon’s luminous glow and individual stars. It’s a versatile color for brightening your palette.
- Glossy Varnish (Clear Acrylic Sealer): The final and crucial protective layer. Varnish seals your artwork, protects it from the elements (especially if placed outdoors), and enhances the vibrancy of your colors. A glossy finish will give your rock a beautiful, polished look, making the colors pop and adding a professional touch.
Step-by-Step Directions: Crafting Your Celestial Cat and Moon Rock
Now that you have your clean rock and all your materials, let’s embark on the creative journey and bring your whimsical cat and moon design to life!
1. Prepare Your Canvas: Gesso Application
Begin by priming your rock with two even coats of white gesso. This step is crucial for creating a smooth, non-porous surface that will make your colors vibrant and ensure the longevity of your artwork. Apply the first thin coat with your medium brush, covering the entire surface you intend to paint. Ensure even coverage. Allow it to dry completely – gesso usually dries quite quickly, but patience here will prevent lifting or uneven textures. Once dry, apply a second thin coat. This double layer provides optimal opacity and a perfect, bright white base for your subsequent paint layers.
2. Outline the Moon: Creating a Perfect Circle
Once the gesso is thoroughly dry, it’s time to mark out your moon. Place the bottle cap (or any circular object of your desired moon size) onto the prepared rock surface. Hold it firmly in place to prevent it from shifting, and carefully trace its shape with your pencil. This will give you a crisp, perfect circle that will serve as the guiding boundary for your moon and the surrounding night sky. If you prefer a freehand or crescent moon, you can adjust this step accordingly.
3. Crafting the Night Sky: Blending Colors for Depth
Now, let’s bring the night sky to life. Prepare your black acrylic paint. Using your medium brush, carefully paint the areas outside the traced circle, extending to the uneven edges of the rock. This creates a dramatic, dark frame for your moonlit scene. Don’t worry about perfectly straight lines at this stage, as the natural rock edges add character. You can create an irregular, natural-looking border that complements the stone’s form.
Next, take your blue paint. Start painting around the inner edges of your traced moon circle, overlapping slightly with the black paint you just applied. While the blue paint is still wet, gently blend it outwards into the black area. This wet-on-wet technique is key to creating a soft, cloudy, and seamless transition, mimicking the ethereal quality of the night sky as it deepens into the darkness of space. Continue blending until you achieve a smooth gradient from blue to black, creating a sense of depth and mystery.
4. Illuminating the Sky: Adding Stars and Light
While the blue and black background is still wet (or lightly damp if you’ve allowed it to dry slightly for more control), mix a small amount of white paint with your blue paint to achieve a lighter, brighter blue shade. With your thin detail brush, gently dab or lightly brush this lighter blue within the blue area, especially closer to where the moon will eventually be. This creates points of light and the illusion of distant stars or a celestial glow. For a truly sparkling night sky effect, you can also use the tip of a toothpick or the back of a small brush handle to add tiny white dots for individual stars, making them appear scattered and twinkling.
5. Painting the Moon: Bringing in the Luminescence
Now, fill in the traced circle with pure white paint using your medium brush. Apply it carefully to stay within the lines, ensuring a neat edge. You might need two coats for opaque coverage, allowing the first to dry before applying the second. While the white is wet, you can add a touch of very light blue or even a tiny hint of yellow/orange near the edges if you want to create a subtle glow or texture for the moon. However, pure white provides a stark, beautiful contrast that perfectly simulates a bright full moon. Let this layer dry completely before moving to the cat.
6. Introducing the Cat Silhouette: The Star of the Show
Once your moon and night sky background are fully dry, it’s time to add your charming cat. Using your pencil, lightly sketch the outline of a sitting cat silhouette on top of your painted moon or against the darker sky, as if gazing intently at the celestial body. Keep the design simple and elegant – a classic cat silhouette often works best. Once you’re happy with the sketch, take your thin detail brush and black acrylic paint. Carefully paint in the entire silhouette of the cat, ensuring clean, crisp edges. This solid black silhouette will beautifully stand out against the moonlit background, giving your rock its unique character and focal point.
7. The Final Touch: Varnishing for Protection and Shine
Allow all your painted layers, especially the black cat silhouette, to dry completely. This might take a few hours, or even overnight, depending on the paint thickness and humidity. Once you’re absolutely sure it’s dry, apply a coat of glossy varnish. Use your medium brush and apply an even, thin layer over the entire painted surface. Varnish protects your artwork from UV damage, moisture, and general wear and tear, especially if your rock will be placed outdoors in a garden or windowsill. The glossy finish will also deepen your colors and give your rock a beautiful, professional sheen, making your art truly pop. For maximum durability, you can apply a second coat after the first has dried, always following the product’s instructions. Ensure you work in a well-ventilated area when using varnish.
Tips for Success and Further Inspiration
- Patience is Key: Don’t rush the drying process between coats. This prevents smudging, ensures crisp layers, and allows colors to develop properly.
- Practice Makes Perfect: If you’re new to painting or unsure about a specific technique, don’t hesitate to practice your blending or cat silhouette on a piece of paper or a spare rock first.
- Experiment with Colors: While blue and black create a classic night sky, feel free to experiment with purple, deep green, or even warmer tones like orange and pink for a sunset or twilight effect.
- Varying Brush Strokes: Play with different brush strokes to create texture, like subtle wisps of clouds around the moon or a slightly textured rock surface.
- Embrace Imperfections: Remember, hand-painted art has character. Don’t strive for absolute perfection; enjoy the creative process and the unique charm of your handmade piece!
- Reference Images: If sketching freehand is challenging, find simple cat silhouette images online to guide your pencil sketch.
Beyond This Project: Your Rock Art Journey Continues
And there you have it! A beautifully painted rock dedicated to your love for cats, or simply a charming piece of art on an unconventional canvas. The joy doesn’t have to stop here. Once you’ve mastered this cat and moon design, your imagination is the only limit. You can paint more designs on your rocks, explore different animals, intricate mandalas, inspiring quotes, or vibrant abstract patterns. Consider creating a series of rocks featuring cats in various positions, each enjoying the serene light of the moon or the warmth of the sun.
These painted rocks make fantastic gifts for friends and family, unique garden markers, charming paperweights for your desk, or simply delightful decorative accents around your home. The act of creating is as rewarding as the finished product, fostering relaxation and a sense of accomplishment. So, gather your supplies, find your perfect stone, and let your creativity flow. Happy painting, and enjoy the magical world of rock art!