
Spooktacular DIY Halloween Candy Bowls: Easy & Budget-Friendly Decorations
Halloween is a time for enchanting transformations, turning the ordinary into the extraordinary, and creating lasting memories for family and friends. While costumes and spooky lights often take center stage, the small details truly elevate your celebration. Imagine the delight on trick-or-treaters’ faces when they encounter not just any candy receptacle, but a uniquely crafted, delightfully eerie, or charmingly spooky candy bowl!
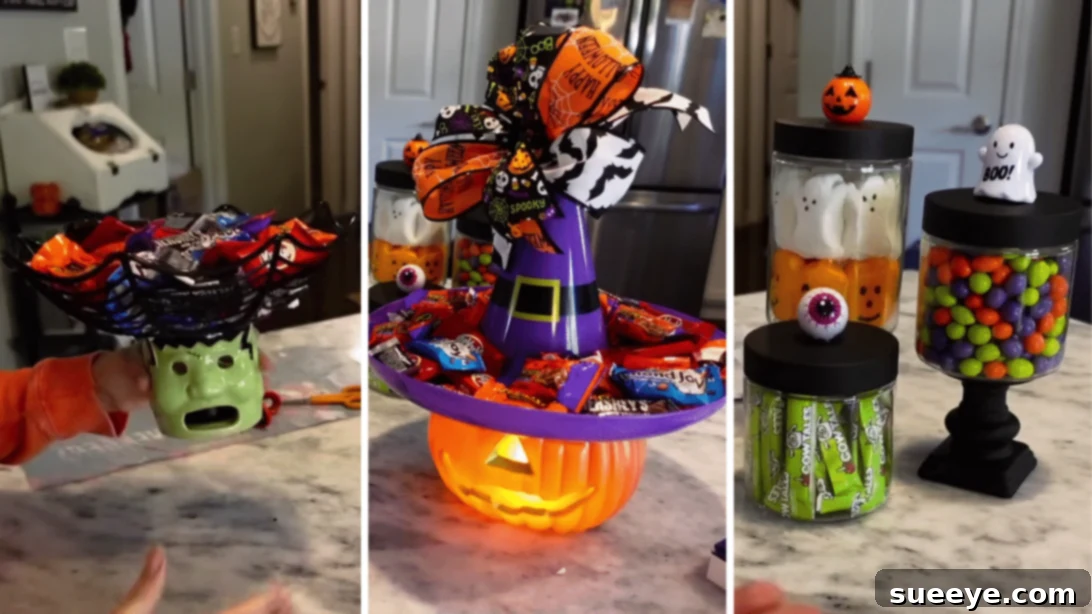
If you’re looking to complete your Halloween setup with a touch of personal flair and creative charm, these fun and adorable candy bowl ideas, inspired by the fantastic tutorials from Happiness is Homemade 4 on YouTube, are exactly what you need. They are designed to be both eye-catching and incredibly easy to make, ensuring your Halloween decorations stand out without breaking the bank or requiring extensive crafting skills.
These imaginative candy bowls are perfect for the bustling excitement of trick-or-treating. We’re confident that kids of all ages will absolutely adore their spooky yet cute designs, making the candy collection experience even more magical. What makes these DIY projects truly special is their accessibility: the majority of materials you’ll need can be effortlessly found at your local dollar store. This budget-friendly approach also encourages creative repurposing; scour your home for similar items that can be transformed into ghoulishly delightful decorations.
RELATED: Easy DIY Reversible Trick or Treat Bag
Crafting your own Halloween candy bowls adds a personal touch that store-bought decorations simply can’t replicate. Each bowl becomes a unique piece of art, reflecting your creativity and adding character to your festive display. Whether you’re hosting a ghoulish gathering, setting up a spooky front porch display, or simply want to add some extra festive cheer to your home, these DIY candy bowls are versatile and incredibly fun to make. They offer a fantastic opportunity to engage in a creative activity, either by yourself for a relaxing craft session or with family members for a memorable bonding experience.
You might also like this: 4 Last-Minute Halloween Face Paint Idea For Kids
Let’s dive into the simple yet impactful projects that will transform everyday items into Halloween masterpieces. Get ready to gather your supplies and unleash your inner Halloween decorator!
Essential Materials for Your DIY Halloween Candy Bowls
One of the greatest advantages of these Halloween candy bowl projects is their reliance on readily available and inexpensive materials. A quick trip to the dollar store will likely yield everything you need, making this a perfect last-minute craft idea or an activity for those on a tight budget. Before you begin, gather all your supplies in one place to ensure a smooth and enjoyable crafting process.
- Dollar Tree canisters (or similar clear plastic/glass containers)
- Candlestick holders (various heights and styles can add visual interest)
- Mini Halloween toys (spiders, bats, skeletons, eyeballs – whatever inspires you!)
- Black spray paint (matte or glossy, depending on your desired finish)
- Frankenstein tealight holder (or any small spooky figurine with an opening for a light)
- Spiderweb basket (or a decorative basket that evokes a Halloween theme)
- Black tealight (LED flickering tealights are safer and reusable)
- Plastic witch hat (a standard size for decoration)
- Flame glow jack-o-lantern (battery-operated for safety and longevity)
- Pencil (for marking and tracing)
- Hot glue gun and glue sticks (essential for quick, strong bonds)
- Ribbon (orange, black, purple, or striped for embellishment)
- Scissors (for cutting ribbon and any other necessary adjustments)
Beyond this list, feel free to explore your craft stash or dollar store aisles for additional embellishments. Think glitter, googly eyes, spooky fabric scraps, or even small artificial leaves. Personalizing your candy bowls is part of the fun! Remember to ensure you have good ventilation if you’re using spray paint, and always supervise children when using hot glue guns.
Step-by-Step Guide: Crafting Your Own Halloween Candy Bowls
Now that you have all your materials, let’s get crafting! These three distinct candy bowl designs offer a variety of spooky aesthetics, from charmingly creepy to elegantly eerie. Follow these detailed instructions to bring your Halloween visions to life.
1. The Elegant Halloween Candy Jar
This project transforms simple dollar store canisters and candlestick holders into sophisticated, elevated candy displays, perfect for a haunted mansion theme or a more refined Halloween party. The beauty lies in its simplicity and the dramatic effect of black spray paint.
- Prepare for Painting: Lay down newspaper or a drop cloth in a well-ventilated area. Carefully arrange your candlestick holders and the lids of your canisters on the protected surface.
- Spray Paint Components: Using your black spray paint, apply even, thin coats to both the candlestick holders and the canister lids. It’s often better to do two or three light coats rather than one thick coat to prevent drips and ensure a smooth, professional finish. Allow each coat to dry to the touch before applying the next.
- Allow for Complete Drying: Once painted, set all the components aside in a safe, well-ventilated area and let them dry completely. This might take a few hours or even overnight, depending on your paint type and humidity levels. Ensuring they are fully dry prevents smudges and ensures a strong bond in the next step.
- Assemble the Base: Once dry, take a candlestick holder. Dab a generous amount of hot glue around the top edges of the holder.
- Attach the Canister: Carefully center a canister (without its lid yet) directly on top of the hot-glued candlestick holder. Press down gently but firmly to secure the bond. Hold it in place for a few moments until the glue cools and sets completely, ensuring stability.
- Decorate the Lid: Get some mini Halloween toys – spiders, bats, tiny skulls, or anything spooky. Inspect them and remove any unnecessary plastic tabs or parts that would prevent them from sitting flat.
- Affix Lid Decorations: Apply a small amount of hot glue to the bottom of each mini Halloween toy. Position and glue them flat on top of each canister lid, arranging them creatively. You can create a cluster of spiders, a flying bat scene, or a ghostly graveyard. Allow the glue to dry completely.
- Final Touches: Once everything is dry and securely attached, place the decorated lids onto your assembled candy jars. Fill them with your favorite Halloween treats, and watch them become a centerpiece of your decor!
2. The Spooky Halloween Candy Basket
This straightforward project combines a Halloween-themed basket with a festive tealight holder to create an enchanting and softly glowing candy display. It’s quick, easy, and adds a warm, inviting (yet spooky) ambiance.
- Prepare Your Base and Basket: Take your Frankenstein tealight holder (or similar spooky figurine with a base) and your spiderweb basket. Ensure both are clean and free of dust.
- Apply Hot Glue: Apply a generous circle of hot glue around the rim or top surface of the Frankenstein tealight holder. Make sure to apply enough glue to create a strong bond with the basket.
- Attach the Basket: Carefully center the spiderweb basket on top of the hot-glued tealight holder. Press down gently but firmly to ensure the basket is securely attached and level. Hold it in place for a moment or two until the hot glue sets completely.
- Insert Tealight: Once the glue is dry and the basket is stable, place a black tealight inside the holder’s designated spot. For safety, especially if children are around, an LED flickering tealight is highly recommended. It provides the same spooky glow without any fire hazard.
- Display and Enjoy: Your spooky candy basket is now ready! Fill it with wrapped candies and place it in a prominent spot where its eerie glow can be appreciated.
3. The Whimsical Halloween Witch Hat Candy Bowl
This design ingeniously transforms a standard plastic witch hat and a jack-o-lantern into a charming and stable candy bowl. It’s a whimsical addition that’s sure to bring smiles.
- Position the Witch Hat: Place the plastic witch hat upside down on a flat, stable surface. Then, take your flame glow jack-o-lantern and position its base onto the brim of the witch hat, as if it’s “sitting” on it.
- Trace the Outline: Using a pencil, carefully trace around the base of the jack-o-lantern where it makes contact with the witch hat. This marking will serve as your guide for glue placement.
- Apply Hot Glue: Remove the jack-o-lantern. Apply a generous bead of hot glue along the pencil markings on the witch hat. Ensure an even application to create a strong, continuous bond.
- Reattach and Secure: Carefully place the jack-o-lantern back onto the witch hat, aligning its base with the hot glue markings. Press down firmly and hold it in place until the glue cools and sets completely.
- Enhance Stability (Optional but Recommended): For added stability, especially if the bowl will hold a lot of candy or be moved frequently, flip the entire assembly upside down. Apply extra hot glue around the seam where the jack-o-lantern meets the hat from underneath. This creates a reinforced bond and ensures your candy bowl is robust.
- Craft a Decorative Bow: Take your chosen ribbon and tie it into a neat bow. You can make a simple bow or a more elaborate multi-loop design.
- Attach the Bow: Apply a small dab of hot glue to the back of your ribbon bow. Affix it to the witch hat wherever you desire – perhaps at the front brim, or on the side for a jaunty look. Let the glue dry.
- Fill and Present: Once completely dry and stable, your witch hat candy bowl is ready for its grand debut! Fill it with a bounty of Halloween treats and enjoy the playful spirit it brings to your decorations.
Each of these DIY Halloween candy bowls offers a unique charm and serves as a delightful addition to your festive decor. Not only are they budget-friendly and easy to create, but they also allow for significant personalization. Experiment with different colors of spray paint, add glitter, or attach other small Halloween-themed embellishments to truly make them your own. The process is just as enjoyable as the outcome, providing a wonderful opportunity for creative expression.
Remember, safety first when crafting! Always use hot glue guns with care, especially if crafting with children, and ensure good ventilation when using spray paint. These projects are fantastic for involving the whole family, fostering creativity, and building excitement for Halloween night.
Once your masterpieces are complete, proudly display them! Place them on your entryway table, scatter them across your party buffet, or use them to greet trick-or-treaters at your front door. Their handmade charm will surely be a talking point and add an extra layer of magic to your Halloween celebrations.
These images are credited to Happiness is Homemade 4 via YouTube. We highly recommend visiting her channel and subscribing for more brilliant DIY ideas and crafting inspiration! Her clear tutorials make complex projects approachable and fun for everyone.
Embrace the Spirit of DIY This Halloween
The beauty of DIY Halloween decorations, especially these candy bowls, extends beyond mere aesthetics. It’s about the joy of creation, the satisfaction of making something unique, and the memories forged during the crafting process. Instead of simply buying decorations, you’re investing time and creativity into pieces that tell a story.
These three DIY Halloween candy bowls are more than just containers for treats; they are expressions of festive spirit and ingenuity. They demonstrate that you don’t need expensive supplies or advanced skills to create impactful holiday decor. With a bit of imagination and a few dollar store finds, you can transform ordinary items into extraordinary Halloween accents.
So, gather your materials, perhaps invite some friends or family members to join in the fun, and embark on these exciting DIY projects. Your Halloween celebration will be unforgettable, filled with spooky charm and personalized touches that everyone will admire. Happy crafting, and have a wonderfully eerie Halloween!