
Mastering the English Ivy Quilt Block: Your Comprehensive Guide to a Beautiful Quilt Project
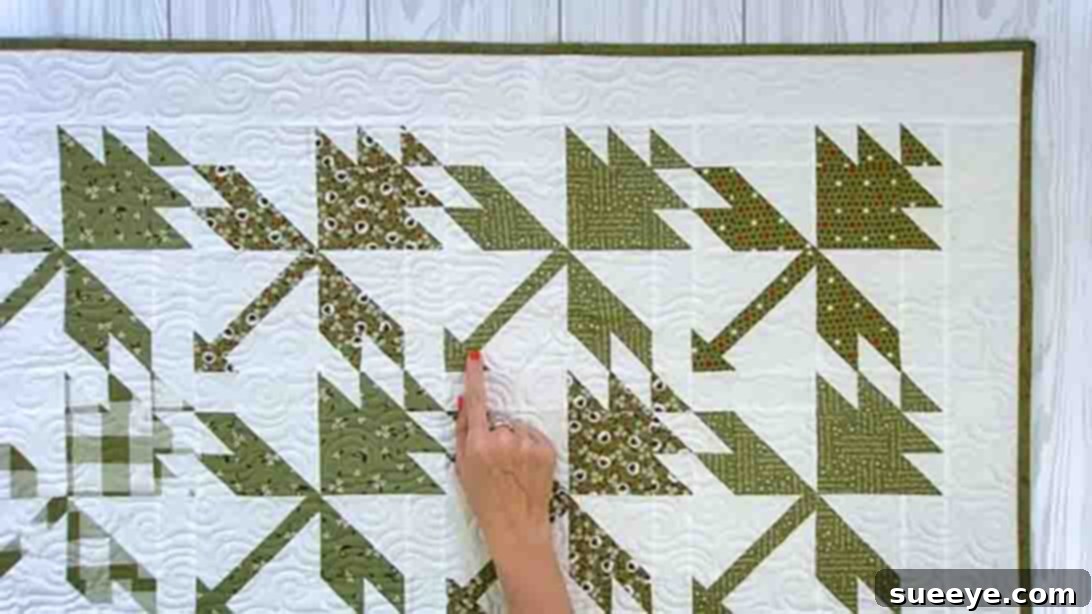
If you’re searching for your next captivating quilting adventure, look no further than the exquisite English Ivy Quilt Block. This stunning design, expertly showcased by the Fat Quarter Shop on YouTube, might appear intricate at first glance, but it’s surprisingly accessible and incredibly rewarding for quilters of all skill levels. Its timeless elegance makes it a personal favorite for creating memorable gifts or adding a touch of sophistication to any home decor project. Dive into this detailed guide and discover why the English Ivy Quilt Block is the perfect choice to elevate your quilting skills and bring a delightful touch to your fabric creations.
Whether you’re a seasoned quilter or just beginning your journey into the world of fabric artistry, the English Ivy Quilt Block offers a wonderful opportunity to hone your precision piecing and half-square triangle techniques. The finished block presents a beautiful, leafy motif that can be repeated to form a lush quilt top, a charming table runner, or even a decorative pillow. With clear instructions and visual support, you’ll gain confidence in your quilting abilities and be amazed at how quickly this beautiful design comes together.
This tutorial draws inspiration from the fantastic resources provided by the Fat Quarter Shop, renowned for their high-quality patterns and engaging video instructions. Their step-by-step approach ensures that every quilter can successfully complete this project. By following along, you’ll master the art of creating precise units that seamlessly combine into a breathtaking quilt block. Get ready to transform your fabric stash into a work of art!
Essential Materials for Your English Ivy Quilt Block
Before you begin sewing, gathering all your materials is key to a smooth and enjoyable quilting process. Precision in cutting and quality tools will significantly enhance your finished English Ivy Quilt Block. Here’s a detailed list of what you’ll need, along with insights into their importance.
- Free English Ivy Quilt Block Pattern: Your indispensable guide for this project. Click here to download your free PDF pattern directly from Fat Quarter Shop. This pattern provides all the measurements and diagrams you’ll need.
- Triangle Paper (or Half-Square Triangle Paper): This specialized paper is a game-changer for creating perfectly sized and consistent half-square triangles (HSTs) with ease. It helps maintain accuracy, especially for repetitive units.
- Assorted Quilting Cotton Fabrics: The heart of your project! Choose high-quality quilting cottons in various prints and solids to create contrast and visual interest. You’ll need designated “Print” fabrics for the ivy leaves and a “Background” fabric to make the design pop.
- Rotary Cutter, Mat, and Quilting Ruler: Essential tools for precise and efficient fabric cutting. A sharp rotary cutter, a self-healing mat, and an acrylic ruler with clear markings are crucial for accurate measurements.
- Sewing Machine: A reliable sewing machine with a quarter-inch presser foot will ensure consistent seam allowances.
- Thread: High-quality 50wt cotton thread that matches or blends with your fabrics.
- Pins or Fabric Clips: To hold fabric pieces securely in place before stitching.
- Iron and Ironing Board: Crucial for pressing seams correctly at each stage, which contributes significantly to the flatness and accuracy of your block.
- Fabric Marker or Pencil: For drawing lines on fabric when necessary.
- Small Scissors or Thread Snips: For trimming threads and dog ears.
Precise Cutting Instructions for One English Ivy Block
Accuracy in cutting is paramount in quilting, as it directly impacts how well your pieces fit together. Follow these detailed cutting instructions for one English Ivy Quilt Block. Remember to use a rotary cutter, mat, and ruler for the best results.
Print Fabrics (for the “ivy” elements):
- A) 1 – 5″ square: This will form a key component of one of your units, often featuring a focal fabric.
- B) 1 – 4″ square: Used in conjunction with a background fabric to create additional half-square triangles.
- C) 1 – 3 1/2″ square: A central piece in one of the block’s units.
- D) 5 – 2 1/2″ squares: These small squares are vital for your half-square triangle units, often in a vibrant print.
- E) 1 – 2″ square: The smallest square, it adds a finishing touch to one of the units.
Background Fabrics (to highlight the “ivy”):
- F) 2 – 4 1/2″ squares: These large squares provide contrast and structure to the block.
- G) 1 – 4″ square: Partnered with fabric B for half-square triangles.
- H) 5 – 2 1/2″ squares: Mirroring fabric D, these are essential for the primary half-square triangle units, often in a solid or subtle blender.
- I) 2 – 2″ x 5″ rectangles: These rectangular pieces act as sashing or connectors within specific units, adding length and definition.
Step-by-Step Directions: Assembling Your English Ivy Quilt Block
Now that your fabrics are perfectly cut, let’s bring the English Ivy Quilt Block to life! Follow these comprehensive steps, paying close attention to seam allowances (a consistent 1/4 inch unless otherwise specified) and pressing techniques for the best results.
Step 1: Crafting the Half-Square Triangles (HSTs) with Triangle Paper
This initial step focuses on creating a significant number of your half-square triangles (HSTs), which are foundational to the English Ivy pattern. Triangle paper makes this process incredibly precise and efficient.
- Prepare Your Fabrics: Begin by taking one 2½” Fabric D square (your print fabric) and one 2½” Fabric H square (your background fabric). Ensure these are both perfectly square and trimmed.
- Layering for HSTs: Place Fabric D and Fabric H right sides together, aligning all edges perfectly.
- Applying Triangle Paper: Lay your chosen triangle paper over the layered fabrics. The paper should have printed grid lines for sewing and cutting. Pin the paper to the fabric securely to prevent shifting during sewing. This is crucial for accuracy.
- Stitching: Reduce your sewing machine’s stitch length to approximately 1.5. This shorter stitch length helps perforate the paper more effectively, making it easier to remove later, and also creates a more secure seam. Stitch directly on the dotted lines indicated on the triangle paper.
- Cutting: After stitching all dotted lines, carefully cut along the solid lines of the triangle paper. Additionally, cut along the center line that divides the larger square into two smaller units. This method will yield a total of ten individual half-square triangles. For this specific block, you will only require nine of these HSTs.
- Finishing HSTs:
- Gently peel off the triangle paper from each HST. Take your time to avoid stretching the bias edges.
- Press the seam allowance toward the darker fabric to minimize bulk and ensure a crisp finish. Alternatively, you can press the seam open if you prefer.
- “Dog ears” are the small triangles of excess fabric that extend beyond the point of your seam. Carefully trim these off for a neat finish.
- Finally, press each HST open to its finished size. A ruler can be used to check that they measure accurately.
Step 2: Creating Larger Half-Square Triangles
This step introduces another method for creating HSTs, using a drawn line technique, which is excellent for larger units.
- Prepare Fabrics: Take one 4″ Fabric G square (background) and one 4″ Fabric B square (print).
- Marking: On the wrong side of your lighter fabric (Fabric G, typically), draw a diagonal line from one corner to the opposite corner. This will be your cutting line.
- Stitching Guidelines: Now, draw two additional lines, each ¼” away from your central diagonal line, one on each side. These outer lines are your stitching guides.
- Sewing: Place Fabric G and Fabric B right sides together, aligning edges. Stitch directly on the two outer lines you just drew. Do NOT stitch on the center line yet.
- Cutting: After stitching, carefully cut along the original central diagonal line. This action will divide your stitched square into two individual units.
- Finishing: Press the seam allowances towards the darker fabric or open, then trim any “dog ears.” Press these two new HSTs open and check their accuracy.
Step 3: Assembling the Upper Right, Upper Left, and Lower Right Units
Now we start combining our smaller units and fabric pieces to form the larger components of the English Ivy Quilt Block. This step involves careful arrangement and precise piecing.
- Upper Right Unit Construction:
- Take your 3½” Fabric C square.
- Arrange five of the small half-square triangles (from Step 1) around Fabric C, forming a design as shown in your free pattern. This usually involves placing HSTs on each side and two on opposite corners.
- Carefully sew these pieces together in rows, then join the rows to complete the upper right unit. Press seams as you go, ensuring they nest well to reduce bulk.
- Upper Left Unit Construction:
- Gather one 2″ x 5″ Fabric I rectangle, two small half-square triangles (from Step 1), and one of the larger half-square triangles (from Step 2).
- Refer to your free pattern for the exact arrangement of these pieces. This unit typically forms a linear design, perhaps mimicking a stem or vine.
- Sew these components together with a consistent ¼” seam allowance, pressing seams carefully after each join to maintain flatness.
- Lower Right Unit Construction:
- Construct this unit in a manner very similar to the upper left unit.
- You will use another 2″ x 5″ Fabric I rectangle, two small half-square triangles, and the remaining large half-square triangle.
- The key difference lies in the arrangement of the blocks, which should be clearly depicted in your free pattern. Pay close attention to orientation to ensure your ivy pattern flows correctly.
- Piece these together, pressing for accuracy and a flat finish.
Step 4: Completing the Final Unit and Assembling the Block
This final piecing stage brings together the last intricate section of your English Ivy Quilt Block and then combines all created units into the complete design.
- First Part of the Last Unit (Corner Triangle):
- Take one 5″ Fabric A square and one 4½” Fabric F square.
- On the wrong side of one Fabric F square (typically your background fabric), draw a diagonal line from one corner to the opposite corner.
- Place this Fabric F square right sides together onto one corner of your larger Fabric A square, aligning the edges.
- Stitch directly on the drawn line.
- Trim the excess fabric ¼” away from your stitched line, creating a new seam.
- Press the new corner unit open, revealing a perfectly formed triangle.
- Second Part of the Last Unit (Another Corner Triangle):
- Take the second 4½” Fabric F square.
- Draw a diagonal line on its wrong side from corner to corner.
- Place this Fabric F square onto another unstitched corner of your Fabric A square, ensuring it’s positioned correctly according to the pattern (e.g., the bottom right corner).
- Pin it securely in place to prevent any shifting.
- Stitch directly on the drawn line. Press the unit open. You now have two distinct corner units attached to your Fabric A.
- Third Part of the Last Unit (Small Finishing Triangle):
- Take your 2″ Fabric E square.
- Draw a diagonal line from corner to corner on its wrong side.
- Place this smaller Fabric E square onto the remaining unstitched corner of your Fabric A unit (e.g., the very bottom corner).
- Pin securely, stitch directly on the drawn line, and trim ¼” away from the stitched line.
- Press this final small triangle open. This completes the intricate “stem” or “corner” unit of your English Ivy block.
- Final Assembly of the Quilt Block:
- Now you have four main units: the upper right unit (from Step 3), the upper left unit (from Step 3), the lower right unit (from Step 3), and the complex unit you just finished (from Step 4).
- Lay out all four completed units on your design wall or a flat surface, arranging them precisely as depicted in the free English Ivy pattern. Double-check your orientation!
- Sew the units together in rows, and then join the rows to form the complete English Ivy Quilt Block.
- Press your finished quilt block carefully, squaring it up to ensure it meets the pattern’s final dimensions.
Tips for Quilting Success with the English Ivy Block
Achieving a perfectly pieced quilt block is incredibly satisfying. Keep these expert tips in mind to enhance your English Ivy quilting experience and ensure beautiful results every time:
- Accurate Cutting is Key: Invest in a good quality rotary cutter, ruler, and mat. Every millimeter counts when piecing, especially with intricate blocks like the English Ivy. Take your time and double-check measurements.
- Consistent Seam Allowance: A perfect ¼-inch seam allowance is crucial. Consider using a ¼-inch presser foot on your sewing machine to maintain consistency. Practice on scraps if you’re unsure.
- Pressing Matters: Pressing is not ironing. Lift and place your iron to press seams flat and square your units. Pressing after each step ensures flatter blocks and easier alignment in subsequent steps. You can choose to press seams open or to one side, but be consistent.
- Chain Piecing: For repetitive units like the half-square triangles, consider chain piecing. This involves feeding multiple units through your sewing machine one after another without lifting the presser foot, saving time and thread.
- Stitch Length: As mentioned, a slightly shorter stitch length (1.5-2.0 mm) creates stronger seams and can make paper removal easier when using triangle paper.
- Watch the Video: The Fat Quarter Shop tutorial video is an invaluable resource. Watching the steps demonstrated visually can clarify any ambiguities in written instructions.
- Square Up Your Units: After pressing each pieced unit, use a square-up ruler to trim it to its exact unfinished size. This step, though sometimes skipped, makes a huge difference in the overall accuracy of your final block.
- Patience and Enjoyment: Quilting is a journey, not a race. Take breaks, enjoy the process, and don’t be afraid to unpick (frog stitch) if a seam isn’t right. The joy is in the creation!
Why Choose the English Ivy Quilt Block for Your Next Project?
The English Ivy Quilt Block offers a unique blend of challenge and charm that appeals to a wide range of quilters. Here are a few reasons why this block stands out:
- Timeless Elegance: The design itself is classic and sophisticated, reminiscent of lush garden foliage. It translates beautifully into both traditional and modern quilt aesthetics, depending on your fabric choices.
- Skill Builder: This block effectively utilizes several fundamental quilting techniques, including precise cutting, half-square triangles (HSTs) made with different methods, and accurate unit assembly. It’s a fantastic way to refine your skills.
- Versatile Applications: Once mastered, a single English Ivy block can become a striking centerpiece for a decorative pillow or a tote bag. Multiple blocks can be combined to create a stunning full-sized quilt, a cozy throw, or an elegant table runner. Its adaptability makes it perfect for gifting or enhancing your home decor.
- Rewarding Process: Despite its initial appearance, the step-by-step nature of its construction is very satisfying. Watching the distinct units come together to form the intricate ivy pattern is a truly gratifying experience.
Selecting Your Fabrics: Bringing Your English Ivy to Life
The fabric choices you make will dramatically influence the final look and feel of your English Ivy Quilt Block. Consider these points when curating your fabric palette:
- Contrast is Key: Ensure there’s enough contrast between your “Print” fabrics (Fabrics A, B, C, D, E) and your “Background” fabrics (Fabrics F, G, H, I). This allows the ivy pattern to pop and prevents the design from getting lost. A mix of light and dark values works wonderfully.
- Color Palette:
- Traditional: Opt for rich greens, deep reds, and creams for a classic, autumnal ivy feel.
- Modern: Experiment with bright, solid colors or contemporary geometric prints with a crisp white or charcoal background.
- Seasonal: Imagine an English Ivy block in spring pastels, vibrant summer florals, or icy blues and whites for winter.
- Fabric Scale: Consider the scale of your prints. Smaller, intricate prints can add depth without overwhelming the detailed piecing of the block. Larger prints might be better suited for the larger pieces (like Fabric A) if you want to showcase a particular motif.
- Quality Matters: Use high-quality 100% quilting cotton. It cuts, sews, and presses beautifully, ensuring your finished block is durable and attractive.
- “Scrappy” vs. Coordinated: This block can look fantastic with a scrappy approach, using various greens for the ivy against a consistent background. Or, choose a coordinated fabric line for a harmonious, designer look.
English Ivy Quilt Block Tutorial: Your Path to a Beautiful Quilt
The English Ivy Quilt Block is more than just a pattern; it’s an opportunity to create something truly beautiful and enduring. By meticulously following these steps, utilizing the free pattern, and watching the invaluable Fat Quarter Shop video tutorial, you’ll be well on your way to mastering this delightful design.
Whether you’re making a single block for practice, assembling a series for a quilt top, or crafting a thoughtful gift, the satisfaction of creating the English Ivy Quilt Block is immense. Embrace the process, enjoy the creativity, and delight in the beautiful results of your quilting endeavors. Happy quilting!
RELATED: English Garden Quilt With Jenny Doan