
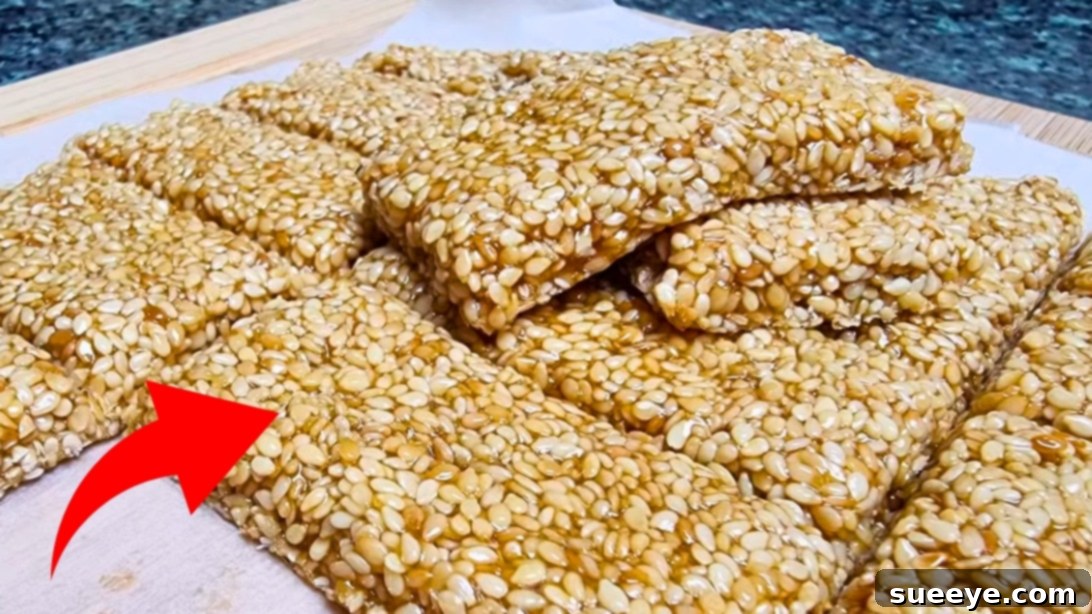
Craving a delightful sweet treat that’s both incredibly easy to make and remarkably healthy? Look no further! These No-Bake 2-Ingredient Crunchy Bars from Jasvini Foods are an absolute game-changer. Imagine a snack that requires minimal effort, zero baking, and comes together in under 10 minutes. Yes, it’s possible! Perfect for satisfying your sweet tooth without any guilt, these bars are not only gluten-free and flour-free but also packed with natural goodness. Whether you’re a busy parent, a health-conscious individual, or just someone who loves simple, delicious recipes, these crunchy sesame bars are sure to become a staple in your kitchen. They make an ideal accompaniment to your morning coffee or afternoon tea, offering a satisfying crunch and a boost of energy.
No-Bake 2-Ingredient Crunchy Bars: Your Ultimate Quick & Healthy Snack
In today’s fast-paced world, finding time to prepare nutritious and delicious snacks can be a challenge. That’s where this incredible recipe shines. We’re talking about a treat so simple, so quick, and so wholesome, you’ll wonder why you hadn’t discovered it sooner. These crunchy bars are a testament to the fact that you don’t need a long list of ingredients or complex techniques to create something truly special. With just two core ingredients – sesame seeds and maple or date syrup – you can whip up a batch of these delectable bars in mere minutes, making them an excellent choice for a last-minute dessert, a healthy snack for kids, or an energy bite before a workout.
Beyond their ease of preparation, these bars boast impressive dietary credentials. They are naturally gluten-free, flour-free, and can easily be made vegan by ensuring your choice of syrup is plant-based. This makes them a fantastic option for individuals with dietary restrictions or those simply looking to incorporate more whole, unprocessed foods into their diet. The rich, nutty flavor of roasted sesame seeds perfectly complements the natural sweetness of maple or date syrup, creating a harmonious blend that’s both comforting and invigorating. Get ready to impress your taste buds and simplify your snack routine with this irresistible recipe!
Why You’ll Absolutely Love These No-Bake Crunchy Bars
- Effortlessly Simple: With just two primary ingredients, this recipe minimizes shopping and preparation time. It’s perfect for beginners or those who prefer straightforward cooking.
- No Baking Required: Say goodbye to turning on the oven! This recipe is entirely stovetop-based, making it ideal for hot weather or when you’re short on time.
- Lightning Fast: From start to finish, you can have a fresh batch of these crunchy bars ready in approximately 10 minutes, plus a brief cooling period.
- Naturally Gluten-Free & Flour-Free: An excellent option for those with gluten sensitivities or anyone looking to reduce their grain intake.
- Wholesome Ingredients: Made with nutrient-rich sesame seeds and natural sweeteners like maple or date syrup, these bars offer a healthier alternative to many store-bought snacks.
- Versatile Snack: Perfect as a quick breakfast on the go, a satisfying mid-day snack, a delightful dessert, or a pre/post-workout energy boost.
- Customizable: While delicious on their own, these bars can be easily adapted with additional flavors and textures to suit your preferences.
- Kid-Friendly: A great way to introduce healthy seeds into your children’s diet in a fun and appealing format.
Ingredients for Your Delicious Crunchy Bars
The magic of this recipe truly lies in its simplicity. You only need a couple of staple ingredients to create these incredibly satisfying bars. High-quality ingredients will yield the best flavor and texture, so choose wisely!
- 1 cup of Sesame Seeds: These tiny powerhouses are the star of our recipe. They contribute a wonderful nutty flavor and a satisfying crunch. Sesame seeds are rich in healthy fats, fiber, protein, and essential minerals like calcium and magnesium. You can use either hulled or unhulled sesame seeds, though hulled seeds tend to have a milder flavor and slightly lighter color when roasted. Ensure they are fresh for the best taste.
- 1/2 cup of Maple Syrup (or Date Syrup): This is our natural sweetener and the binding agent that holds the bars together.
- Maple Syrup: Opt for pure maple syrup, preferably Grade A dark, robust taste, for a rich, authentic flavor. Maple syrup offers more nutritional benefits than refined sugar, containing antioxidants and minerals.
- Date Syrup: A fantastic alternative to maple syrup, especially if you prefer a different flavor profile or need to ensure the recipe is entirely plant-based. Date syrup is made from natural dates and provides a rich, caramel-like sweetness along with fiber and various vitamins and minerals.
- Oil (optional, for greasing the baking pan): A light, neutral-flavored oil like coconut oil, avocado oil, or even a basic vegetable oil works perfectly. This step is crucial for preventing sticking and ensuring easy removal of your finished bars.
An Important Note on Sweeteners: Why Honey is NOT Recommended
While honey is a natural sweetener often used in no-bake recipes, it is strongly advised against for this particular recipe when heat is applied. The primary reason is that heating honey, especially to the temperatures required for this recipe, can significantly diminish its beneficial enzymes and antioxidants. More importantly, when honey is heated to high temperatures (above 104°F or 40°C), its molecular structure can change, potentially leading to the formation of compounds that are considered less healthy or even harmful in traditional Ayurvedic practices. Furthermore, heating honey can alter its taste, making it less pleasant, and change its consistency in a way that might not bind the sesame seeds as effectively as maple or date syrup, which are more stable under heat for this application. For the best taste, texture, and health benefits, stick to maple syrup or date syrup.
Essential Equipment for Your Crunchy Bar Creation
Gathering your tools beforehand will make the process even smoother and quicker. You won’t need anything fancy, just standard kitchen items:
- Non-stick Frying Pan or Skillet: Essential for roasting the sesame seeds and cooking them with the syrup. A good quality non-stick pan will prevent sticking and ensure even cooking.
- Baking Tray or Square Pan (approx. 8×8 inches): This will be the mold for your bars. The size can vary slightly depending on how thick you prefer your bars.
- Parchment Paper (Baking Sheet): Absolutely crucial for easy removal of the bars from the pan. Make sure you have enough to line the bottom and extend over the edges.
- Silicone Spatula or Wooden Spoon: For stirring the sesame seed mixture and spreading it evenly in the pan. Silicone spatulas are particularly good as they are heat-resistant and non-stick.
- Flat-Bottomed Glass or Small Rolling Pin: To firmly press the mixture into an even layer, ensuring compact and sturdy bars.
- Pastry Brush (optional): For applying oil to the pan. You can also use a paper towel.
- Sharp Knife or Pizza Cutter: For cleanly slicing the cooled bars into individual portions.
- Measuring Cups: For accurate measurement of ingredients.
Step-by-Step Instructions: Crafting Your Crunchy Bars
Follow these simple steps closely to create perfect, irresistible crunchy bars every time. Remember, the key is attention to detail and working efficiently!
Step 1: Prepare Your Baking Pan
First things first, let’s get your baking pan ready. Take your chosen baking tray or square pan and use a pastry brush or a piece of paper towel to lightly coat the inside with a thin layer of oil. Ensure all surfaces, including the sides, are lightly greased. This initial greasing acts as an extra layer of protection against sticking. Next, carefully line the greased pan with parchment paper. Make sure the parchment paper extends up the sides of the pan, ideally with an overhang on two opposite sides. This overhang will serve as convenient handles later, allowing you to easily lift the entire slab of bars out of the pan. A well-prepared pan is crucial for a smooth removal process, so don’t skip this step. Set your prepared pan aside for now.
Step 2: Roast the Sesame Seeds to Golden Perfection
Place a clean, dry non-stick pan over medium-low heat. Add one cup of sesame seeds to the pan. The goal here is to gently roast the seeds, enhancing their natural nutty flavor and aroma, which is vital for the overall taste of your crunchy bars. Begin to stir the sesame seeds constantly using a silicone spatula or wooden spoon. This continuous stirring is incredibly important to ensure even roasting and to prevent any seeds from burning, as burnt sesame seeds can impart a bitter taste. Continue roasting for about 3-5 minutes, or until the seeds turn a delicate, light golden-brown color and become fragrant. You’ll notice a distinct nutty aroma filling your kitchen. Keep a close eye on them, as they can go from perfectly toasted to burnt very quickly. Once they reach the desired color and aroma, immediately proceed to the next step.
Step 3: Combine and Cook the Mixture
Once your sesame seeds are perfectly roasted, reduce the heat to low. Now, carefully add one-half cup of maple syrup (or date syrup) directly into the pan with the roasted sesame seeds. You’ll notice the syrup will instantly begin to bubble vigorously upon contact with the hot pan and seeds. This is normal. Immediately begin to mix the syrup and sesame seeds together using your spatula. Continue to stir continuously, ensuring all the sesame seeds are thoroughly coated in the syrup. Let this mixture cook over low heat for approximately five minutes. During this time, the syrup will thicken and caramelize, binding with the sesame seeds. The constant stirring prevents sticking and burning, ensuring an even, glossy coating. You’ll observe the mixture becoming increasingly thick and forming a cohesive mass that pulls away from the sides of the pan. This indicates it’s ready. The goal is a consistency that is thick enough to hold its shape once cooled, but still pliable enough to spread. If the mixture doesn’t spread easily through the pan with your spatula, it’s a good sign it has thickened sufficiently.
Step 4: Transfer, Spread, and Press
Working quickly, as the mixture will begin to set as it cools, immediately transfer the hot sesame seed and syrup mixture from the pan into your previously prepared baking tray lined with parchment paper. Use your silicone spatula to spread the mixture evenly across the bottom of the pan. Aim for a uniform thickness throughout. For best results and a truly compact, crunchy bar, use a glass with a flat bottom or a small rolling pin to firmly press the mixture down. Apply consistent pressure across the entire surface to compress the seeds and syrup tightly together. This step is crucial for achieving that characteristic crunch and ensuring the bars don’t crumble. Once pressed, set the pan aside and allow the mixture to cool down undisturbed for about two to three minutes. This brief cooling period helps the bars solidify enough for the next step, but doesn’t let them become too hard to slice cleanly.
Step 5: Slice, Serve, and Savor!
Once the bars have cooled sufficiently in the pan – they should be firm to the touch but not yet rock-hard – it’s time to remove them. Gently lift the entire slab of crunchy goodness out of the pan by pulling on the parchment paper overhangs. Transfer it to a clean, flat surface or a sturdy chopping board. Now, with a sharp knife or a pizza cutter, carefully slice the large slab into your desired bar shapes. You can make them long and thin, or shorter and wider, depending on your preference. For neat, clean cuts, apply firm, even pressure. Once sliced, carefully peel the individual bars away from the parchment paper. They should come off easily. Your delicious No-Bake 2-Ingredient Crunchy Bars are now ready to be served! Enjoy them immediately with your favorite coffee or tea, or store them for later indulgence. Each bite delivers a perfect balance of nutty flavor and satisfying crunch. Enjoy!
Tips for Achieving Perfect Crunchy Bars Every Time
- Don’t Skip Roasting: Roasting the sesame seeds is key to developing their deep, nutty flavor and enhancing the crunch. Raw seeds will result in a much blander bar.
- Low and Slow Heat: Whether you’re roasting the seeds or cooking the syrup mixture, use low to medium-low heat. High heat can burn the seeds quickly or cause the syrup to crystallize or burn, leading to a bitter taste.
- Constant Stirring: This cannot be emphasized enough. For both roasting and cooking with syrup, continuous stirring ensures even cooking and prevents any part of the mixture from sticking or burning.
- Work Quickly: Once the syrup and seeds are combined and cooked, the mixture will begin to set as it cools. Be prepared to transfer, spread, and press immediately.
- Press Firmly: A well-compressed mixture results in sturdy, compact bars that won’t crumble. Use a flat-bottomed glass or a rolling pin and apply good pressure.
- Allow Adequate Cooling: While the initial cooling is quick, for the cleanest cuts and best texture, let the bars cool completely before serving, ideally at room temperature for about 15-30 minutes, or even a short stint in the fridge.
- Accurate Measurements: Especially for the syrup, precise measurements ensure the correct binding consistency.
Creative Variations & Customizations
While these bars are fantastic in their original form, they also serve as an excellent base for experimentation. Here are some ideas to spark your culinary creativity:
- Nutty Additions: Introduce other finely chopped nuts like almonds, pistachios, cashews, or peanuts for added flavor and texture. Add them along with the sesame seeds during the roasting stage or at the end.
- Dried Fruit Boost: Mix in a handful of finely chopped dried fruits such as cranberries, raisins, apricots, or dates after the mixture has cooked but before transferring to the pan.
- Flavor Enhancers: A dash of vanilla extract, a pinch of cinnamon, cardamom, or even a tiny amount of orange or lemon zest can elevate the flavor profile. Add these at the end of the cooking process.
- Chocolate Drizzle: For a decadent touch, melt some dark or milk chocolate and drizzle it over the cooled and sliced bars. Let the chocolate set before serving.
- Coconut Love: Toasted shredded coconut can be mixed into the sesame seeds or sprinkled on top of the pressed bars for an exotic twist.
- Seed Mix: Instead of just sesame seeds, try a blend of various seeds like sunflower seeds, pumpkin seeds, or chia seeds. Adjust quantities to maintain the overall seed-to-syrup ratio.
Storing Your Delicious Crunchy Bars
Proper storage ensures your no-bake crunchy bars remain fresh, crisp, and delicious for longer:
- Room Temperature: Once completely cooled, store the bars in an airtight container at room temperature. They will retain their crunch and freshness for up to 5-7 days. Avoid direct sunlight or warm environments.
- Refrigeration: For a firmer texture and extended freshness, you can store them in an airtight container in the refrigerator for up to 2 weeks. They might become slightly harder when cold, but will soften a bit at room temperature.
- Freezing: For long-term storage, wrap individual bars tightly in plastic wrap, then place them in a freezer-safe airtight container or bag. They can be frozen for up to 2-3 months. Thaw at room temperature for a few minutes before enjoying.
- Layering: If stacking bars, place a small piece of parchment paper between layers to prevent them from sticking together.
Frequently Asked Questions (FAQs)
Q: Can I use honey instead of maple or date syrup?
A: As noted in the ingredients section, it is not recommended to use honey in this recipe because heating honey to high temperatures can diminish its beneficial properties and potentially form less healthy compounds. For the best results and health benefits, stick with maple syrup or date syrup.
Q: My bars aren’t crunchy, what went wrong?
A: There could be a few reasons:
- Under-roasted sesame seeds: Ensure the seeds are a light golden-brown and fragrant.
- Insufficient cooking time with syrup: The syrup needs to cook down and thicken enough to bind the seeds firmly. It should be thick and pull away from the pan.
- Not enough pressing: Ensure you press the mixture very firmly into the pan.
- Not cooled enough: The bars must be completely cooled for optimal crunch.
Q: My bars are too hard or brittle. What can I do?
A: This usually means the syrup mixture was cooked for too long, causing it to over-caramelize and harden excessively. Reduce the cooking time slightly next time. If they are already made, you might try letting them sit at room temperature for a while to soften slightly, or gently warm them for a few seconds if you don’t mind a softer texture.
Q: Are these bars truly vegan?
A: Yes, if you use maple syrup or date syrup, these bars are naturally vegan as both are plant-based sweeteners. Sesame seeds are also plant-based. Ensure your oil choice is also vegan.
Q: Can I make a larger batch?
A: Absolutely! Simply double or triple the ingredients. Just make sure to use a larger pan to maintain the desired thickness, and you may need to adjust the cooking time slightly for the syrup mixture, as a larger volume will take longer to thicken. Always ensure even cooking and stirring.
Q: Can I add protein powder to these bars?
A: Adding protein powder can be tricky in no-bake recipes as it can affect texture and binding. If you wish to try, add a very small amount (e.g., 1-2 tablespoons) of a neutral-flavored protein powder at the very end of Step 3, just before transferring to the pan. Mix quickly and thoroughly. Be aware it might slightly alter the crunchiness and might require a bit more syrup for binding.
We hope these tips and FAQs help you create the perfect batch of No-Bake 2-Ingredient Crunchy Bars. They’re a simple, healthy, and incredibly satisfying treat that you’ll want to make again and again!