
DIY Z Gallery Makati Plaque Dupe: Achieve High-End Decor for Less
Are you a fan of chic, designer home decor but not the hefty price tags that often come with it? If so, you’re in for a treat! We’ve uncovered an incredibly clever and surprisingly simple DIY project that allows you to replicate a stunning high-end piece for just a fraction of its original cost. Imagine transforming your living space with elegant wall art that looks like it came straight from an upscale boutique, but cost you mere dollars to create. This is not just a project; it’s a budget-savvy decorator’s dream come true!
The inspiration for this remarkable DIY comes from the stylish Z Gallery, renowned for its luxurious home furnishings. Specifically, we’re talking about their captivating “Makati Plaque,” which, while undeniably beautiful, comes with a substantial price tag of around $140. For many, that price makes it an aspirational piece rather than an achievable one. However, with a dash of creativity and a few inexpensive materials, you can craft an identical-looking piece that will leave your guests wondering where you found such an exquisite item.
The Allure of the Makati Plaque: Designer Style at a Premium Price
The original Z Gallery Makati Plaque is celebrated for its distinctive design and sophisticated appeal. It typically features a geometric pattern, often in a metallic finish like gold, mounted within a frame and elevated on a solid base. This layered construction gives it a substantial, three-dimensional quality, making it a focal point in any room. Its minimalist yet striking aesthetic complements a wide range of interior design styles, from modern and contemporary to transitional and even glam. The clean lines, the shimmer of gold, and the architectural depth combine to create a statement piece that exudes luxury.
However, the beauty of such designer items often comes at a premium. The $140 price point for a single decorative plaque can be prohibitive for many who are trying to furnish their homes on a budget. This is precisely why the DIY movement thrives – it offers an empowering alternative, allowing individuals to enjoy the beauty of high-end design without the financial strain. Our goal here is to show you how to capture the essence of the Makati Plaque, replicating its visual impact and quality finish, all while keeping your wallet happy.
Why DIY? The Unbeatable Benefits of Crafting Your Own Decor
Beyond the obvious financial savings, embarking on a DIY home decor project offers a plethora of benefits. Firstly, there’s immense satisfaction in creating something beautiful with your own hands. The sense of accomplishment when you display a piece you’ve made is unparalleled, adding a personal touch that mass-produced items simply can’t match. Secondly, DIY allows for complete customization. While the Z Gallery plaque is specific, your homemade version can be adapted to perfectly match your existing decor, color scheme, or personal taste. You can experiment with different colors, textures, and finishes to make it truly unique.
Moreover, DIY projects are often more sustainable. By repurposing common household items or using affordable, readily available materials, you reduce waste and minimize your environmental footprint. It’s a fantastic way to stretch your budget, unleash your creativity, and infuse your home with character and charm. This particular project stands out because it’s genuinely easy, requiring no specialized skills or expensive tools, making it accessible even for beginners.
Gather Your Materials: What You’ll Need for Your DIY Makati Plaque
The true genius of this DIY project lies in the simplicity and affordability of its components. You’ll be amazed at how everyday items can be transformed into something so elegant. Here’s a detailed look at what you’ll need:
The Star of the Show: The Gold Vinyl Placemat
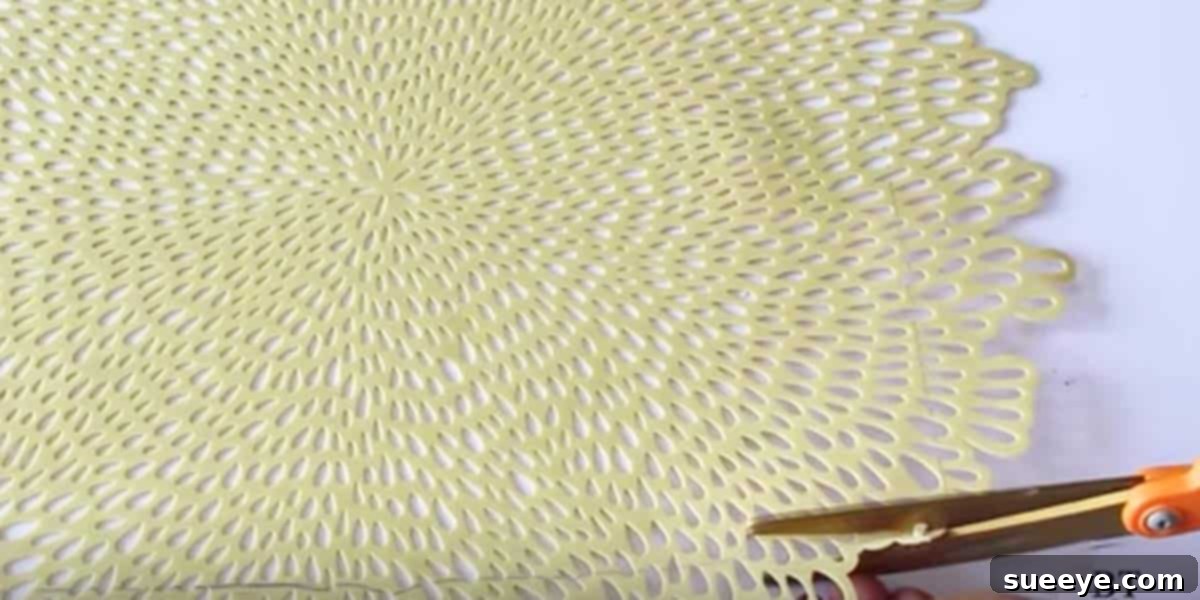
This is where the magic truly begins! The core of your Makati Plaque will be a gold vinyl placemat. Our inspiration found hers for an unbelievable $0.98 at Walmart. Other similar stores like “At Home” are also excellent places to scour for these gems, often at bargain prices. The key is to find a placemat with an interesting, preferably geometric or textured, pattern that mimics the sophisticated look of the original Z Gallery piece. Vinyl is ideal because it’s durable, easy to cut (if needed), and provides that desirable metallic sheen. Don’t be afraid to look at various designs; a little creativity can turn a simple placemat into a stunning artistic element.
The Foundation: Wood Blocks for Dimension
To achieve the layered, three-dimensional effect characteristic of the Makati Plaque, you’ll need two blocks of wood. The suggested sizes are a smaller block (approximately 5″ x 5″) and a slightly larger one (around 6.5″ x 6.5″). These can be easily found at craft stores like Michael’s. You might also find suitable pre-cut wood pieces at hardware stores or even salvage some from scrap wood. The exact dimensions aren’t as critical as ensuring you have two distinct sizes that can be stacked to create a stepped appearance. The raw wood provides a perfect canvas for painting or staining, or you can leave it natural for a rustic contrast.
The Frame: Adding Structure and Style
A simple picture frame will serve as the elegant border for your placemat design. The Dollar Store is an excellent source for inexpensive frames, usually available for just a dollar. Look for a frame that is a suitable size for your placemat, or one that you can easily trim the placemat to fit. The color of the frame isn’t crucial initially, as you’ll be customizing it. The important thing is its structural integrity and the ability to hold your design securely.
The Essential Adhesives and Tools
- Rapid Fuse Wood Adhesive: This adhesive is highly recommended for its quick-drying properties. It typically sets in just 30 seconds and fully cures in about 30 minutes, allowing you to move through your project efficiently. Its strong bond is perfect for securing the wood blocks together.
- Spray Paint: A can of spray paint is essential for customizing your frame. Gold spray paint is ideal for replicating the Z Gallery look, but you could choose silver, black, or any metallic finish that complements your decor. Opt for a good quality spray paint for an even, durable finish.
- Sandpaper: Fine-grit sandpaper (around 120-220 grit) will be needed to smooth the edges of your wood blocks, ensuring a polished, professional look.
- Measuring Tape/Ruler: For precise placement and measurements.
- Craft Knife or Scissors: To trim the vinyl placemat if necessary.
- Protective Drop Cloth or Newspaper: To protect your work surface during spray painting.
- Masking Tape (Optional): For clean lines during painting or for holding pieces temporarily.
Step-by-Step Guide: Crafting Your Z Gallery-Inspired Makati Plaque
Now that you have all your materials ready, let’s dive into the simple steps to create your stunning DIY Makati Plaque. Remember, patience and attention to detail will yield the best results!
Step 1: Preparing Your Wooden Foundation
Begin by taking your two wood blocks, the smaller (5″ x 5″) and the larger (6.5″ x 6.5″). Apply a generous amount of Rapid Fuse Wood Adhesive to the center of the larger block. Carefully center the smaller block on top of the larger one, ensuring it is perfectly aligned. Press down firmly for about 30 seconds to allow the adhesive to bond. This fast-acting glue is a game-changer, significantly reducing project time. Once the blocks are securely attached and the adhesive has cured (approximately 30 minutes), use fine-grit sandpaper to gently smooth all the edges and surfaces of the assembled wood block. This step removes any splinters or rough patches, giving your plaque a professional, finished appearance. Wipe away any dust with a clean cloth.
Step 2: Customizing Your Picture Frame
Take your Dollar Store picture frame apart, removing the glass, backing, and any matting. You will only be working with the frame itself. In a well-ventilated area, preferably outdoors, lay the frame on a protective drop cloth or newspaper. Apply several thin, even coats of your chosen spray paint (e.g., gold) to the frame. Holding the can about 6-8 inches away, sweep it back and forth, overlapping each pass slightly. Allow each coat to dry completely before applying the next to prevent drips and ensure a smooth, uniform finish. This might take anywhere from 15-30 minutes per coat, depending on your paint and climate. Once painted, set the frame aside to dry thoroughly, ideally overnight, to ensure it’s fully cured.
Step 3: Transforming the Placemat
While your frame dries, prepare your gold vinyl placemat. If your placemat has a distinct pattern, decide which portion you want to feature within your frame. Use the frame’s opening as a guide to determine the exact size you’ll need. Carefully measure and mark the placemat, then use a craft knife or sharp scissors to cut it to fit precisely within the frame opening. Ensure the cut edges are clean and straight for a polished look. If your placemat has a backing, you might consider removing it if it makes the placemat too thick for the frame. Some placemats are thinner vinyl and won’t require trimming.
Step 4: Assembling Your Masterpiece
Once your frame is completely dry, reassemble it with the cut vinyl placemat instead of glass. Carefully place the placemat into the frame, ensuring it is centered and sits flat. Replace the backing of the frame to secure the placemat in place. If your frame doesn’t have a backing or if the placemat is too thick, you can use a strong adhesive (like E6000 or even hot glue) around the edges of the placemat on the back of the frame to hold it. Now you have a beautifully framed, Z Gallery-inspired metallic pattern.
Step 5: The Finishing Touches
Finally, it’s time to bring all the elements together. Apply a strong adhesive to the back of your newly framed placemat. Carefully center and press the framed piece onto the top of your prepared wood block foundation. Hold firmly for the adhesive to bond. If using Rapid Fuse, this will be quick; for other glues, you might need to clamp it or weigh it down while it cures. Once fully secure, stand back and admire your handiwork! You’ve just created a stunning piece of wall art that looks like it cost a fortune, but was made for mere dollars. Your Z Gallery Makati Plaque dupe is now ready to adorn your walls!
Expert Tips for a Flawless DIY Makati Plaque
To ensure your project turns out perfectly, consider these additional tips:
- Ventilation is Key: Always use spray paint in a well-ventilated area, preferably outdoors, and consider wearing a mask to protect yourself from fumes.
- Thin Coats for Spray Paint: Patience with spray paint will pay off. Multiple thin coats are always better than one thick coat, preventing drips and achieving a smoother, more professional finish.
- Practice Makes Perfect: If you’re new to spray painting or cutting materials, consider doing a small test run on a scrap piece first.
- Read Adhesive Instructions: Always follow the manufacturer’s instructions for any adhesive you use, especially regarding drying and curing times.
- Cleanliness: Ensure your wood blocks are free of dust and debris before gluing and painting to ensure proper adhesion and a smooth finish.
- Sourcing Materials: Keep an eye out for sales at craft stores for wood blocks or placemats. Thrift stores can also be a treasure trove for unique frames or even metallic materials that can be repurposed.
Unleash Your Creativity: Customization Ideas for Your Wall Art
While the gold Z Gallery look is highly coveted, this DIY project is incredibly versatile. Here are some ideas to personalize your Makati Plaque:
- Color Palette: Experiment with different spray paint colors for the frame and even for the wood blocks. Silver, black, white, or even a bold jewel tone can create a completely different vibe.
- Placemat Power: Look for placemats with different textures or patterns. A faux leather placemat, a woven design, or even one with an intricate mandala pattern could be stunning.
- Wood Block Finishes: Instead of leaving the wood blocks natural, consider painting them to match the frame, staining them a rich dark wood tone, or even applying a decorative stencil pattern.
- Embellishments: Add small decorative elements like faux gems, studs, or a thin strip of metallic trim around the edge of the frame for an extra touch of glam.
- Size Variations: Create a series of plaques in different sizes and arrange them in a gallery wall display for a dynamic and cohesive look.
- Orientation: While typically displayed as a square, consider if your placemat pattern allows for a diamond or even rectangular orientation within the frame for a unique twist.
Why This DIY Project is a Must-Try for Every Home Decor Enthusiast
In conclusion, this DIY Z Gallery Makati Plaque dupe is more than just a craft project; it’s an intelligent way to elevate your home decor without breaking the bank. It demonstrates how a little inspiration, a keen eye for affordable materials, and a willingness to get creative can result in truly spectacular outcomes. The fact that you can achieve a sophisticated, high-end look that is almost indistinguishable from a $140 designer piece for a mere fraction of the cost is, in our opinion, a phenomenal win.
So, whether you’re a seasoned DIY pro or just starting your journey into crafting your own home decor, we wholeheartedly encourage you to give this project a try. It’s incredibly rewarding, budget-friendly, and will undoubtedly add a touch of personalized elegance to your living space. Prepare to impress your friends and family with your incredible sense of style and your knack for smart, affordable decorating!