
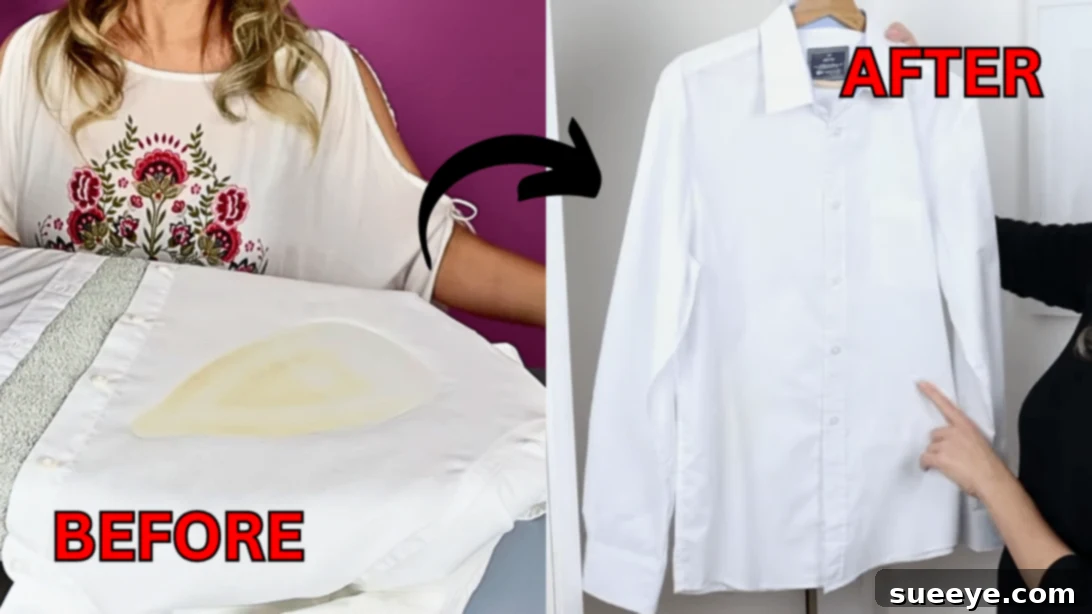
There’s nothing quite like the satisfaction of wearing a freshly ironed shirt, crisp and wrinkle-free. However, this common household chore can sometimes turn into a nightmare when an overheated iron leaves behind unsightly burnt marks, scorching your beloved garments. Many of us have experienced that sinking feeling, believing a favorite piece of clothing is ruined forever. This article offers a beacon of hope for such unfortunate incidents, revealing a surprisingly simple yet incredibly effective method to eliminate those dreaded iron burns and restore your clothes to their former glory.
Imagine purchasing that perfect shirt you’ve been eyeing for months, only to accidentally scorch it during its first ironing session. This precise scenario recently unfolded for me. After enjoying my new acquisition on a few occasions, a momentary lapse in attention or an iron set to the wrong temperature resulted in distinct burnt marks. My heart sank, convinced the shirt was irreparable, a permanent reminder of an ironing mishap. However, driven by the desire to salvage what had quickly become a wardrobe staple, I embarked on a quest for a solution.
My search led me to an ingenious hack shared by Ironing Lab on YouTube, which promised to work wonders. Skeptical yet hopeful, I followed their detailed instructions, and to my astonishment, the results were nothing short of miraculous. The stubborn burn marks, which initially seemed indelible, faded to the point where they are now almost invisible. This transformative method not only saved my favorite shirt but also instilled a newfound confidence in tackling future laundry challenges. If you’re grappling with similar iron-induced woes, prepare to be amazed by this practical and accessible solution. You can see the original video tutorial for yourself to understand the technique visually.
Understanding Why Iron Burns Occur and How to Prevent Them
Before diving into the fix, it’s beneficial to understand why clothes get burnt during ironing. Scorching typically happens when the iron’s temperature is too high for the fabric type, or when the iron remains stationary on one spot for too long. Synthetic fabrics like nylon and polyester are particularly susceptible to heat damage, melting or scorching easily, while natural fibers like cotton and linen can also burn if subjected to excessive heat. Prevention is always better than cure, so here are crucial tips to avoid future iron burn marks:
- Check Fabric Labels: Always refer to the care label on your garment for recommended ironing temperatures.
- Sort Clothes by Fabric Type: Iron clothes requiring lower temperatures first, gradually increasing the heat for more heat-resistant fabrics.
- Use a Pressing Cloth: For delicate fabrics or dark-colored garments, place a thin cotton cloth (or a specialized pressing cloth) between the iron and the fabric to protect it.
- Keep the Iron Moving: Avoid letting the iron rest on any one spot for too long. Maintain a continuous, smooth motion.
- Test on an Inconspicuous Area: If unsure about a fabric’s heat tolerance, test the iron’s temperature on an inside seam or hem before ironing the visible parts.
- Use Steam Wisely: Steam can help remove wrinkles at lower temperatures, reducing the risk of scorching. However, excessive steam on certain fabrics can cause water marks.
Even with the best precautions, accidents can happen. When they do, knowing how to remedy the situation can save your cherished clothing. The method we’re about to explore is specifically designed for light to moderate scorch marks, where the fabric is discolored but not completely melted or singed through. For severe burns resulting in holes or extensive damage, unfortunately, the garment may be beyond saving.
Materials for Removing Burnt Iron Marks: Your Rescue Kit
Gathering the right tools is the first step towards successfully removing those frustrating burn marks. The beauty of this method lies in its simplicity and the accessibility of the required items. You likely already have most of these lying around your house, making this a convenient and cost-effective solution for ironing mishaps. Here’s what you’ll need:
- Iron: Ironically, you’ll need your iron again, but this time, it will be used carefully as part of the remediation process.
- 3% Hydrogen Peroxide: This is the star of our solution. Available at most pharmacies and supermarkets, hydrogen peroxide is a mild bleaching agent that effectively lifts discoloration. Ensure it’s the standard 3% solution, as stronger concentrations can be too harsh for fabrics.
- A Small or Medium-Sized Bowl: For soaking your small towel in the hydrogen peroxide.
- A Large Towel: This will act as a protective layer on your ironing board, preventing the hydrogen peroxide from seeping through and potentially damaging your board.
- A Small Cotton Towel (or Washcloth): This will be your application tool, soaking up the hydrogen peroxide and transferring it to the burnt area. Make sure it’s clean and color-safe.
How to Remove Burnt Iron Marks: A Step-by-Step Guide to Fabric Restoration
With your materials ready, let’s walk through the process of magically making those burnt marks disappear. This technique relies on the gentle oxidizing and bleaching properties of hydrogen peroxide, combined with the controlled heat of your iron, to break down the discolored fibers without damaging the rest of the fabric. Remember to proceed with patience and observe the changes carefully.
Step 1: Prepare Your Workspace and Solution
Begin by laying the large towel flat over your ironing board. This provides a clean, absorbent surface and protects your ironing board from any hydrogen peroxide contact. Next, pour a generous amount of 3% hydrogen peroxide into your small or medium-sized bowl. Submerge the small cotton towel (or washcloth) completely into the hydrogen peroxide, ensuring it’s thoroughly soaked. Wring out any excess liquid so the towel is damp but not dripping.
Step 2: Position the Garment and Apply the Treated Towel
Carefully place the burnt garment on the ironing board, positioning it so the burnt or scorched area is facing directly upwards and is easily accessible. Take the hydrogen peroxide-soaked small towel and place it directly over the burnt mark, ensuring it completely covers the discolored area. The direct contact of the treated towel with the burn is crucial for the process to work effectively.
Step 3: Iron the Burnt Mark Away
Now, gently iron over the hydrogen peroxide-soaked towel. Use a moderate heat setting on your iron – not too high, to avoid further scorching, but warm enough to activate the hydrogen peroxide. Move the iron in small, circular motions over the wet towel. Periodically, lift the small towel to check the progress. You should start to notice the burnt mark becoming lighter or fading away. If the towel begins to dry out, lift it, add a little more hydrogen peroxide directly onto the towel, and continue ironing. The key here is patience; continue this process, reapplying hydrogen peroxide as needed, until the marks are almost entirely gone or significantly lightened.
Step 4: The Final Wash for Complete Restoration
Once you are satisfied with the fading of the burnt marks, and they are barely visible, it’s time for the final crucial step. Remove the garment from the ironing board and immediately throw it into your washing machine. Wash the item as you normally would, following the care label instructions for temperature and detergent. This final wash will help remove any remaining hydrogen peroxide residue, further clean the treated area, and eliminate any last traces of the burn mark, often making the repair completely undetectable.
Why This Method Works: The Science Behind the Salvage
The effectiveness of hydrogen peroxide in removing iron burn marks stems from its chemical properties. Hydrogen peroxide (H₂O₂) is a mild oxidant and a gentle bleaching agent. When applied to the scorched fabric, especially with a bit of heat from the iron, it works to break down the discolored organic compounds that form the burn mark. The scorching process essentially caramelizes or burns the cellulose fibers in the fabric, creating a yellowish-brown discoloration. Hydrogen peroxide helps to reverse this by oxidizing these compounds, making them colorless or easier to wash away. It’s a less aggressive bleaching action compared to chlorine bleach, making it safer for a wider range of fabrics, though a patch test is always recommended for delicate or brightly colored items.
Important Considerations and Warnings
While this hack is highly effective, a few precautions are necessary to ensure the best outcome and avoid further damage:
- Test on an Inconspicuous Area: Before applying hydrogen peroxide to the burnt mark, especially on colored or delicate fabrics, dab a small amount on an hidden seam or hem to check for colorfastness or adverse reactions.
- Not for Severe Burns: This method is ideal for light to moderate scorch marks where the fabric is discolored but its fibers are still intact. If the fabric is melted, has holes, or is severely thinned out, it’s unlikely to be fully restored.
- Safety First: Hydrogen peroxide is generally safe, but prolonged skin contact can cause irritation. Consider wearing gloves, especially if you have sensitive skin. Avoid contact with eyes.
- Ventilation: Ensure you are working in a well-ventilated area, particularly when using an iron and potentially releasing steam.
- Patience is Key: Don’t rush the process. Some marks may take longer to fade than others. Repeated applications and gentle ironing are often more effective than aggressive single attempts.
Beyond Burnt Marks: General Fabric Care Tips
Mastering the art of removing iron burns is a valuable skill, but integrating good fabric care practices into your routine will prevent many mishaps. Always read garment labels, invest in a good quality iron with temperature control, and consider a specialized ironing board cover. For delicate items, steaming can be a gentler alternative to direct ironing. Taking a few extra moments to prepare your garments and equipment can significantly extend the life and appearance of your clothing.
Conclusion: Salvage Your Style with This Simple Solution
The despair of discovering a burnt iron mark on a cherished piece of clothing can be truly disheartening. However, as this guide demonstrates, such incidents don’t necessarily spell the end for your garment. With the humble power of 3% hydrogen peroxide and a little patience, you can effectively diminish and often completely remove these unsightly marks. This DIY laundry hack, popularized by channels like Ironing Lab, empowers you to take control of common household accidents and become your own fabric restoration expert. So, the next time your iron decides to leave an unwanted signature, remember this guide, and confidently bring your clothes back to life!
*All image credit belongs to Ironing Lab via YouTube. Follow and subscribe to her channel for more ingenious tips and tricks!