
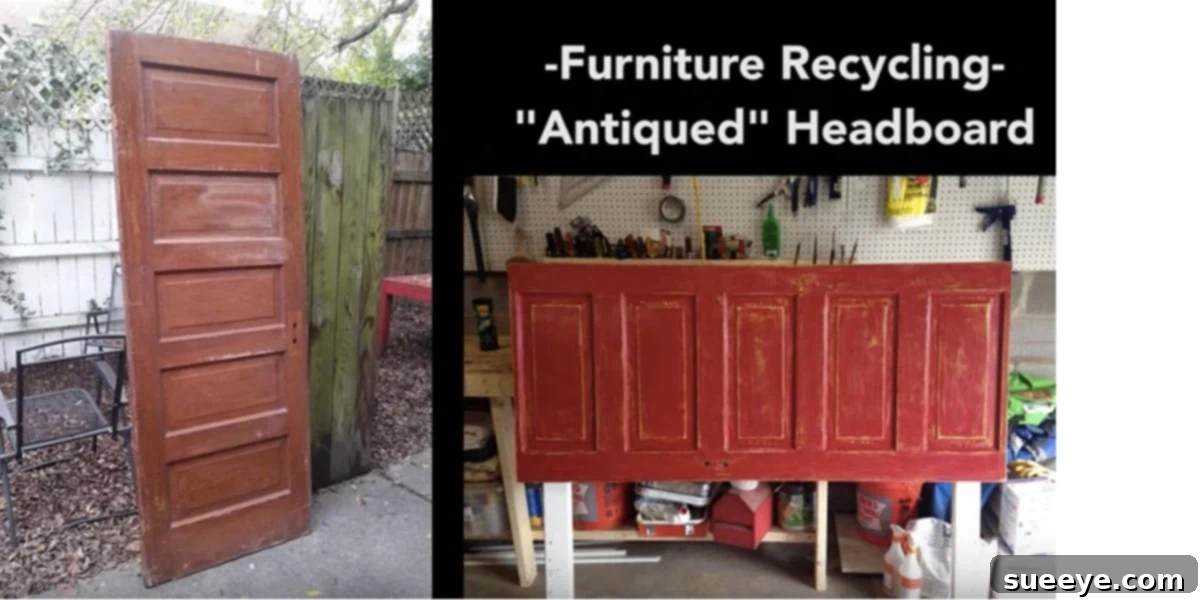
Transform Your Bedroom: Craft a Unique DIY Headboard from an Old Door
Are you dreaming of a bedroom that exudes charm, personality, and a touch of vintage elegance without breaking the bank? Look no further than the transformative power of a DIY old door headboard. This incredibly rewarding project allows you to create a one-of-a-kind focal point for your sleeping sanctuary, turning what was once a forgotten piece of architectural history into a captivating work of art. Imagine the stories an old door could tell, now gracing your bedroom with its unique character and timeless appeal. Not only is this project incredibly satisfying, but it also offers significant savings compared to purchasing a new, mass-produced headboard. With a little creativity and effort, you can achieve exactly the custom look you desire, making your bedroom truly your own.
Why an Old Door Headboard is the Ultimate Bedroom Upgrade
The allure of a repurposed old door headboard extends far beyond its aesthetic appeal. It’s a choice that reflects a conscious desire for unique design, sustainability, and personal expression. Here’s why this DIY project is gaining immense popularity:
Unrivaled Charm and Character
Unlike store-bought headboards, an old door brings an immediate sense of history and depth to a room. Its weathered texture, original hardware (if present), and architectural details often possess a patina that cannot be replicated. Each scratch, dent, and faded paint layer tells a story, adding an irreplaceable vintage charm that enriches your bedroom’s ambiance. Whether it’s a grand Victorian panel door or a simple farmhouse style, the inherent character of an old door instantly elevates your space.
A Budget-Friendly Decor Solution
One of the most compelling reasons to choose this DIY route is the significant cost savings. While custom-designed or antique-inspired headboards can cost hundreds, if not thousands, of dollars, you can often acquire a beautiful old door for a fraction of that price. Our own experience involved purchasing a solid, paneled door for just $20 at a local junk store – an incredible steal for such a robust foundation. This allows you to allocate more of your budget to other bedroom essentials or decorative accents.
Sustainable and Eco-Friendly
In an era where conscious consumption is key, repurposing an old door aligns perfectly with sustainable living. By giving a discarded item a new purpose, you’re not only preventing it from ending up in a landfill but also celebrating the beauty of upcycling. It’s a green approach to home decor that allows you to contribute positively to the environment while enhancing your home.
Endless Customization and Personalization
The beauty of a DIY project lies in the freedom to make it uniquely yours. From the moment you select your door to the final coat of paint and embellishments, every decision reflects your personal style. You can choose colors that perfectly match your decor, experiment with distressing techniques, or add decorative elements to create a headboard that truly speaks to your aesthetic. The sky’s the limit when it comes to transforming a blank canvas into a personalized masterpiece.
Robust and Durable Construction
Old doors were often built to last, crafted from solid wood that stands the test of time. This inherent durability means your new headboard will be sturdy and reliable, offering a robust backdrop for your bed for many years to come. You’re investing in a piece that not only looks fantastic but is also built with enduring quality.
Finding Your Perfect Door: A Treasure Hunt Guide
The first and most exciting step in this DIY journey is finding the right door. This is where the real treasure hunt begins!
Where to Look for Salvaged Doors
- Architectural Salvage Yards: These are goldmines for unique doors, often organized by style and size.
- Antique Shops & Junk Stores: Many smaller shops have sections dedicated to old building materials.
- Habitat for Humanity ReStores: Excellent places to find affordable, donated home improvement items, including doors.
- Online Marketplaces: Websites like Craigslist, Facebook Marketplace, and local classifieds often list doors for sale by individuals.
- Estate Sales & Garage Sales: Keep an eye out for properties being cleared out; you might find a forgotten gem.
What to Look For When Choosing Your Door
- Material: Solid wood doors are ideal. They are sturdy, durable, and take paint and distressing beautifully. Avoid hollow core doors for this project.
- Condition: Minor imperfections like scratches, small dents, or faded paint are not just acceptable but often desirable, as they contribute to the door’s character. However, avoid doors with significant warping, rot, or active insect damage, as these can compromise the structural integrity and require extensive, difficult repairs.
- Style: Paneled doors (like the ones we used) are incredibly popular for headboards due to the depth and visual interest their panels provide. Flat doors can also work for a more minimalist or modern rustic look. Consider whether the door has glass panes; if so, ensure they are securely removed or replaced with a solid insert for safety, especially in a bedroom setting.
- Size: Measure your bed and the space available in your room. Standard interior doors are typically 80 inches tall and 24-36 inches wide. A single door often works well for a twin or full-sized bed. For a queen or king-sized bed, you might opt for a wider door, or as we discovered, use two doors side-by-side to create a grand, extra-wide, or extra-tall headboard that makes a dramatic statement. Remember, you can always cut a door down to size if it’s too wide or tall, but it’s harder to add to it.
The Transformation Process: From Old Door to Dream Headboard
Once you’ve secured your perfect door, the real fun begins: transforming it into a beautiful headboard. This process involves several key steps, each contributing to the final, polished look.
Step 1: Thorough Cleaning and Preparation
Before any painting or structural work, give your door a thorough cleaning. Use a good degreaser or a mixture of warm water and mild soap to remove all dirt, grime, and any old wax or polish. Allow it to dry completely. If there’s loose or peeling paint, gently scrape it off. For doors with old lead paint, take appropriate safety precautions, including wearing a respirator and working in a well-ventilated area.
Step 2: Sanding for a Smooth Canvas
Lightly sand the entire surface of the door. This step helps create a smooth base and provides “tooth” for the primer and paint to adhere to. Start with a medium-grit sandpaper (e.g., 120-grit) to smooth out any rough patches, then finish with a finer grit (e.g., 220-grit) for a silky-smooth finish. Wipe away all sanding dust with a tack cloth or damp cloth before moving on.
Step 3: Framing and Structural Enhancement
To give our headboards a more finished, substantial, and prestigious look, my husband framed each door with trim. This step is optional but highly recommended as it not only adds stability but also creates a clean, intentional border around the door. Simple wood strips or more ornate decorative molding can be used, depending on your desired aesthetic. The framing also makes it easier to mount the headboard securely to the wall or bed frame later on.
Step 4: Priming for Lasting Beauty
Applying a good quality primer is crucial, especially when working with old wood or when changing the color significantly. Primer helps seal the wood, prevents stains from bleeding through, and ensures a uniform surface for your topcoat of paint. Apply one or two thin, even coats, allowing adequate drying time between each.
Step 5: Painting Your Vision
Now comes the exciting part – bringing your headboard to life with color! We chose a classic white for one of our headboards, which instantly brightened the room and provided a versatile backdrop. For others, we explored different colors to match distinct room decors, proving that any shade can work beautifully. Apply several thin coats of your chosen paint, allowing each coat to dry thoroughly. This layered approach creates a durable, even finish. You can use brushes, rollers, or a paint sprayer for different effects.
Step 6: The Art of Antiquing and Distressing
To achieve that coveted aged look and enhance the door’s inherent character, we antiqued our headboards. For the white headboard, we used acrylic paint, carefully applying and wiping it back to highlight the details of the panels and trim, giving it a subtle, time-worn appearance. For other headboards, we experimented with distressing the paint. This can be done by lightly sanding edges and raised areas to reveal glimpses of the wood or previous paint layers beneath, or by applying a dark glaze and wiping it back to settle into crevices. This technique adds incredible depth and a prestigious, authentic vintage feel that truly makes the headboard stand out.
Elevating the Design: The Mantle Ledge Feature
One of the most impactful additions we made to our headboards was a decorative “mantle ledge.” This feature not only enhances the architectural grandeur of the piece but also offers functional advantages.
Constructing the Mantle Ledge
- Install Crown Molding: First, we meticulously installed crown molding along the very top edge of the door. This instantly elevates the headboard, giving it a refined, classic finish reminiscent of traditional architectural elements. Precise measurements and miter cuts are key here for seamless corners.
- Cut and Secure the Ledge Piece: Next, we measured the desired depth for our ledge and cut a piece of sturdy wood to fit precisely on top of the crown molding and extend out. This forms the flat surface of your “mantle.”
- Add Decorative Trim: To complete the look and add a sophisticated touch, we installed decorative trim along the front edge of the newly created ledge. This trim hides any raw wood edges and ties the entire piece together visually.
The mantle ledge transforms the headboard from a simple backdrop into a functional and stately piece of furniture. It provides a perfect spot for displaying small decorative items, a treasured book, or even a subtle task light, adding to the room’s utility and aesthetic appeal. This detail truly gives the headboards a more prestigious and custom-built appearance, making them feel like an integrated part of the room’s architecture rather than just a standalone piece.
Mounting Your Masterpiece
Once your headboard is finished and dry, the final step is to securely mount it behind your bed. There are a few effective methods:
- Attach to the Bed Frame: If your bed frame has attachment points for a headboard, you can use heavy-duty bolts and brackets to secure the door directly to the frame. Ensure the door is stable and at the correct height.
- Mount to the Wall: For a more permanent and sturdy installation, especially with heavier doors, consider mounting it directly to the wall. French cleats are an excellent option for a strong, hidden hold. Alternatively, heavy-duty L-brackets anchored into wall studs can provide reliable support. Always use a level to ensure your headboard is perfectly straight.
Unleash Your Creativity: Beyond the Basics
While our project focused on distressed finishes and mantle ledges, the possibilities for customizing your old door headboard are virtually limitless:
- Color Palettes: Don’t limit yourself to white! Bold jewel tones, serene pastels, or rich earthy hues can dramatically alter the feel.
- Unique Finishes: Explore crackle finishes, two-tone paint jobs (revealing a contrasting color beneath), or even wallpapering recessed panels for a pop of pattern.
- Hardware & Embellishments: Add decorative rosettes, antique pulls, or unique knobs to the door’s panels. Consider stenciling a motif or adding fabric inserts to the recessed areas for a softer look.
- Dramatic Scale: For truly grand bedrooms, use two doors to create an expansive headboard, or stack them vertically for an exceptionally tall and imposing focal point.
Embrace the DIY Journey
Creating a DIY old door headboard is more than just a home decor project; it’s an opportunity to infuse your living space with personality, history, and a touch of your own craftsmanship. The process is incredibly rewarding, from the excitement of finding the perfect old door to the satisfaction of seeing your vision come to life. The money you save, the unique charm you add, and the eco-friendly choice you make all contribute to a project that delivers immense value. If you’re ready to transform your bedroom into a uniquely inviting haven, we wholeheartedly recommend embarking on this fantastic DIY adventure. For visual guidance and detailed steps, many online tutorials offer excellent resources to help you along the way.